Unlike the character mesh, you can’t just drag and drop the PixelHair/hair into the Unreal scene.
Instead, we need to attach the PixelHair/hair to the character as a component inside the character’s blueprint. This ensures that:
The PixelHair/hair follows the character wherever it is used.
The hair is always included when the character is referenced in animations, cinematics, or gameplay.
Open the Character Blueprint #
Since PixelHair must be added as a component, we need to open the MetaHuman or custom character blueprint:
If you’re using a MetaHuman → Skip to the next section (the blueprint already exists).
If you’re using a custom character without a blueprint → Follow the steps below to create one before proceeding.
However if you already have a character blueprint like the metahuman, skip the next section ( Adding PixelHair as a Groom Component in the Blueprint ) .
Setting Up a Character Blueprint for Custom Characters #
If you’re using a custom character that doesn’t already have a character blueprint, follow these steps to create one.
Create a New Character Blueprint #
- Open the Content Browser in Unreal.
- Right-click in the folder where your character is stored.
- Select “Blueprint Class”.
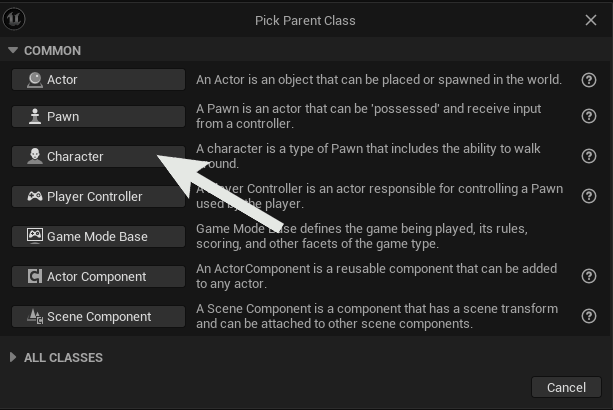
- In the new window, choose “Character” as the parent class.
- Name your blueprint (e.g., “MyCharacter_BP”).
- Double-click to open the Blueprint Editor.
Add Your Character to the Blueprint #
Before continuing, we need to assign your custom character to the blueprint.
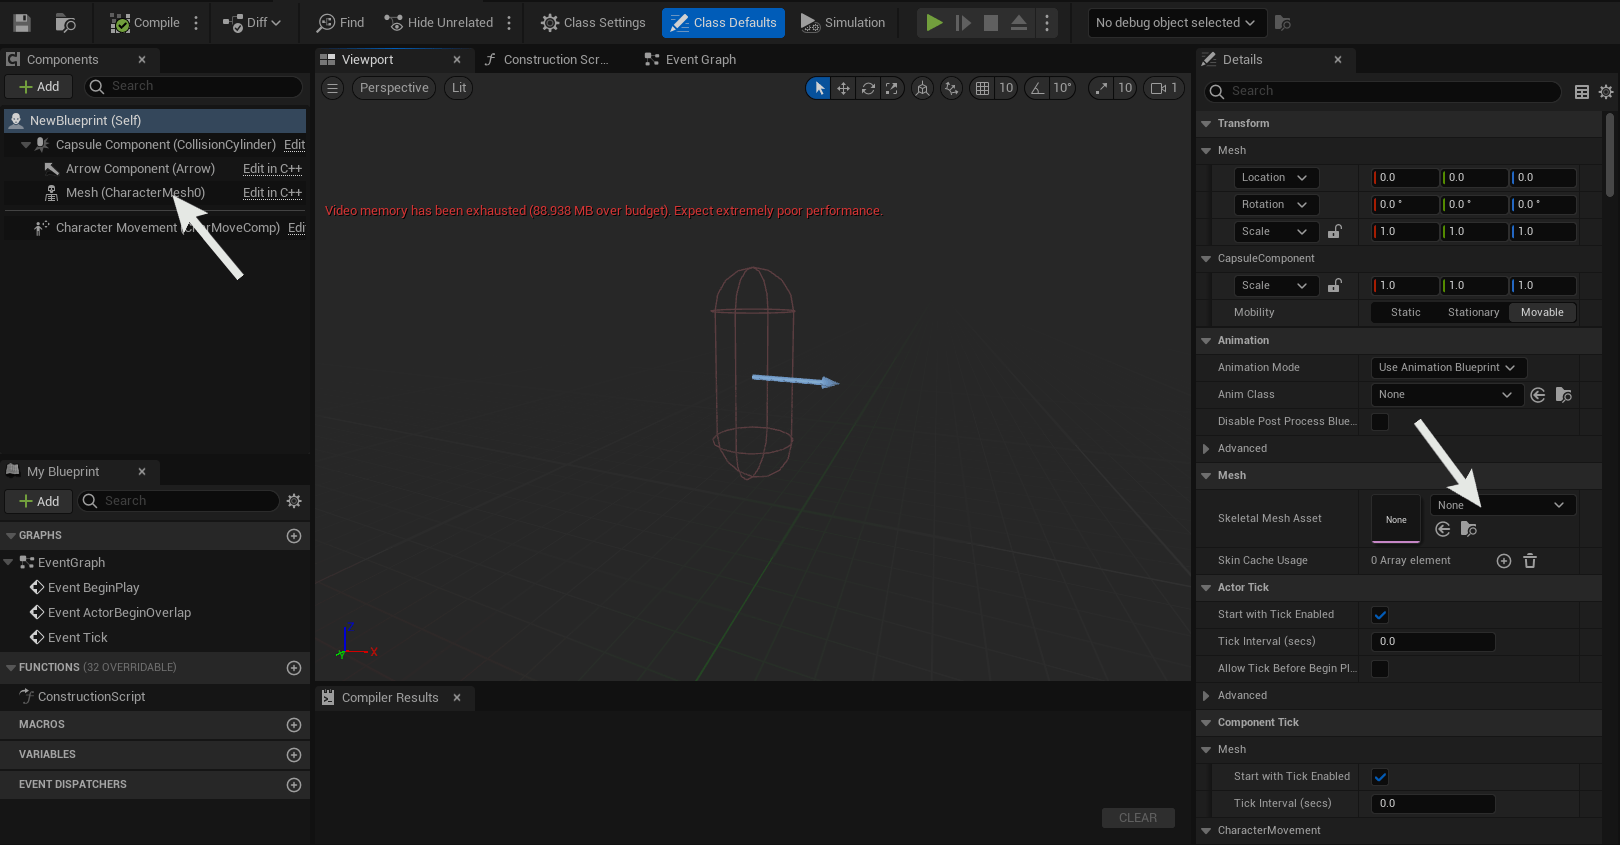
- In the Blueprint Editor, look at the top-left corner under “Components”.
- Find “Mesh (CharacterMesh0)” and click on it.
- On the right side, under Mesh Settings, you’ll see a box labeled “None”.
- Click the box and assign your custom character as the mesh.
With your character blueprint set up, we can move forward in the tutorial


Adding PixelHair as a Groom Component in the Blueprint #
With the character blueprint open, we now need to attach the PixelHair/hair as a Groom Component so it follows the character.
Step 1: Add a Groom Component #
For MetaHumans:
- In the Components panel, you’ll see a list of groom components that MetaHuman already uses.
- Select the existing groom components
For Custom Characters ( With No Groom Component Yet):
- Click the “Add” button at the top of the Components panel.
- Search for “Groom” and select “Groom Component”.
- Rename it to “Hair” (for consistency with MetaHuman components).
- Drag the Groom Component onto “Mesh (CharacterMesh)” so it attaches to the character’s body.
Step 2: Assign the PixelHair Groom Asset #
Now, whether you’re using MetaHuman or a custom character, follow these steps:
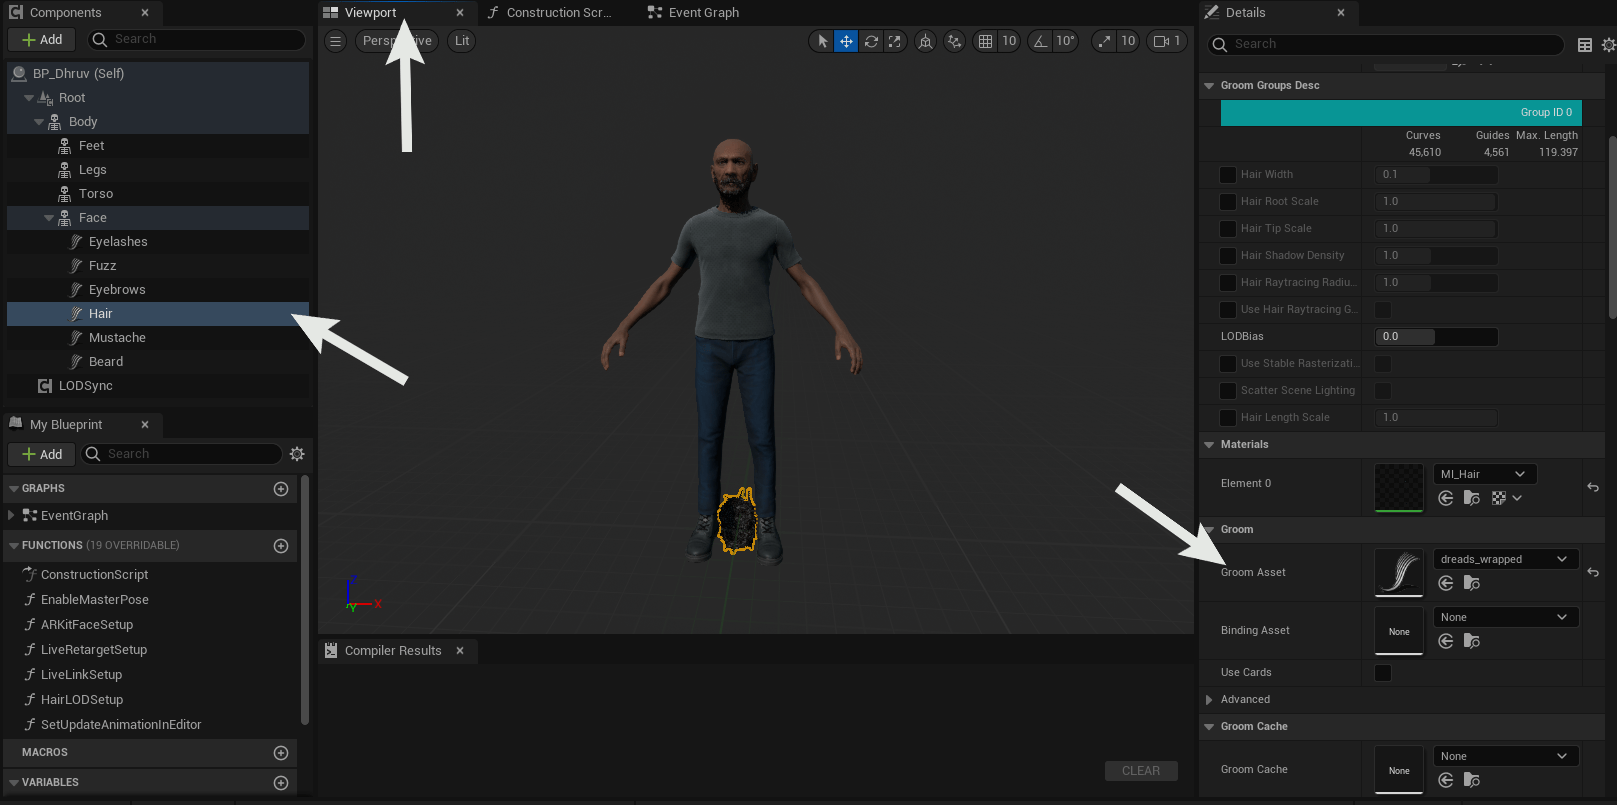
- Click on the Hair Groom Component in the Components panel.
- Look to the right-side panel and scroll down to find “Groom Asset” under the Groom section.
- Click on the setting and select your imported PixelHair Groom asset.
Step 3: Check the Hair in the Viewport #
- Switch the Blueprint Editor to the Viewport to preview the hair.
- In many cases, you might notice the PixelHair/hair is floating above the character or even on the floor.

To fix the Hair position, we need to bind it to the character’s head.
Step 1: Open the Binding Options #
- Minimize the Blueprint Editor and return to the Content Browser.
- Find the imported PixelHair Groom asset.
- Right-click on the groom asset and select “Create Binding”.
Step 2: Bind the Hair to the Character #
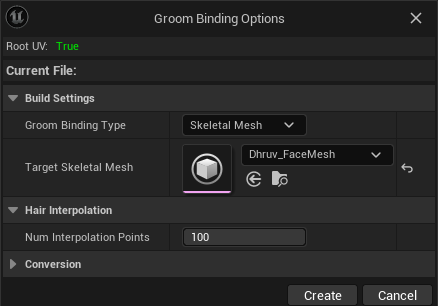
- In the Binding Options window, look for “Target Skeletal Mesh”.
- Click the dropdown and select your MetaHuman or custom character mesh.
- Once selected, click “Create”.

Step 3: Return to the Character Blueprint #
- Unreal should automatically take you back to the Blueprint Editor after creating the binding.
- Go to the top of the window and switch to your MetaHuman or custom character blueprint.
Step 4: Apply the Binding to the Groom Asset #
- In the Blueprint window, click on your Groom Component (Hair).
- Go to the Groom Asset settings (right-side panel).
- Under the Groom Asset setting, you’ll now see a “Binding” option.
- Click on it and select the binding asset you just created.
Step 5: Confirm the Hair Alignment #
- Once the binding asset is applied, the PixelHair/hair should automatically snap into place on the character’s head.
- Now your character and its new hairstyle are fully set up!
That’s it! Enjoy Your Character’s New Look #
Your character is now ready to use with PixelHair in Unreal Engine. You can now freely use, animate, and modify the character with the new hairstyle.


