How to use PixelHair on any custom Character In Blender
1. First Look
Having bought a PixelHair hairstyle, you’ll get a RAR file to download. This file has the blend file with the hairstyle.

After downloading, unzip the file with any software you prefer. I use WinRAR, which is free (note: I’m not affiliated with them, it’s just what I use). Once unzipped, you’ll see the blend file with the hair.
At this point, you can directly append the hair to your project if you want to. Just go to the ‘Append’ section of this tutorial for guidance.
But if you’d like to view and maybe tweak the hair before adding it to your project, keep reading. We’ll cover that next
2. Hair Blend File
With the Hair blend file open, your Blender window will look like this.
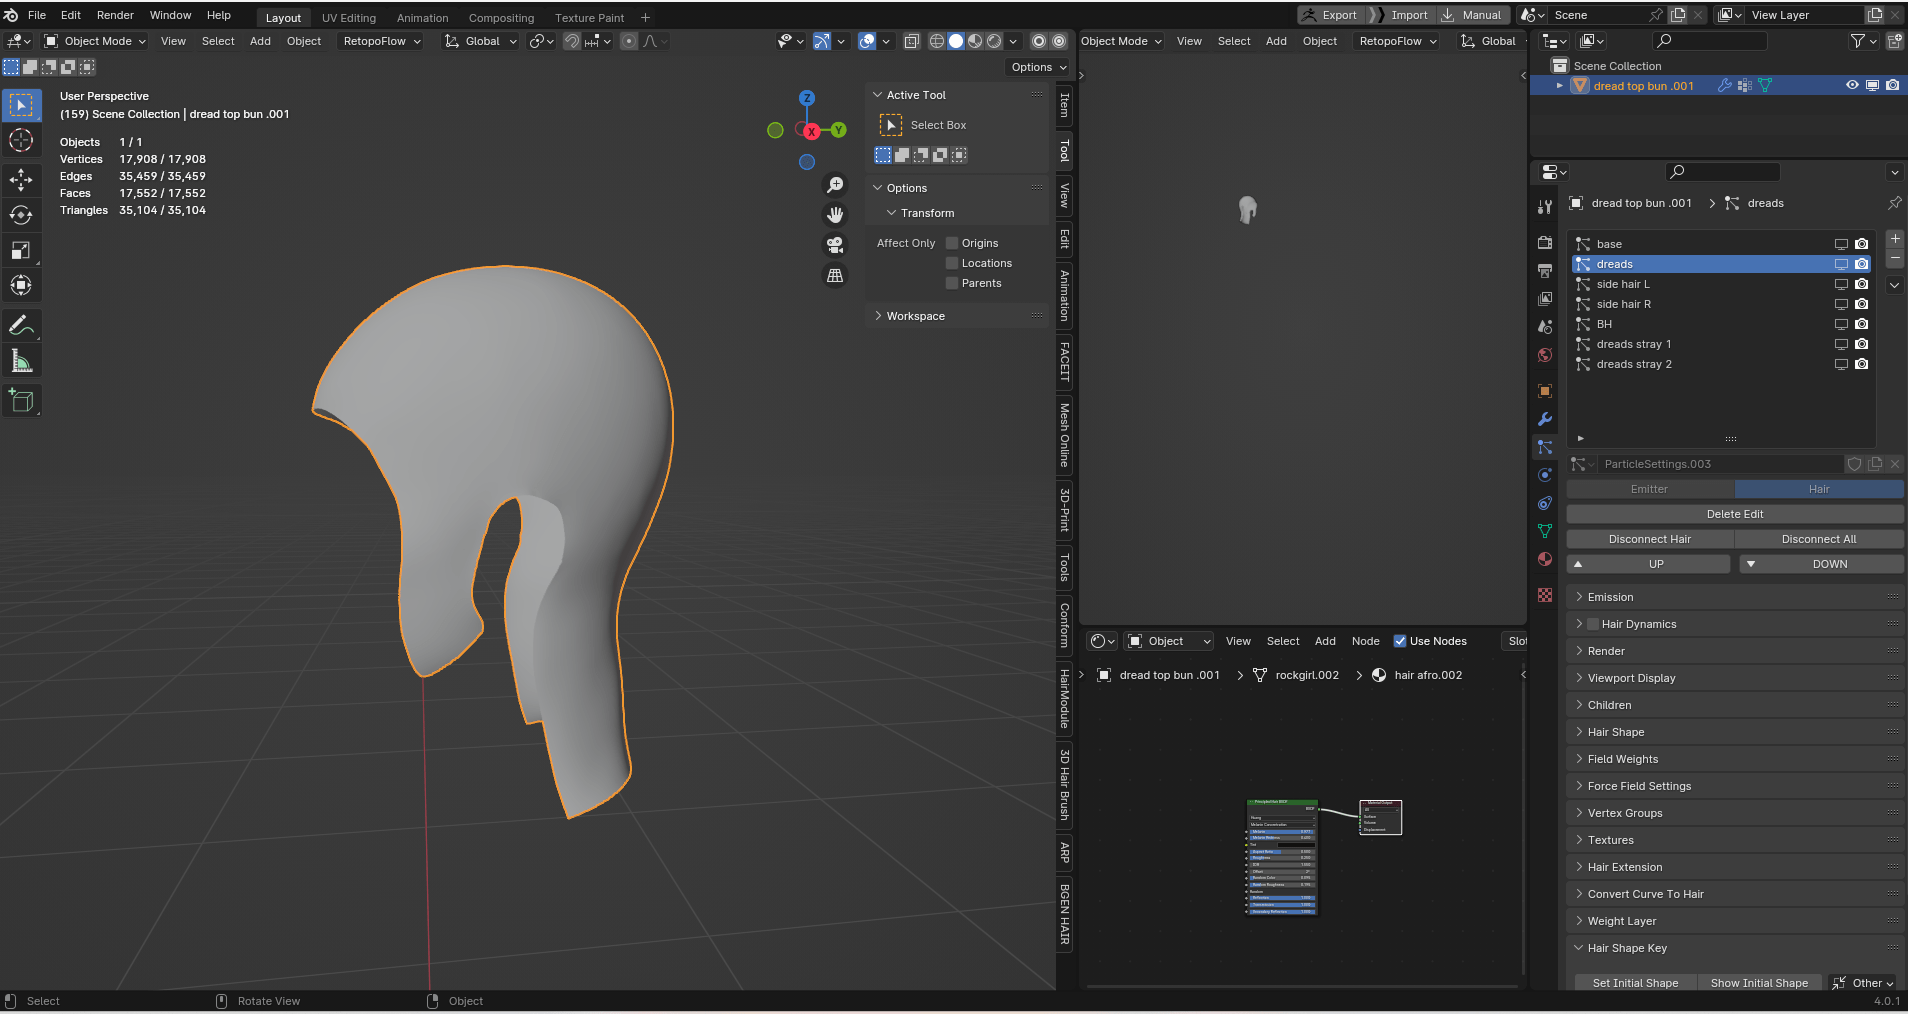
In the blend file, there’s just one mesh. This mesh is where the hair grows from. it is also what you’ll append to your project. Knowing this mesh’s name is important. Look at the top right corner of your screen to see the outliner. If you’re unfamiliar, the outliner displays everything in your Blender scene. Since there’s only one thing this blender scene. It’s the Hairstyle mesh. its name is easily visible there. For instance, mine is ‘dread top bun .001’. Make sure to note this name.
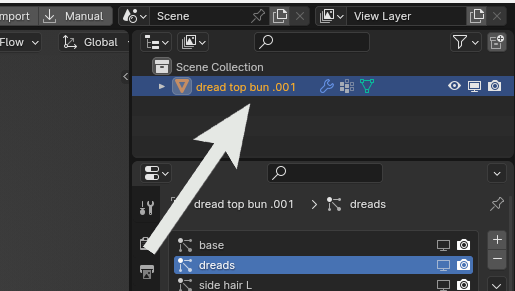
3. Hair Particles (optimizations)
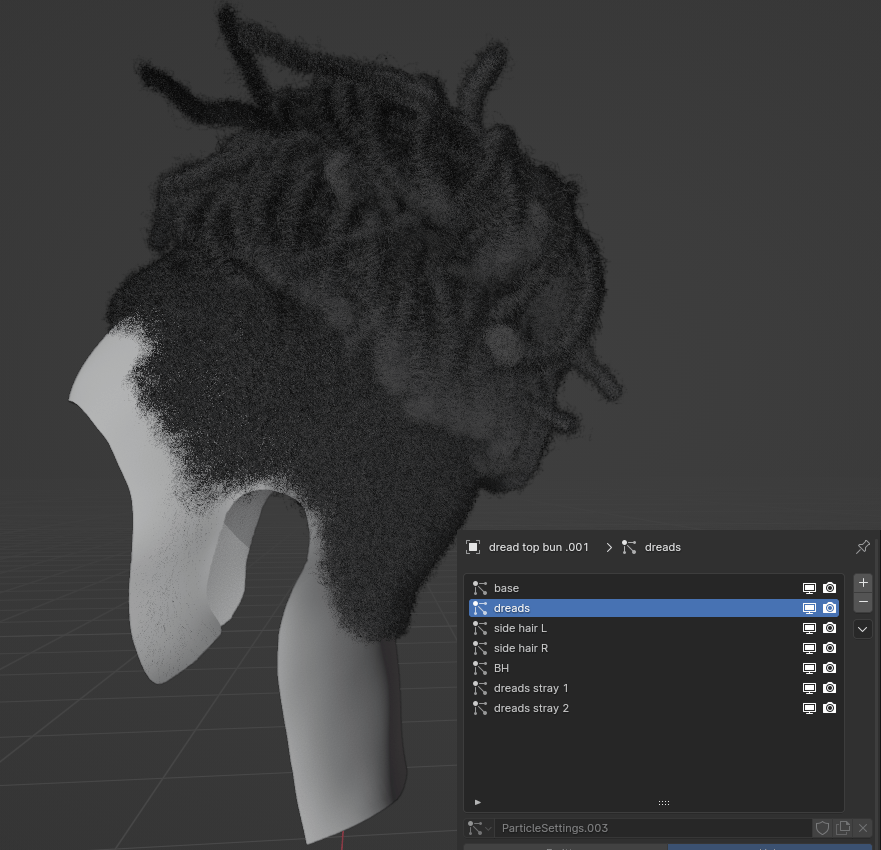
Now that we know the mesh’s name, let’s look at the hair. If you opened the blend file and wondered ‘where’s the hair?’, don’t worry. The hair is there, but it’s hidden. How can you see it? Look at the right side of your screen for the properties tab. In this tab, there’s a section for particles. Here, you’ll find a list of hair particle systems. Each hairstyle has different particle systems, so their names might vary in your blend file. Don’t be surprised if they’re named differently.
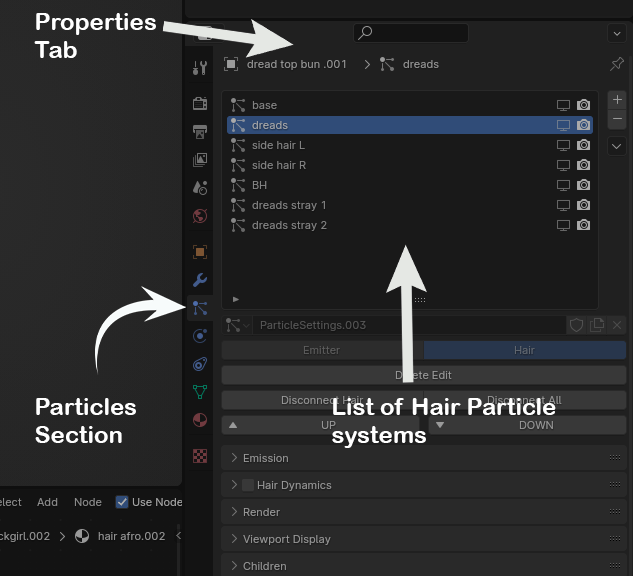
Now you know where to find the hair. The next step is to make it visible. But first, let’s talk about why it was initially hidden. The hair settings are at their highest for top-quality renders. This might cause lag on lower-spec computers. If you have a high-end computer, you’re good to go and can skip to the next section. Otherwise, follow the next steps closely
In 3D hair, two things increase computing power usage:
- strand steps
- children amount
Strand steps make 3D hair flexible. Without them, the hair looks like toothpicks which is not what we want. We need them for styling, but too many can slow down your computer. The trick is to reduce them without losing the hair’s appearance.
I like to start with the hair particle system with the most strand steps. from the previous explanation, you know that this is the part of the hair that needs the most flexibility. These are braids, dreads, afros, or curls. These styles require more bending and curls.
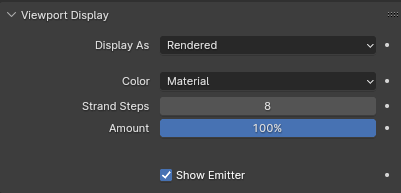
In the list of hair particles, select one of these, or choose any one at random if those names aren’t there. Once selected, go to ‘viewport display‘ open it and find the ‘strand steps’ option.
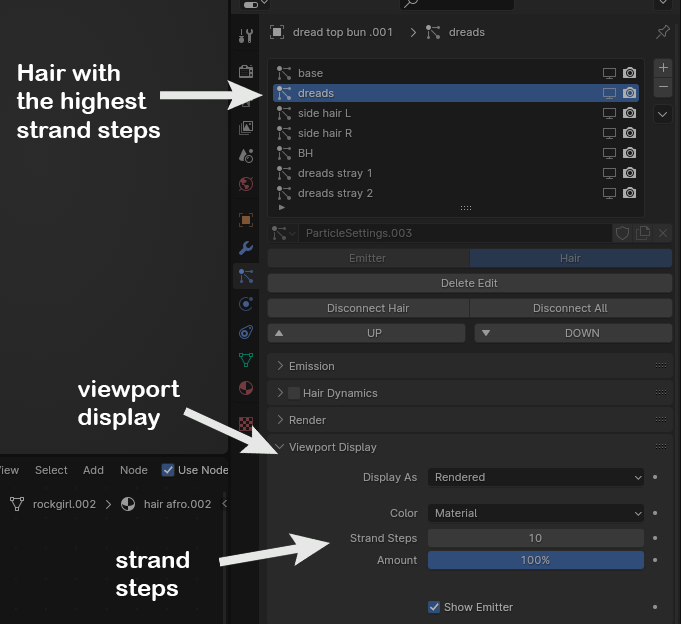
The strand steps in blender ranges between 1 – 10. Having selected the hair system with the highest strand steps, you should have a number close to 10. reduce that by two points. for example, if your strand steps was at 10, reduce it to 8.
Now, let’s talk about ‘children amount’. If you’re new to this, there are two parts when styling hair: parent hair (or guides) and children hair. Parent hair is the part of the hair you style to create a hairstyle, while children hair are generated around it to add volume.
More parent hair means more control over the style and more child hair means more volume. But here’s the thing. Increasing the children amount makes the hair look better and more realistic, but it also uses more computing power.
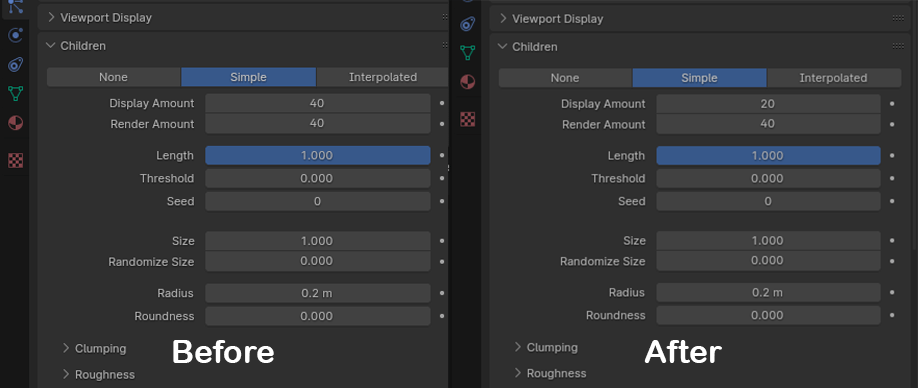
Like with strand steps, We need to balance the children amount carefully to maintain the hair’s look without straining your computer. To do this, go to the ‘children’ section. There are many settings here, but our main focus is on the display amount, which shows how many child hairs are around each parent/guide. This is what we are going to reduce. I usually reduce the children amount by half. for example, if you had 100 in your display amount. you can take that down to 50.
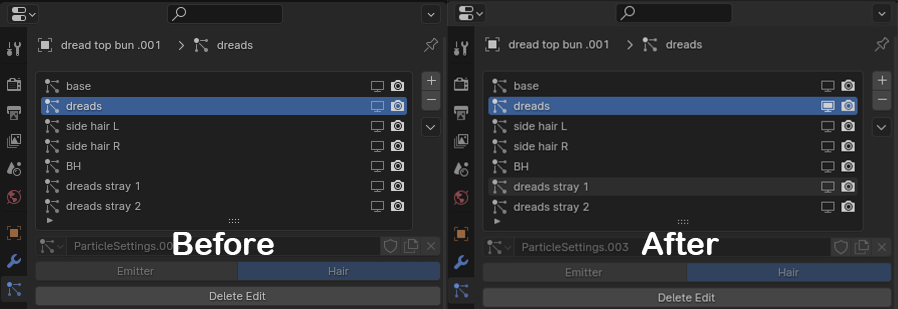
Having reduced the strand steps and children amount, it’s time to unhide the hair, and it’s pretty straightforward. Head over to the list of particle systems. Look for an icon resembling a Television. it’s near the camera icon. Clicking this TV-like icon will make the hair visible in your 3D window. The camera icon is what you use to make it visible in renders.
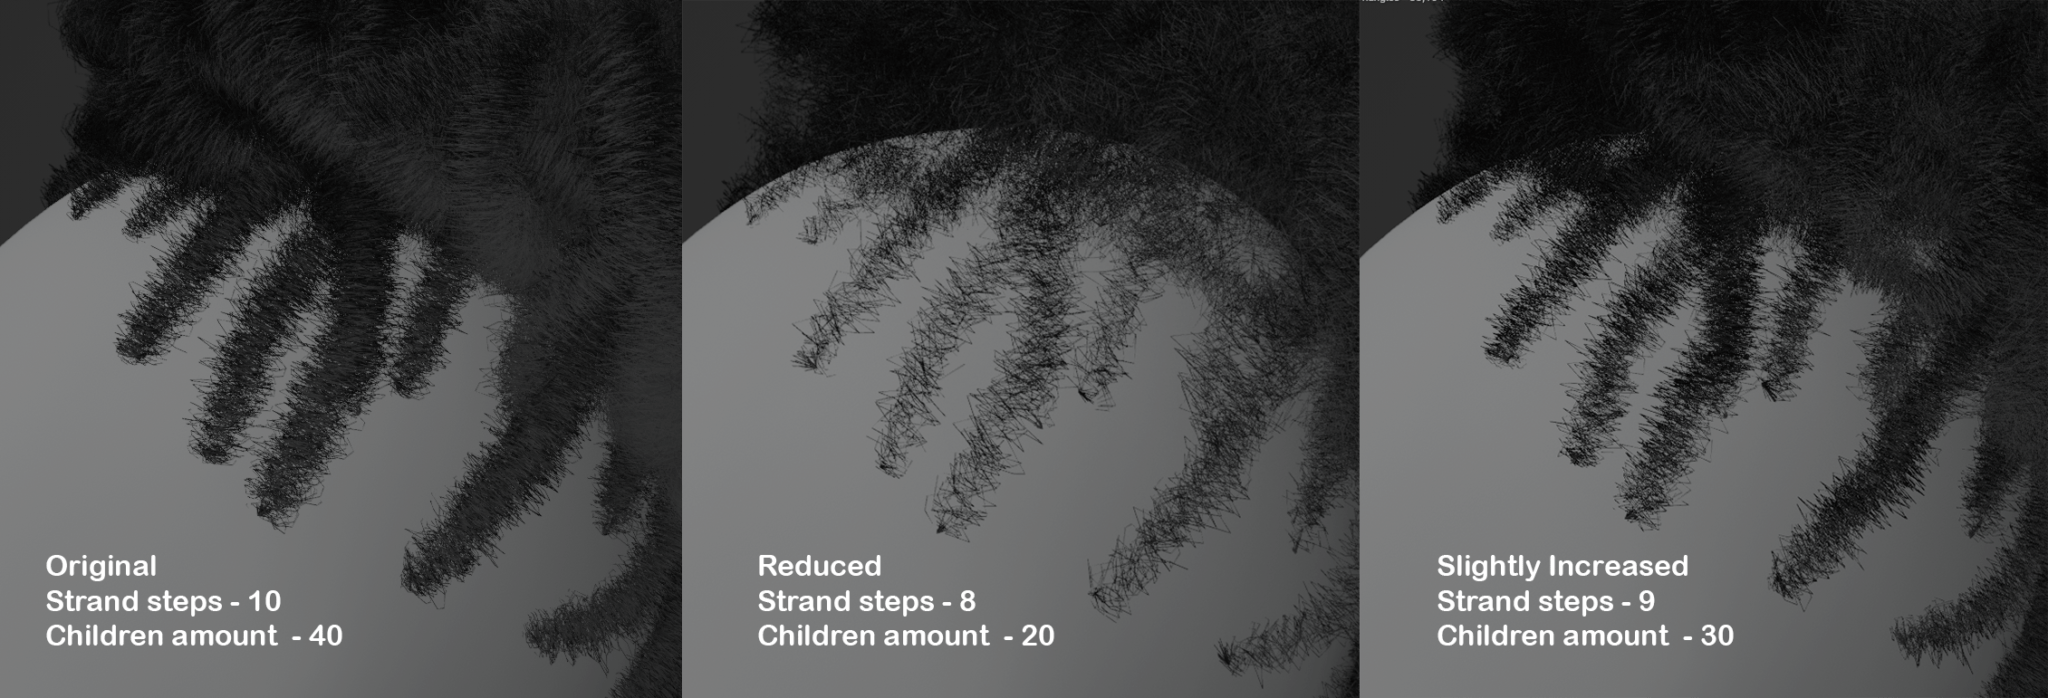
With the hair visible on the scalp, try rotating or moving the model to check for lags. Don’t forget to put it back in its original position afterward. If there’s no lag and everything looks smooth, zoom in to examine the hair closely. After you’ve reduced the strand steps, the hair might look rough or blocky. If it looks fine, you can skip ahead to the last paragraph of this section.
If the hair appears blocky, you’ll need to adjust the strand steps and children amount slightly. For instance, if you previously set strand steps to 8 from 10 and children amount to 50 from 100, try increasing the strand steps to 9 and children amount to 70. This is just an example. Feel free to experiment with these settings until you find a balance. Stop adjusting when you notice any lag while moving or rotating the mesh.
Once you’ve settled on a children amount and strand steps number. Sometimes, you notice that the hair lacks volume and you can’t increase the children amount due to your computer’s limitations. Here’s something you can do. Head back to the properties tab and find the ‘Hair Shape’ setting. In ‘Hair Shape’, focus on two settings: ‘diameter root’ and ‘tip’. These control the thickness of each hair strand. ‘Diameter root’ affects the thickness at the base, and ‘tip’ controls the end of each hair.
Since we can’t increase the children count to create volume, we could trick the eyes into believing that there is volume. we are going to do that by increasing the thickness of each strand. These settings won’t affect your computer’s performance. But be cautious, as small changes can have a big impact. For example, increasing the root by just 0.01 can significantly alter the hair’s appearance. Remember, real hair is quite thin, so make very small adjustments at a times to add volume.
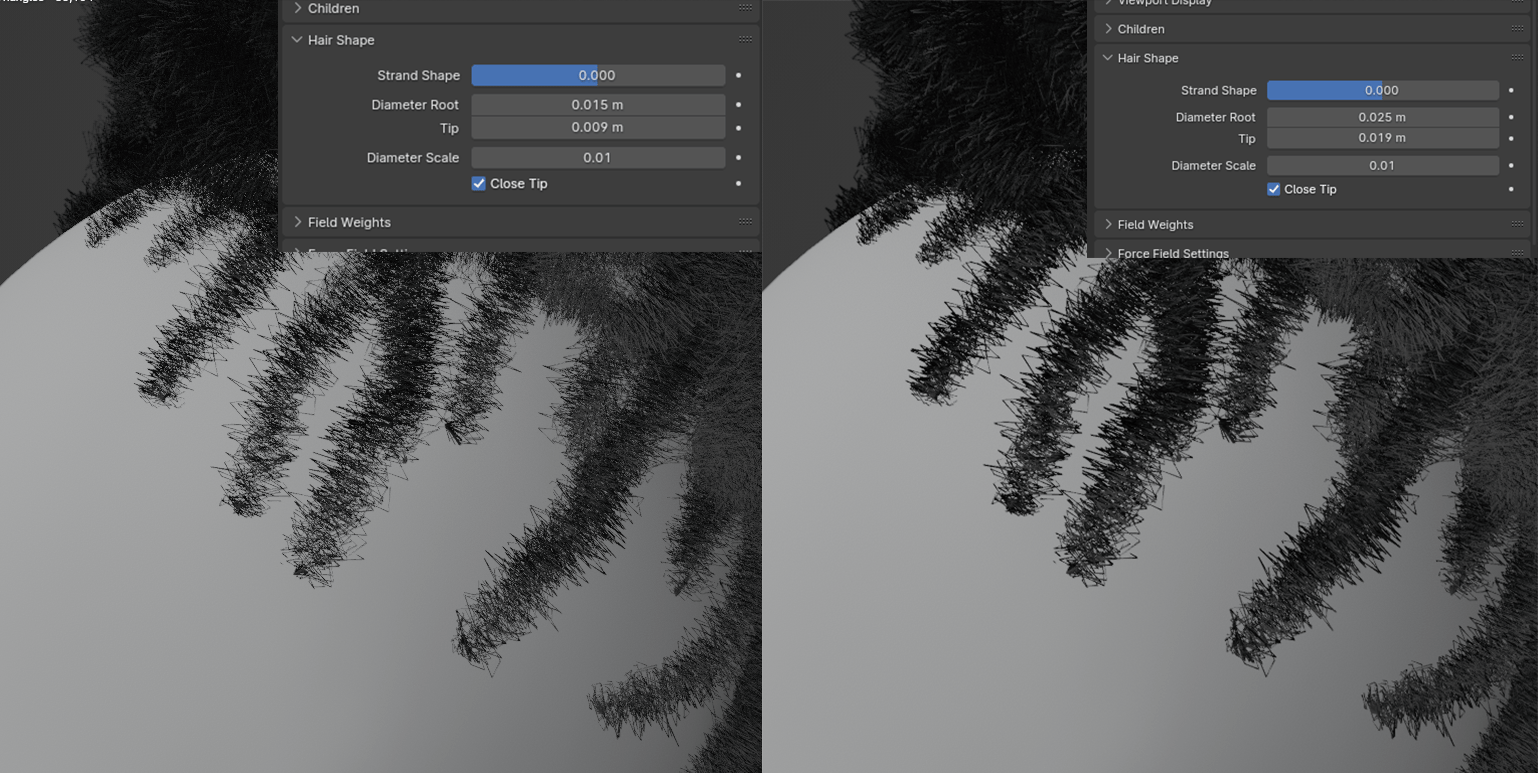
By now, you should have a hair system tailored to both your computer and your projects. The next step is to apply the same process to the other hair systems. This way, you have a full head of hair that works.
Since we started with the most demanding system, adjusting the others should be easier. You might not need to tweak each one, especially if there are no lags after making all hair systems visible.
Once all hair systems are adjusted and visible, you’ll see the complete hairstyle in your 3D window.
In the next section, we would look at applying this hair to your character.
4. Applying PixelHair to your character
Applying the hair to your character is simple. First, make sure to save the changes you’ve made to the hair. This ensures you can import the hair as it is now into your project. After saving, open your project in a new Blender file.
Before applying the hair, remember this key detail: the appearance of the hair is greatly influenced by your character’s head shape. If the head closely matches an average human shape or the hair mesh, the hair will look more like what’s shown on the website.
I’ve had a case where an artist sculpted hair on a character and then tried to apply PixelHair on top. It didn’t look right due to the added volume and uneven scalp area from the sculpt. Ensure your character is bald with a reasonably shaped head. if it’s not, you might need to adjust the scalp shape and size for a perfect fit.
Now, let’s apply the hair to your character. In your project, go to the top left corner of the Blender window. Click ‘File’, then ‘Append’. This opens the Blender file viewer. Locate the hair file you saved and double click it to open. it should look like this.
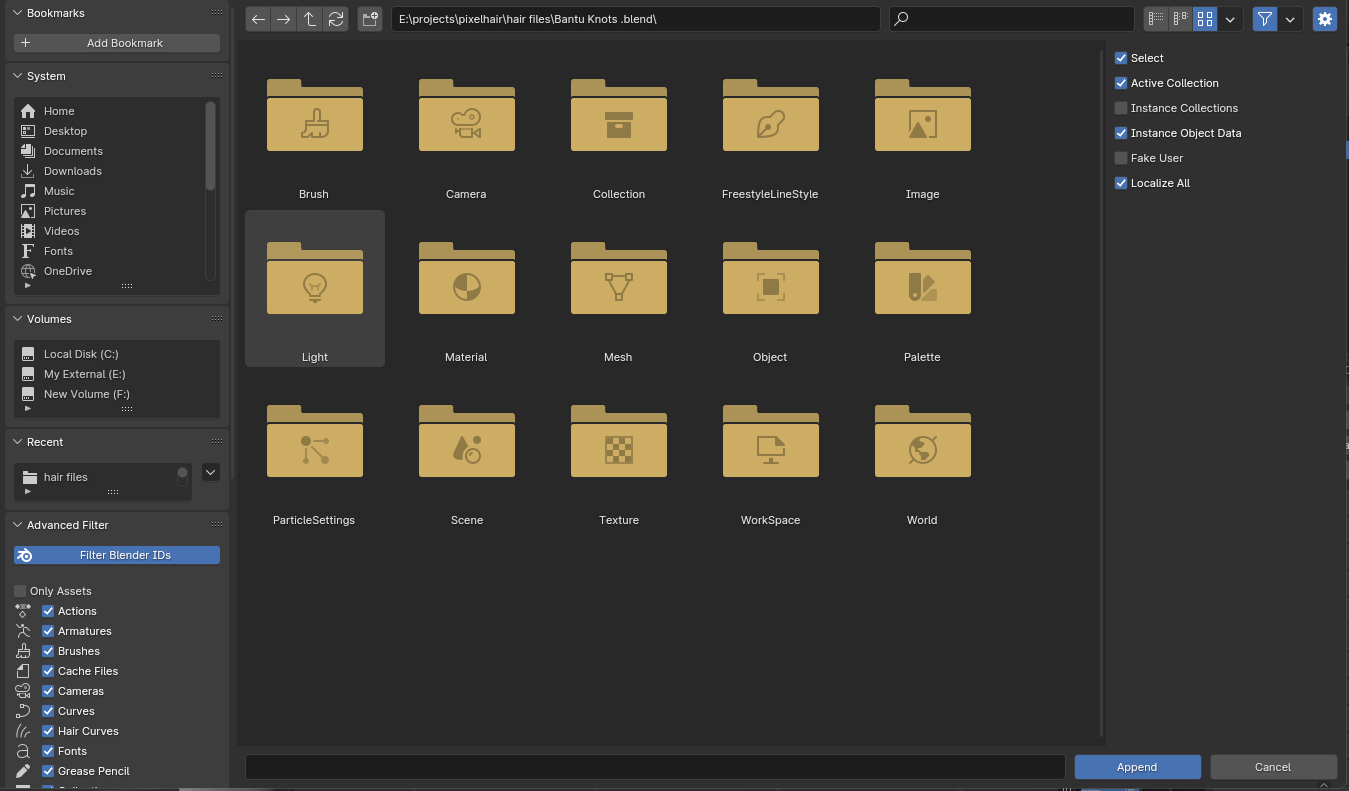
double click “Object” to open. find the object with the name of the hair mesh from earlier ( if you can’t remember the name, you can quickly check, you should still have the file open). click that, then click append.
The hair mesh will now be in your project file, but it’ll likely be out of place at first. We need to fix that. To position it correctly, start by selecting the hair mesh. Then, choose the move tool. If the move tool (or move gizmo) isn’t centered on the hair mesh, right-click on the mesh. Select ‘Set origin’ and then ‘Origin to center of mass (surface)’. This centers the gizmo on the mesh.
Now, use the move tool to position the hair mesh over your character’s head. You can scale the mesh by pressing ‘S’ and dragging the mouse. The aim is to fit the hair mesh as close to the character’s head as possible, which should look like this.
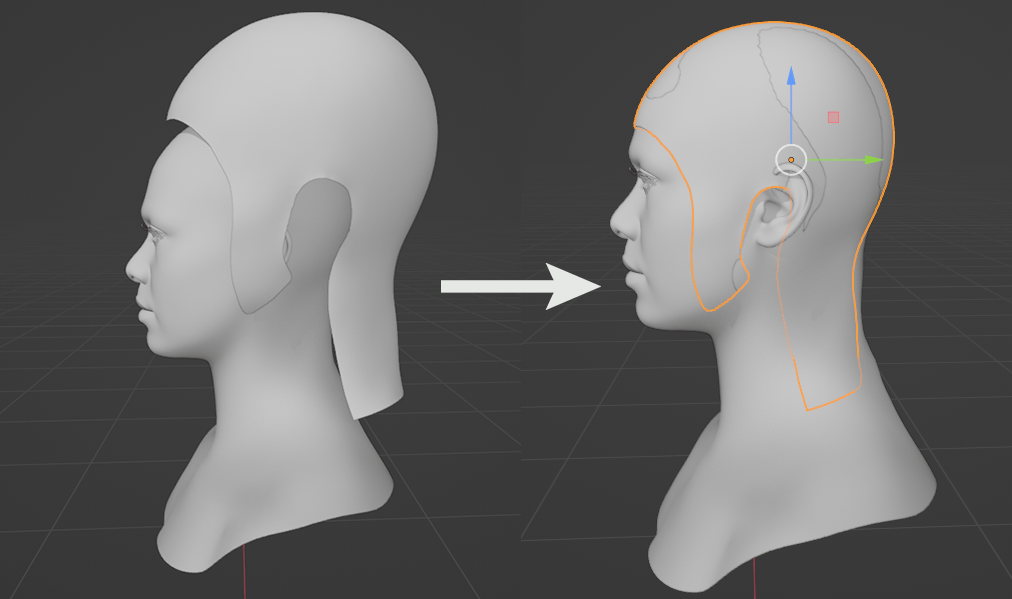
If your hair mesh, like in my example, is partly inside the character’s head, don’t worry. We’ll use Blender’s sculpting tools to align it better.
First, ensure the hair mesh is selected. Then, switch from ‘Object Mode’ to ‘Sculpt Mode’. You’ll find this option at the top left corner of your window.
In Sculpt Mode, select the ‘Elastic Deform’ Brush. With your mouse, gently adjust the hair mesh so it fits better on the head. Aim to have most of the mesh outside the character’s head, as shown in my example below. It’s better to have the mesh slightly outside than inside for the next steps.
The hair mesh doesn’t need to sit tightly against the head; some gaps are okay. Pay special attention to the ears. Align the hair mesh’s ear openings with the character’s ears, as demonstrated in my example below.
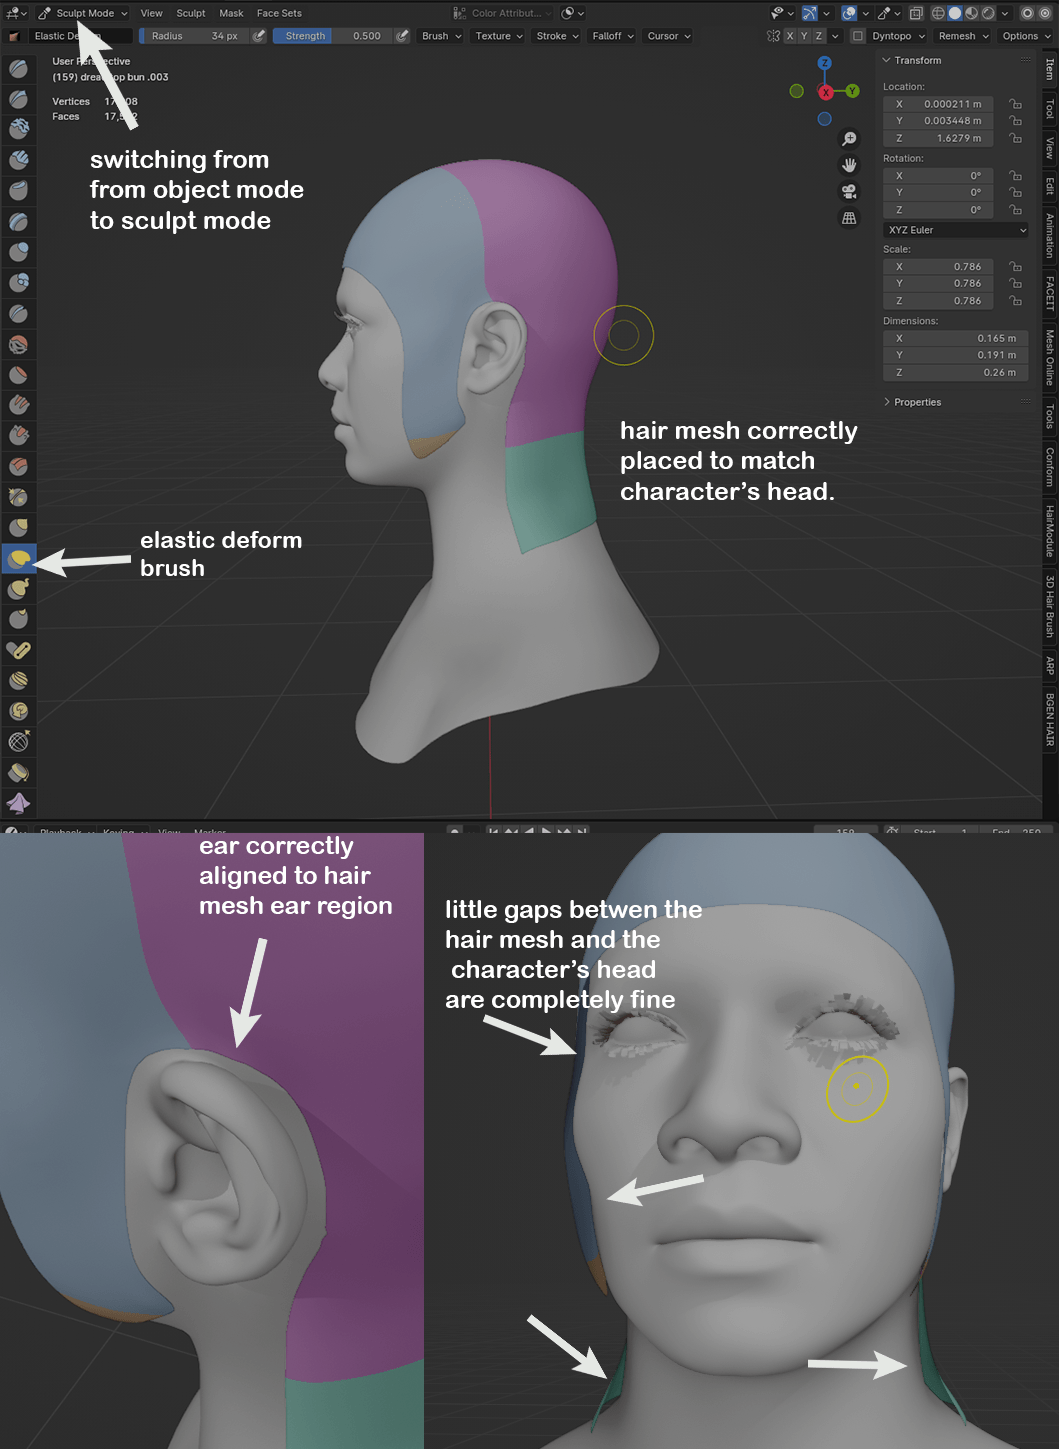
Now that the hair mesh matches your character’s head shape, let’s move to the final step: activating the shrink wrap modifier. This can be done while still in Sculpt Mode. Select the modifier icon.
For some of you, the purchased hair might have a modifier set up but if the purchased hair doesn’t have a modifier, you can easily add one.
To do that click on the add modifier button. Depending on the version of blender you have, you would either be presented a list of modifiers or a list of options to pick from.
If you have a list of modifiers, simply find the shrinkwrap modifier in the list and click it. However, if you have a list of options to pick from all you need to do is type “shrinkwrap modifier” and you’ll see it pop up. Then you can go ahead and click that. With the shrinkwrap modifier added, drap it to the top of the list.
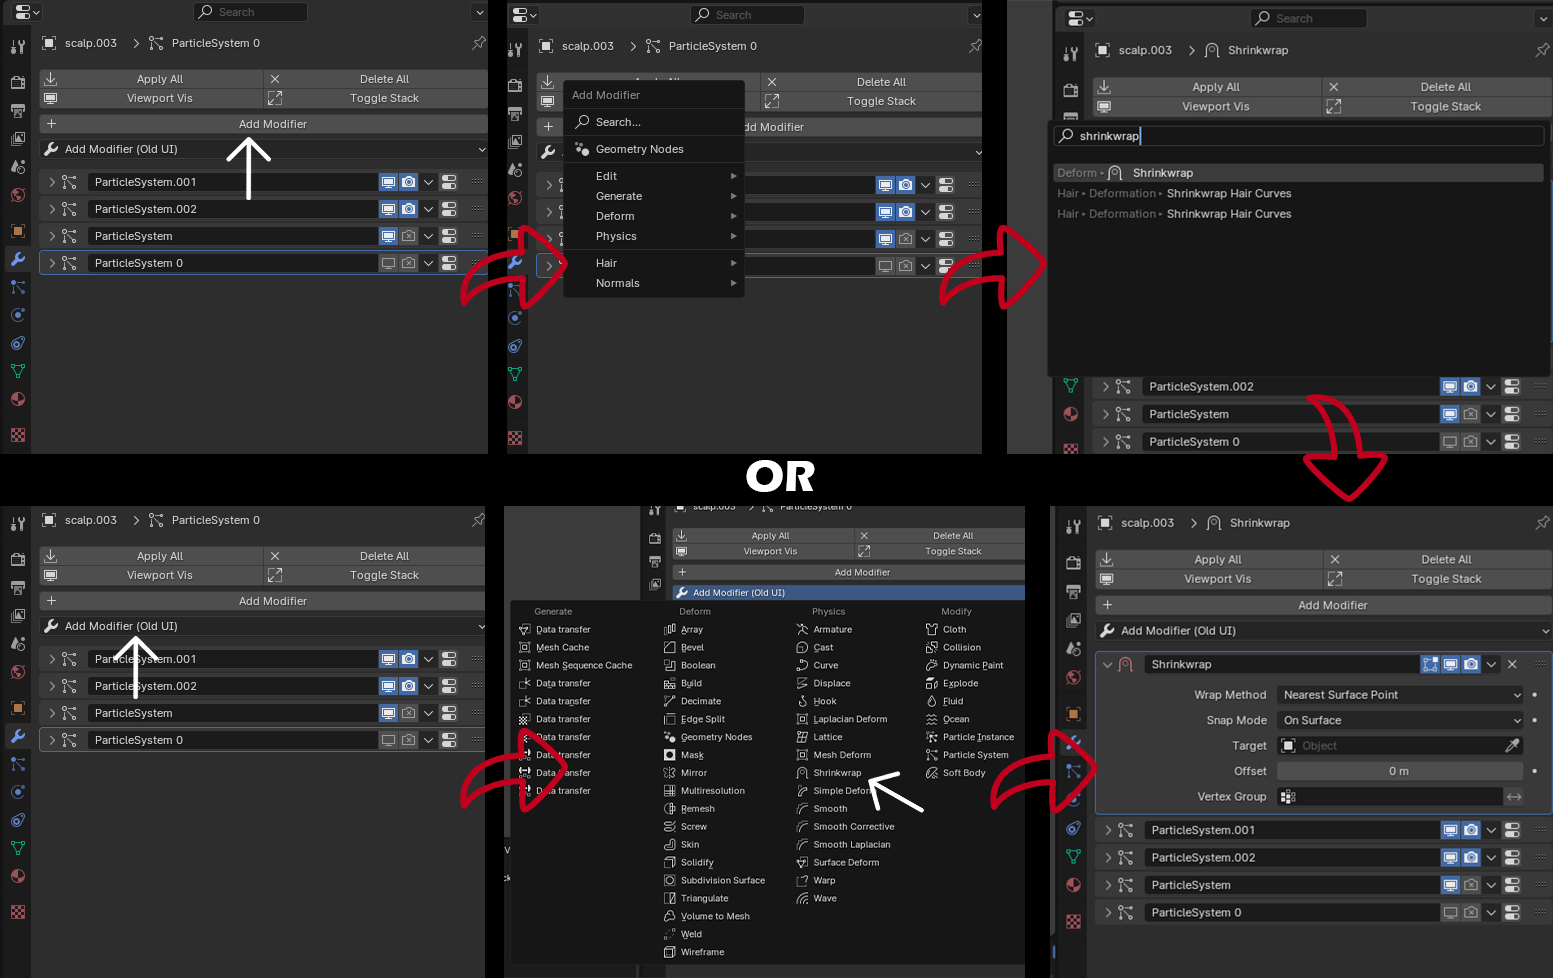
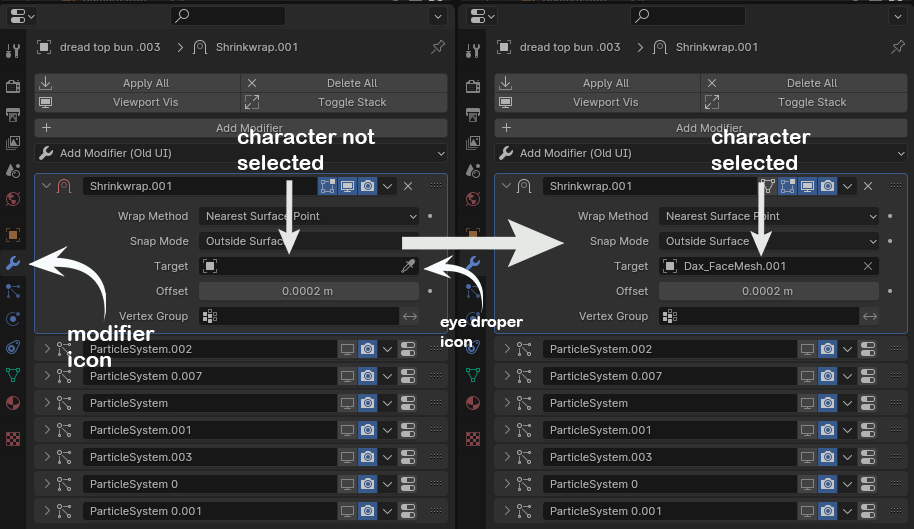
Now we should all have a shrinkwrap modifier at the top of our list, which is our focus. With the shrinkwrap modifier open, you’ll notice a ‘Target’ setting with an empty field next to it and an eyedropper icon. Click the eyedropper, then move your cursor over to your character and click to select them. Once selected, the name of your character should appear in the empty ‘Target’ field. Refer to the image below for clarification. Go to the snap mode settings and change that to outside surface. Then set the offset value to 0.0002m. This would ensure that the hair mesh is sitting on top of your characters scalp.
If done correctly, you’ll see the hair mesh snap to your character’s head, which is our goal. Sometimes, you might encounter errors like the one shown below, often occurring around the ear. This issue arises when the hair mesh is too far from the scalp and closer to the ear, causing confusion for the shrink wrap modifier.
To fix this, first, deactivate the shrink wrap modifier by turning off the TV icon. Then, while still in Sculpt Mode, use the Elastic Deform tool to gently pull the hair mesh closer to the head. After adjusting, reactivate the shrink wrap modifier. This should resolve the issue.
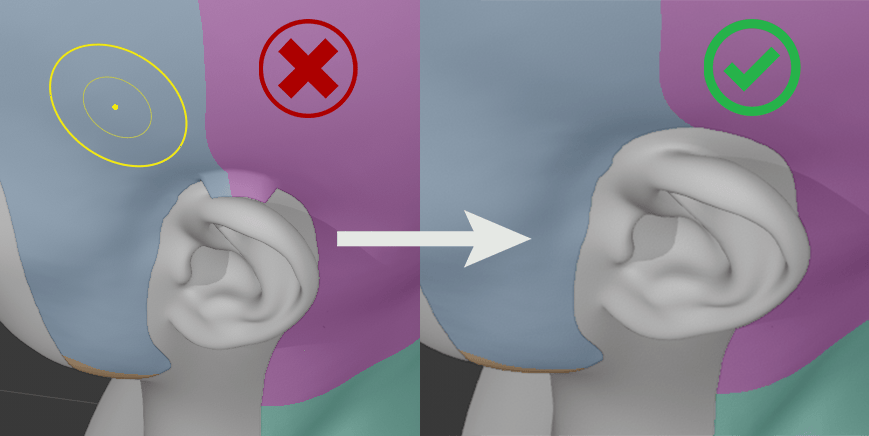
With all errors fixed and the hair mesh perfectly aligned with your character’s head, it’s time to switch back to Object Mode. Now, go ahead and unhide the hair particles. Voilà! Your character now has the new hairstyle. Feel free to render it or use it as you wish in your project. Hope you have fun with it!
Note: If you adjusted settings like strand steps and children amount earlier in this tutorial, remember to apply these changes to the rendering settings as well. This ensures that your render matches what you see in the viewport. For example, if you changed the viewport display strand steps from 10 to 8, make sure to set the render strand steps to 8 too. The same goes for the children amount.
To find the render settings for strand steps, click on ‘Render’, then ‘Path’. The settings will be right above the viewport version. For the children amount, once you open the children settings, you’ll find both the viewport and render options close to each other, making it easy to ensure they match.
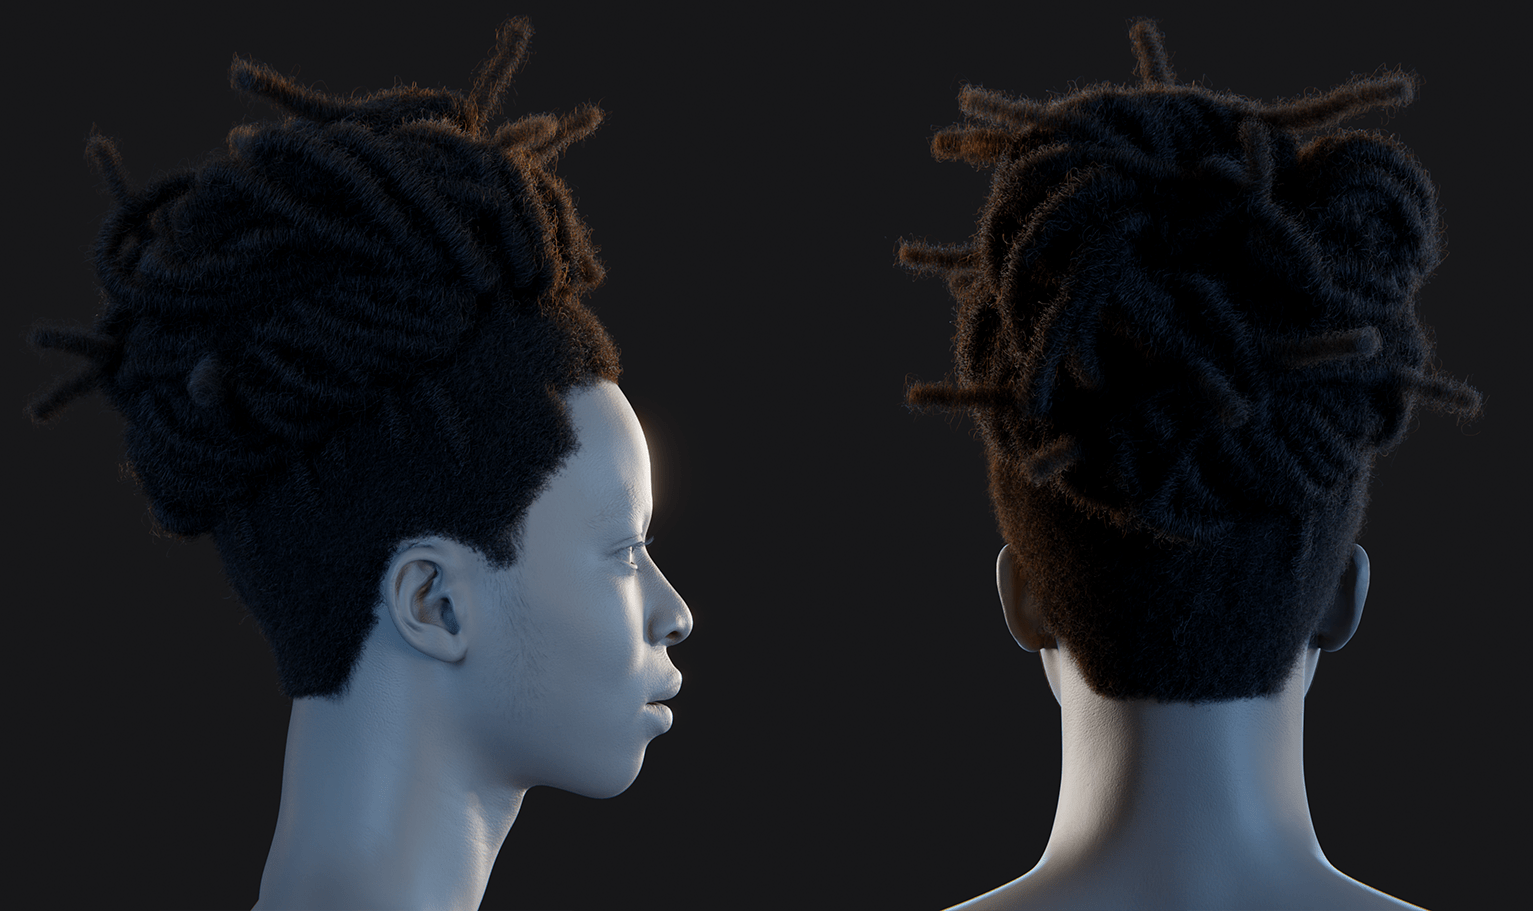
To check out more hairstyles you can apply this to, Visit https://yelzkizi.org/pixelhair-ready-made-3d-hair-for-blender/

