Use PixelHair on any Metahuman or custom character in Unreal
Hi, I’m Isaac, a 3D Character Artist and the one behind “Yelzkizi”. Over the next couple of minutes, I will be taking you through a written tutorial. This tutorial explains how to use any Hairstyle from PixelHair on any MetaHuman or Custom Character in Unreal Engine.
the Basics.
Before we start, let’s go over some basics. This tutorial is tailored for Unreal Engine 5.3.2 and Blender 4.0.1. If you’re using older versions, please note that some things might differ. Both softwares are free to upgrade if you want to. Also, since we’re focusing on transferring Pixelhair/hair from Blender to Unreal, I’m assuming you have basic knowledge of both software. This will help you get the most out of the tutorial. While I can’t dive deeply into every detail of Blender and Unreal due to how long it could get. I’ll cover everything necessary to transfer the Pixelhair/hair smoothly from Blender to Unreal, thereby helping you avoid any major issues. If you are ready for that, let’s get into it!
1. setting the scene
From my understanding, everyone who is taking this tutorial is probably one of two categories. you’ve either you’ve bought Pixelhair for a metahuman, or you have a character in Blender with a Pixelhair hairstyle that you want to transfer to Unreal. Both scenarios are similar; in each, you’re aiming to have a mesh and a hair system/Pixelhair in Unreal Engine.
To start, we need to ‘set the scene’, which means ensuring you have a copy of the character (which would use the Pixelhair/hair) in both Unreal and Blender.
For custom characters, this involves importing your character into both Unreal and Blender. While textures in Blender aren’t important at this stage, textures and materials in Unreal are important. especially if that’s where your final project will be.
There are many ways and plugins to transfer characters from Blender to Unreal, so choose what works best for you. If you have the mesh exported as an FBX, you can also drag and drop into Unreal. Once you have your character imported to both skip to the next section of this tutorial.
For those using a metahuman, I assume you already have your custom metahuman or a default one in mind. Import that. If you don’t know how to do that, I’ll show you.
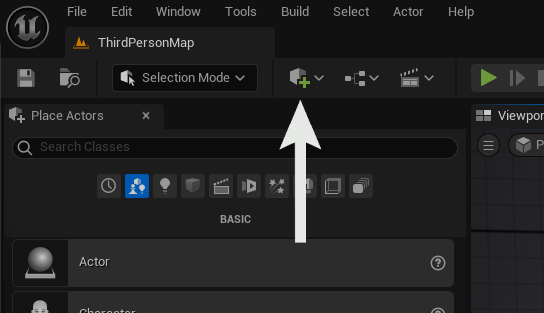
Open Unreal Engine and start a new project. At the top left corner, you’ll see an icon of a cube with a plus sign. ( image below). click that then select Quixel bridge.
Quixel bridge serves a bridge (pun intended) between the metahuman editor and Unreal engine.
Having clicked that, Quixel bridge would be openned in a new window. Next, you need to sign into Quixel Bridge, which gives you access to all your custom metahumans. You can sign in using your Unreal account. , or choose another preferred method.
Once logged in, select ‘Metahuman Presets’ and then ‘My Metahuman’ to access your custom builds. It doesn’t matter whether you choose a custom or default metahuman. Hover your mouse over your selection. You’ll see a green arrow icon. Click this to start downloading the MetaHuman. The download time depends on your network speed, so feel free to grab a cup of tea or do some shadow boxing while you wait. A percentage count pop up to show the progress of your download.

After your download is complete, hover your mouse over the metahuman again. You’ll now see a blue arrow pointing right, replacing the percentage counter. Click this arrow to export the metahuman to Unreal. This process might take a few seconds to a couple of minutes.
Once the export is done, you can close Quixel Bridge and return to Unreal. In Unreal, check your content browser. You’ll find a new folder named ‘Metahuman’. This folder contains your exported metahuman. Open it, then open the folder named after your metahuman to access its files. Now, you can see that your metahuman is successfully in Unreal.
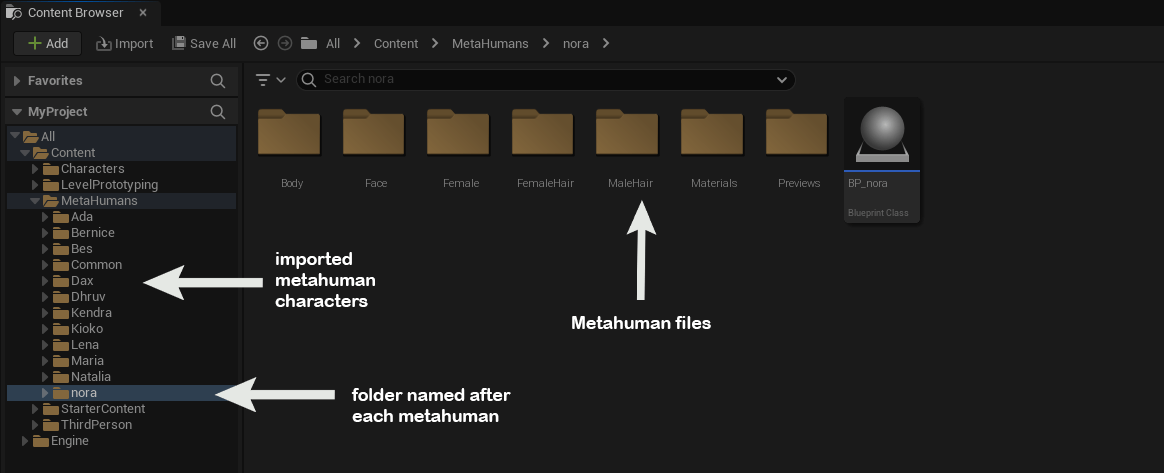
With the Metahuman imported into Unreal, we also need to bring the character into Blender. It’s important to know that Metahumans are divided into two parts: the head region and the body. For PixelHair, we only need the head region.
To export the head part, we’ll use the Metahuman blueprint, which is more straightforward than locating the file manually. Here’s how to export it.
Double-click on your Metahuman blueprint in Unreal. This opens a new window. Click on ‘Viewport’ to switch to a view where you can see your Metahuman.Click on the head of your Metahuman. Then, on the right side, look for ‘Skeletal Mesh Asset’ under the ‘Mesh’ section. Next to the Metahuman’s top region displayed in a small box, you’ll see an icon with a magnifying glass. Click this to go to the storage location of the top region.
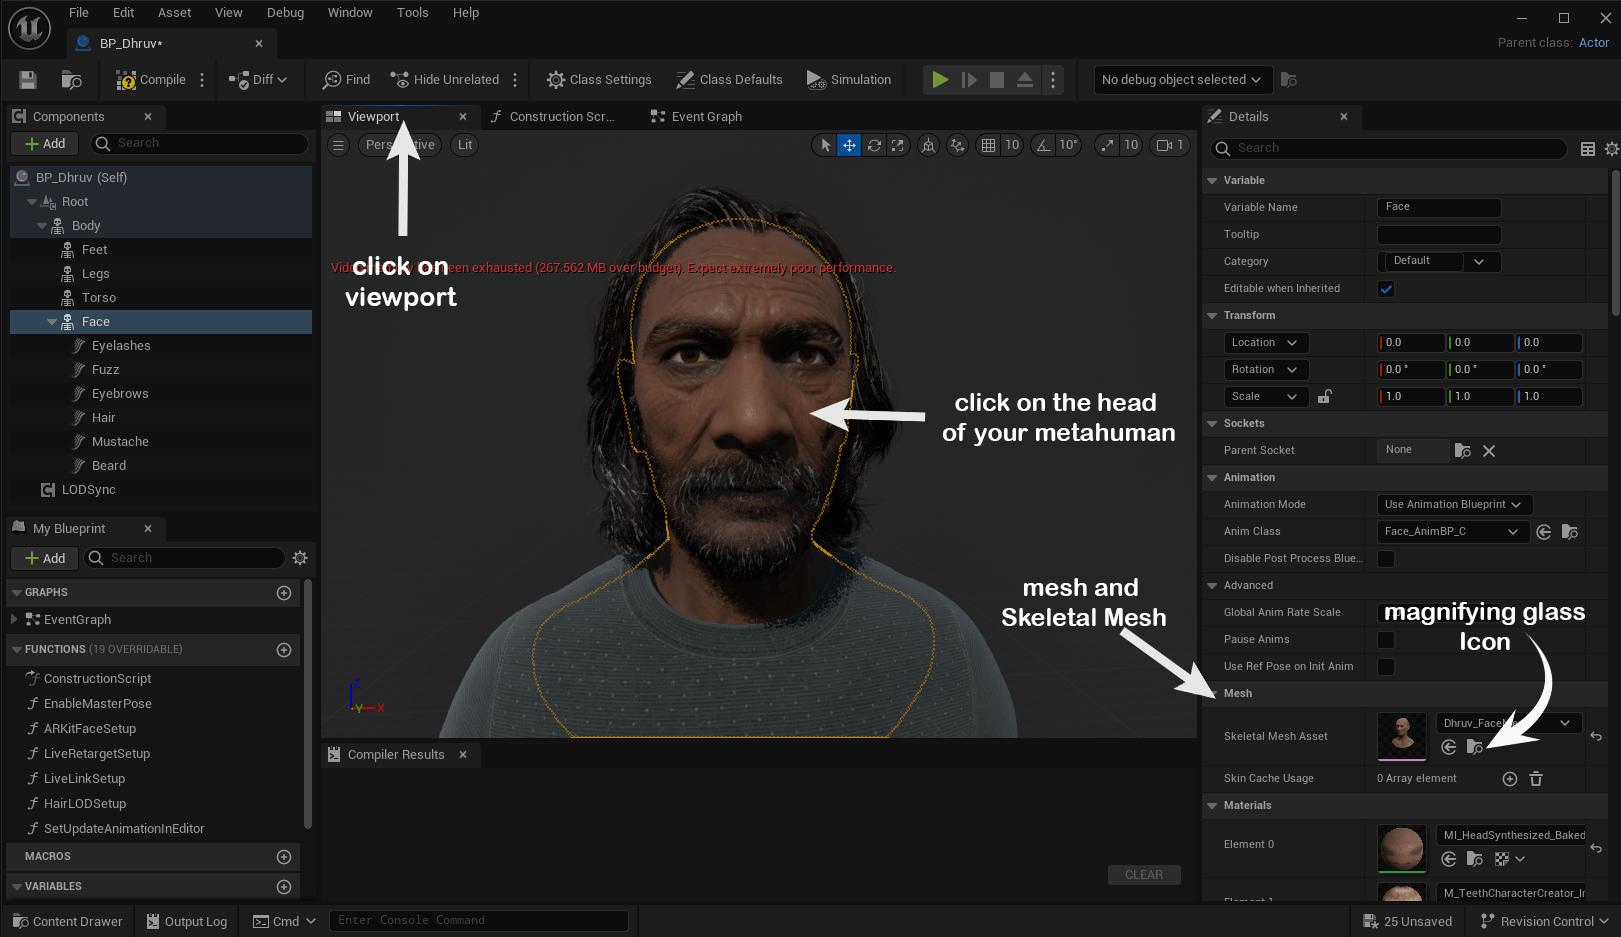
After clicking the magnifying glass icon, minimize the blueprint window and go back to your content browser. You’ll notice that the browser has automatically navigated to the location of your Metahuman’s top half and highlighted it for you. Here’s what you do next:
Hover your mouse over the selected top region. Right-click on it and choose ‘Asset Actions’, then select ‘Export’. This would prompt you to choose the save location for the FBX file. Select where you wish to save it. After that, a second popup appears for the FBX settings. Metahuman uses several LODs (Levels of Detail), which are essentially different versions of the same mesh with different detail levels. However, we don’t need all of these for PixelHair. We just need to export the mesh with the highest level of detail. Here’s how I set mine up, to export precisely that.
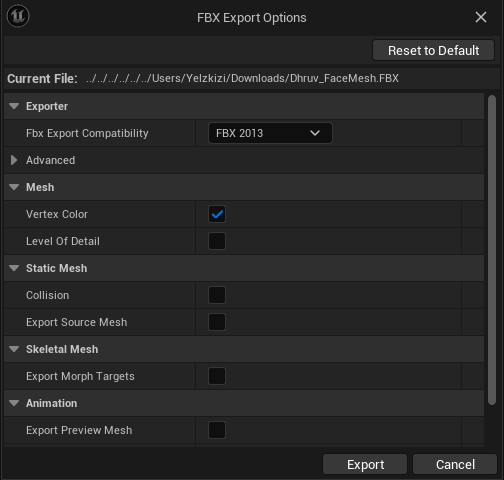
Now that you’ve exported the top part of the Metahuman, it’s time to bring it into Blender. Open Blender and import the FBX file just like any other FBX file. There’s no need to change or tweak any settings for this import. Once successfully imported, your screen should display something like this.
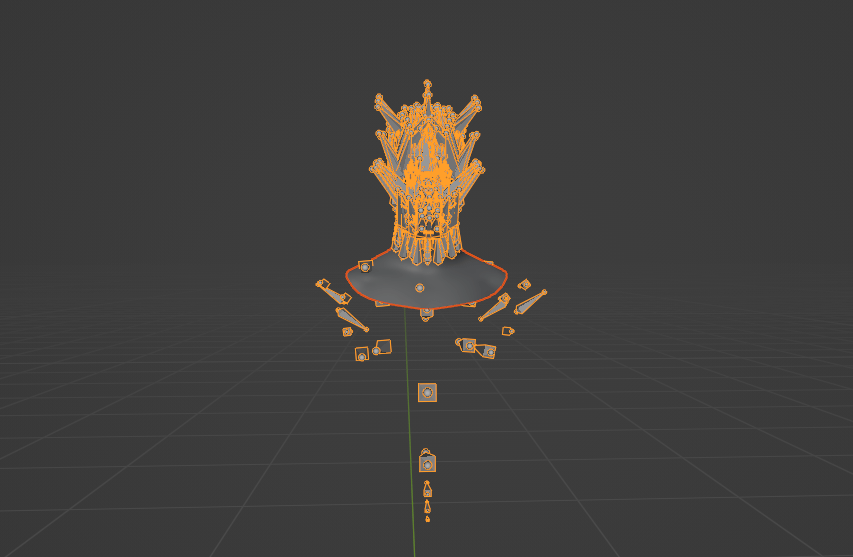
Although the bones are all over the place we don’t need to worry about that. Our focus is solely on the head mesh. But be careful, we can’t just delete the armature because the mesh is parented to it. Deleting the armature would also remove the mesh, which is not what we want. Instead, we need to separate them.
Here’s how to do it. Select the mesh and press ALT + P. A small box titled ‘Clear Parent’ will pop up, offering three options. Choose ‘Clear and Keep Transform’. You might not see any immediate change, but let’s verify if it worked. Click on the armature and try moving it. If the mesh still moves with it, the process didn’t work, and you might need to try again. However, if the armature moves independently without the mesh, you’ve successfully unparented them. Now, select the armature and press ‘X’ to delete it. You should now have just the Metahuman head in Blender, while the complete Metahuman is in Unreal. Let’s proceed to the next section.
2. Applying PixelHair to metahuman or custom character in Blender
Now that you have your Metahuman or custom character in both Blender and Unreal, we’re set for the next step. In this section, we’ll focus on applying Pixelhair to your character or Metahuman in Blender before moving things over to Unreal.
It turns out that I’ve already covered the process of applying Pixelhair to a custom character or Metahuman in a previous tutorial. To avoid repetition, I recommend checking out that section of the tutorial first. Here’s a link to it, click here. Once you’ve gone through it, come back to this tutorial and continue from the next section. See you there!
3. Exporting PixelHair to Unreal
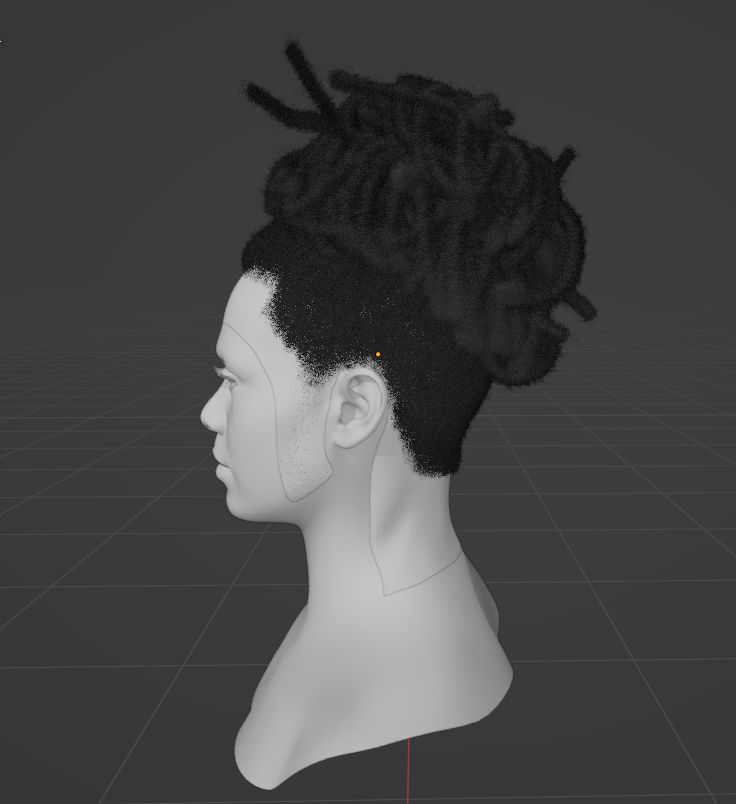
Welcome back! Now that you’ve attached Pixelhair to your character or Metahuman, it’s time to focus on exporting this hair to Unreal. There will be some important contextual information along the way, so it’s crucial to pay close attention
As you know, the hair mesh fits tightly to your character or Metahuman’s head because of the shrinkwrap modifier. This is our starting point. The first thing to do is apply the shrinkwrap modifier. This way the hair mesh’s default shape becomes the shape of your character/metahuman’s head. To do this, go to the modifiers panel. Find the shrinkwrap modifier, click on the small downward arrow on the right, and select ‘Apply’.
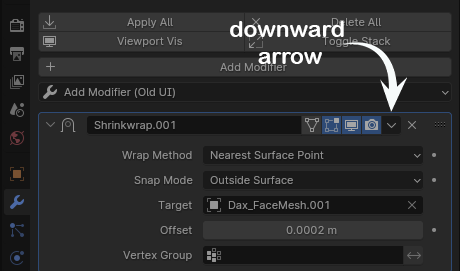
With the Pixelhair/hair mesh shaped to your character or Metahuman’s head, we’re set to export to Unreal. But there’s an important point to note. Blender hair and Unreal’s groom (Unreal’s version of hair) are different. In Blender, hair needs a mesh to grow from, while in Unreal, the groom can be an independent asset, separate from the mesh. To export Blender hair/Pixelhair to Unreal as its own asset, we need Blender to export just the hair, not the mesh. I’ll show you how to do this.
Go to the particle settings in Blender. It doesn’t matter which hair particle system you choose. Find ‘viewport display’, and there will be a setting named ‘show emitter’. Uncheck this. It makes the mesh invisible in the viewport, leaving only the hair visible. Now Blender knows that ithas to ignore the mesh when exporting.

If you’ve followed this tutorial closely, you’ll recall the earlier steps involving importing and exporting 3D meshes. Typically done in FBX or OBJ formats. However, exporting 3D hair/Pixelhair is different. For transferring Pixelhair/hair between software, we use Alembic files (ABC) which is just a different format compared to FBX and OBJ. Fortunately, Blender can export hair as an Alembic file, and Unreal can import it in the same format. Therefore, that’s the method we’ll use in this tutorial.
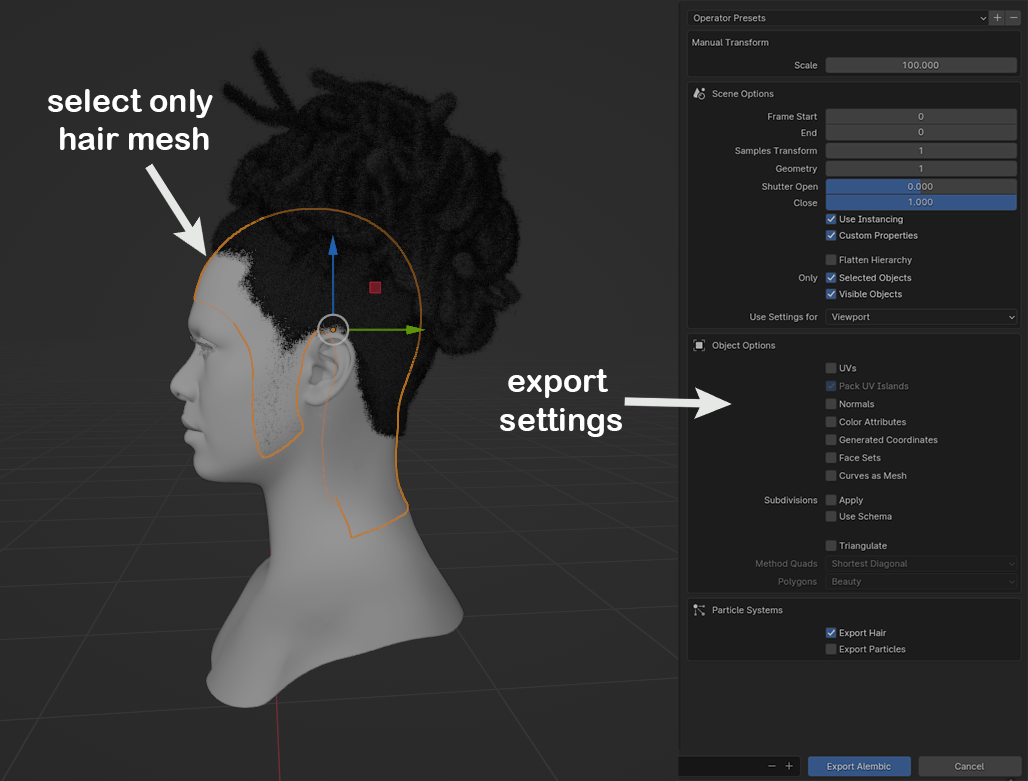
To export the hair, ensure that only the Pixelhair/hair is selected, not the Metahuman or anything else. Go to ‘File’ in the top left corner of your Blender window, then navigate to ‘Export’ and select ‘Alembic (.abc)’. A popup will appear for you to choose the file destination and name. But don’t click ‘Export’ just yet! There are some specific settings to adjust. This is because Unreal and Blender operate differently. These settings ensure the Pixelhair/hair exported from Blender is correctly received by Unreal. Below, you’ll find the settings that I use, which you can apply in your Blender export setup.
Before hitting ‘Export’, there’s one more step to make your life easier. This just ensures that you don’t have to fill in these settings every time. I’m pretty lazy so this helps me a lot. If you’re hardworking, you can skip this.
At the top of the export window’s right corner, just above the export settings, you’ll find a box labeled ‘Operator Presets’ with a plus and minus sign beside it. Click the plus icon. A new box will pop up with a slot for a name and an ‘OK’ button. This is how you save your settings for future use. Just type in a name for the setting, then hit ‘OK’. Now, whenever you export, you can select ‘Operator Presets’, choose the setting you saved, and Blender will automatically set everything up, ready for export.
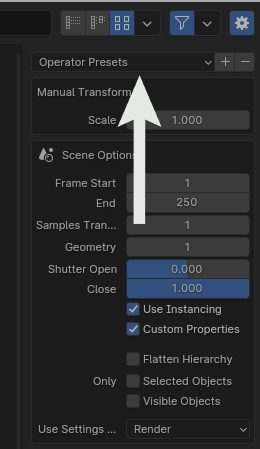
Now that you’ve saved your settings, go ahead and hit ‘Export’. With the export complete, it’s time to switch back to Unreal for the remaining steps.
In Unreal, we’ll import the Alembic file you just exported from Blender. To keep your project organized, you might want to create a new folder in your content browser. If not, just navigate to the location where you want the file. Then, simply drag and drop the Alembic file into your content browser. If everything was exported correctly from Blender, the following window should appear.
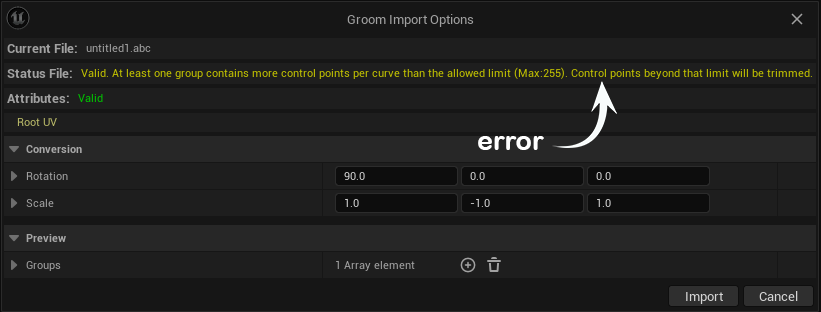
as you can see in the image, I highlighted an error message. It might not show up for most of you. If you encounter the error, I’ll explain why. If you’re interested, stick around. If not, skip to the fix. However, if you don’t have the issue at all, proceed to the next section.
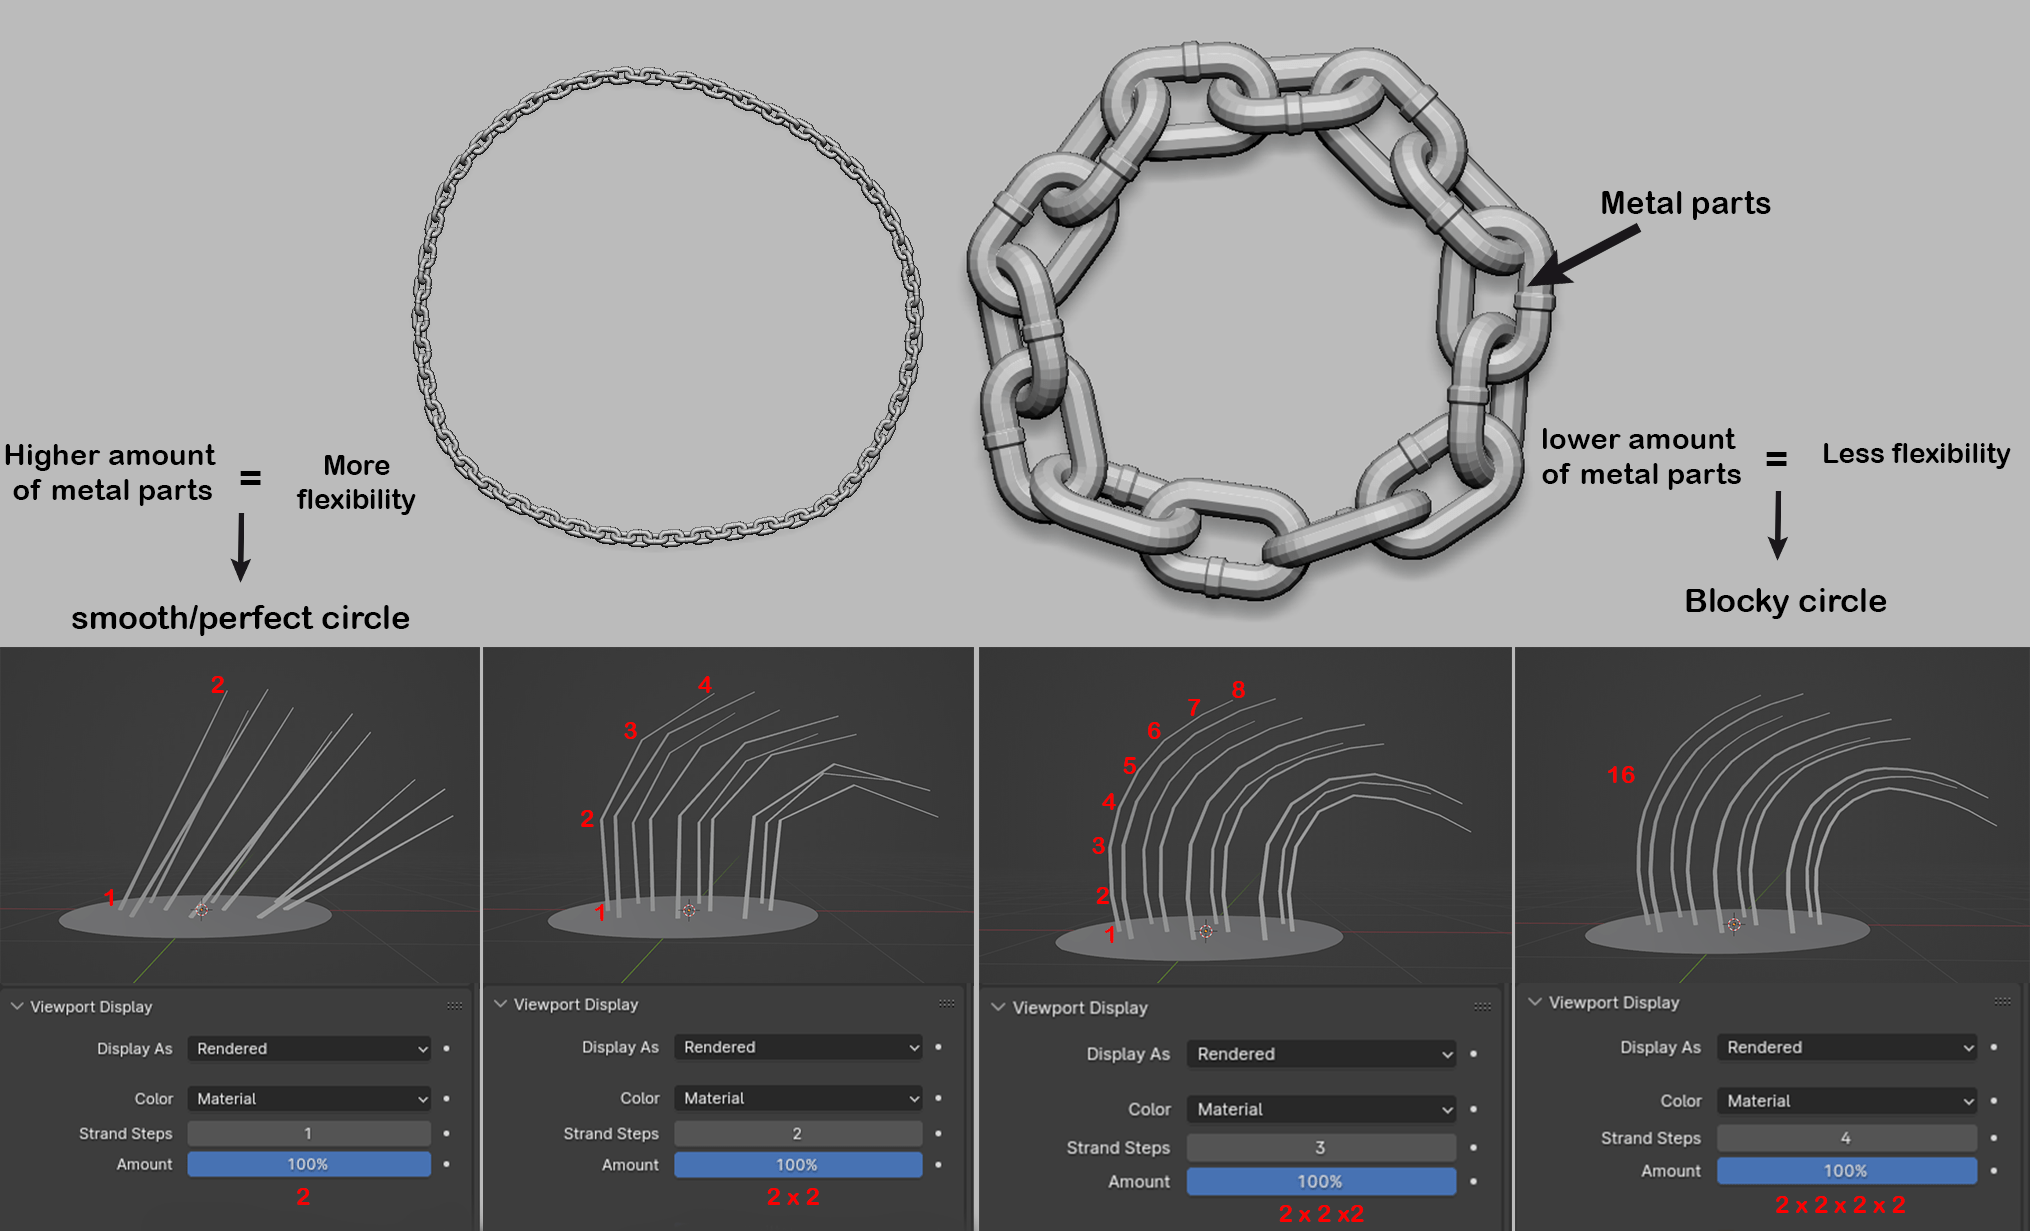
Explanation : This error isn’t related to your export or the Pixelhair/hair itself. It is about the difference in hair flexibility between Blender and Unreal. I gave a little blender explanation in the ‘How To Use PixelHair On Any Custom Character In Blender’ tutorial. Blender’s strand steps determine the flexibility of the hair. They do this by creating points where the hair can bend.
Think of it like a necklace chain. Imagine two chains of the same length but of one of these chains has less metal parts than the other. Naturally, the chain with less metal parts won’t be as flexible as the one with more metal parts. A chain with 5 metal parts won’t be able to form a perfect circle like a chain with 20 metal parts. This is the same with hair in blender. The metal parts are just like the points created by the strandsteps. More points mean more flexibility.
However, there’s a twist. Each time you increase the strand steps of a hair strand in blender, these points where the hair bends gets multiplied by 2. To simplify, if a hair has 7 strand steps, then the amount of points created on that hair would be 2 raised to the power of 7 (2^7) or 2x2x2x2x2x2x2. which would give us 128 points. 128 points on a strand is a lot so we can assume that the hair quite flexible. Flexible enough to shape it into drealocks, braids, curls etc.
Here is another example to drive the point home. Let’s say a hair has a strand step of 4. The amount of points created on that hair would be 2 raised to the power of 4 or 2x2x2x2 which is 16 points. From this little calculation, you can see that the hair with 128 points or 7 strandsteps has way more flexibility than the one with 4 strand steps or 16 points.
Having understood this, let’s compare with unreal. When importing your Alembic file into Unreal Engine, it doesn’t interpret your hair as strand steps. Instead it calculates the points. Unfortunately, Unreal imposes a limit on how many points you can import, set at a maximum of 255 points, as indicated in the error message.
To spare you from the calculations, 8 strand steps (2 raised to the power of 8) give a total of 256 points, just 1 point above Unreal’s limit. We can’t persuade Unreal to overlook that one point, so every hairstyle must have a maximum of 7 strand steps in Blender. Since we’re dealing with a hairstyle that exceeds this limit during import, let me show you what unreal would do if we choose to ignore the error. After that, I’ll show you how to fix it. To do that, simply ignore the error message and click import.
After importing, double-click on the groom. A new window will appear, showcasing the imported Pixelhair/hair and some settings. If you observe the Pixelhair/hair closely, you’ll notice that a significant part of it is missing. This is Unreal’s response when you overlook the error and import the hair. it only imports the initial 255 points and disregards the rest. To avoid this, I’ll guide you on how to fix it.
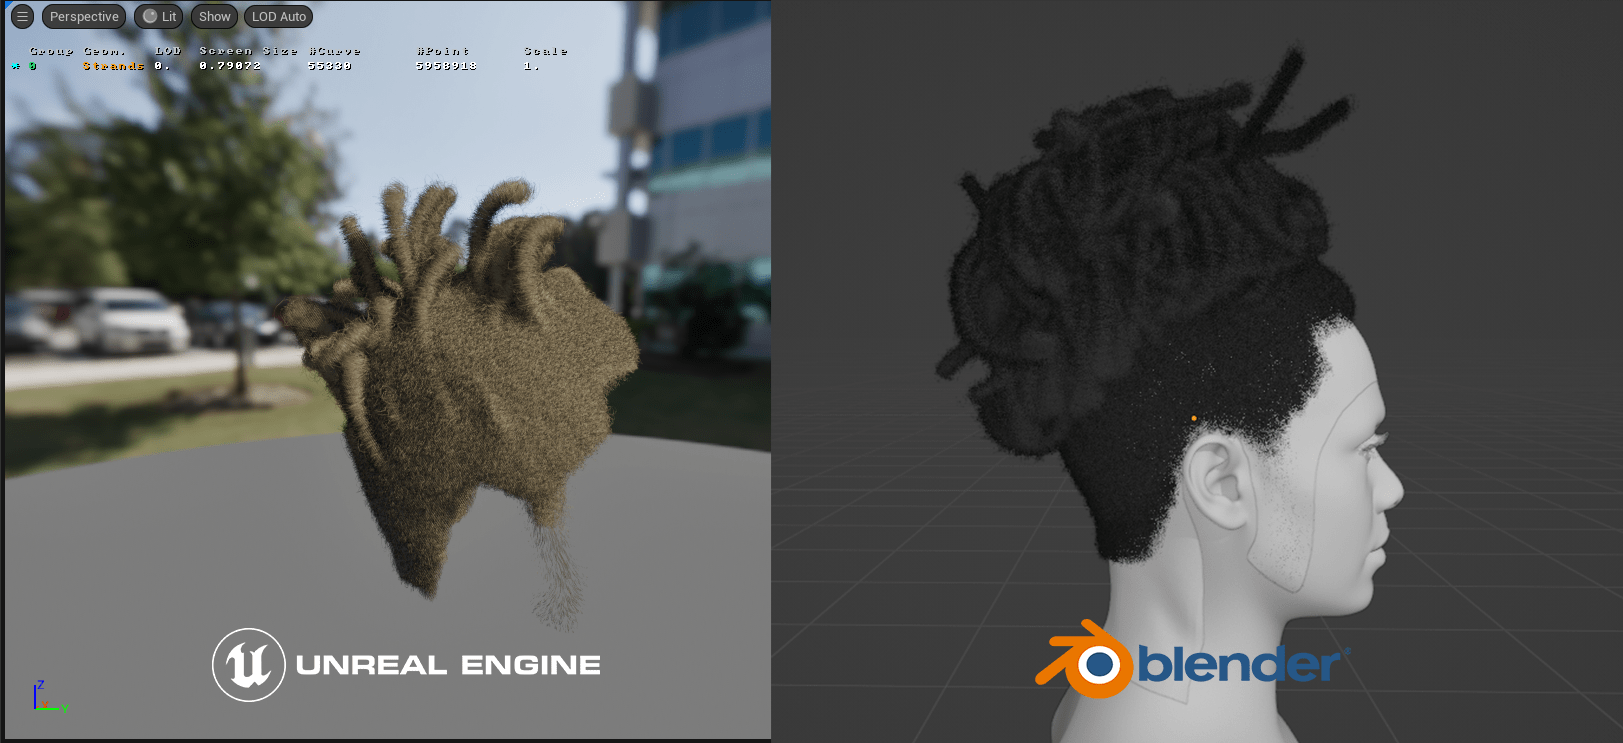
To fix this issue, we need to go back to Blender and re-export the Alembic file with fewer than 255 points.
In Blender, the only way to reduce points is by decreasing the strand steps. As mentioned earlier, strand steps create these points.
To achieve this, go to the hair particle system and ensure that all hair systems have a maximum of 7 in the strand steps settings. This adjustment allows the Pixelhair/hair to be imported into Unreal without errors. However, in cases like with dreads, reducing strand steps might alter the hair’s appearance. If the change is minimal or barely noticeable, feel free to export to Unreal Engine. But if there’s a noticeable difference, you can make some adjustments. You could either increase the hair shape to compensate or, in the case of dreads, change the kink. To do this, go to the children settings, switch the kink type from curl to braid. This will result in a rougher and flatter version of the dreads but can compensate for the lack of resolution. Once done, proceed with the export as we did before. I’ll meet you in Unreal after importing the hair.
4. Applying PixelHair to metahuman or custom character in Unreal
Unlike the character, we can’t simply drag and drop the Pixelhair/hair into the Unreal scene. Instead, we have to add the Pixelhair/hair to the character as a character component. This ensures that wherever and whenever the character is referenced, the Pixelhair/hair is included as well. To achieve this, we need to open the MetaHuman/character blueprint. This is where the Pixelhair/hair would be added. If you’re using a custom character without a character blueprint, follow follow the steps in the next paragrah. However if you already have a character blueprint like the metahuman, skip the next paragraph.

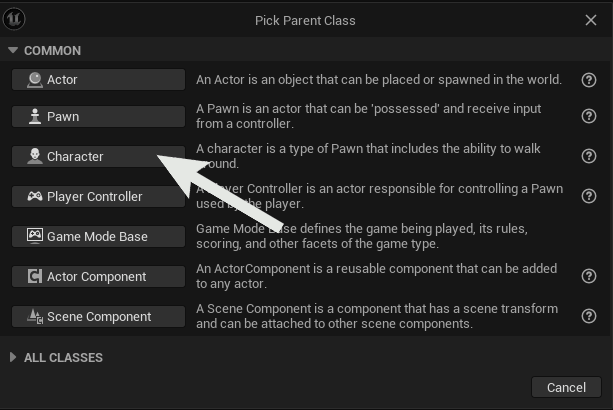
If you’re using a custom character without a character blueprint, follow these steps: In your content browser, right-click, and select “Blueprint Class.” In the new box, choose “Character” as the blueprint parent class. Name your blueprint and double click to open it. The blueprint window will appear.
Before proceeding with the tutorial, we need to add your custom character to the blueprint. In the top-left corner of the blueprint window, under “Components,” find “Mesh (CharacterMesh0)” and click on it. On the right side of the window, under the mesh settings, click the box that says “None” and add your custom character.
Now that you have your character blueprint set up, we can continue with the tutorial.

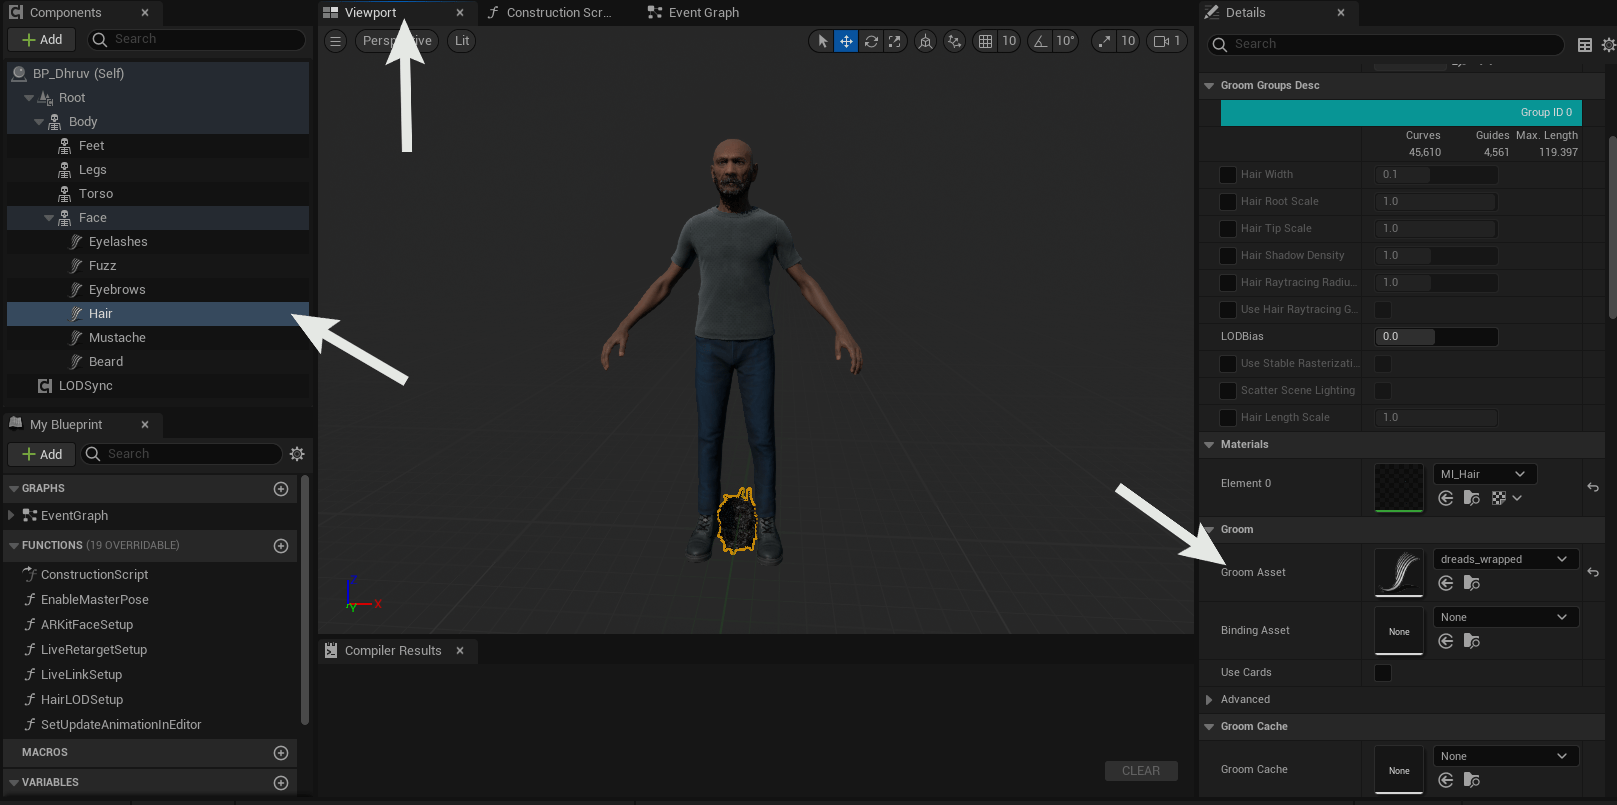
With the blueprint open, head to the components. If you’re using MetaHuman, you’ll see a list of groom components that MetaHuman already uses. If not, you’ll need to add a groom component. To do this, click on “Add,” search for groom, and add it. Feel free to rename it to “hair” for consistency with MetaHuman. Next, drag the groom component to “Mesh (CharacterMesh0).”
Now, whether you’re using MetaHuman or not, click on the hair groom component. Go to the right side of your window, scroll down, and locate the “Groom Asset” setting under “Groom.” For MetaHuman, switch this with the imported hair. If it’s a custom character, choose your imported groom. Switch the blueprint to the viewport to see how the character looks with the hair. In many instances, you might find the Pixelhair/hair floating or on the floor.
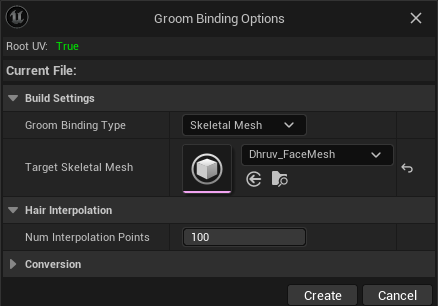
To resolve this, let’s bind the Pixelhair/hair to the character. Minimize the blueprint window and return to your content browser. Select the imported hair, right-click with your mouse hovering over it, and choose “Create Binding.” The binding options window will appear. Go to the target skeletal mesh and select your MetaHuman or your custom character. Once done, click “Create.”
Now that the binding asset is created, Unreal will take you back to the blueprint window. Simply go to the top of the window, switch to your MetaHuman or custom character blueprint window, and then go back to the groom asset setting. Right under it, you’ll see the binding setting. Just select the binding asset we created, and your Pixelhair/hair will align on the character’s head as it should. Now you can use the character and its new hairstyle however you want. Have fun with it! If you have more questions or need further assistance, feel free to ask
for more information on Hair in Unreal check out https://docs.unrealengine.com/5.0/en-US/hair-rendering-in-unreal-engine/

