


Rendering a 360-degree view in Blender allows you to create immersive visuals ideal for virtual reality (VR), panoramic displays, or interactive experiences. Blender provides built-in tools and camera settings to render 360-degree views effectively. Here’s a detailed guide on how to achieve this.
What Is a 360-Degree Render?
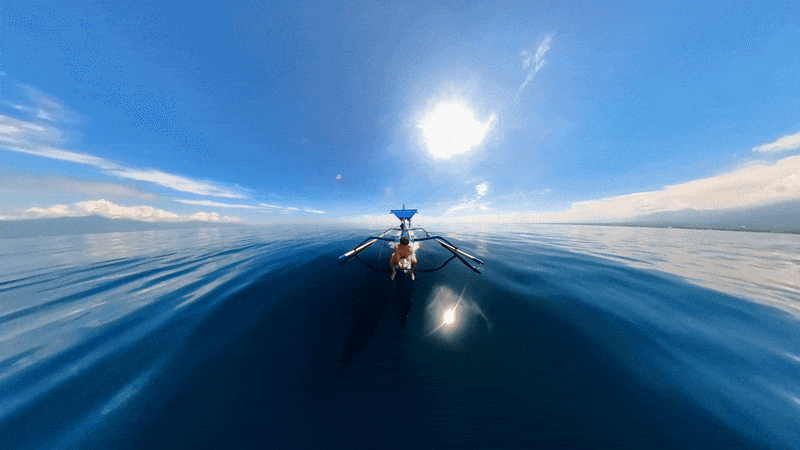
A 360-degree render captures an entire scene around a central point, providing a spherical image. This type of rendering is often used for:
- Virtual Reality (VR): Create immersive environments for VR applications or headsets.
- Architectural Visualizations: Offer interactive walkthroughs of spaces.
- Gaming: Generate environmental maps for realistic reflections or lighting.
- Marketing and Advertising: Produce interactive panoramas for websites and apps.
- Cinematic Experiences: Add spherical backgrounds for use in films or animations.
Why Render a 360-Degree View?
Rendering a 360-degree view has several benefits:
- Immersion: Allows viewers to experience the scene as if they are present in it.
- Versatility: Supports applications in VR, gaming, and architecture.
- Realistic Lighting: Can be used as HDRI maps for accurate reflections and global illumination.
- Engagement: Interactive 360-degree content often has higher engagement in online platforms.
Setting Up a 360-Degree Render
1. Use a Camera with Equirectangular Projection
- Select or add a camera in your scene.
- Go to the Camera Properties tab.
- Under the Lens section, change the camera type to Panoramic.
- Choose Equirectangular as the panoramic type. This setting ensures the render wraps horizontally and vertically, creating a seamless 360-degree image.
2. Position the Camera
- Place the camera at the central point of your scene.
- Adjust its height and orientation to capture the desired perspective.

Adjusting Render Settings for 360-Degree Output
1. Set the Resolution
- Open the Output Properties tab.
- Set the resolution to a 2:1 aspect ratio. For example:
- 4096×2048 for high-quality renders.
- 8192×4096 for ultra-high resolution.
2. Enable Cycles for Photorealism
- Switch to the Cycles render engine for detailed and realistic lighting.
- Use Eevee if you need faster render times, but note that Cycles produces better results for 360-degree renders.
3. Adjust Sampling Settings
- In the Render Properties tab, increase the samples to reduce noise.
- Enable Denoising to clean up the final render.
Rendering the 360-Degree View
1. Render an Image
- Press F12 to render a single frame.
- The output will be an equirectangular image suitable for use in VR, panoramas, or interactive viewers.
2. Render an Animation
- Set the timeline duration and output format in the Output Properties tab.
- Render the animation with Ctrl+F12. The frames will be stored as a sequence or a video, depending on your output settings.
Using The View Keeper for 360-Degree and Regular Shots
In most instances, you might want to switch between 360-degree cameras and regular shots or render out both a 360-degree view and a regular shot. The View Keeper makes this easy by allowing you to use multiple camera settings on a single camera. The View Keeper can store unique settings, such as lens type as well as other camera settings, thereby letting you render both a 360-degree shot and a regular shot in one go without having to manually readjust settings.
How to Use The View Keeper:
- Create a View Record for a 360-Degree Render:
- Set your camera’s projection type to Panoramic and select Equirectangular.
- Adjust the resolution in the Output Properties to a 2:1 aspect ratio (e.g., 4096×2048).
- Open The View Keeper panel and save this configuration as a new view record.
- Rename the record for easy identification (e.g., “360 View”)
- Create a View Record for a Regular Shot:
- Switch the camera’s projection type back to Perspective in the Camera Properties.
- Adjust the resolution for a standard aspect ratio (e.g., 1920×1080 for 16:9).
- Position and orient the camera for the desired regular shot.
- Save this configuration in The View Keeper as another view record
- Rename the record for easy identification (e.g., “Regular Shot”).
- Switch Between View Records:
- Use The View Keeper to toggle between the 360-degree view record and the regular shot record. This allows you to render both perspectives without resetting camera settings manually.
- Render Both Views:
- Activate the desired view record and render the scene.
- To render both, use The View Keeper’s Alternative Rendering feature to render multiple view records in one go.
Tips for Improving 360-Degree Renders
- Position the Camera Correctly: Place the camera at the scene’s center to minimize distortion.
- Use High Resolution: 360-degree renders require high resolutions to look sharp, especially in VR headsets.
- Optimize Lighting: Use HDRI maps for realistic ambient lighting.
- Enable Denoising: Reduces noise in large renders, improving clarity.
- Test in a Viewer: Preview your render in a panoramic viewer or VR headset to ensure quality.
Common Questions About 360-Degree Renders
Why does my 360-degree render look distorted?
- Distortion can occur if the camera is not set to Equirectangular Projection or if it is not positioned at the center of the scene. Ensure proper settings in the Camera Properties.
Can I use Depth of Field (DoF) in 360 renders?
- DoF is generally not recommended for 360-degree renders, as it can create unnatural blurring in spherical images. However, it can be used sparingly for artistic purposes.
How do I view my 360 render?
- Use tools like Google Photos, YouTube (360 videos), or panoramic viewers to display your render. For VR, load the image into software like Unity or Unreal Engine.
Can I use Eevee for 360-degree renders?
- Yes, Eevee supports 360-degree renders, but it may lack the photorealistic quality of Cycles. Use Eevee for quick previews or projects where speed is a priority.
How do I reduce noise in my 360 render?
- Increase the sample count in the Render Properties.
- Enable Denoising for both viewport and final renders.
What is the ideal resolution for VR?
- A resolution of at least 4096×2048 is recommended for VR, with higher resolutions like 8192×4096 providing better clarity.
Can I create partial 360-degree renders?
- Yes, use the Render Region tool (Ctrl+B) to render specific areas of the 360-degree view.
Rendering a 360-degree view in Blender is a powerful feature that caters to immersive and interactive content creation.
With The View Keeper, you can take this a step further by using a single camera to switch between 360-degree views and regular shots. The View Keeper allows you to create separate view records for the same camera, storing different settings such as lens type, and orientation.
This means you can seamlessly switch between capturing immersive 360-degree views and focused regular shots within the same scene.
With the right camera settings, render engine, and tools like The View Keeper, you can efficiently produce stunning panoramic visuals for a variety of applications. Whether it’s for VR, gaming, or environmental maps, Blender makes the process accessible and versatile.


