


GIMP’s latest update, GIMP 3.2, brings a game-changing boost to its layering system by introducing Link Layers and Vector Layers. These new layer types enable non-destructive editing workflows that were previously difficult or impossible in GIMP. In this comprehensive guide, we will explain what Link Layers and Vector Layers are, how to use them effectively, and how they compare to familiar concepts (like Photoshop’s Smart Objects). We’ll also cover practical tips, use cases (such as logos, UI icons, and more), and key details from the GIMP 3.2 release notes. By the end, you’ll know how to leverage linked external assets and editable vector shapes in GIMP 3.2 to enhance your creative workflow.
Before diving in, keep in mind that non-destructive editing means you can modify or transform elements without permanently compromising their original quality. GIMP 3.2’s Link Layers and Vector Layers embody this principle – allowing you to scale, rotate, and update content freely while preserving the source data. Let’s explore each feature in depth.

GIMP 3.2 Link Layers explained
Link Layers allow you to insert external image files (like PNG or SVG) into a project as references rather than copying pixels. Similar to Photoshop’s linked Smart Objects, these layers stay tied to the source file and update automatically if the external file is changed. This system uses a placeholder in the layer stack that points to the external asset. Key benefits include:
- Non-destructive transforms: Scale, rotate, or transform layers without permanent resampling; they always render from the original source data to maintain sharpness.
- External editing: Edits made to the source file in other programs (like Inkscape for SVGs) are reflected live in GIMP.
- Consistency: A single source file can be used across multiple projects or instances, ensuring all update simultaneously when the source is modified.
These are linked-only assets, meaning pixel data is not stored in the .xcf file, keeping file sizes smaller. The external file must remain at the specified path for the link to function.
How to use Link Layers in GIMP 3.2
Creating and managing Link Layers is a straightforward process:
- Open as Link Layer: Use File > “Open as Link Layer…” or the shortcut Ctrl + Alt + Shift + O (Cmd + Option + Shift + O on macOS).
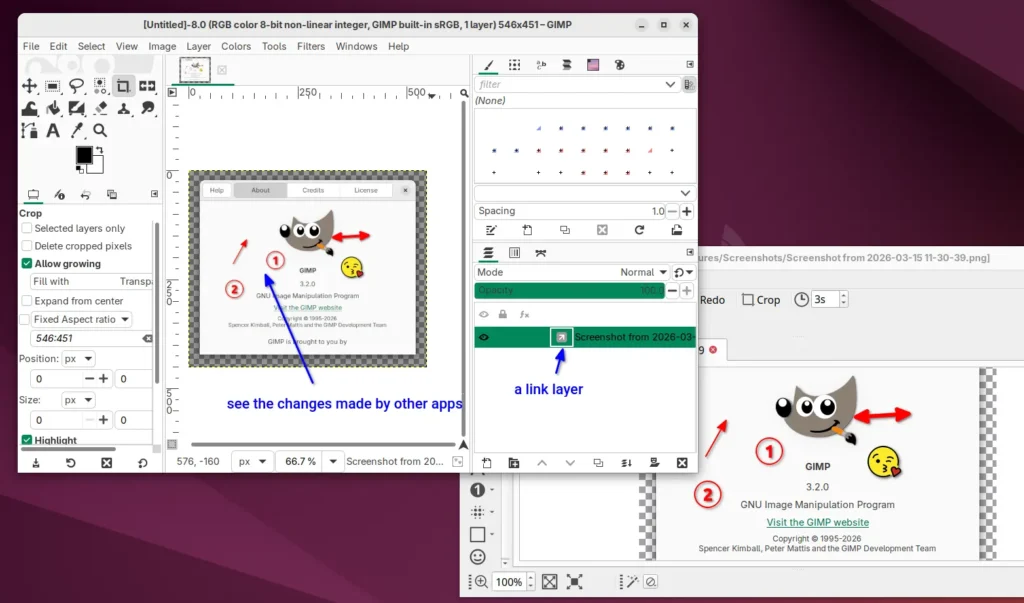
- Identification: Linked layers are marked in the Layers panel with a special link or chain icon next to the thumbnail.
- Non-destructive transforms: Move, scale, and rotate layers freely. GIMP renders from the source file, preventing quality loss during resizing.
- External updates: Modifications saved to the source file in an external editor will auto-refresh the layer in GIMP.
- Multiple instances: You can link the same file multiple times; all instances will update if the source file changes.
- Saving: The .xcf file saves the file path. When moving projects, the external assets must accompany the .xcf file.
Note that you cannot paint or erase directly on a Link Layer; it must be rasterized first, which breaks the link. Complex transforms like perspective warping may also require rasterization.
Link Layers vs Photoshop Smart Objects
GIMP Link Layers are compared to Photoshop Smart Objects with several key distinctions:
- Similarity: Both allow for non-destructive transformations and keep the source image pristine.
- Linked vs Embedded: GIMP currently only supports the “linked” model (external files), whereas Photoshop offers both “linked” and “embedded” (stored within the project) options.
- Editing: Photoshop allows editing within a separate window or the source app; GIMP requires opening the source file manually, though it monitors for saves to update the canvas.
- Instances and Filters: Both support multiple instances pointing to one file and allow for non-destructive filters (GEGL in GIMP).
- Limitations: GIMP 3.2 is a new implementation and may not yet support the advanced encapsulation of multiple layers or complex warp transforms found in Photoshop.
Non-destructive scaling with Link Layers in GIMP
Link Layers eliminate the quality loss associated with scaling raster pixels. Because GIMP refers to the original source file for every transform:
- Source resampling: GIMP re-samples from the source at the required resolution each time you change the layer size.
- Data preservation: Scaling down does not discard pixels; scaling back up (within source limits) remains sharp.
- Vector advantage: Linking SVG files allows for infinite scaling without pixelation.
- Workflow flexibility: Users can experiment with sizes and rotations repeatedly without degrading the image quality.
Live updating linked files in GIMP 3.2
GIMP 3.2 monitors the timestamp of linked files to provide real-time updates:
- External editor integration: You can use GIMP as a layout preview while editing assets in specialized software like Inkscape or Krita.
- Collaboration: Teams can update shared assets that automatically refresh in the layout artist’s GIMP project.
- Batch processes: Scripts can update a source image, and the GIMP composition will reflect the new data.
- Manual control: If a refresh doesn’t trigger, users can toggle visibility or right-click to reload. Rasterizing a layer will “freeze” it and stop future updates.
How to relink or swap a Link Layer source file in GIMP
GIMP allows users to manage and change the source paths of Link Layers via the Layer Attributes dialog:
- Accessing Attributes: Double-click the layer name/thumbnail or right-click and choose “Edit Layer Attributes…”.
- Relinking/Swapping: Use the “Source” or “Linked File” field to type a new path or browse for a different file.
- Automatic updates: Once a new file is selected, the layer content swaps while maintaining existing transforms (scale/rotation).
- Templates: This feature is useful for swapping placeholder images in mockups while keeping positions consistent.
- Fixing broken links: If an asset is moved, this dialog is used to point GIMP to the new location.
- Breaking links: “Rasterize Layer” converts the link into static pixels within the .
GIMP 3.2 Vector Layers explained
Vector Layers in GIMP 3.2 allow for the creation and maintenance of editable vector shapes directly on the canvas, moving beyond the software’s historical raster-based limitations. These layers are defined by paths with fill and stroke properties, remaining resolution-independent and mathematically defined. Key characteristics include:
- Created from Paths: The existing Paths tool can now generate new Vector Layers based on drawn anchor points and Bézier curves.
- Fill and Stroke: Each layer features adjustable attributes for the interior (fill) and the outline (stroke), both of which can be modified after creation.
- Non-destructive editing: Shape nodes can be moved using the Paths tool to update the layer live. Additionally, layers can be scaled or rotated without rasterization or quality loss.
- Real-time updates: The layer’s content morphs instantly as the underlying path is modified.
- Integration with other tools: Vector layers behave similarly to text layers; they support non-destructive filters, blending modes, and clipping masks. Colors and patterns can be applied quickly by dragging and dropping them onto the shape.
This feature enables a hybrid raster-vector workflow, allowing shapes like rectangles, circles, and icons to remain flexible and crisp throughout the design process.
How to create Vector Layers from paths in GIMP 3.2
Creating a Vector Layer follows a specific workflow integrated with the Paths tool:
- Draw a path: Use the Paths tool (shortcut B) to create anchor points and curves.
- Finish the path shape: Ensure the path is closed for shapes intended to have a fill.
- Create the Vector Layer: Click the “Create New Vector Layer” button found in the Tool Options or Paths panel once a path is active.
- Name and confirm: Name the new layer in the Layers panel as prompted.
- Adjust fill and stroke settings: Define the fill (none, solid color, gradient, or pattern) and the stroke (none, color, width/thickness, and line style).
- See the result on canvas: The shape renders with anti-aliased edges dynamically based on the set properties.
- Edit the shape if needed: Re-activate the Paths tool and adjust nodes or handles to reshape the layer in real time.
- Use the layer normally: Move, stack, or adjust the opacity of the vector layer like any standard raster layer.
The associated path remains in the Paths panel and must be maintained to keep the vector layer’s shape editable.

Editable fill and stroke settings in GIMP Vector Layers
GIMP 3.2 provides interactive properties for Vector Layers that can be refined at any time:
- Fill Color / Pattern: Supports solid colors, patterns, and gradients. These can be updated via settings or by dragging swatches from the palette directly onto the shape.
- Fill Visibility: Users can toggle the interior fill on or off independently.
- Stroke Color: The outline color is set independently of the fill.
- Stroke Width: Thickness is adjustable in pixels and remains resolution-independent for crisp rendering at any zoom level.
- Stroke Style: Includes options for line styles (solid, dashed, dotted) and join/cap settings (mitered, rounded, butt caps).
- Stroke Visibility: The outline can be enabled or disabled as needed.
These settings allow for rapid variations, such as duplicating a layer to create an outlined version of a shape. While one vector layer generally applies a single style to all sub-paths within it, overall layer opacity and blend modes provide further compositing flexibility.
Best uses for Vector Layers in GIMP (logos, UI shapes, icons)
Vector Layers are specifically beneficial for designs requiring clean edges and scalability:
- Logo Design and Illustration: Allows for the creation of scalable logos that can be exported as true vector files via SVG or PDF.
- UI Elements and Icons: Ideal for buttons, sliders, and icon sets that must remain sharp at various screen densities.
- Diagrams and Info-graphics: Facilitates the creation of boxes, arrows, and connectors that require frequent layout adjustments.
- Text + Shape combinations: Useful for designing badges, ribbons, and frames around text while keeping all elements editable.
- Icons and symbols within larger artwork: Ensures graphic symbols overlaid on photos remain sharp and adjustable.
- Print layouts requiring sharp lines: Maintains high-quality separators and shapes for high-DPI print projects.
By providing these capabilities, GIMP 3.2 allows users to maintain vector data throughout the project, enabling true SVG export for scalable outputs.

Vector Layers vs paths in GIMP: what changed in 3.2
Historically, GIMP users utilized paths as auxiliary tools for creating selections or stroking/filling pixels on a raster layer. Once the pixels were painted, the link between the path and the visual result was broken; editing the shape later required manual clearing and re-painting. GIMP 3.2 introduces several fundamental changes:
- Integration with Layers: Paths can now be attached to a layer to create a Vector Layer, where the layer’s rendering is dynamically derived from the path.
- Persistent Editability: Similar to text layers, vector layers store source data (path and style) that remains editable at any time.
- Workflow Efficiency: Users can now convert a path directly into a vector layer instead of first creating a selection.
- Vector Export: Because these layers maintain fill and stroke data, GIMP 3.2 supports exporting actual vector objects in SVG and PDF formats.
- UI and Format Updates: The interface now includes a “Create New Vector Layer” button, and the .xcf file format has been updated to store path and style information.
- Unified Non-Destructive Editing (NDE): The “Rasterize” and “Revert Rasterize” options now apply to text, link, and vector layers collectively.
GIMP 3.2 workflow tips for combining Link Layers and Vector Layers
Combining these non-destructive tools allows for a highly flexible and quality-preserving workflow:
- Compositing: Use Link Layers for high-resolution external photos and Vector Layers for overlays, ensuring both stay sharp during transformations.
- Templates: Design templates using link layers as placeholders for photos and vector layers for branding elements like borders or icons.
- Linked SVGs vs. Native Layers: Use native vector layers for shapes created within GIMP. Use linked SVGs for complex illustrations or collaborative workflows where assets are updated in external programs like Inkscape.
- Resolution Independence: By keeping elements as link or vector layers, a project can be scaled for multiple output sizes (e.g., web vs. print) without quality loss.
- Layer Grouping: Place link and vector layers in a group set to “Passthrough” mode to apply non-destructive GEGL filters to the entire composite.
- Clipping and Masking: While native vector masks are not yet present, users can use paths and group masks to approximate these effects.
- Performance and Safety: Use pixel locking to prevent accidental rasterization prompts. For very complex compositions, rasterizing a final version can improve performance.
- The Design Trifecta: Use text layers for typography, vector layers for graphics, and link layers for photos to maintain a fully editable composition.
- Final Exporting: Exporting to raster formats renders all content at the target resolution, while PDF/SVG exports can preserve vector and text data for high-quality printing.
GIMP 3.2 release notes for Link Layers and Vector Layers
The official release notes highlight GIMP 3.2’s focus on non-destructive editing:
- Non-destructive Layer Types: Link and Vector layers join Text layers as “special” types that require explicit rasterization before destructive pixel edits.
- Link Layers: These reference external images, update automatically when the source file changes, and can be swapped or relinked via the Layer Attributes dialog.
- Vector Layers: Referred to as “path layers,” these feature editable fill and stroke properties (color, pattern, visibility, and width). The shape updates live as nodes are moved.
- Interactive Styling: Like text layers, users can drag and drop color or pattern swatches onto vector layers to change their fill instantly.
- Enhanced Export Options: The introduction of vector layers enables SVG export and improves vector preservation in PDF exports.
- Safety Features: GIMP now actively prevents accidental edits to non-destructive layers by requiring a “Rasterize” step, which can be undone using “Revert Rasterize.”
- Technical Advancement: The ability to handle vector objects internally is a significant stepping stone for future vector integration in GIMP’s codebase.

Frequently Asked Questions (FAQs)
- How do I add a Link Layer in GIMP 3.2?
To add a Link Layer, go to File → Open as Link Layer… and select your image. You can also use the shortcut Ctrl + Alt + Shift + O (Cmd + Opt + Shift + O on Mac). The layer will appear in the Layers panel with a link icon indicating it is an external reference. - Will a Link Layer update automatically if I edit the source file?
Yes. If you modify and save the linked source file in an external program, GIMP detects the change and refreshes the content automatically. - What happens if I move or rename the external file for a Link Layer?
GIMP will be unable to display the content and may show a placeholder or error. You can fix this by moving the file back or using the Layer Attributes dialog (double-click the layer or right-click → Edit Layer Attributes) to relink the layer to the new file location. - How do I replace the image used in a Link Layer with a different image?
Double-click the layer to open Layer Attributes and choose a new file path. This swaps the asset while maintaining your existing transforms and layer settings. - How do I create a Vector Layer in GIMP 3.2?
First, draw a shape with the Paths tool. Then, click the “Create New Vector Layer” button in the Tool Options or Paths panel. This generates a new vector layer based on that path. - Can I change the fill or outline of a vector shape after creating it?
Yes. You can adjust Fill color, Stroke color, and Stroke width at any time. You can also drag a color from the palette directly onto the shape to update its fill instantly. - Are vector layers in GIMP resolution-independent?
Yes. They are defined by mathematical paths, allowing them to be scaled or rotated without losing crispness. While rendered at the document’s resolution for display, they re-render perfectly if the image size or DPI is increased. - Can I export my GIMP image with vector layers as an SVG or PDF?
Yes. GIMP 3.2 supports SVG export and improved PDF export. Vector and text layers remain as vector objects in the exported files, though linked raster images will likely be embedded. - Does GIMP 3.2 support Photoshop Smart Objects and shape layers in imported PSDs?
While GIMP 3.2 improves PSD support, Smart Objects are typically rasterized upon import rather than converted to Link Layers. Shape layers may also import as raster or paths. You may need to manually replace these with native GIMP Link Layers. - Do Link Layers and Vector Layers work with GIMP’s layer filters and groups?
Yes. They support non-destructive GEGL filters and work within layer groups. Using Pass-Through mode on a group allows you to apply filters as overall adjustments to all layers within that group.

Conclusion
GIMP 3.2 represents a milestone by introducing a modern, non-destructive workflow. Link Layers provide functionality similar to Photoshop’s Smart Objects, allowing external assets—including SVGs—to remain updated and high-quality through transformations. Vector Layers offer flexible shape creation and adjustment, enabling GIMP to function as a hybrid raster-vector tool. This evolution benefits graphic designers making logos or UI elements and photographers reusing assets across compositions.
The non-destructive approach allows for complex designs where every major element—text, links, and vectors—remains editable. These features, combined with the improved filter system and layer groups, provide a workflow comparable to adjustment layers and smart filters. GIMP 3.2 also includes enhancements like MyPaint brushes and UI tweaks, further narrowing the gap between GIMP and professional proprietary design software.
Sources and Citations
- GIMP Official News – “GIMP 3.2 Released” (March 14, 2026)
https://www.gimp.org/news/2026/03/14/gimp-3-2-released/ - GIMP 3.2 Release Notes – GIMP Team Documentation
https://www.gimp.org/release-notes/gimp-3.2.html - UbuntuHandbook – Ji m, “GIMP 3.2 Released! Link & Vector Layers, SVG Export”
https://ubuntuhandbook.org/index.php/2026/03/gimp-3-2-released-link-vector-layers-svg-export-ubuntu-ppa/ - OMG! Ubuntu – Joey Sneddon, “GIMP 3.2 released with Link Layers, SVG export + more”
https://www.omgubuntu.co.uk/2026/03/gimp-3-2-release-new-features - CG Channel – Jim Thacker, “GIMP team releases GIMP 3.2 with new vector and link layers”
https://www.cgchannel.com/2026/03/gimp-team-releases-gimp-3-2-with-new-vector-and-link-layers/ - GIMP 3.1.4 Development Release Notes – “GIMP 3.1.4: Second Development Release towards GIMP 3.2”
https://www.gimp.org/release/3.1.4/ - UbuntuHandbook – “GIMP 3.1.4 Released! Link Layers, Vector Layers & MyPaint Brushes 2”
https://ubuntuhandbook.org/index.php/2025/09/gimp-3-1-4-released-link-layers-vector-layers-mypaint-brushes-2/ - 9to5Linux – Marius Nestor, “New GIMP 3.2 Development Release Brings Link Layers and Vector Layers”
https://9to5linux.com/new-gimp-3-2-development-release-brings-link-layers-and-vector-layers - GIMP UX Issue Tracker (GitLab) – “Link Layers (was: Non-Destructive Editing/Smart Objects …)”
https://gitlab.gnome.org/Teams/GIMP/Design/gimp-ux/-/issues/588
Recommended
- How to Create Your Own Metahuman in Unreal Engine 5: Complete Step-by-Step Guide
- Bossfight Returns After Netflix Closure: Boss Fight Founders Relaunch Studio
- How to Add Texture to a 3D Model in Blender: A Step-by-Step Guide to Creating Stunning Materials
- PixelHair on Stylized Characters in Blender: Achieving Studio-Quality Hair with Ease
- Boris Gertsovsky Got Rid of His Stake in GDEV: What the March 2026 Share Sale Means
- King of Meat Is Shutting Down And Refunding Players: Shutdown Date, Refund Steps, and What Happens Next
- How to Add Realistic Dust, Hair, and Surface Imperfections in Blender to Increase Scene Realism
- Bloodborne Remake Reportedly Shot Down By FromSoftware As Bluepoint Games Scrambled For Ideas (Bloomberg Report, Bluepoint Shutdown, What Happens Next)
- How do I lock a camera to an object in Blender?
- Venom Animated Movie From Final Destination: What Fans Mean, Rumors Explained, and What Could Actually Happen


