


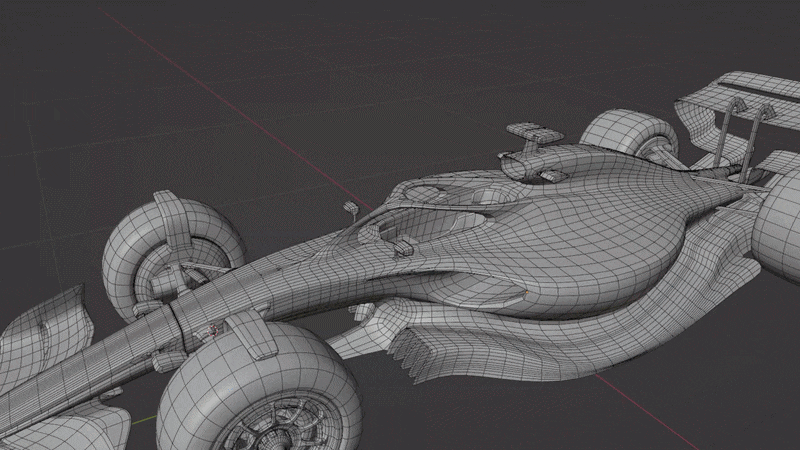
What is topology in Blender and why it matters
In 3D modeling, topology refers to how a mesh’s vertices, edges, and faces are arranged and flow across a model’s surface. Good topology is crucial for several reasons: it makes a model easier to edit later, deforms more naturally during animation, and achieves better shading results. Clean topology (usually with well-placed quads and loops) ensures that applying subdivision, deformations, or UV mapping won’t produce artifacts. On the other hand, messy topology can lead to glitches in lighting or animation, and can bloat the polygon count unnecessarily. In practical terms, optimizing topology means using only as many polygons as needed for the shape and keeping them well-organized, which improves performance (especially in games or real-time engines) and simplifies further editing.

How to check polygon count in Blender (faces, tris, vertices)
Blender offers real-time statistics to track your model’s complexity before optimization:
- Viewport Statistics Overlay: In Blender 2.8+, enable this via Viewport Overlays → Statistics. It displays vertices, edges, faces, and triangles in the top-left of the 3D View. It shows scene totals by default or selection-specific counts when an object is active.
- Status Bar Scene Statistics: Enable this via Edit → Preferences → Interface → Status Bar: Scene Statistics to display counts at the bottom of the window.
Monitoring these is vital for performance; while Blender often uses quads (faces), game engines prioritize triangle (tris) counts.
How to reduce topology in Blender without losing the model shape
To simplify a mesh while preserving its silhouette and volume, use these strategies:
- Angle-based dissolution: Use the Limited Dissolve tool to remove loops on flat or gently curved surfaces based on a specific angle threshold.
- Decimate modifier: Algorithmically collapse edges. It is often best to apply this in incremental stages to prevent the model from losing its form.
- Manual loop removal: Delete or dissolve redundant edge loops (X → Dissolve Edges) in flat areas, using Shade Smooth and Auto Smooth to check for shading distortions.
- Retopology: For dense sculpts or scans, create a new low-poly mesh over the original using snapping. This allows for precise control over detail placement.
Combining these methods helps maintain the model’s look from a distance while significantly lowering the polycount.

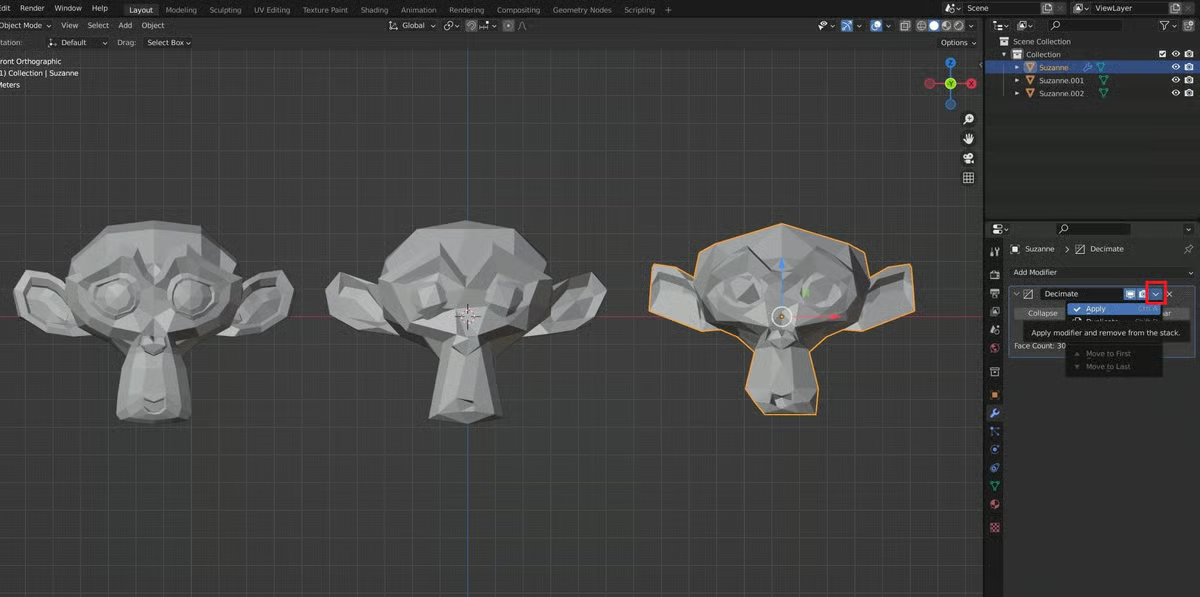
How to use the Decimate modifier in Blender to reduce poly count
The Decimate modifier is the primary tool for automated reduction.
- Access: Add it via the Modifiers tab under Generate → Decimate.
- Ratio: Use the Ratio slider in Collapse mode (1.0 is original detail). Lower the value and preview the changes in Object Mode.
- Symmetry: Enable this to maintain a symmetrical mesh during reduction.
- Delimit: Use Material or Seam options to prevent the modifier from merging across specific boundaries, protecting UV islands and material zones.
- Finalization: Apply the modifier to make the changes permanent, ideally on a duplicate of the high-poly mesh.
Best Decimate modifier settings for game assets (Collapse vs Planar)
Choosing the correct mode depends on the asset type:
- Collapse Mode: Merges edges and vertices into triangles. It is best for organic shapes and high-poly sculpts where the resulting messy topology is acceptable for static props or normal map baking.
- Planar Mode: Reduces detail based on an Angle Limit. It is ideal for hard-surface or architectural models with flat surfaces. It produces quads and n-gons. Use the Delimit UV option to prevent texture stretching.
- Un-Subdivide Mode: Reverses previous subdivision operations (covered below).
For best results, use Collapse on organic parts and Planar on flat surfaces, ensuring you verify the final look with auto-smooth enabled.

When to use Limited Dissolve to reduce geometry in Blender
Limited Dissolve (X → Limited Dissolve) merges coplanar faces meeting below a defined angle.
- Applications: Ideal for cleaning up 3D scans, CAD imports, and boolean results on flat or gently curved surfaces.
- Max Angle: Adjust this in the operator panel (F9) to control aggression; higher angles allow more curvature simplification.
- Delimit Options: Protect materials, seams, or sharp edges from being dissolved.
- Result: It often creates large n-gons. While efficient for reduction, these may require triangulation (Triangulate modifier) to avoid lighting or physics issues in game engines.
How to clean up topology with Merge by Distance in Blender
Merge by Distance (formerly “Remove Doubles”) welds vertices within a specific proximity.
- Usage: In Edit Mode, select the mesh (A) and use M → By Distance.
- Merge Distance: Adjust the threshold in the operator panel. Use small values (e.g., 0.0001) to weld coincident points without distorting the shape.
- Benefits:
- Cleans up duplicate vertices from Booleans or Joined objects.
- Unifies meshes on imports where faces might be unwelded.
- Provides a small polycount reduction and a cleaner, crack-free topology.
How to use Un-Subdivide in Blender to remove extra edge loops
Un-Subdivide reverses the subdivision process on meshes with regular, grid-like topology.
- Edit Mode Un-Subdivide: Found in the Edge menu, it removes every other edge loop to restore original topology levels.
- Decimate Modifier (Un-Subdivide): Use the Iterations setting to remove specific levels of subdivision. For example, two iterations can revert a mesh that was subdivided twice.
- Best Use Cases: It is most effective on mostly quad meshes, such as cloth or terrains, where the subdivision pattern is predictable. It is a targeted way to lower polycount while preserving shape better than generic decimation. It does not work well on highly irregular or manually edited topology.

How to remesh in Blender for cleaner quad topology
Remeshing creates new, uniform topology for a mesh, typically resulting in an all-quad structure. Unlike decimation, which reduces existing geometry, remeshing recreates the surface following the original shape.
- Remesh Modifier (Voxel Mode):
- Add the modifier and select Voxel mode. This treats the model as a solid volume and refills it with a grid.
- Voxel Size: Controls resolution. Smaller values increase detail and polycount; larger values create a coarser, lower-poly mesh.
- Adaptivity: Simplifies flatter regions to reduce face count. A value of 0 maintains a uniform grid, while higher values (e.g., 0.1 or 0.2) simplify flat areas while preserving detail where needed.
- Applications: It is ideal for converting messy sculpts or scans into a clean quad base for further sculpting or animation.
- Limitations: Remeshing can lose fine details smaller than the voxel size and may occasionally increase polycount if the voxel size is set too fine.
- Quadriflow Remesh: A specialized algorithm available in Object Data Properties that attempts to create all-quad meshes with aligned edge flows, though it is more computationally intensive.
Blender Voxel Remesh settings for lowering topology (voxel size and adaptivity)
Two primary settings determine the efficiency of a voxel remesh:
- Voxel Size: Defines the resolution of the 3D grid. High values capture broad shapes with low polycounts, while low values capture fine details but result in high polycounts. You can use the Voxel Size Picker to sample density directly from the model. Be careful with large voxel sizes on thin parts, as they may merge (e.g., fingers).
- Adaptivity: This reduces triangles in planar regions after the initial remesh. A value of 0.1 is a common starting point to cut polycount significantly without visible curvature loss.
- Sculpt Mode Tools: Voxel Remesh can be triggered via Ctrl+R. Options like “Preserve Volume” and “Fix Poles” help maintain the model’s integrity and reduce artifacts.

Remesh vs Decimate in Blender: which one reduces topology better
Decimate and Remesh serve different purposes based on the desired outcome:
- Decimate (Collapse): Superior for preserving visual fidelity and fine details (like pores) at a lower polycount. It produces messy triangle-heavy topology, which is suitable for static props, LODs, or bake targets.
- Remesh (Voxel): Best for creating a clean, uniform quad slate. It is easier to UV unwrap, rig, and weight paint but sacrifices fine detail for topology cleanliness. It is not ideal for extreme poly reduction.
- Comparison: Decimate is more effective for raw reduction and silhouette preservation. Remesh is better for usability in the production pipeline.
- Quadriflow: Often provides a better automatic retopology result for organic models by aligning edge loops with the mesh features.
How to do manual retopology in Blender with Shrinkwrap and snapping
Manual retopology involves tracing a new, optimized mesh over a high-poly reference for maximum control.
- Setup: Use the high-poly model as a reference, often set to X-Ray or wireframe mode.
- Snapping: Enable Face Snapping with “Project onto self/other” and “Project Individual Elements” to ensure new vertices stick to the high-poly surface.
- Shrinkwrap Modifier: Apply this to the new low-poly mesh, targeting the high-poly model. Enable “On Cage” to see vertices snap in real-time during Edit Mode.
- Workflow:
- Begin by creating loops around critical features (eyes, mouth, joints).
- Use the Poly Build tool to interactively lay down quads.
- Work in patches and bridge them together, maintaining even quad spacing.
- Mirror Modifier: Place this above the Shrinkwrap modifier to handle symmetrical models efficiently.
- Cleanup: Use the F2 and LoopTools add-ons, or the Relax brush, to refine the new topology.
How to use the Poly Build tool for retopology in Blender
The Poly Build tool is a specialized interactive mode for drawing topology directly onto a surface.
- Vertex and Edge Operations: Click to create a vertex, or click-drag from a vertex to extrude it. Dragging from an edge midpoint automatically creates a new quad face.
- Face Filling: Drag from one edge toward another to quickly fill the space with a polygon, bypassing the need for the manual Fill (F) command.
- Tweaking: Click and drag existing edges or faces to reposition them while snapping is active.
- Efficiency: It combines extrusion, vertex placement, and face filling into a single tool, making it significantly faster than standard modeling methods for retopology. It is best used alongside snapping and the Shrinkwrap modifier to ensure the new geometry perfectly conforms to the high-poly source.

Automatic retopology options in Blender (Remesh workflows anAutomatic retopology options in Blender (Remesh workflows and alternatives)
Blender provides several automated methods to generate cleaner topology without manual tracing:
- Voxel Remesh: Quickly creates an all-quad mesh in a uniform grid. It is not feature-aware and does not follow edge flow, but it is useful for making dense sculpts manageable.
- Quadriflow Remesh: An algorithm that attempts to align quads with the mesh’s flow and features (like limbs or holes). You can set a target face count. It is more sophisticated than voxel remeshing but can be slow or fail on complex/open geometry.
- Decimate + Limited Dissolve Workflow: A semi-automatic method where you reduce polycount with Decimate and then use Limited Dissolve to clean up planar areas. This reduces the count but leaves messy topology.
- External Tools: Options like Instant Meshes (free) or Quad Remesher (paid) are often used for high-quality, one-click quad layouts suitable for animation.
- Blender Add-ons: Tools like DynRemesh or techniques involving Shrinkwrap and Subdivision can project grids onto existing meshes for a semi-automated result.
How to reduce topology for sculpted models in Blender (high poly to low poly)
Optimizing a high-poly sculpt involves creating a low-poly version that captures essential forms:
- Duplicate and Decimate: A fast way to lower count for background props or bake targets. It is best to decimate in gradual steps (e.g., 50% at a time) to preserve shape, though it destroys symmetry and topology.
- Retopologize: Using manual or automatic (Quadriflow) retopology is recommended for models intended for animation or high-quality UV unwrapping.
- Voxel Remesh Simplification: Large voxel sizes can turn dense Dyntopo sculpts into chunky, low-poly versions that serve as good bases for further work.
- Preserve Features: Isolate thin or fine parts (like fingers or horns) and treat them separately to ensure they don’t “melt” during the reduction process.
- Multi-resolution Workflow: If a sculpt uses the Multires modifier, you can simply step down to lower subdivision levels to export a clean, low-poly base mesh.
How to preserve shading when reducing topology in Blender (normals and smooth shading)
Reducing geometry can cause faceting or shading errors. These can be mitigated using normal management:
- Smooth Shading: Right-click and select Shade Smooth to interpolate lighting across faces.
- Auto Smooth: Located in Object Data Properties, this maintains sharp edges for faces meeting at angles sharper than a set threshold.
- Recalculate Normals: Use Shift+N in Edit Mode to ensure all faces point outward, fixing black artifacts or dark patches.
- Weighted Normal Modifier: Improves shading on low-poly hard-surface models by prioritizing the orientation of larger faces.
- Normal Maps: The most effective way to preserve high-poly appearance on a low-poly mesh is by baking surface details into a texture.
How to bake high-poly details to a low-poly mesh in Blender (normal maps workflow)
Baking transfers high-frequency details to a low-poly mesh texture:
- Preparation: UV unwrap the low-poly mesh and align it exactly in the same location as the high-poly.
- Texture Setup: Create a new Image Texture in the low-poly’s material and ensure the node is selected.
- Bake Settings: In Render Properties (using Cycles), set the bake type to Normal and enable “Selected to Active.”
- Ray Distance: Adjust this value so the baking rays capture the high-poly surface without missing areas (black spots) or hitting the wrong side of the mesh.
- Application: Save the resulting purple-blue map and plug it into a Normal Map node (set to Non-Color data) in the low-poly shader.
- Fixes: If artifacts appear, consider baking separate parts of the mesh independently to avoid projection interference.
How to reduce hair topology in Blender (PixelHair, particle hair, and hair cards)
Hair optimization involves abstracting thousands of strands into efficient geometry:
- Hair Cards: This standard game-art technique replaces strands with flat polygon strips (cards) using alpha textures. This can reduce millions of vertices to a few thousand.
- PixelHair: A library of premade, optimized hairstyles for Blender and Unreal (MetaHuman). These assets utilize particle systems with optimized parent and children strand counts to balance realism and memory usage.
- Geometry Nodes Hair: A modern system that allows for more flexible hair management and potential dynamic LOD optimizations.
- Reducing Particle Hair: You can lower topology by reducing parent particles, decreasing steps along the strands, or using “Simplify” settings to reduce the amount of children rendered in the viewport.
- Conversion: Particle hair can be converted to curves and then into hair cards using specialized add-ons to drastically cut vertex counts for real-time applications.

Common Decimate and Remesh problems in Blender (what to do when topology “turns to mush”)
Using Decimate or Remesh can sometimes lead to “mushy” topology where shapes lose clarity or shading breaks. Below are common issues and their solutions:
- Over-decimation causing loss of shape: Pushing ratios too low causes features to distort or disappear. To fix this, decimate in stages by applying the modifier at moderate levels multiple times. You can also use vertex groups with a weight of 1.0 to protect critical areas like a face’s nose or ears from being reduced.
- Skinny triangles or artifacts: Decimation can create long, thin triangles or zig-zag edges. Manually dissolve stray vertices or edges in problematic areas. You can also run a Merge by Distance operation with a very small threshold to clean up nearly overlapping vertices.
- Shading issues after Decimate: Reductions often break normals, causing black patches. Use Recalculate Normals (Shift+N) in Edit Mode and clear any custom split normals. Check for and delete duplicate geometry or overlapping faces created during the process.
- Remesh merging separate parts: Voxel remeshing may fuse thin gaps, such as webbing fingers together. Ensure the gap between parts is at least two voxels wide by using a smaller voxel size. Alternatively, split the model into separate objects, remesh them individually, and join them back later.
- Remesh losing fine detail: Coarse remeshing smooths out high-frequency details. Plan to reintroduce these details using normal maps or a Multires sculpting workflow. You can also use a Shrinkwrap modifier in Project mode to snap the new topology back to the high-resolution original.
- Remesh with adaptivity causing artifacts: High adaptivity values can cause faceted surfaces or holes. Use lower adaptivity values and ensure “Fix Poles” is enabled. Running a Limited Dissolve with a low angle after remeshing can also clean up flat regions.
- High-poly to low-poly pipeline issues: If the low-poly mesh deviates too much from the high-poly, baking rays may miss the surface. Use a second Shrinkwrap pass or manually adjust vertices to ensure the low-poly closely follows the high-poly silhouette.
- Decimate Un-Subdivide not working: This mode only works on meshes with clean, regular subdivision history. If it fails on messy sculpts, use Collapse mode instead.
- Blender freeze or crash: Heavy meshes can overwhelm memory. Pre-simplify the mesh using Voxel Remesh at a higher resolution, or slice the model into chunks (e.g., head, torso, arms) and decimate each part separately before merging them back together.
Frequently Asked Question (FAQs)
- How can I reduce polygon count in Blender without losing much detail?
Use the Decimate modifier for general reduction and Limited Dissolve for planar surfaces. You can protect specific features by using vertex groups within the Decimate modifier. To maintain the visual appearance of high detail on a simpler mesh, bake a normal map from the original model to the reduced version. - What’s the difference between using Decimate vs. Remesh for lowering polycount?
Decimate collapses edges on the existing mesh to keep the original shape and detail as triangles, but it leaves messy topology. Remesh (voxel) regenerates the entire mesh into a clean, uniform quad layout, which is better for sculpting and rigging but smooths out fine details. - How do I check the polycount of just one object in Blender?
Enable “Statistics” in the Viewport Overlays. When you select an object, the stats will display counts for that selection only. In Edit Mode, the status bar also shows the vertex, face, and triangle counts for the active mesh. - My decimated model looks shading-wrong (weird dark artifacts). How can I fix the shading?
Recalculate Normals (Shift+N) in Edit Mode and ensure the object is set to Shade Smooth. Enable Auto Smooth in the Object Data Properties (usually between 30° and 60°). If the shading still looks odd, try adding a Weighted Normal modifier to improve how lighting interacts with low-poly surfaces. - What polycount is considered “low-poly” for games?
This is relative to the target platform and the asset’s importance. A modern PC lead character might be 20k-100k triangles, while a mobile character might be under 10k. Optimization is more important than a specific number; use more polygons for items close to the camera and rely on normal maps for surface detail. - How can I reduce the vertex count of a dense mesh from a 3D scan?
Start with Limited Dissolve to merge thousands of tiny triangles on flat areas. Follow this with a Decimate (Collapse) modifier. For extremely heavy scans, you may need to Voxel Remesh to get a clean slate, though you will need to bake the original details back onto the new mesh. - Is there an automatic retopology tool in Blender?
Blender includes Voxel Remesh and Quadriflow Remesh. Quadriflow is a dedicated auto-retopo tool that attempts to follow the model’s curvature with a specific target face count. Third-party options like Quad Remesher and Instant Meshes are also popular for high-quality automated results. - How do I convert Blender’s particle hair to a low-poly form?
You can convert particles to a mesh, but this results in very high polycounts. For low-poly hair, it is better to use “hair cards”—textured polygon strips that mimic clumps of hair. You can also reduce the number of parent particles and segments before conversion or use add-ons designed to generate cards from particle guides. - What is PixelHair and how can it help with hair topology?
PixelHair is a collection of optimized, premade 3D hairstyles for Blender. It uses an efficient particle system attached to a hair cap, which can be shrinkwrapped to any character. It provides a professional look without requiring the user to model thousands of strands manually and is compatible with Unreal Engine’s MetaHuman system. - My model’s fingers merged together when using Voxel Remesh. How do I avoid that?
This occurs when the voxel size is larger than the gap between the fingers. Decrease the voxel size until the parts remain separate. If this creates too many polygons, separate the fingers into different objects before remeshing, then join them back together afterward.
Conclusion
Reducing topology in Blender requires a balance between efficiency and visual fidelity. By assessing the specific needs of a model, you can choose between the speed of the Decimate modifier, the clean quad structure of Remesh, or the precision of manual retopology using snapping and the Shrinkwrap modifier. Shading must be maintained through smooth shading, Auto Smooth, and recalculated normals to ensure the low-poly result looks professional.
Normal maps are essential for preserving the appearance of high-poly details on optimized geometry. For complex tasks like hair, switching to hair cards or using systems like PixelHair can save significant time and resources. By understanding the limitations of each tool and troubleshooting issues like “mushy” topology or merging parts, you can effectively prepare high-quality assets for games, animation, or 3D printing. Always work incrementally and keep backups of your high-poly models to ensure the best results during the optimization process.
Sources and Citations
- Blender Manual – Mesh Reduction Tools: Official documentation on Blender’s mesh editing and modifiers provides detailed reference for tools like Decimate and Remesh. (e.g., Decimate Modifier: “reduce the vertex/face count of a mesh with minimal shape changes”, Limited Dissolve: “reduces detail on planar faces with an angle threshold”). https://docs.blender.org/manual/en/latest/modeling/modifiers/generate/decimate.html | https://docs.blender.org/manual/en/latest/modeling/modifiers/generate/remesh.html | https://docs.blender.org/manual/en/latest/modeling/meshes/editing/mesh/delete.html
- Blender Stack Exchange – Community Q&A: Numerous solutions and explanations from experienced users. For example, discussions on preserving smoothness when lowering polycount, using Limited Dissolve for optimization, fixing decimate artifacts by dissolving stray vertices, and baking high-to-low normal maps all informed best practices in this guide. https://blender.stackexchange.com/questions/89204/how-to-lower-the-polygon-number-but-keep-smoothness | https://blender.stackexchange.com/questions/15581/remove-extra-geometry-from-objects | https://blender.stackexchange.com/questions/126395/strange-artefacts-when-using-decimate-modifier | https://blender.stackexchange.com/questions/5542/how-do-i-decimate-part-of-a-mesh | https://blender.stackexchange.com/questions/313600/baking-to-give-low-poly-model-a-high-poly-model-detail
- RebusFarm Blog – Retopology in Blender: A comprehensive article on manual and automatic retopology techniques. It highlights the use of shrinkwrap, snapping, and the Poly Build tool for efficient retopo, as well as touches on tools like Quad Remesher and RetopoFlow for speeding up the process. https://rebusfarm.net/blog/how-to-retopology-in-blender-from-manual-techniques-to-automatic-retopology
- CGCookie – “Clean Topology” Guide: Provided insight into why topology matters, emphasizing that good models deform and shade better. This reinforced the importance of reducing topology wisely rather than arbitrarily. https://cgcookie.com/posts/guide-to-clean-topology
- Blender Artists and Reddit Communities: User experiences such as dealing with a heavy sculpt decimation and hair particle optimizations were referenced to address real-world “what can go wrong” scenarios and their solutions. https://blenderartists.org/t/so-turns-out-my-sculpture-has-4-939-482-faces-how-do-i-reduce-the-number-of-faces/1577681 | https://www.reddit.com/r/blender/comments/ec23q7/hair_particle_system_and_render_optimization/ | https://www.reddit.com/r/blender/comments/17g6e01/how_can_i_optimize_hair_rendering_more_info_in/
- FlippedNormals – PixelHair Product Description: Gave specifics on PixelHair’s approach (hair cap, particle hair, Unreal Engine compatibility). This helped describe how PixelHair can be used as an alternative method for hair topology management. https://flippednormals.com/product/pixelhair-3d-hair-for-blender-and-unreal-engine-bantu-knots-38923
- Yelzkizi (PixelHair creator) via Social Snippets: Indicated future plans like integrating geometry nodes hair into PixelHair for improved workflow and showcased the expanding https://yelzkizi.org/blender-smooth-hair-curves-geometry-node/ | https://www.instagram.com/yelzkizi/?hl=en | https://www.instagram.com/p/DOzFsXCgmLO/
Recommended
- Devil May Cry Vergil: Complete Guide to Dante’s Iconic Rival, Powers, and Storyline
- How to Create a Metahuman of Yourself: Turn Your Likeness Into a Digital Character in Unreal Engine 5
- Intergalactic: The Heretic Prophet Controversy – Exploring the Backlash and Public Discourse
- How do I make the camera orbit around an object in Blender?
- The Outer Worlds Mods – Best Mods, Installation Guide, and Community Insights
- Secrets to Blender Photorealism: How to Make Your Renders Look Real
- Brainrot Metahuman Animation for YouTube and Social Media: How to Create Viral Character Content in Unreal Engine 5
- How do I align the camera to a specific axis in Blender?
- Love, Death and Robots New Season: Release Date, Episode List, Studios, and Everything We Know So Far


