


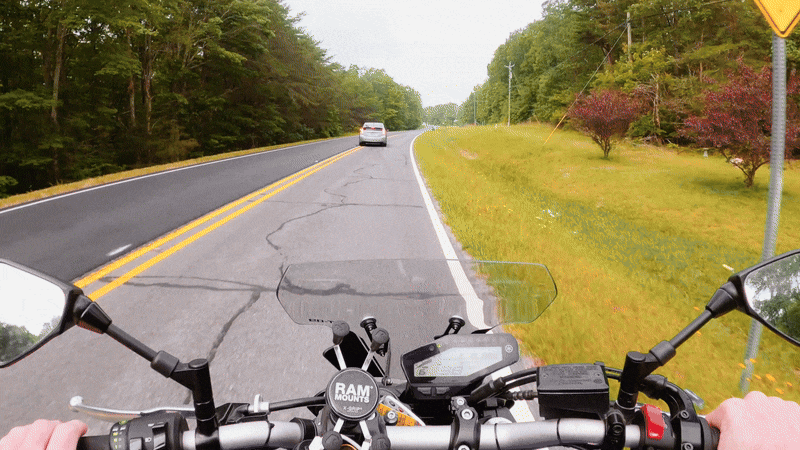
A point-of-view (POV) shot is one of the most immersive ways to tell a story. It places the viewer directly into the character’s shoes, making them experience the scene as if through the character’s eyes. In Blender, creating a POV shot involves a combination of careful camera placement, precise alignment, and subtle animation to replicate natural head movements. In this comprehensive guide, we will explore everything you need to know about creating a POV shot in Blender. From the basics to advanced techniques. We’ll also discuss how to use tools like The View Keeper to save and recall your camera setups, streamlining your workflow and allowing you to experiment with multiple configurations.
Introduction
Point-of-view (POV) shots are widely used in films, video games, VR experiences, and interactive media to immerse viewers in the narrative. Whether it’s an intense chase, a quiet moment of introspection, or a dynamic action sequence, a POV shot creates a strong emotional connection by showing the world exactly as the character sees it. In Blender, you can achieve this by carefully positioning and animating the camera, ensuring that the viewer’s perspective is both realistic and engaging.
This article provides a step-by-step guide on creating a POV shot in Blender. We’ll cover various techniques and tools that let you position your camera at the character’s eye level, parent it to the character’s head for natural movement, or use constraints to ensure that the camera always follows the desired path. Additionally, we’ll dive into how you can use The View Keeper to store multiple camera setups, making it easier to experiment with different POV configurations without reconfiguring your scene each time.
Understanding POV Shots
What Is a POV Shot?
A POV (point-of-view) shot is a camera angle that shows the scene from the perspective of a character. Rather than capturing the action from an external viewpoint, a POV shot allows the audience to see the world as if they were the character. This approach is used to create immersion and make the viewer feel like they are experiencing the events firsthand.
Key Characteristics of a POV Shot
- Immersive Perspective: The camera is positioned at the eye level of the character, capturing the environment as the character would see it.
- Subjective View: It often lacks a visible character model, focusing instead on the world around the character.
- Dynamic Movement: The camera moves naturally with the character, including subtle head movements like bobbing or slight rotations that mimic real-life motion.
- Focus on Interaction: POV shots are excellent for showing details that might otherwise be missed in a wider, external shot.
Why Use a POV Shot?
Using a POV shot can enhance your animation in several ways:
- Immersion: By placing the viewer inside the character’s perspective, you create a highly immersive experience. This is especially effective in VR projects or first-person games.
- Emotional Connection: POV shots allow the audience to experience the scene directly, which can intensify emotional engagement and empathy.
- Dramatic Effect: In action sequences or moments of tension, a POV shot can heighten the impact, making the scene feel more immediate and visceral.
- Visual Variety: Switching between external and POV shots can add visual variety to your animation, keeping the audience engaged and enhancing the narrative flow.
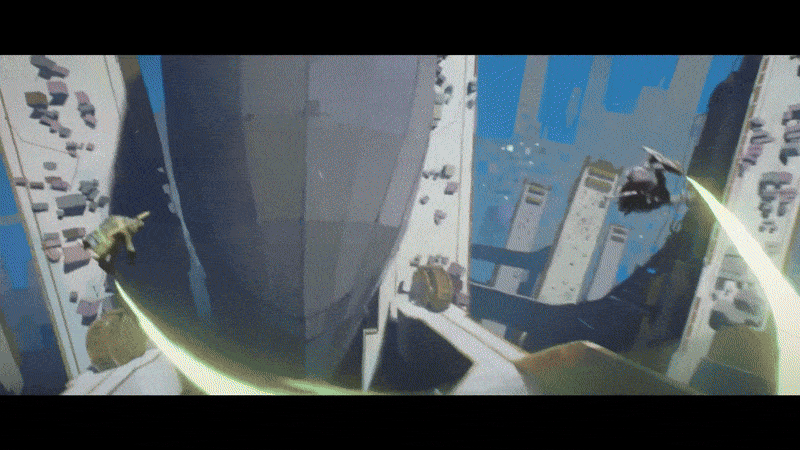
Real-world examples of POV shots include the immersive sequences in video games like Call of Duty or films like Hardcore Henry, where the viewer feels as though they are part of the action.
Setting Up Your Scene for a POV Shot
Before you can create a POV shot, you need to prepare your scene properly.
Step 1: Open Your Blender Project
- Launch Blender and load your project.
- Ensure your scene contains your character and any relevant environment elements.
Step 2: Add or Select Your Camera
- If your project doesn’t have a camera, press Shift + A and choose Camera.
Step 3: Organize Your Scene
- Name your camera (e.g., “POV_Camera”) so that it’s easily identifiable.
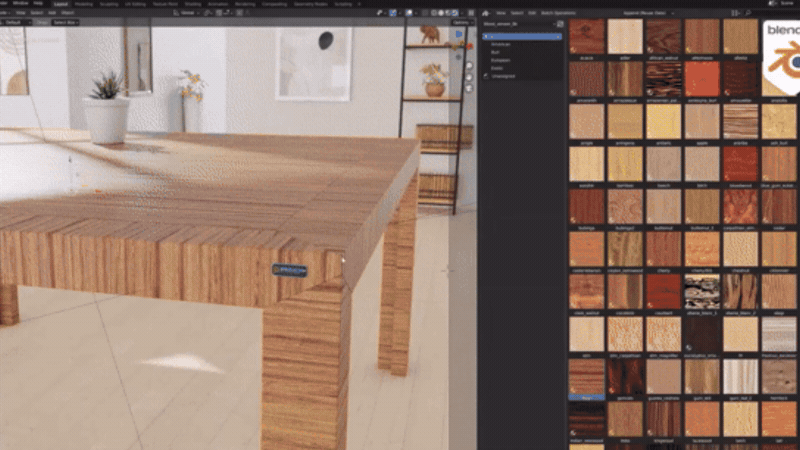
- Organize your cameras using collections in the Outliner or The View Keeper. This helps maintain a clean workspace, especially when working with complex scenes.
Techniques for Creating a POV Shot in Blender
There are several methods to create a convincing POV shot in Blender. Each method has its advantages depending on your project’s needs and complexity.
Positioning the Camera at Eye Level
The simplest method is to manually position the camera at the character’s eye level.
- Identify the Eye Position:
Locate the area where the character’s eyes are. - Enter Edit Mode on the Character:
Select your character and press Tab to enter Edit Mode. - Select a Verte/Edge/Face in the Eye position:
with your character in the edit mode, select a vertex/edge/face in the eye region of your camera. This is where the camera would be placed. If your character has two eyes, you can select an edge at the middle of both eyes. - Snap Cursor:
Go to Mesh at the top left of the edit mode screen. In the drop down menu, go to snap and click snap cusor to selected. - Place the Camera:
Switch back to Object Mode, select the camera. Right-click, in the pop up menu, go to snap and click selection to cusor. This would place your camera at the eye level of your character. - Adjust the Orientation:
Rotate the camera (using R) so that it faces forward, mimicking the natural viewpoint of the character.
Parenting the Camera to the Character’s Head
To ensure the camera follows the character’s movement naturally, parenting the camera to the character’s head (or head bone) is highly effective.
- Select the Camera:
In Object mode, Select the Camera - Select the Character’s Head or Head bone:
if your character is rigged, select the camera and the rig. Go to Pose mode and select the head bone. Otherwise, hold shift and select the head mesh. - Parent the Camera:
With the camera selected first, then the head bone or mesh, press Ctrl + P and choose Object (Keep Transform). This action makes the camera a child of the head, ensuring it moves in sync with the character. - Test the Setup:
Move or rotate the character’s head to confirm that the camera follows accurately. This method simulates natural head movements and provides a consistent POV.
Using Constraints for Dynamic POV Shots
If you want more control over how the camera tracks the character’s movements, consider using constraints.
- Apply a Track To Constraint:
Select your camera and navigate to the Constraints tab in the Properties Editor. Click Add Object Constraint and choose Track To. - Set the Target:
Add and empty and assign the empty as the constraint target. - Configure Axes:
Set the To axis to -Z and the Up axis to Y to ensure the camera faces the target correctly. - Test and Refine:
Animate the empty and observe how the camera adjusts. Fine-tune the constraint settings to achieve a natural POV.
Copying Orientation with the Copy Attributes Add-on
For precision, you can use Blender’s Copy Attributes Add-on to duplicate the orientation of a selected face or bone onto the camera.
- Enable the Add-on:
Go to Edit > Preferences > Add-ons and search for “Copy Attributes.” Enable it. - Select the Source Orientation:
In Edit Mode, select the face or vertex group corresponding to the character’s eye area. - Copy the Orientation to the Camera:
Exit Edit Mode, select the camera, and use the Copy Attributes function (accessible via the Object menu or right-click context menu) to copy the orientation from the source. - Fine-Tune if Necessary:
Adjust the camera’s position or rotation to perfect the alignment.

Animating Natural Head Movements
A static POV shot can sometimes feel robotic. To create a more natural and immersive experience, add subtle animations that simulate natural head movements.
Adding Subtle Camera Motion
- Keyframe the Camera’s Position and Rotation:
With the camera parented to the character’s head, add keyframes to simulate slight head bobbing or breathing. - Use the Graph Editor:
In the Graph Editor, add a noise modifier to these keyframes to introduce gentle, randomized movement. Adjust the strength and scale until the effect feels natural. - Test the Motion:
Play back your animation to see if the subtle movements enhance the POV without distracting from the main action.

Simulating Realistic Motion
- Subtle Oscillation:
Even slight movements can make a POV shot feel more organic. Experiment with small oscillations in the camera’s location and rotation. - Dynamic Response:
If your character is moving or interacting with the environment, synchronize the camera’s motion to those actions. This can be achieved through carefully timed keyframes or by linking the camera’s movement to the character’s rig.
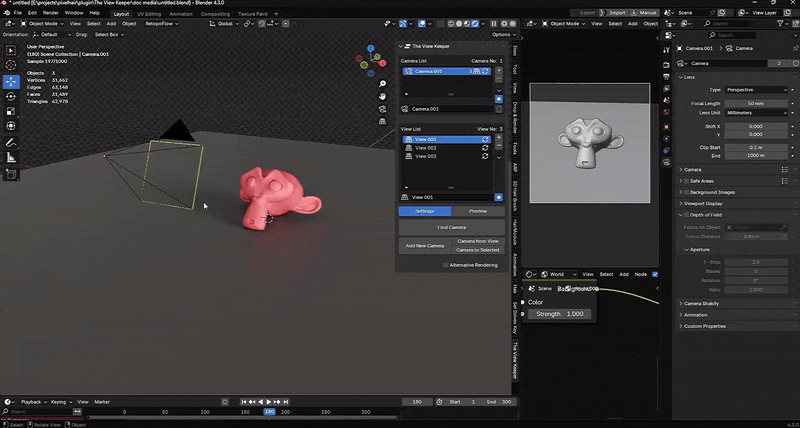
Enhancing Your Workflow with The View Keeper
In cases where you need to manage multiple camera setups and utilize different POV configurations, The View Keeper is an excellent tool. It allows you to store and quickly switch between various camera settings. These include switching between POV of multiple cameras which can be used to tell a story from different character’s POV. It also includes switching between POV and third person views without reconfiguring your scene from scratch.
Benefits of Using The View Keeper for POV Shots
- Store Multiple Camera Records:
Save several POV configurations as separate records. For example, one record might capture a standard close-up POV of one character during a dialogue scenes, while another stores the POV of another character at wider angle of that scene. - Instant Recall:
Quickly switch between saved setups to compare different angles or to test variations without manually adjusting settings. - Consistent Output:
Each camera record can retain its unique render settings for example resolution, file format, output folder and so much more. Thereby ensuring that every POV shot is optimized for its intended platform or use case. - Streamlined Workflow:
By saving your camera setups, you reduce the risk of losing a carefully tuned POV alignment. The View Keeper can be a part of your creative toolkit, enabling you to experiment and iterate quickly.
Integrating The View Keeper into your POV workflow not only saves time but also expands your creative possibilities, allowing you to refine your shots until they perfectly capture the intended perspective.
Real-World Inspirations and Applications
Video Games
Many first-person games use POV shots to immerse players in the game world. For instance, titles like Call of Duty, Cyberpunk and Half-Life rely on the camera being perfectly aligned with the player’s viewpoint to create an authentic experience. In Blender, replicating this effect can help you design cutscenes and interactive experiences that feel personal and engaging.
Film and Television
In film, POV shots are often used to give viewers an inside look at a character’s perspective. For example, in horror films, a POV shot might intensify the tension by showing the protagonist’s view as they encounter danger. By aligning the camera to a character’s eyes and adding subtle movements, you can create a powerful, immersive narrative that draws the audience directly into the scene.
Architectural Visualization
Architectural walkthroughs benefit greatly from POV shots. When a virtual tour mimics the experience of walking through a space, it provides a more immersive and intuitive understanding of the design. Positioning the camera at the level of a visitor’s eyes and animating it to follow the flow of the space can create a compelling virtual tour.
Product Animations
For product visualizations, a POV shot can showcase the product from a user’s perspective. This is particularly effective in commercials or online demos where you want to highlight how a product is used. By capturing the product from a first-person view, you can emphasize its features and usability in a dynamic way.
Virtual Reality Experiences
VR projects demand authentic POV shots to maximize immersion. When the camera is positioned as if it were the viewer’s eyes, every movement becomes more engaging. By fine-tuning your VR camera with realistic head motion and alignment, you create an environment where users feel truly present.
Troubleshooting Common Issues
Even with careful planning, you might run into challenges when creating a POV shot. Here are some common issues and their solutions:
Misalignment of the Camera
- Problem: The camera is not perfectly aligned with the character’s eyes.
- Solution: Use viewport alignment shortcuts such as Shift + Numpad 7 (to align the view to a selected face) and then Ctrl + Alt + Numpad 0 to snap the camera to that view. If needed, adjust manually or use the Copy Attributes Add-on for precision.
Unnatural Motion
- Problem: The POV shot feels too static or too jerky.
- Solution: Add subtle keyframe animations for natural head movements. In the Graph Editor, adjust noise modifiers to achieve smooth, realistic oscillations that mimic breathing or slight head bobbing.
Focus Issues
- Problem: The subject is sometimes out of focus due to camera movement.
- Solution: Adjust the depth of field in the Camera Properties panel to keep your subject in sharp focus, even as the camera moves. Consider keyframing the focus distance if your scene demands dynamic adjustments.
Scene Clutter
- Problem: Managing multiple camera setups including POV shots is exhausting.
- Solution: Use The View Keeper to save and organize different POV configurations. This not only keeps your scene tidy but also allows you to switch between setups effortlessly.
Inconsistent Rendering
- Problem: The final render does not match the intended POV shot due to misconfigured output settings.
- Solution: Double-check that the active camera is set correctly and that all render settings (resolution, clipping distances, etc.) match your intended output. Using The View Keeper to manage these settings can help maintain consistency across different shots.
Advanced Tips and Best Practices
Custom Transform Orientations
For precise alignment, create a custom transform orientation based on the selected face or vertex group in your character’s head. This orientation can then be applied to the camera to ensure it is exactly perpendicular to the object’s surface.
Use Snapping Tools
Leverage Blender’s snapping tools to position the camera accurately. The Shift + S menu lets you snap the camera to the 3D cursor or to selected objects, ensuring precision in placement.
Combine Parenting and Constraints
For dynamic POV shots, consider combining parenting with constraints. For example, parent the camera to the character’s head for general movement, and add a Track To constraint targeting an empty to fine-tune the orientation.
Automate with Python Scripting
If you find yourself repeatedly creating similar POV setups, consider automating the process with Python scripting. Blender’s API allows you to write scripts that can automatically position and align the camera based on predefined parameters.
Leverage The View Keeper
Using The View Keeper is an excellent strategy for managing multiple POV configurations. Save your optimized camera setups as records so you can easily use and compare between them. Whether you need to switch between different focus distances, clipping settings, or slight variations in camera movement, The View Keeper stores these configurations, making your workflow more efficient. This tool is particularly valuable in complex projects where experimentation is key to achieving the perfect POV shot.
Regular Testing and Iteration
Always test your POV shot by switching to Camera View (press Numpad 0) and playing back your animation. Iterative testing helps you identify and correct issues early, ensuring that the final output meets your creative vision.
People Also Ask
- How do I create a POV shot in Blender?
Position the camera at the character’s eye level, parent it to the head (or use constraints), and add subtle head movements to simulate natural motion. - What is the easiest way to create a POV shot?
parenting the camera to the character’s head is a straightforward approach. - Can I use constraints for a POV shot?
Yes, applying a Track To or Locked Track constraint can help ensure the camera remains focused on the character’s perspective. - How do I add natural head movements to a POV shot?
Animate subtle keyframes for the camera’s location and rotation, and use noise modifiers in the Graph Editor to mimic natural head bobbing. - What role does The View Keeper play in POV shots?
The View Keeper allows you to store multiple camera setups, including precise POV alignments and animation settings, so you can quickly switch between configurations and render multiple versions without manually reconfiguring your scene. - How do I ensure my POV shot remains consistent?
Organize your scene, use precise alignment techniques, and save your camera settings with tools like The View Keeper for consistent results. - What are common challenges when creating a POV shot?
Common issues include misalignment, unnatural movement, focus problems, and scene clutter. These can be resolved by fine-tuning keyframes, using snapping tools, and leveraging The View Keeper. - Can I render different POV setups at once?
Yes, by saving multiple camera records with unique settings using The View Keeper, you can render them simultaneously. - How do I handle complex head movements in a POV shot?
Use a combination of parenting, keyframe animation, and noise modifiers to simulate realistic head motion. - Is it possible to automate the creation of POV shots?
Advanced users can use Python scripting and drivers to automate camera placement and alignment, though manual methods are usually sufficient for most projects.
Bringing It All Together
Creating a POV shot in Blender is an essential technique for immersing your audience in your narrative. By positioning the camera at the character’s eye level, you capture the scene from a first-person perspective that feels personal and engaging. Whether you achieve this by parenting the camera to the character’s head, using constraints, or employing manual alignment techniques, the goal is to create a natural, believable viewpoint that draws viewers directly into the experience.
The process begins with careful planning: set up your scene, position your camera accurately, and use viewport alignment shortcuts to ensure a perfect starting point. Fine-tune the camera’s orientation using keyframes and the Graph Editor to add subtle natural head movements. This creates a realistic POV shot that mimics how we naturally see the world.
For those working on complex projects or multiple scenes, The View Keeper is a valuable add-on. It allows you to store various camera setups as records within the same blend file. This means you can save different POV configurations, each with unique settings like focal length, clipping distances, aspect ratio, output format, render file location and so much more. Then switch between them with ease. Whether you need a dramatic close-up POV shot for an emotional moment or a wide shot for an immersive VR experience, The View Keeper streamlines your workflow and expands your creative possibilities.
Real-world examples from first-person video games to immersive VR experiences, cinematic films, and architectural walkthroughs all demonstrate the power of an effective POV shot. By applying the techniques described in this article, you can create POV shots that not only enhance your storytelling but also elevate the overall quality of your 3D animations.
Final Thoughts
Creating a POV shot with the Blender camera is a multifaceted process that blends technical precision with creative vision. It involves positioning the camera at the right spot, using parenting or constraints to follow the character’s natural movement, and fine-tuning the animation to produce a seamless and immersive experience. Advanced tools like The View Keeper further enhance this workflow by allowing you to save and switch between multiple camera configurations effortlessly.
By mastering the techniques outlined in this guide, you can produce POV shots that captivate your audience, whether you’re developing a video game, an animated film, a VR experience, or a detailed architectural walkthrough. The ability to accurately simulate a first-person perspective adds a layer of authenticity and emotional depth to your work, making it an indispensable tool in the arsenal of any 3D artist.
Thank you for reading this comprehensive article on how to create a POV shot with the Blender camera. We hope the detailed instructions, practical tips, and real-world examples inspire you to experiment and perfect your POV techniques in Blender. Enjoy your creative journey, and may your POV shots immerse your audience in every scene you craft!


