


Creating realistic hair in 3D art is a challenging yet rewarding endeavor. One of the most critical elements in this process is achieving the perfect hair roughness, the property that dictates how light interacts with hair strands, influencing whether they appear glossy and vibrant or dull and lifeless. For 3D artists, from beginners just starting out to top-level professionals refining their craft, and for 3D agencies and animation studios managing large-scale projects, mastering hair roughness is essential to producing photorealistic characters.
This article explores the intricacies of hair roughness, offering detailed guidance tailored to artists of varying skill levels and organizations with diverse needs. It also introduces PixelHair, a tool designed to address common challenges, providing an efficient pathway to professional-quality results.
What Is Hair Roughness in 3D Art?
Hair roughness in 3D rendering refers to the microscopic imperfections on the surface of hair strands that affect how light scatters or reflects. This property determines the hair’s visual character, low roughness values produce a smooth, shiny surface with tight highlights, while high roughness values create a matte, diffused appearance. In the real world, hair roughness varies depending on factors such as hair type, condition, and external influences like styling products or environmental wear. For example, straight, well-maintained hair often reflects light evenly, resulting in a sleek look, whereas curly or damaged hair scatters light more broadly, appearing rougher and less polished.
In 3D software, artists replicate these effects by adjusting shader parameters that control light behavior. This process requires a balance of technical knowledge and artistic intuition, as the goal is to mimic natural hair while aligning with the creative vision of a project. Beginners may find the array of settings daunting, mid-level artists might seek ways to refine their techniques, and top-tier professionals often aim for nuanced realism across complex scenes. Agencies and studios, meanwhile, need methods that ensure consistency and efficiency without compromising quality. The following sections break down the tools and techniques needed to achieve this, addressing the unique needs of each audience.

Hair Roughness in Blender: A Foundational Toolset
Blender, a widely used open-source 3D software, provides robust tools for creating realistic hair through its Principled Hair BSDF shader. This shader consolidates essential parameters into a single node, making it accessible yet powerful for manipulating hair roughness. Understanding its components is the first step toward mastering this aspect of 3D art.
Core Shader Parameters
- Roughness: This primary setting governs the spread of light reflection across hair strands. Values between 0.1 and 0.3 typically yield glossy, sleek hair, ideal for straight or polished styles. Values from 0.5 to 0.8 diffuse light more broadly, suiting curly, coarse, or worn textures.
- Radial Roughness: This parameter adjusts roughness along the length of each strand, allowing artists to simulate natural variations, such as smoother roots and rougher tips due to wear. A gradual increase toward the ends can enhance realism subtly but effectively.
- Coat: This adds a secondary specular layer, mimicking the effect of natural oils or hair products. Adjusting this can heighten shine, offering flexibility for styled or healthy-looking hair.
Applying the Shader in Practice
To begin, artists set the hair’s base color either through melanin values for natural tones or direct color inputs for stylized effects. Next, they adjust the roughness to match the desired hair type: low for straight and shiny, higher for textured or matte. Radial roughness introduces variation, preventing an overly uniform appearance. For instance, a character with sleek, anime-inspired hair might use a roughness of 0.2 with minimal radial variation, while a rugged adventurer’s hair could feature a roughness of 0.6 with increased radial roughness to suggest weathering.
- For Beginners: Start with default settings or presets, then adjust roughness in small steps (e.g., 0.05 increments) while previewing changes in Blender’s viewport. This gradual approach builds familiarity with the shader’s effects.
- For Mid-Level Artists: Incorporate texture maps to add micro-details, such as split ends or frizz, by connecting a noise texture to the roughness input. This introduces controlled variation without overwhelming complexity.
- For Top-Level Artists: Layer multiple shaders or build custom node groups to achieve sophisticated effects, such as wet hair with a glossy base and matte overlay, blending realism with artistic intent.
While Blender’s tools provide a strong foundation, applying them effectively across different projects reveals several challenges that artists and studios must navigate.

Common Challenges in Achieving Realistic Hair Roughness
Despite the capabilities of modern 3D software, perfecting hair roughness presents obstacles that vary by skill level and project scale. These difficulties can hinder progress, but understanding them is key to finding solutions.
Balancing Realism and Render Performance
Highly realistic hair often requires detailed light scattering calculations, especially with high roughness values. This increases render times, particularly in scenes with multiple characters or dense hair systems. For example, using Blender’s Cycles renderer, a scene with several high-roughness hairstyles can slow down significantly, straining hardware resources.
- Beginner Perspective: Limited computing power makes this issue more pronounced, restricting experimentation and refinement.
- Studio Perspective: Prolonged render times disrupt production schedules, potentially increasing costs and delaying deliverables.
Maintaining Consistency Across Hairstyles
Different hair types demand distinct roughness settings to look natural, straight hair benefits from low roughness for sharp highlights, while curly hair requires higher values to avoid an artificial sheen. Ensuring consistency across a diverse cast of characters is difficult, as mismatched roughness can break visual cohesion.
- Mid-Level Perspective: Artists may struggle to standardize settings, resulting in uneven quality within a project.
- Agency Perspective: Without a unified approach, characters may not appear to belong to the same world, undermining narrative integrity.
Navigating Technical Complexity
Advanced techniques, such as custom shader nodes or texture-driven roughness, demand a deep understanding of material systems. Beginners may feel overwhelmed by the learning curve, while even experienced artists can spend excessive time fine-tuning settings to achieve the desired look.
- Top-Level Perspective: Time invested in technical adjustments detracts from broader creative tasks, reducing efficiency.
- Studio Perspective: Training staff to achieve uniform results across a team requires significant resources, complicating workflows.
These challenges underscore the need for a streamlined solution that delivers realistic hair roughness without excessive effort. PixelHair emerges as a practical alternative, addressing these pain points with pre-configured assets designed for efficiency and quality.

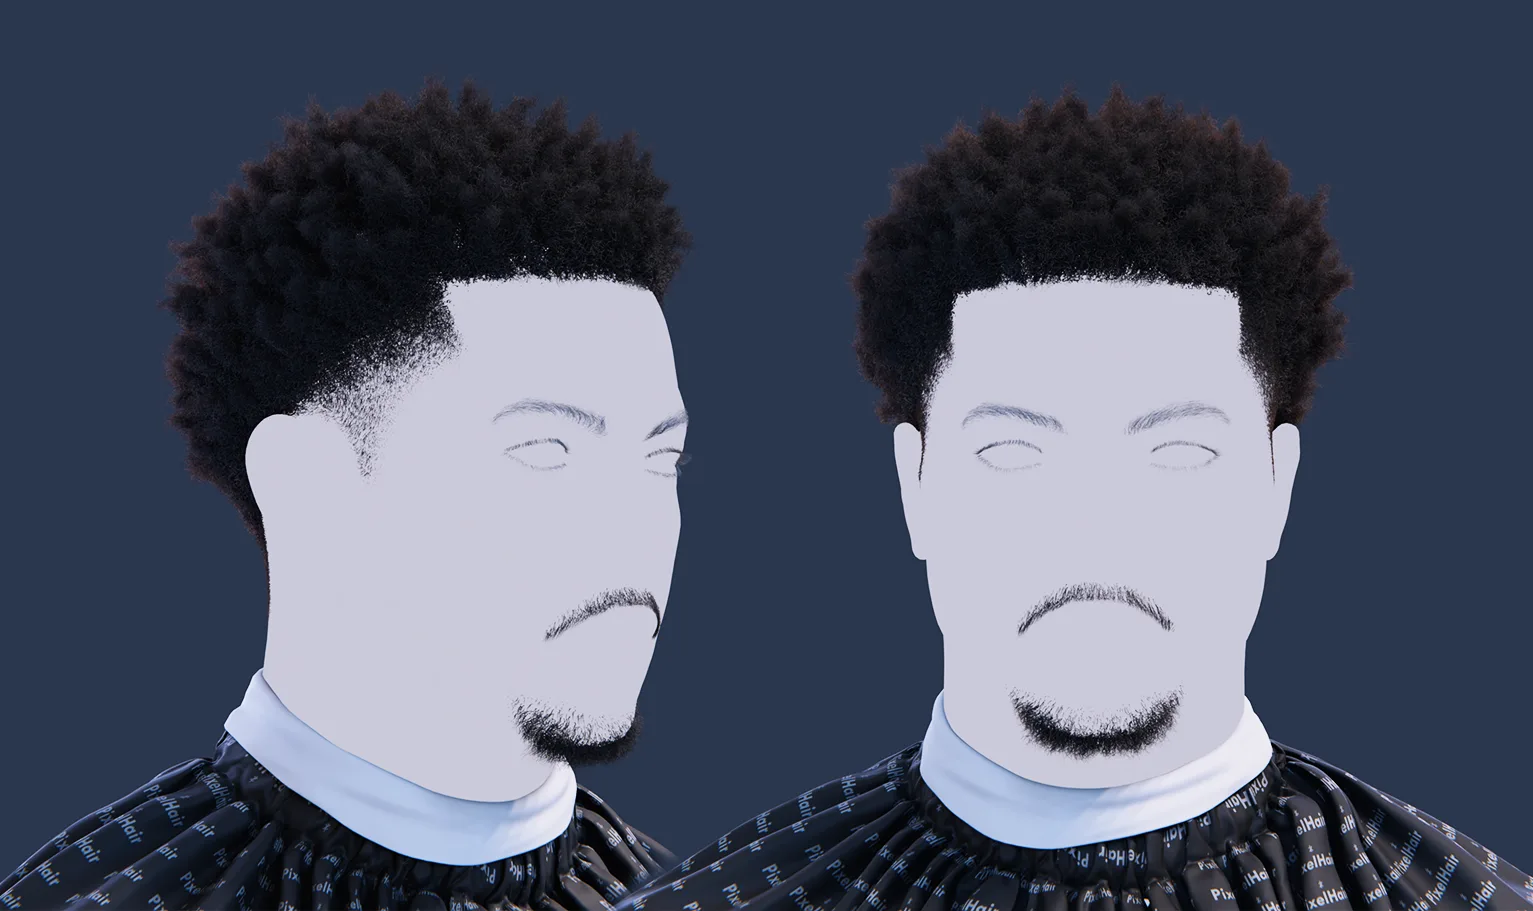
PixelHair: Streamlining the Process
PixelHair is a library of pre-made 3D hairstyle assets for Blender, developed by experienced groom artist Isaac (Yelzkizi). It offers professionally crafted hairstyles with optimized materials, including roughness settings, to simplify hair creation for artists and organizations alike.
Benefits of PixelHair
- Pre-Optimized Shaders: Each asset includes a Principled Hair BSDF setup with roughness values tailored to the hairstyle, removing the trial-and-error process. This ensures realistic light behavior from the outset.
- Performance Efficiency: PixelHair assets allow artists to adjust strand count and children settings, balancing visual quality with render speed. This adaptability is invaluable for studios managing complex scenes.
- Project-Wide Consistency: The library’s standardized hairstyles help agencies maintain a cohesive aesthetic across characters, mitigating the risk of visual discrepancies.
- Flexible Customization: While pre-set, materials remain fully editable, enabling artists to tweak roughness or other properties to suit specific project demands.
Broad Compatibility
PixelHair supports export to Unreal Engine, making it suitable for studios working in real-time applications. Its materials translate effectively across platforms, preserving roughness and appearance in game engines or virtual environments.
By incorporating PixelHair, artists can bypass many technical hurdles, focusing on creative aspects rather than shader intricacies. The next section provides a detailed workflow for leveraging this tool effectively.
Step-by-Step Workflow with PixelHair
This guide outlines how to integrate PixelHair into your Blender projects, ensuring optimal hair roughness with minimal effort. It is designed for beginners while offering insights for advanced users and studios.
Step 1: Obtain the Asset
Visit yelzkizi.org to purchase and download a PixelHair hairstyle. Extract the .blend file and open it in Blender to examine its components, noting the hair mesh name in the Outliner for later use.
Step 2: Append to Your Project
Open your character’s Blender file, then go to File > Append. Locate the PixelHair .blend, navigate to the “Object” folder, select the hair mesh, and click “Append” to import it into your scene.
Step 3: Align the Hair Cap
Select the hair mesh and use Blender’s Move, Rotate, and Scale tools to position it over your character’s head. For a precise fit, switch to Sculpt Mode and apply the Elastic Deform brush to adjust the cap, ensuring it conforms without overlapping deeply into the head mesh.
Step 4: Secure with Shrinkwrap
If not already applied, add a Shrinkwrap Modifier to the hair mesh, targeting the character’s head surface. Set the mode to “Outside Surface” with a slight offset (e.g., 0.0002 meters), then apply the modifier to finalize the fit.
Step 5: Optimize Performance
In the Particle Systems tab, reduce strand steps (e.g., from 10 to 8) and children count (e.g., from 100 to 50) to enhance viewport responsiveness and render speed. Adjust these values based on your hardware and project requirements.
Step 6: Adjust Roughness Settings
Select the hair material in the Material Properties tab. The pre-set Principled Hair BSDF will feature optimized roughness values, but you can refine them:
- For straight hair, lower roughness to 0.1–0.3 for glossy highlights.
- For curly hair, raise it to 0.5–0.7 for a diffused effect.
- Increase radial roughness slightly toward the tips for natural variation.
Step 7: Explore Advanced Customization
- Texture Integration: Connect a noise texture to the roughness input to introduce subtle imperfections, enhancing realism with organic variation.
- Shader Layering: Combine multiple Principled Hair BSDF nodes for effects like a glossy base with frizzy overlay, using a mix shader to blend them.
- Lighting Adjustments: Position scene lights to emphasize highlights, experimenting with angles to optimize reflection based on roughness settings.
Step 8: Export for Real-Time Use (Optional)
For Unreal Engine projects, export the hair as an Alembic file (File > Export > Alembic), ensuring “Show Emitter” is unchecked. Import it into Unreal, attach it to your character via a Groom Component, and adjust material settings to align with Blender’s roughness values.
This workflow leverages PixelHair’s pre-configured strengths, offering beginners a clear starting point and providing mid-level to advanced users with room for refinement. Studios can scale this process across teams for consistent, efficient results.
Advanced Techniques for Enhanced Realism
For mid-level and top-tier artists, as well as studios seeking cutting-edge quality, PixelHair serves as a foundation for further enhancement. These methods push hair roughness to new levels of sophistication.
Procedural Roughness Variation
Use procedural textures, such as noise or voronoi, to drive roughness dynamically. Connect the texture to the roughness input of the Principled Hair BSDF, adjusting scale and intensity to create subtle, natural variations. This approach adds depth without requiring hand-painted maps, making it scalable for large projects.
Custom Shader Development
Build custom node groups to replicate advanced light behaviors, such as anisotropic highlights or dual-lobe reflections. For instance, blend two Principled Hair BSDF nodes one with low roughness for primary highlights, another with higher roughness for secondary sheen, using a fresnel node to control view-dependent effects. This method offers precise control for high-end productions.

Simulating Hair Treatments
To represent products like gels or oils, increase the coat parameter in the Principled Hair BSDF or add a clearcoat layer in a custom shader. This boosts specular reflection, ideal for styled or wet hair, adding a layer of realism to character designs.
Optimizing for Real-Time Environments
For studios targeting games or VR, simplify shaders in Unreal Engine while preserving roughness effects. Leverage PixelHair’s export compatibility to ensure consistent appearance in real-time engines, balancing quality with performance.
These techniques transform PixelHair into a versatile tool, meeting the demands of both artistic exploration and professional workflows.
Tailoring the Approach to Different Audiences
- Beginners: Follow steps 1–6 for a straightforward path to realistic hair roughness, gaining confidence with minimal technical overhead.
- Mid-Level Artists: Emphasize optimization and basic customization (steps 5–6) to refine skills and improve efficiency in personal projects.
- Top-Level Artists: Dive into advanced techniques and cross-platform workflows to push creative boundaries and achieve photorealistic results.
- Agencies and Studios: Adopt PixelHair as a standardized asset across projects, ensuring consistency and scalability to meet tight deadlines and client expectations.
Addressing Broader Considerations
Beyond technical execution, achieving perfect hair roughness involves practical considerations that impact workflow and outcome. Lighting plays a significant role, directional lights can accentuate glossy highlights on low-roughness hair, while soft, ambient lighting complements higher roughness values. Artists should experiment with light placement to enhance the shader’s effects. Additionally, collaboration within studios benefits from clear documentation of roughness settings, ensuring team members can replicate results. For beginners, seeking feedback from peers or online communities can accelerate learning, while agencies might invest in training to maximize PixelHair’s potential across staff.
FAQ
- What is hair roughness in 3D art?
Hair roughness refers to the microscopic imperfections on hair strands that control how light scatters or reflects. Low roughness gives a smooth, glossy look, while high roughness results in a matte, diffused appearance. - Why is achieving realistic hair roughness challenging?
It’s challenging because hair involves managing thousands of fine strands, balancing shader settings (like roughness, radial roughness, and coat), and simulating natural variation, all of which demand both technical precision and artistic intuition. - How does Blender help artists achieve realistic hair roughness?
Blender’s Principled Hair BSDF shader consolidates essential parameters, such as roughness, radial roughness, and coat into a single node, making it easier to tweak light behavior on hair surfaces. - What are some common settings to adjust for hair roughness?
Key settings include roughness (controls overall gloss), radial roughness (adds variation along the strand), and the coat value (simulates natural oils or styling products for extra shine). - How can beginners start working with hair roughness in Blender?
Beginners should start with default settings or presets, then adjust roughness in small increments while previewing changes. This gradual approach builds familiarity without overwhelming technical details. - What techniques can mid-level artists use to enhance hair realism?
Mid-level artists can incorporate texture maps, like noise textures to drive roughness variation, add micro-details such as split ends or frizz, and fine-tune radial roughness for more natural variation. - How do top-level artists push hair roughness further?
Advanced users often layer multiple shaders or build custom node groups (e.g., combining a glossy base with a matte overlay), and may simulate effects like wet hair or natural oil sheen for a more photorealistic result. - What role does lighting play in hair roughness?
Lighting is crucial, it influences how highlights and shadows appear on hair. Directional lights can emphasize glossy highlights on low-roughness hair, while soft ambient lighting complements higher roughness values. - How does PixelHair help with hair roughness challenges?
PixelHair offers pre-groomed, high-quality hair assets with optimized roughness settings. This saves time and effort by providing a solid starting point that can be further customized to match your creative vision. - What are the benefits of using PixelHair in your workflow?
PixelHair improves efficiency by bypassing the manual grooming process, delivers professional-quality hair from day one, ensures consistency across projects, and is fully customizable, making it ideal for beginners, mid-level artists, and studios alike.

Conclusion and Next Steps
Achieving the perfect hair roughness is a nuanced yet vital component of realistic 3D character creation. Traditional methods, while effective, demand significant time and expertise, posing challenges for artists and studios alike. PixelHair assets offers a compelling solution, delivering pre-configured, high-quality hairassets that streamline the process while preserving artistic flexibility. By following the workflow outlined here, artists at all levels can integrate professional-grade hair into their projects, focusing on storytelling and design rather than technical obstacles. Whether you are a beginner building foundational skills, a mid-level artist refining your craft, a top-tier professional pushing realism, or a studio seeking efficiency, PixelHair provides a pathway to success. Visit yelzkizi.org to explore this tool and elevate your approach to 3D hair creation.


