


MetaHuman Animator is a cutting-edge tool for realistic facial animation in Unreal Engine 5. It lets you capture an actor’s facial performance and apply it to a digital character (MetaHuman) with astonishing fidelity. If you’ve ever wondered how to do animation that captures every smirk, blink, and subtle expression, this guide will show you how. We’ll walk through setting up MetaHuman Animator, capturing facial motion, processing it into animation, and exporting the results. Whether you’re a beginner curious about facial motion capture or a professional seeking advanced technical details, this step-by-step guide will help you bring faces to life – in minutes, using just an iPhone and a PC.
What is MetaHuman Animator?
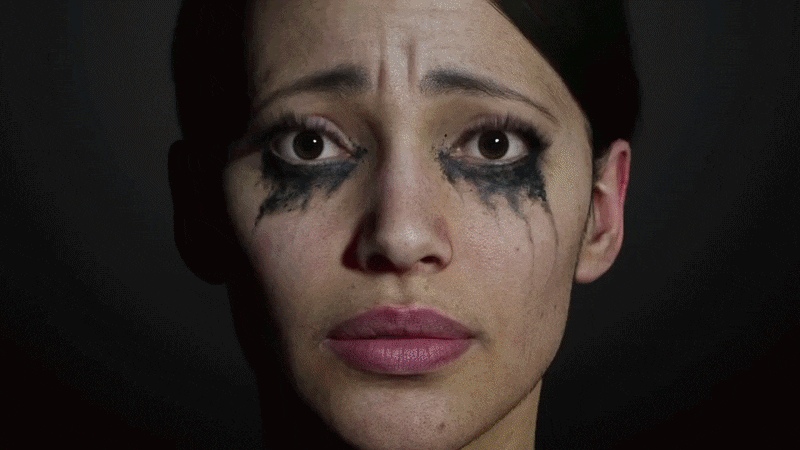
MetaHuman Animator (MHA) is a feature within Unreal Engine that converts real-world facial performances into high-fidelity animations for MetaHuman characters. It uses a facial motion capture system where an actor’s face is recorded via an Apple iPhone TrueDepth camera or a stereo head-mounted camera, and MHA’s 4D solver transforms the footage into an animated MetaHuman facial rig.
Every facial nuance, including micro-expressions and lip sync, is captured accurately without manual keyframing, significantly reducing animation time. The resulting animation applies to a chosen MetaHuman character with smooth rig controls for further tweaks. MetaHumans are Epic Games’ realistic, fully rigged 3D human characters, and MHA is part of the free MetaHuman Plugin for Unreal Engine 5.2+. This guide focuses on the facial performance capture workflow, covering setup, recording, and animation export.
Getting Started: Setup and Requirements
To use MetaHuman Animator, specific software and hardware are required:
- Unreal Engine 5.2 or later: MHA requires UE 5.2+ for functionality, with the latest 5.x version recommended for optimal performance.
- MetaHuman Plugin: Install the MetaHuman Plugin via Epic’s Fab marketplace. In Unreal Editor, navigate to Edit > Plugins, search for “MetaHuman,” download, enable, and restart the editor.
- Hardware – PC Specs: Facial solving demands high GPU power. Recommended specs include an 8+ core CPU (e.g., Intel i9, AMD Ryzen 9), a high-end GPU (e.g., NVIDIA RTX 3080), and 64 GB RAM. Minimum specs are an Intel i7/AMD Ryzen 5, RTX 2070 (8GB VRAM), and 32 GB RAM. A Windows 10 64-bit system and fast SSD are required due to large data sizes (e.g., iPhone clips at 60 FPS ≈800 MB/min; stereo rig ≈45 GB/min).
- Capture Device:
- iPhone/iPad with TrueDepth: Requires iPhone 12 or newer for reliable captures. The iPhone X is insufficient, and iPad Pro models are untested. The device can be handheld, tripod-mounted, or head-mounted.
- Stereo Head-Mounted Camera (HMC): Uses dual cameras for texture and depth, mounted vertically on a helmet. Provides higher fidelity but requires complex setup.
- Software – Live Link Face App: For iPhone captures, install the free Live Link Face app from the iOS App Store to stream or record facial data to Unreal Engine.
- Project Settings:
- Enable DirectX 12 (DX12) in Project Settings > Platforms > Windows for MHA processing.
- Increase Image Media cache size in Project Settings > Plugins > IMG Media to 2–8 GB for smooth video handling.
- Enable “Use Unlimited Bone Influences” and “Support 16-bit Bone Index” in Project Settings > Engine > Rendering for MetaHuman facial rigs.
- Optionally, disable real-time viewport rendering in Editor Preferences > Performance to save GPU resources.
With these components configured, you’re ready to proceed.

Capturing a Facial Performance (Recording Your Actor)
Capturing an actor’s facial performance is key to MetaHuman Animator’s process:
- Prepare the actor and environment: Ensure the actor’s face is well-lit with even lighting and no harsh shadows. Avoid obstructions like glasses, hair, or hands. Use a neutral background and minimize audio noise if capturing sound.
- Mount the camera: For iPhone, use a tripod with a ring light at eye level, 1–2 feet away, or a head-mounted rig for stability during head movement. HMCs require a vertical stereo camera setup.
- Using the Live Link Face app: On the iPhone, input the Unreal Engine computer’s IP address and Live Link Face port (default 11111). In Unreal, add the iPhone as a Live Link source to preview motion. The app records video, depth, and motion data.
- Recording the performance: Enable “Capture FaceAR” in the app, have the actor perform, and save the take. Start with a neutral expression and include a teeth-baring pose for calibration. Keep recordings under 10 minutes (≈36,000 frames at 60 FPS) for manageable processing.
- Performance guidelines: Ensure the actor stays in frame with moderate head movement. For static tripods, face the camera; for dynamic movement, use a head-mounted rig. Capture extreme expressions for best results.
The recorded takes are ready for processing in Unreal Engine.
Step-by-Step Workflow: Using MetaHuman Animator
This section outlines the process to convert captured footage into a MetaHuman facial animation:
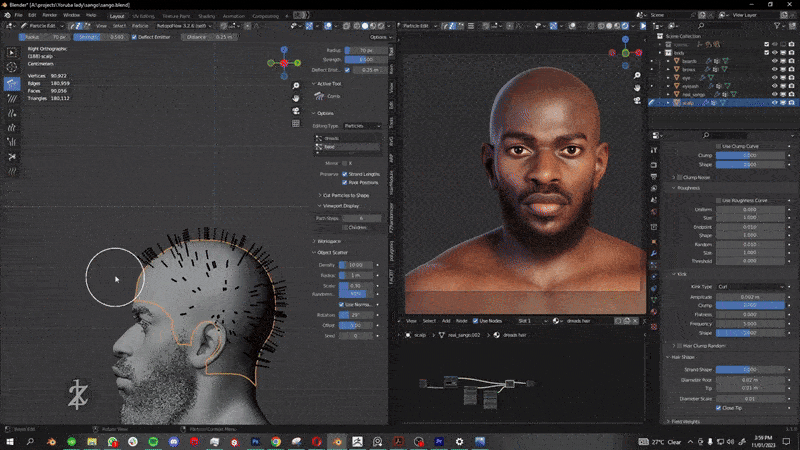
- Import Your MetaHuman Character: Use Quixel Bridge to download a MetaHuman from MetaHuman Creator or use a sample MetaHuman. Add its Blueprint to your level as the animation target.
- Create a MetaHuman Identity Asset: In Content Browser, create a MetaHuman Identity asset (e.g., “MyActor_Identity”) to align captured data with a performer’s face. This improves solver accuracy, especially if the MetaHuman matches the actor.
- Link the Footage as Capture Data:
- Create a Capture Source asset in Content Browser, set to LiveLink Face Archives for iPhone recordings.
- Transfer takes from the iPhone via USB or network. In Unreal’s Capture Manager, select the Capture Source, queue takes, and import them to create Capture Data assets with video, depth, and tracking info.
- Calibrate the MetaHuman Identity (Optional but Recommended): Open the Identity asset, use “Components from Footage” to select a Capture Data asset, and promote a neutral expression frame for tracking. Optionally, add a teeth-baring frame. Perform the MetaHuman Identity Solve/Conform to map the actor’s face, saving the asset for improved fidelity.
- Create a MetaHuman Performance Asset: Create a MetaHuman Performance asset, assign the Capture Data and Identity assets, and process the footage to generate animation. The process takes seconds to minutes, producing a timeline with the solved animation.
- Export the Animation to an Asset: Export the solved animation as an Animation Sequence asset, selecting a MetaHuman skeleton. Apply it to a MetaHuman in a Level Sequencer or Animation Blueprint for playback. Alternatively, export a Level Sequence for direct application.
- Refine and Edit (if needed): Use Unreal’s Control Rig to adjust facial curves or fix glitches. Edit timing in Sequencer or tweak solver parameters in the Performance asset for advanced refinement.
This workflow delivers a high-fidelity facial animation ready for use or further integration.

Exporting MetaHuman Animations to Other Platforms
MetaHuman animations can be exported from Unreal Engine for use in other software like Maya, Blender, or Unity. The process involves exporting the Animation Sequence as an FBX file, with considerations for full character or face-only exports, and specific workflows for each platform:
- Export to FBX (General method): Locate the Animation Sequence asset in Unreal’s Content Browser, right-click, and select Asset Actions > Export as FBX. Enable “Include Mesh” and optionally “Include Skeleton” to export the MetaHuman face/head mesh with baked animation curves on the bones, creating a portable FBX file.
- Using the Full Character vs Face-Only: MetaHumans have separate head and body meshes linked via Blueprint. For a combined character export, select the MetaHuman Blueprint in the Level, swap the Face component for the “Body (Preview Mesh)” in Details > Components, bake the animation in Sequencer, and export as FBX. This provides a single file with full character animation. Alternatively, exporting just the head animation is simpler but may require retargeting in external software.
- Import to Maya: Use Quixel Bridge to export a MetaHuman to Maya as a rig, or import the FBX file directly. The FBX includes a skeletal hierarchy with joint-based animation (or blendshapes). Match Maya’s frame rate (30fps or 60fps) to Unreal’s to ensure correct timing. Edit animation curves as needed using Maya’s tools.
- Import to Blender: Import the FBX into Blender, adjusting for a 90-degree bone orientation difference (Blender uses Z-up). Set Primary Bone Axis to Y and Secondary to -Z in FBX import settings or manually adjust the armature. Tools like Auto Rig Pro or the MetaHuman DNA Blender add-on can enhance rig reconstruction. Animations may appear as bones or shape keys.
- Using in Unity: Import the FBX into Unity as a skinned mesh with animation, setting up an Animator Controller. However, Epic’s license restricts MetaHuman meshes to Unreal Engine, prohibiting their use in Unity for released projects. Animations can be retargeted to a non-MetaHuman character with compatible blendshapes or rigs, requiring external mapping or Unity’s retargeting system.
- MotionBuilder or Others: FBX exports work in MotionBuilder or other 3D software, allowing retargeting to other characters or combining with body motion capture.
- Round-trip to Unreal after external edits: Export edited animations from Maya as FBX and import them back into Unreal as an Animation asset for the MetaHuman skeleton, enabling a pipeline of capture, external refinement, and Unreal integration.
Exporting uses FBX to transfer animations, with adjustments for rig compatibility and licensing constraints, particularly for Unity.
Performance Optimization and Best Practices
To ensure efficient workflows and smooth playback with MetaHuman Animator, follow these optimization strategies:
- Use Optimized MetaHumans for real-time: Choose Optimized MetaHumans (available in UE 5.5’s MetaHuman Creator) with simplified materials and LODs for better performance in games or VR, maintaining near-cinematic quality.
- Level of Detail (LOD): Use lower LODs (e.g., LOD1 or 2) during editing via the LODSync component or console commands, switching to LOD0 for final renders to improve real-time FPS.
- Facial Rig Complexity: Enable “Unlimited Bone Influences” to prevent visual artifacts from dropped influences. Disable or hide groom (hair) during previews to reduce performance load.
- Smooth real-time playback: Use a small viewport or Standalone Game mode for smoother previews. Animation quality remains intact at lower FPS, but choppy viewports can hinder evaluation.
- Trim and edit footage: Trim unnecessary frames in the Performance asset’s Start and End settings to reduce solver processing time.
- Avoiding re-solve for small changes: Edit animation curves manually in Unreal’s curve editor or Control Rig for minor tweaks instead of re-processing. Re-solve only for significant calibration issues.
- Motion capture data cleanup: Apply curve smoothing in Unreal, Maya, or Blender to reduce sensor noise. Focus on artistic tweaks like amplifying smiles or tightening blinks, as MHA’s output is smooth and temporally consistent.
- Hardware considerations: Update GPU drivers for DX12, use a discrete GPU on laptops, and close other GPU-heavy apps. Stick to shorter clips on lower-end systems to avoid memory issues.
- Batch processing and pipeline integration: Automate multiple captures with Unreal Python or Blueprint scripts for high-volume workflows.
- Keep Unreal Engine updated: Use the latest UE version for performance improvements and new features, such as enhanced GPU utilization.
These practices optimize capture, processing, and playback for high-quality results.

Frequently Asked Questions (FAQs)
- Do I need an iPhone to use MetaHuman Animator?
Yes, an iPhone 12 or newer with a TrueDepth sensor is the primary supported device, or a stereo head-mounted camera rig for higher-end captures. Webcams and Android phones lack the necessary depth sensor and precision. - Can MetaHuman Animator capture body or only the face?
It captures only facial animation, including head movements and expressions. Combine with separate body motion capture or keyframe animation for full-body performances. - How is this different from the Live Link Face app on its own?
Live Link Face streams raw ARKit data for real-time puppetry, while MetaHuman Animator uses a 4D solver and footage for higher-fidelity, editable, film-quality facial animations capturing subtle details like tongue and wrinkles. - How long does it take to process a performance into animation?
Processing takes minutes for a 1-minute clip (1x–2x clip duration) on a decent PC, with shorter clips (e.g., 10 seconds) solving in 5–10 seconds on high-end GPUs. - The animation has a slight error (e.g., mouth jitter). Can I fix it?
Yes, refine animations using Unreal’s Control Rig or curve editor to adjust poses or curves. Re-process with a better neutral frame if needed, as errors may stem from occlusions or mis-tracked markers. - How can I transfer the facial animation to a different character (not a MetaHuman)?
In Unreal, use animation retargeting to map MetaHuman animations to another rig, ideally with ARKit-compatible blendshapes. For external software, export the animation and map it in Maya/Blender using constraints or scripts, though this requires rig compatibility effort. - Are MetaHumans and their animations restricted to Unreal Engine?
MetaHuman models are restricted to Unreal Engine rendering per Epic’s license. Animations can be exported as FBX (without meshes) and applied to other characters in different engines, respecting licensing. - What are some best practices for capturing good facial animation?
Ensure even front lighting, no facial occlusions (hair, hands), a steady camera (tripod or secure head-mount), a neutral starting pose, and normal or exaggerated expressions. Test takes first to verify setup. - Can MetaHuman Animator work with multiple people at once or only one face at a time?
It supports one face per capture. For multiple actors, use separate devices and process each take individually, as each Performance asset handles one face’s footage. - Does MetaHuman Animator require internet or any cloud service?
No, processing is local using the plugin and GPU, requiring no internet after initial asset/plugin downloads, ensuring privacy and fast iteration.

By following this guide, you should now have a solid grasp of how to do animation for realistic faces using MetaHuman Animator. We covered the journey from setup and capture, through the technical process of converting footage to animation, all the way to exporting and fine-tuning the results. This powerful tool empowers beginners to create high-quality facial animations with minimal effort, while giving professionals the freedom to dive into technical details and integrate with existing pipelines. The possibilities for real-time animation – in games, films, or virtual production – are vast when you can so easily capture authentic human performances and bring digital characters to life. Happy animating!
Sources and Citations:
- Epic Games – MetaHuman Animator Release Blog (Epic / Unreal Engine)
- Epic Games Documentation – MetaHuman Plugin and Animator Guides
- Epic Games Documentation – Hardware and Capture Guidelines
- Epic Games Documentation – MetaHuman Identity and Performance Asset
- Epic Games Forums – MetaHuman to Blender Workflow
- Epic Games Forums – MetaHuman License for Other Engines
- Unreal Engine Forums – Exporting MetaHuman Animation (FBX)
Recommended
- 10 Tips to Start Clawing Your Way to Victory in Mewgenics (Beginner Strategy Guide)
- Blender Restore Curve Segment Length Geometry Nodes Preset: Complete Guide
- What is the camera’s field of view in Blender?
- How to Create Your Alter Ego with Metahuman for the Metaverse: A Guide to Building Digital Identity in Unreal Engine 5
- Optimizing Blender Camera Settings with The View Keeper Add-on
- Devil May Cry Vergil: Complete Guide to Dante’s Iconic Rival, Powers, and Storyline
- Venom Animated Movie From Final Destination: What Fans Mean, Rumors Explained, and What Could Actually Happen
- Can you have multiple cameras in one Blender scene?
- Top Video Games with Really Good Foley Work: The Best Sound Design in Gaming


