


What is the full process for creating real-time hair for AAA games?
Creating AAA-quality real-time hair involves sculpting a rough hair volume to define shape and flow, often in ZBrush. Artists generate hair textures using tools like FiberMesh or XGen, baking them into alpha-transparent images. Hair cards, polygon strips, are crafted in Maya or Blender to match the sculpted volume, layered for bulk and flyaways. These cards use baked textures to mimic numerous hairs realistically. The hair is previewed in real-time with tools like Marmoset Toolbag to adjust shading. Finally, the asset is optimized for performance with reduced polycount and LODs, then integrated into the game engine with appropriate shaders.
What’s the difference between strand-based and card-based real-time hair?
Real-time hair techniques include strand-based and card-based methods. Strand-based hair, used in systems like Unreal Engine’s groom system since UE4.24, renders individual strands with physics and advanced shading for high realism but is computationally intensive, suited for cinematics or high-end hardware. Card-based hair, the long-standing industry standard, uses textured polygon strips with alpha masks to simulate hair clumps, offering performance efficiency for AAA game characters. While less detailed than strand-based hair, skilled card layering and anisotropic shaders achieve convincing results. Card-based hair remains prevalent in AAA production despite emerging strand techniques. This tutorial focuses on the card-based workflow for its real-time optimization.
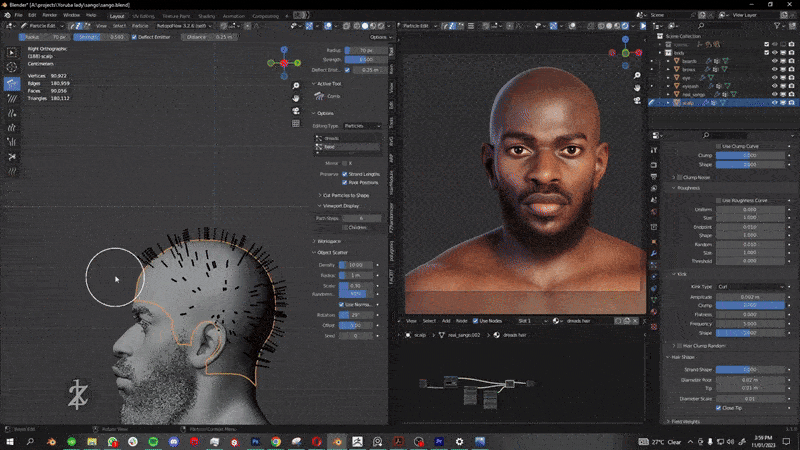
How do I block out hair volume and direction in ZBrush?
Blocking out hair in ZBrush involves sculpting a rough hair mass to define the hairstyle’s shape, volume, and flow before creating low-poly hair cards. Using clay or move brushes, artists shape a “helmet” on the character’s head, focusing on the hairline and clump directions. Sculpting in segments helps define strand separations, with tools like Curve Tubes or IMM brushes sketching locks. The moderately high-poly proxy prioritizes form over topology, serving as a guide for hair card placement. Checking the silhouette from all angles ensures a natural head shape and correct profile. This sculpt acts as a template for laying hair cards, similar to retopology, with ZBrush’s fibermesh or grooming brushes aiding direction.

How do I block out hair volume and direction in ZBrush?
Sculpting a hair blockout in ZBrush establishes the hairstyle’s silhouette, volume, and flow before transitioning to hair cards. Artists use clay or move brushes to form a rough hair mass, emphasizing the hairline and major clump directions. Segmenting the sculpt into clumps, with tools like Curve Tubes or IMM brushes, defines strand gatherings. The proxy, which can be high-poly, focuses on shape, as retopology or card extraction follows later. Iterating from multiple angles ensures a balanced silhouette and natural head shape, acting as a guide for card placement.
Can I use FiberMesh in ZBrush to guide real-time hair card placement?
ZBrush’s FiberMesh generates hair-like strands to guide hair card placement, though its dense meshes aren’t game-ready. After blocking out hair volume, artists mask the scalp and create FiberMesh strands, adjusting density and length to mimic the hairstyle’s flow. Low-density FiberMesh can be exported as guide curves to Blender or Maya for card positioning or extruded into card-like strips. Wide, low-segment FiberMesh creates UV-ready ribbons, streamlining card creation. While useful for prototyping and texture baking, FiberMesh requires manual card adjustments for game-compatible results due to its high-poly nature.
How do I convert ZBrush hair guides into usable hair card geometry?
Converting ZBrush hair guides into low-poly hair cards involves multiple techniques requiring some manual refinement. Below are the summarized methods:
- ZRemesher Method: Sculpt hair volume in ZBrush, define polygroups for strands, and use ZRemesher with Keep Groups to create ribbon-like polygon strips that follow the hair’s flow. Adjust polycount to simplify into card-like meshes, clean up in Maya by trimming and welding vertices, and UV unwrap into straight strips for texturing. This method efficiently generates hair cards aligned with the sculpt’s shape but needs post-processing for usability.
- Curve Export Method: Export FiberMesh or ZBrush curves to Maya or Blender, where tools like Maya’s XGen, nHair, or Blender’s Geometry Nodes instance flat cards along these guide curves. In Maya, plugins like GS CurveTools or native curve tools create polygon strips, while Blender uses curve-based instancing to form cards. The resulting cards match the guide shapes but often require manual adjustments to prevent interpenetration and ensure proper scalp placement.
- Direct FiberMesh Conversion: Configure FiberMesh to produce flat ribbons with UVs, accept the result, and decimate or manually reduce to main strips, deleting excess. Select key strands for cards, leveraging auto-UVs for texturing, and fill gaps with manual cards. This provides a quick starting point but demands cleanup to optimize card placement and avoid clipping through the head.
In all methods, manual cleanup adjusts card positions, orientations, and UVs, ensuring vertical alignment for hair textures and slight elevation above the scalp to prevent clipping, making the cards game-ready.

How do I generate texture maps for hair cards (alpha, normal, ID, AO)?
Hair card textures are created by baking or rendering high-detail hair onto a plane, producing maps for visual detail. Below are the key approaches:
- XGen or Ornatrix Baking: Groom a hair clump in Maya’s XGen or Ornatrix, apply a hair shader, and bake passes like alpha, normal, and ambient occlusion using Arnold. For example, bake diffuse with a standard material, convert hair to geometry for AO, and derive specular maps, creating a texture set per hair strip for varied card application, maximizing detail and realism.
- ZBrush FiberMesh Baking: Grow FiberMesh on a ZBrush plane, export as OBJ, and use xNormal or Marmoset to bake alpha, normal, and other maps onto a low-poly plane. This captures fiber opacity and shape, producing textures from various clump orientations for diversity, requiring efficient UV coverage to avoid cutoff and ensure usable maps.
- Hair Texture Generator Tools: Tools like FiberShop enable procedural hair strip design, outputting alpha, normal, ID, and other maps in real-time with modifiers for clumping and variation. These tools streamline texture creation, allowing live adjustments and efficient UV space use, producing a texture atlas with multiple hair strip variants for card application.
Essential maps include an alpha mask for strand shapes, a normal map for 3D lighting effects, an ID map for root-to-tip variation, and an AO map for self-shadowing, with optional depth and flow maps for advanced shading. Textures are applied to hair card materials, often as an atlas with varied clumps, ensuring efficient UV use and post-bake cleanup for optimal game engine performance.
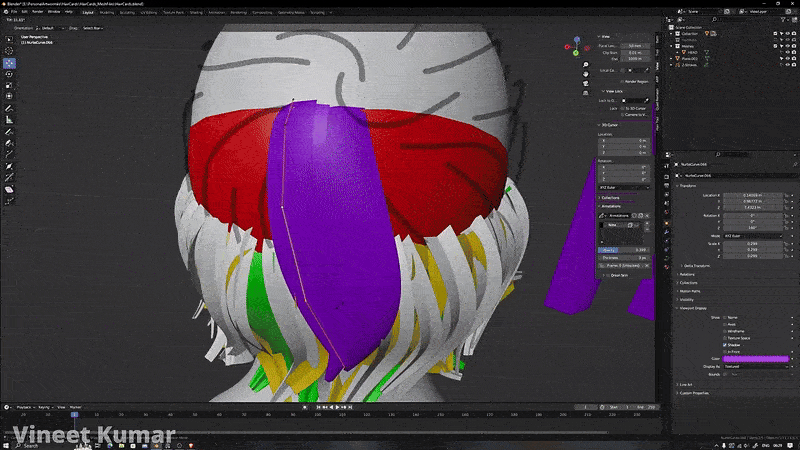
How do I use Maya or Blender to create, position, and UV hair cards?
To create realistic hair in 3D modeling for game-ready characters, place hair cards strategically in programs like Maya or Blender using a structured process. The workflow involves crafting base geometry, positioning and shaping cards, duplicating them thoughtfully, and ensuring proper UV mapping to align with hair textures. These steps, executed with precision, ensure the hair follows the scalp’s flow and achieves a natural look.
- Base Card Geometry: Create flat, rectangular planes shaped like hair strands, keeping them long and narrow with a few lengthwise subdivisions for flexibility. Apply the hair material to visualize the strands. This foundational step ensures the cards are ready for placement and can bend to follow the hair’s natural flow.
- Position and Shape Cards: Place cards along the scalp, snapping their roots to a hair cap or head mesh, and align them with the hair’s flow using guide curves or a sculpted volume. Use tools like soft selection, lattice deformers, or modifiers (e.g., Blender’s Shrinkwrap) to curve cards, ensuring they hug the head and taper naturally.
- Strategic Duplication: Duplicate cards to populate the hair, working in layers from the hairline upward with slight overlaps. In Maya, use Duplicate Special or XGen for placement; in Blender, leverage addons like Hair Tool or Curve modifiers to array cards along guides, ensuring a layered, voluminous look.
- UV Mapping: Align each card’s UVs to the hair texture atlas, ensuring straight UV islands that cover the strand area for maximum resolution. Use planar projection and tools like Maya’s Unfold or Blender’s UV Squares to straighten UVs, preventing skewed strand patterns.
Both Maya and Blender excel for this task, Maya offers robust modeling and scripts like GS CurveTools, while Blender’s Geometry Nodes enable procedural placement. Meticulous card placement, akin to retopology over a hair sculpt, ensures smooth flow and realism in the final result.

What are the best practices for laying out hair cards for game-ready characters?
Effective hair card layout enhances realism and minimizes visual flaws through strategic placement and coverage techniques:
- Layering and Coverage: Arrange cards in at least three overlapping layers to cover the scalp fully. The base layer uses thick cards to define shape and prevent scalp visibility. A second layer of thinner cards adds detail and volume, while the top layer includes sparse flyaway cards to break the silhouette, creating depth and realism.
- Follow Natural Growth Direction: Orient cards to mimic natural hair growth, upward and backward at the hairline, or away from part lines. Reference the hairstyle’s direction (e.g., side-swept) to ensure consistent flow, avoiding unnatural patterns and enhancing the hair’s lifelike appearance.
- Stagger Card Positioning: Offset cards to avoid grid-like patterns, preventing a striped look. Overlap cards slightly to hide transitions, ensuring no visible endpoints form lines. Careful placement prevents Z-fighting or depth sorting issues, maintaining a seamless appearance.
- Vary Card Sizes and Shapes: Use cards of different widths and lengths to mimic real hair’s varied clumps. Apply texture variations (e.g., thick vs. thin clumps) and slightly twist or tilt some cards to catch light differently, ensuring consistent normals to avoid lighting seams.
- Use a Hair Cap Material: Apply a dark or fuzzy scalp texture beneath cards to disguise gaps. Bake a hair cap texture by projecting hair onto the scalp, ensuring any visible scalp blends with the hair’s color, enhancing fullness and realism.
How do I add clumping, flyaways, and breakup for realism in hair cards?
Clumping, flyaways, and variation add essential realism by breaking uniformity in hair card setups:
- Clumping: Group cards closely to form thicker locks, with slight gaps between clumps for contrast. Use alpha textures with clustered strands (created via tools like XGen or FiberMesh) to enhance the clumpy look, ensuring cards visually group into natural-looking locks separated by small spaces.
- Flyaways: Add sparse, thin cards with single or few strands along the hair’s silhouette, like around the head’s outline or crown. Rotate these slightly off-angle to disrupt uniform flow, creating a subtle, realistic halo effect that catches highlights without overdoing it.
- Breakup and Variation: Introduce slight twists or curls in some cards and vary their tip positions to avoid uniform ends. Taper card mesh width toward tips to mimic thinning clumps, and use flow maps or slight geometry twists to add visual variety, simulating uneven, natural hair.
- Transitional Wisps: Place short, thin cards near the hairline or nape to represent baby hairs or growing strands. These bridge the gap between scalp and full-length cards, softening transitions and adding realism by mimicking shorter, flatter hairs.

Can I use XGen in Maya or Geometry Nodes in Blender to automate hair generation?
Automating hair card creation for real-time rendering can be achieved using tools like Maya’s XGen, Blender’s Geometry Nodes, and other specialized solutions, significantly reducing manual work while maintaining quality.
- Maya XGen (Interactive Groom) to Cards: XGen enables realistic hair grooming with tools to shape strands. Artists can convert grooms into hair cards by exporting guide curves and using scripts like GS CurveTools to generate polygon strips along them, or Maya 2022’s Sweep Mesh to extrude ribbons. This automates card placement, reducing days of work, though optimization is needed.
- Blender Geometry Nodes: Geometry Nodes procedurally instance hair cards along curves or particles, aligning them to a head’s surface. Setups like Daniel Bystedt’s adjust card twist and UVs automatically, updating in real-time as curves change, speeding up experimentation and ensuring consistent UV layouts.
- Other Automation Tools: Blender’s Hair Tool, Maya scripts, Houdini’s SideFX labs, and Unreal Engine’s experimental Groom to Cards converter assist in generating hair cards. These tools require cleanup and manual refinement, especially for critical areas like hairlines, to achieve polished results.
How can PixelHair streamline the real-time hair card creation process across Blender, Maya, and Marmoset for AAA-quality results?
PixelHair, developed by Yelzkizi, offers pre-made 3D hair presets to simplify and accelerate realistic hair creation for games.
- Pre-made Hair Grooms: PixelHair provides ready-to-use hairstyles with realistic strand arrangements, clean cards, UVs, and textures. Starting with a preset eliminates manual card layout and grooming, allowing artists to customize an optimized base for faster workflows.
- Cross-Platform Use: Assets are editable in Blender and exportable to Maya, Marmoset, or engines like Unreal. Artists can adjust hairstyles in Blender, then integrate them into other tools, leveraging PixelHair’s geometry and textures without starting from scratch.
- Consistent AAA Quality: Created by grooming specialists, PixelHair ensures professional strand patterns, card placement, and textures (e.g., anisotropy, root-to-tip variation). This allows less-experienced artists to achieve high-quality results with minimal tweaking.
- Time Savings: By providing pre-made cards, textures, and layering, PixelHair skips early grooming steps. Artists can focus on minor adjustments like flyaways, enabling faster iteration for characters, especially NPCs in large-scale projects.

How do I bake hair textures and normals using Marmoset Toolbag?
Marmoset Toolbag’s baking system creates hair card textures (normals, AO, alpha) from high-detail geometry with a user-friendly interface and real-time feedback.
- Setup High and Low Poly: Import high-poly hair (e.g., FiberMesh or XGen strands) and low-poly planes matching the UV layout. Arrange planes to correspond to hair card UVs, ensuring proper alignment for baking.
- Assign Materials for Baking Passes: Use a white material for hair and black for the background to bake an albedo pass, creating an alpha mask. Material ID baking can also assign unique colors per hair clump for identification.
- Baking the Normal Map: Bake normals by projecting high-poly hair onto low-poly planes, adjusting the cage to capture all strands. The resulting map encodes hair depth and waviness for realistic shading.
- Ambient Occlusion (AO): Enable AO baking to capture shadowing where strands cluster, enhancing depth. Use high ray counts for clean results, applying AO as a multiply or specular mask in the final material.
What are the ideal texture resolutions and formats for real-time hair in games?
The ideal resolution and format for hair textures vary by platform and character importance, with general guidelines for optimization:
- Resolution: Main characters in AAA titles typically use a 2K texture atlas for hair, sometimes 4K, to ensure sharp strand details and smooth alpha edges. Background characters may use 512² or 1K for simpler hairstyles. Mipmaps and LODs allow high-res textures for close-ups to scale down at distance, saving memory. Testing often shows 1K can suffice if no visual difference is noticed compared to 2K.
- Texture Atlas Layout: Hair textures are often arranged as strips in a single 2048² image, containing multiple variations to reduce draw calls. Each strand should be a few pixels wide in the alpha to prevent aliasing and flickering. Atlasing multiple hair textures into one material optimizes performance. Thicker strands in the texture enhance stability.
- Formats: Hair textures need an alpha channel for opacity, authored in lossless TGA or PNG. In-engine, these are compressed to DDS, like DXT5 for color and alpha or BC7 for better quality. Normal maps use BC5, sometimes packing extra data like ambient occlusion. HDRP in Unity or Unreal may split channels for specific groom systems, but card-based hair typically uses simple RGBA.
Start with high-resolution (2K or 4K) textures during authoring, then test in-engine to optimize to 1K if sufficient. Use 8-bit formats with alpha support, avoiding lossy formats like JPEG to prevent alpha artifacts. Pre-multiplied alpha may be needed to avoid halos, and high-quality formats are justified for hero characters where hair is a focal point.

How do I create realistic hair shading using hair cards in Unreal Engine or Unity?
Realistic hair shading on cards leverages engine-specific hair shaders to mimic hair’s unique light reflection, focusing on anisotropy, specular highlights, and transparency:
- Anisotropic Specular Highlights: Hair shaders in Unreal and Unity (HDRP) support anisotropic highlights, creating light streaks along strands. Unreal’s Hair Shading Model uses UV-aligned tangents or a Flow map to define strand direction. Unity’s HDRP Hair shader offers an Anisotropy slider and expects similar UV or tangent map inputs. This creates long, strand-aligned highlights for realism.
- Dual Specular Highlights: Hair has a primary highlight (lighter, at glancing angles) and a secondary, tinted highlight from light passing through. Unreal and Unity shaders implement dual lobes, with artist-controlled parameters like shift and roughness. Inputs for root and tip colors blend highlights, with primary spec white-ish and secondary slightly colored for natural sheen.
- Transmission and Scatter: Hair’s translucency is simulated via subsurface scattering or transmission. Unreal’s shader uses a transmission term for back-lit warmth, while Unity’s HDRP has a transmission toggle. A grayscale root-to-tip texture controls light penetration, with tips often more translucent. Thin translucency functions are preferred over standard subsurface scattering.
- Transparency and Sorting: Alpha blending with dithering ensures realistic transparency without sorting issues. Unreal’s hair shader uses dithered opacity masks for stability, while Unity’s HDRP supports alpha clipping with dithering. Maps like alpha masks, normals, and AO are applied to opacity, normal, and base color inputs, with ID maps randomizing strand properties.
What is the best lighting setup in Marmoset Toolbag for previewing game hair?
A three-point lighting setup with an HDRI environment in Marmoset Toolbag effectively previews hair cards, highlighting their appearance under various conditions:
- HDRI for Ambient: A neutral HDRI, like “Ennis House,” provides subtle ambient light and realistic reflections. Low-intensity HDRIs fill shadows and enhance anisotropic highlights on shiny hair. Rotating the HDRI prevents conflicts with manual lights, keeping it dim for reflections.
- Key Light: A primary Omni or directional light, placed above and slightly off-center, acts as the main source, mimicking sunlight. Adjusted to 30–45 degrees, it creates strong anisotropic highlights on hair curves. High-intensity, small-width lights produce sharp speculars, while wider lights soften them.
- Rim Light: Positioned behind the character, rim lights highlight hair outlines and flyaways, separating it from the background. Cool-colored rims contrast warm key lights, with multiple small lights ensuring even edge highlights. This enhances the hair’s silhouette and stray strands.
- Fill Light: A softer, low-intensity fill light opposite the key reduces harsh self-shadows on layered cards. Placed near the camera, it lifts shadows subtly, often with a cooler tone. High shadow resolution and spot lights in Toolbag prevent jagged shadows, while GI adds natural bounce lighting.

How do I optimize hair cards for performance in AAA games?
Optimizing hair for real-time performance is critical due to the high fill-rate and polygon demands of hair cards. Below are summarized best practices for efficient hair creation, with key details preserved in a three-line paragraph followed by concise lists with four-line paragraphs per item.
- Limit polygon count: Keep hair triangles between 5k–20k for optimized results, though some high-end characters may use 20k–40k. Use longer cards to cover more area and reduce subdivisions on straight cards, reserving cuts for curved ones. Lower counts maintain visual density while improving performance. Aim for the minimum polygons needed for the desired look.
- Level of Detail (LOD): Implement LODs to simplify hair at distance, reducing cards by 50% in LOD1 or using billboards in LOD2. Switch to dithered or opaque imposters to minimize transparency overdraw. This ensures distant characters don’t render excessive alpha cards. Automated systems like Unreal’s groom can generate low LODs efficiently.
- Optimize alpha usage: Prefer alpha test (cutout) over alpha blend for faster rendering and fewer sorting issues, using a cutoff for smooth edges. Alpha-to-coverage or dithered alpha reduces overdraw for softer transitions. Check in-engine overdraw visualization to avoid heavy overlap. Adjust card placement or opacity if overdraw is excessive.
- Batching and Materials: Use one material and texture atlas for all hair cards to minimize draw calls. Disable shadow casting on small cards or use a simplified shadow mesh. This reduces performance hits from noisy shadows. Consolidating materials streamlines rendering significantly.
- Physics and Rigging: Limit bones and vertices for dynamic hair to a few strands or sections. Use minimal cloth simulation constraints for efficiency. Overuse of dynamic bones can strain CPU performance. Ensure simulations remain lightweight for real-time applications.
- Backface Culling: Use two-sided shaders for hair to avoid doubling draw calls, as single-sided culling may hide backfaces. Most engines handle two-sided rendering efficiently. Unreal’s hair shading model is inherently two-sided, optimizing energy conservation. Disable culling only if backfaces are guaranteed to be hidden.
- Texture MIPs: Generate mipmaps and bias them to prevent aliasing, sampling lower-res textures at distance. Compress textures (e.g., BC7) to save memory without sacrificing quality. Efficient texture use improves performance. Every bit of saved memory enhances overall rendering speed.
- Profiling: Use engine profiling tools to identify hair-related GPU bottlenecks. Reduce complexity in high-overdraw areas like bangs by rearranging or removing cards. Profiling ensures hair stays within performance budgets. Small adjustments can significantly cut overdraw without visual loss.
Can I use Blender for the entire real-time hair creation process?
Blender supports the complete hair card workflow, with plugins and tools enhancing efficiency:
- Sculpting and Modeling: Sculpt hair volume using Blender’s sculpt mode or model a rough hair cap with curves. While less specialized than ZBrush, Snake Hook brush aids in shaping. This establishes a solid base for grooming. It’s functional for blocking out hair forms.
- Hair Groom to Cards: Use Blender’s particle hair or Hair object to groom strands interactively. Convert these to cards via Geometry Nodes or addons like Hair Tool, which simplifies card creation and texture baking. Manual conversion is possible but slower. These tools streamline the grooming-to-card process.
- Texture Baking: Bake opacity and normal maps in Cycles from dense particle hair patches. Use Principled Hair BSDF for realistic shading during baking. External tools like xNormal may be easier, but Blender suffices. Orthographic rendering supports texture creation.
- Placement and UVs: Duplicate and place cards with Blender’s modeling tools, using Mirror modifiers for symmetry. UV unwrapping aligns card textures, with addons to straighten UVs. Proportional editing smooths card adjustments. These ensure precise card positioning.
- Preview and Shading: Eevee’s viewport approximates hair with transparency and anisotropic shaders, though it lacks dual spec highlights. Cycles offers detailed previews for texture and placement tweaks. This iterative feedback refines the hair look. Blender’s rendering aids real-time adjustments.
- Export to Engine: Export hair meshes (FBX) and textures (PNG/TGA) to engines like Unreal or Unity. Blender lacks native hair shaders for export, but engine-specific shaders handle this. The process integrates smoothly with game pipelines. Blender keeps the workflow self-contained.

How do I retarget hair assets between characters with different head shapes?
Retargeting hair assets to new head shapes saves time, using deformation tools and tweaks:
- Mesh Deformers (Wrap/Lattice): In Maya, use a wrap deformer to morph hair from the original head to the new one. Alternatively, a lattice adjusts hair by reshaping lattice points. This accommodates changes in head size or shape. Minimal manual card repositioning is needed.
- Blender Surface Deform or Shrinkwrap: Apply Blender’s Shrinkwrap modifier to snap hair cards to a new head, adjusting by sections if needed. Surface Deform binds hair to a morphing head mesh. These ensure hair conforms to new proportions. Projection axes may need tweaking.
- Scaling and Manual Tweaks: Scale hair uniformly or non-uniformly for minor size differences, aligning to key landmarks like the hairline. Manually adjust cards around ears or bangs for fit. This works best for similar head shapes. Soft selection aids smooth repositioning.
- Bone/Skinned Hair: Transfer bone positions via similar skeletons to move rigged hair to a new head. Adjust ponytail or strand bones for fit. This relies on comparable skeletal structures. Minor bone tweaks ensure proper alignment.
- Adjusting Cap and Hairline: Re-fit the hair cap to the new head via shrinkwrapping or reprojection. Re-extract a new scalp mesh if needed and transfer textures. Align card roots to the new cap. This prevents floating or sinking issues.
- Manual Polishing: Fix intersections around ears, nape, or bangs post-deformation using soft selection. These tweaks are faster than creating new hair. Manual adjustments ensure a natural look. Tools like sculpt mode refine final placement.
Retargeting leverages deformation tools to adapt hair, followed by minor manual fixes to ensure a natural fit on the new character.
What are common mistakes to avoid in AAA-quality hair creation?
Creating hair for games requires careful balance to avoid visual or performance issues. Common pitfalls can make hair look unnatural or inefficient. Below are key mistakes to avoid, with strategies to ensure quality.
- Too Few or Too Many Cards: Using too few cards results in blocky, gappy hair, while too many cause performance issues like overdraw. Aim for an optimal number based on the hairstyle; one card with a good alpha texture can replace multiple cards. For thick ponytails, avoid using just a few large cards, as they lack volume. Balance card count with placement for efficiency and realism.
- Misaligned UVs or Normals: Incorrect UVs disrupt anisotropic shading, causing highlights to misalign with strands. Ensure UVs match strand direction (usually U). Flat card normals can create a stripy look under lighting; adjust normals to blend toward the head’s root for continuous lighting. Proper UVs and normals ensure consistent, natural shading across cards.
- Visible Card Edges or Intersections: Abrupt card ends or odd intersections reveal the card structure. Vary card lengths and fade tips with alpha to hide edges. Avoid direct intersections to prevent flickering or Z-fighting; layer cards at different depths. Careful placement ensures a seamless, natural appearance without visual artifacts.
- Ignoring the Hairline and Roots: A sharp hairline without baby hairs or fuzz looks like a wig. Use a hair cap with a gradient and small cards at the hairline to soften the transition. Ensure cards follow scalp emergence direction and overlap to hide the scalp. This creates a realistic skin-to-hair transition.
- Lack of Variation (Uniformity): Uniform card size, texture, or spacing makes hair look plastic. Use varied strand patterns, rotate textures, or edit clumps for diversity. Introduce slight asymmetry, even in symmetric styles, to mimic real hair’s randomness. Variation in cards and textures enhances realism and avoids monotony.
- Overlooking Engine Settings: Hair may look good in modeling software but fail in-engine due to settings like single-sided materials or missing alpha dithering. Ensure two-sided materials and proper mipmap settings to avoid thinning at distance. Create LODs to prevent auto-LOD issues. Correct engine settings ensure consistent visuals.
- Performance Neglect: Ignoring performance budgets leads to frame drops from high overdraw or shadow casting. Disable dynamic shadows on hair, as they’re costly and often noisy. Use simplified shadow proxies if needed. Profile and optimize card count and transparency. Performance awareness ensures smooth gameplay without sacrificing quality.
By avoiding these pitfalls, balancing card count, aligning UVs and normals, hiding edges, softening hairlines, adding variation, checking engine settings, and optimizing performance, hair can look convincing and run efficiently. Iteration and checklist-based reviews help catch issues early.

Where can I find tutorials, templates, or brushes for real-time hair workflows?
Resources for learning hair card workflows are plentiful, offering tutorials, templates, and brushes. Below are key sources to explore:
- Official Documentation & Guides:
- Autodesk Maya XGen: Maya’s XGen guides cover interactive grooming and game-ready hair exports, explaining card generation. These are ideal for understanding hair creation pipelines. They provide technical insights for Maya users. Resources are available through Autodesk’s official site.
- Pixologic ZBrush: ZBrushGuides.com and Pixologic’s ZClassroom offer FiberMesh tutorials, like Pablo Munoz’s hair-to-cards guide. These detail sculpting and card placement. Top Tips videos provide additional techniques. They’re valuable for ZBrush-based workflows.
- Unreal Engine/Unity: Epic’s Hair and Fur Groom documentation and Unity’s HDRP hair shader manual explain hair shading and card-to-strand workflows. These clarify engine-specific settings. They’re useful for integrating cards into Unreal or Unity. Official docs ensure accurate setup.
- Industry Tutorials (Paid and Free):
- Adam Skutt’s Tutorial: Available on Gumroad, this professional tutorial covers sculpting, baking, card placement, and shader setup. It’s a comprehensive guide for realistic hair. Widely recommended, it’s a benchmark for learning. It includes practical, industry-standard techniques.
- ArtStation/FlippedNormals: ArtStation’s “Real Time Hair for AAA Games” and FlippedNormals tutorials offer video and project files. These dissect expert workflows for hair assets. They’re ideal for in-depth learning. Both platforms provide high-quality, professional content.
- XMD Academy: XMD’s “AAA Salon: Game Hair Creation” course focuses on next-gen techniques, including groom-to-card workflows. It’s tailored for advanced users. The course covers modern hair creation methods. It’s a premium resource for AAA pipelines.
- Community Tutorials and Forums:
- 80 Level Articles: 80.lv features artist breakdowns, like Airship Images’ The Division hair workflow or Ali Glen’s XGen-to-cards process. These offer specific tips and tool recommendations. They’re great for practical insights. Articles are freely accessible online.
- Polycount Forum: Polycount’s “Fibermesh to Game Hair” threads include scripts, advice, and mini-tutorials. Searching “hair cards” reveals professional workflows. It’s a collaborative space for learning. Forums foster community-driven knowledge sharing.
- Reddit: Subreddits like r/3Dmodeling or r/ZBrush share Q&A threads on hair cards, pointing to tools like FiberShop or Blender workflows. Users exchange resources and experiences. These are informal but valuable. Reddit offers community-sourced guidance.
- Tools and Templates:
- FiberShop: FiberShop’s documentation and trial projects teach hair texture design. It’s a standalone tool with educational examples. The site offers workflow insights. Free trials provide hands-on learning opportunities.
- Hair Strand Designer: Available on ArtStation, this tool includes Substance Designer files for procedural hair textures. Its documentation teaches texture creation. It’s practical for texture-focused workflows. Example files enhance learning.
- Blender Addons: Daniel Bystedt’s free geometry nodes template on 80.lv teaches hair creation via nodes. Hair Tool’s paid addon includes example files. Both are educational for Blender users. They provide practical templates for study.
- Video Tutorials (YouTube):
- Blender Tutorials: Channels like JROTools and Yelzkizi’s PixelHair offer Blender hair card tutorials, covering full workflows or specific tools. These are free and detailed. They’re ideal for Blender-focused artists. Videos range from beginner to advanced.
- Epic’s Livestreams: Epic’s UE4 MetaHuman grooming-to-cards livestream demonstrates practical techniques. It’s tailored for Unreal workflows. The content is freely available. It provides high-level insights from industry leaders.
- GDC/SIGGRAPH: Talks by studios like Square Enix cover hair card techniques within broader hair tech discussions. These offer high-end workflow insights. They’re often free online. Presentations highlight AAA approaches.
- Brushes and Alphas: DeviantArt and Textures.com offer free hair strand brushes and alpha atlases for texture painting. These adapt fur textures for hair cards. They speed up texture creation. Reference alphas help generate custom textures efficiently.
These resources, official docs, tutorials, community forums, tools, and brushes, provide a robust learning path. Start with a comprehensive tutorial, supplement with forums and docs, and engage communities for specific questions to refine skills.

What studios use this workflow for real-time hair in AAA game production?
Hair card workflows are standard in AAA game studios for realistic characters. Below are notable studios using this approach:
- Naughty Dog: Uncharted and The Last of Us use hair cards for characters like Nathan Drake and Ellie. Artists sculpt in ZBrush and place cards in Maya. Cards cover main hair and details like stubble. This ensures high-quality, performant hair.
- CD Projekt Red: The Witcher 3 and Cyberpunk 2077 rely on hair cards for default hairstyles, including NPC styles in Cyberpunk. They create varied hairstyles with manual modeling and tools. Cards dominate over optional strand-based tech. Their talks highlight card-based pipelines.
- Ubisoft: Assassin’s Creed, Far Cry, and The Division use hair cards, with The Division’s hair outsourced to Airship Images. Airship hand-paints textures and places cards in Maya. Detailed styles like braids use many cards. Ubisoft’s realistic titles depend on this workflow.
- Rockstar Games: GTA V and Red Dead Redemption 2 feature hair cards, with RDR2’s horse manes using cards with physics. Likely created in Maya with custom shaders, their job postings confirm card use. Visuals suggest a robust card pipeline. This supports detailed, dynamic hair.
- Square Enix (Crystal Dynamics): Tomb Raider and Marvel’s Avengers use hair cards as defaults, with TressFX as an option. Final Fantasy XV and VII Remake employ cards for spiky anime hair. Cards ensure performance across characters. Hybrid techniques supplement in some cases.
- Bungie: Destiny’s player and NPC hairstyles use hair cards, supported by custom shaders. Their artists follow standard card modeling pipelines. This ensures consistent visuals across characters. Cards remain central to their hair creation process.
- 343 Industries: Halo Infinite’s human characters, like Cortana, use hair cards. Their pipeline aligns with industry standards, likely involving Maya or Blender. Cards support detailed NPC hair. This workflow scales for Halo’s character needs.
- EA & DICE: Battlefield and Mass Effect titles use hair cards for soldiers and squadmates. DICE maintains a reusable hair asset library. Cards support varied hairstyles efficiently. Bioware’s characters rely on this technique for consistency.
- Insomniac Games: Marvel’s Spider-Man and Ratchet & Clank use hair cards for characters and fur. Peter Parker and MJ’s hair follows standard card workflows. Stylized titles adapt cards for unique looks. This ensures performance and visual fidelity.
- Guerrilla Games: Horizon Zero Dawn and Forbidden West use hair cards for Aloy’s braids and NPC styles, with some strand simulation. Blender aids card creation. Cards form the bulk of hair assets. This balances detail and performance.
Hair cards dominate AAA studios due to performance advantages, supported by proprietary tools and shaders. External studios like Airship Images reinforce this standard. Job listings highlight card expertise, confirming its ubiquity in 3D game hair creation.
Frequently Asked Questions (FAQ)
- How long does it take to create hair for a game character?
Creating hair for a game character varies by complexity and artist skill. A realistic hero hairstyle may take 3–5 days for sculpting, texturing, card placement, and refinement, longer for intricate styles like braids. Simpler NPC hair, like buzz cuts, can be done in 1–2 days. Using presets and optimizing LODs can reduce time. - My hair cards look good in ZBrush/Maya, but turn out transparent or odd in Unreal – what did I do wrong?
Transparency issues in Unreal often stem from material setup errors. Use a Masked or Translucent material with the alpha texture correctly plugged into Opacity Mask. Enable Two-Sided rendering to show backfaces, set normal maps to NormalMap format, and adjust tangent orientation for anisotropic highlights. For Masked blending, use an alpha cutoff around 0.5 to maintain strand visibility. - How can I prevent my hair texture’s alpha from looking jagged or pixelated?
To avoid jagged alpha textures, bake at high resolution (e.g., 4K) for detail retention. Use premultiplied alpha with a hair-colored background to prevent fringing. In-engine, enable alpha-to-coverage or super-sampling for smoother edges, and add a 1px feather to the alpha mask. Ensure mipmaps use alpha-friendly settings and avoid single-pixel strands for better downsampling. - Is it okay to use alpha blending for hair or should I always use alpha test?
Alpha test (masked) is preferred for performance and sorting stability, especially on consoles, though edges may look hard. Alpha blending offers soft, semi-transparent effects but risks sorting glitches and higher fill-rate costs. Dithered alpha provides a compromise, simulating smoothness with TAA. Use Masked for most hair, reserving Translucent for specific softness needs with managed performance. - How do I handle characters that need to change haircuts or hats (i.e., hair swapping)?
For swappable hair or hats, create separate hair meshes tied to the head bone for easy replacement. For hats, design a flattened “under hat” hair version to avoid clipping, with reduced volume. Ensure hairstyles align with the same hairline to prevent gaps. Use engine scripts to hide hair or show hat-specific hair, testing combinations for seamless transitions. - How can I create braids or dreadlocks with hair cards?
Braids and dreadlocks use cards to add detail to tube-like shapes. Model a low-poly braid cylinder and wrap cards with hair textures around it, or bake a dense braid groom into a strip texture applied to modeled geometry. For dreadlocks, arrange cards radially or use cross-shaped cards for volume. Use fuzzy textures and extra cards for loose strands, ensuring normal maps enhance roundness. - My hair looks good in still images, but in motion I see flickering/moiré. How can I fix that?
Flickering or moiré in motion results from aliasing. Enable TAA and dithered transparency for smoothness, and bias mipmap LOD to retain higher-resolution textures longer. Vary strand patterns to avoid grid-like moiré, increase anisotropic filtering, and reduce overlapping cards. Slightly thicker texture strands help maintain visibility without sub-pixel interference. - Should hair cards be rigged for physics or just static?
Hair rigging depends on game needs. Static hair is simpler and avoids clipping, suitable for short styles. For dynamic motion, use a simplified physics rig with a few bones or cloth simulation, weighting roots stiff and tips loose. This adds realism for ponytails or bangs. AAA games often balance minimal bones or physics for lively yet performant hair. - How do I deal with hair parting (e.g., a center part) with hair cards?
For convincing hair parts, use a scalp texture with fuzz to make the parting line natural. Place short cards along the part, oriented oppositely on each side, to hide gaps. Use thinner cards near the part and a flat “fuzz” card for short hairs. Ensure sufficient card layers to limit scalp visibility except at the intentional part line. - Are there any shortcuts or upcoming tech that could replace hair cards?
Strand-based systems like Unreal’s groom are emerging but are performance-heavy, used mainly for cinematics. Shells and fins are less practical than cards for hair. AI and procedural tools are developing, with some engines auto-converting strands to cards for LODs. As of 2025, hair cards remain dominant for longer hair due to efficiency, though short hair may use shells or ray-traced strands.

Conclusion
Real-time hair creation for AAA games blends artistry and technology, requiring a structured workflow to achieve lifelike results. Artists sculpt hair volume in ZBrush, generate strand textures, place cards in Maya or Blender, and tune shaders in Marmoset or game engines. Planning, using tools like XGen or Geo Nodes, and prioritizing performance are crucial. High-quality textures and layered cards with flyaways enhance realism, while avoiding pitfalls like aliasing ensures polish. Practicing sculpting, grooming, and shader tuning opens doors to studios like Naughty Dog, equipping artists to craft iconic characters as hair tech evolves.
Sources and Citation
- Vadim Sorici – Character Hair Breakdown (Marmoset Toolbag Tutorial)marmoset.comarmoset.co
- Polycount Forum – “Fibermesh to Game Hair” Discussion (MrHobo & thomasp tips on ZBrush to cards)polycount.compolycount.com
- ZBrushGuides – “Low Poly Hair Cards from FiberMesh” Tutorial by Pablo Munozzbrushguides.com
- 80 Level – “Maya XGen to Hair Cards Workflow” by Ali Glen80.lv80.lv
- 80 Level – “Free Hair Cards Geo Nodes Setup for Blender” (Daniel Bystedt)80.lv
- Yelzkizi (PixelHair) – PixelHair Overviewyelzkizi.orgyelzkizi.org
- Marmoset Toolbag Blog – “How to Create Realistic Hair…” (specifically sections on hair layering and material)marmoset.comarmoset.co
- Epic Games – Unreal Engine Tech Blog 2020: Strand-Based Hair (strand vs card explanation)unrealengine.comunrealengine.com
- Autodesk – Support Article: Creating Hair for Realtime Characters (overview of card technique)autodesk.com
- Airship Images Interview on 80.lv – “Creating Hair for AAA Games”80.lv80.lv
Recommended
- How to Download MetaHuman: The Ultimate Step-by-Step Guide to Accessing Digital Humans
- How to Use Film Grain: A Complete Guide to Achieving a Cinematic Look
- What is the clipping range in Blender cameras?
- Your Guide to Making 3D Models for 3D Printing
- Devil May Cry Netflix Series: Release Date, Plot, Cast, and Everything We Know So Far
- Minecraft Movie Cast, Review, Fan Insights, and Box Office Performance: Full Breakdown After Release
- How do I make the camera follow a character in Blender?
- Mastering Water Simulation in Unreal Engine: Techniques, Tools, and Best Practices
- Top Video Games with Really Good Foley Work: The Best Sound Design in Gaming
- How to Create Warhammer Sisters of Battle Characters with MetaHuman in Unreal Engine 5


