


Blender offers robust camera options to cater to various creative needs, including perspective and orthographic cameras. These two camera types provide unique ways to visualize and render scenes, each with its strengths and ideal use cases. Understanding when and how to use them can elevate the quality and precision of your 3D projects.
Understanding Perspective Cameras
What Is a Perspective Camera?
A perspective camera mimics the way human eyes perceive the world. Objects closer to the camera appear larger, while those farther away seem smaller. This creates depth and realistic spatial relationships, making it ideal for:
- Realistic visualizations
- Cinematic animations
- Architectural walkthroughs
In essence, perspective cameras emphasize spatial depth, which is crucial for storytelling and immersive experiences. For instance, in a cityscape render, perspective distortion can make tall buildings appear imposing and dramatic.
Setting Up a Perspective Camera
- Add a camera by going to Add > Camera.
- In the Camera Properties tab, ensure the camera is set to Perspective under the Lens section.
- Adjust the focal length (measured in millimeters) to control the field of view (FOV). A lower value (e.g., 18mm) creates a wide-angle effect, while higher values (e.g., 85mm) result in a telephoto effect.
A wide-angle lens is perfect for capturing expansive landscapes, while a telephoto lens is ideal for isolating a subject, such as focusing on a character’s face in a busy environment.
Using Depth of Field with Perspective Cameras
- Enable Depth of Field in the Camera Properties to blur the background and focus on a specific object.
- Adjust the focus distance and f-stop to control the intensity and area of focus.
Depth of field can simulate the effect of real-world lenses, drawing attention to a focal point while creating a pleasing bokeh effect in the background.
Use Cases for Perspective Cameras
- Product Rendering: Highlight the depth and realism of a product by creating shadows and reflections.
- Character Animation: Enhance the viewer’s connection to the scene by simulating natural eye behavior.
- Storytelling: Use dramatic angles to guide the viewer’s attention to key elements in the scene.
Lighting for Perspective Scenes
- Use directional and point lights to emphasize depth and contours in perspective shots.
- Experiment with shadow softness to add realism.

Exploring Orthographic Cameras
What Is an Orthographic Camera?
An orthographic camera captures objects without perspective distortion. Objects maintain their relative size regardless of distance from the camera. This is ideal for:
- Technical drawings
- 2D animations
- Isometric renders
Unlike perspective cameras, orthographic cameras are often used for precision and clarity. For example, an orthographic view of a product ensures that dimensions and proportions are accurate, which is critical in manufacturing and design.
Setting Up an Orthographic Camera
- Select your camera and go to the Camera Properties tab.
- Change the type to Orthographic under the Lens section.
- Adjust the Orthographic Scale to control how much of the scene is visible.
The orthographic scale acts like a zoom feature, but without altering the perceived size of objects.
Creating Isometric Views
- Rotate the camera to an isometric angle: 45 degrees along the X and Y axes.
- Use snapping options in the viewport to align the camera precisely for isometric rendering.
Isometric views are widely used in game design for strategy and simulation games, offering a clear and consistent perspective.
Use Cases for Orthographic Cameras
- Blueprints and CAD Models: Present accurate dimensions and proportions for engineering purposes.
- Game Design: Create isometric views for strategy or simulation games with a stylized appearance.
- Stylized Renders: Achieve a flat, artistic look for visual projects.
Adding Texture and Shadows
- Use ambient occlusion and baked textures to enhance orthographic renders. Shadows can provide depth even in a perspective-free view.
Switching Between Camera Types
Blender makes it easy to switch between perspective and orthographic views:
- Select the camera and navigate to the Camera Properties tab.
- Toggle between Perspective and Orthographic under the Lens section.
- Adjust relevant parameters, such as focal length or orthographic scale, to fit your desired outcome.
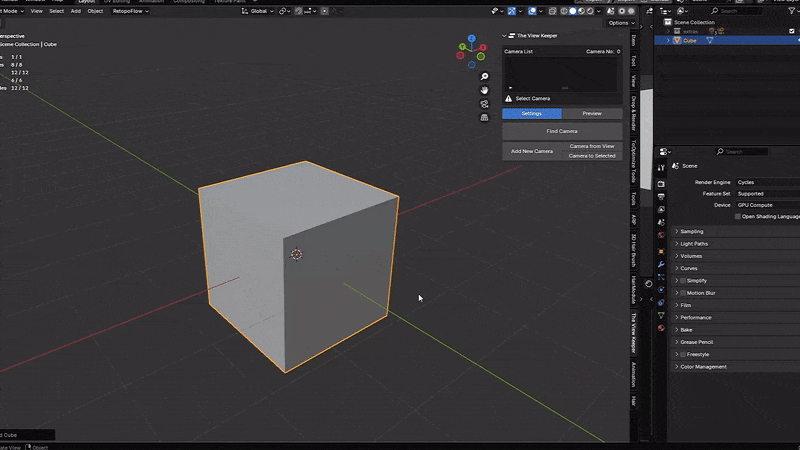
For scenes requiring both types of views, consider using multiple cameras and switching between them in the timeline or during rendering. The View Keeper plugin is highly recommended for managing such setups efficiently. It lets you store multiple camera configurations, switch between them effortlessly, and even render batches of perspectives and orthographic shots.

Combining Perspective and Orthographic Cameras in a Project
You can use The View Keeper to store two (or more) cameras in Blender, one set to perspective and the other to orthographic, with unique lens settings for each. Follow these steps to ensure proper setup and storage using The View Keeper’s tools and settings.
Add the Perspective Camera
- Open The View Keeper panel from the N sidebar.
- Click Add New Camera in The View Keeper settings. This will add a new camera to your scene, and a camera record will automatically be created in the Camera List Table.
- Ensure the Camera From View toggle is off unless you want to align the new camera to your current viewport perspective.
- In the Camera Properties tab, set the lens type to Perspective.
- Adjust the focal length (e.g., 35mm) to achieve your desired field of view.
- Position and orient the camera to frame your subject dynamically.
- Since the camera record was automatically created, click Refresh Camera List in The View Keeper panel to capture the updated settings for the perspective camera. Rename the record to something descriptive, such as “Perspective Dynamic.”
In an architectural project, a perspective camera can show a dramatic exterior shot, while an orthographic camera is perfect for a floor plan.
Add the Orthographic Camera
- Click Add New Camera in The View Keeper panel to add a second camera. This will also automatically create a camera record in the Camera List Table.
- In the Camera Properties tab, set the lens type to Orthographic.
- Adjust the Orthographic Scale to fit the area you want to render (e.g., 10 for a detailed top-down view).
- Position the camera for a top-down or isometric perspective, depending on your needs.
- Use Refresh Camera List in The View Keeper panel to capture the updated settings for the orthographic camera. Rename the record to something descriptive, such as “Orthographic Top View.”
Preview and Manage Camera Records
- The Camera List Table in The View Keeper panel now shows both stored cameras.
- To switch between them, select a record in the list and ensure Activate/Deactivate Updates is toggled on.
- The selected camera will become active, and its stored settings will be restored in the scene.
Keyframe the Records for Rendering
- To render multiple cameras using the alternative rendering feature, the records need to be keyframed.
- To keyframe a record:
- Navigate to the desired frame in the timeline.
- Select the desired camera record in the Camera List Table.
- Right-click on the selected record and choose Insert Keyframe from the context menu.
- Move to the next frame and repeat this process for every record you want rendered.
- Adjust the frame length in your timeline to capture only the keyframed records you want to render.
Render Using Alternative Rendering
- Ensure the output settings for each camera record have been configured as needed. If not, set them in the camera properties and refresh the record to capture all changes.
- Use The View Keeper’s Alternative Rendering feature to render images or animations from the stored camera records.
- Navigate to the Alternative Rendering section in The View Keeper panel and start the rendering process. The system will automatically switch between the keyframed camera records during the render.
Advanced Techniques for Perspective and Orthographic Cameras
1. Animating Camera Properties
- Animate the focal length or orthographic scale to create zoom effects in perspective and orthographic modes.
- Use constraints like “Track To” to make the camera follow moving objects.
2. Using Constraints for Smooth Transitions
- Add constraints like “Damped Track” or “Clamp To” for controlled camera motion between objects or along curves.
3. Custom Render Passes
- Render separate passes for perspective and orthographic views to composite them later in post-production.
- Use render layers to isolate specific elements for each camera view.
4. Interactive Previews
- Use Eevee for real-time previews of both perspective and orthographic setups. This helps in fine-tuning the scene before final rendering in Cycles.
Tips for Optimal Camera Use
- Combine Both Camera Types: Leverage the strengths of each camera type within the same project to maximize flexibility and creative control.
- Use The View Keeper Plugin: If your workflow involves multiple cameras, The View Keeper ensures efficient management and consistent results.
- Experiment with Parameters: Small changes to focal length or orthographic scale can dramatically affect the composition and storytelling.
- Test Renders Frequently: Preview renders to fine-tune camera placement, lighting, and scene composition.
- Add Realism: Enable motion blur and depth of field for perspective cameras to enhance realism.
Perspective and orthographic cameras in Blender are powerful tools that offer distinct advantages depending on the creative goal. By understanding their differences and use cases, you can effectively utilize both to craft stunning visuals. Whether you’re working on a realistic animation or a technical isometric design, mastering these camera types will significantly enhance your projects. With tools like The View Keeper and advanced animation techniques, managing multiple camera setups becomes seamless and efficient.


