


Creating a circular camera animation in Blender is a fun and creative way to show off your 3D scene. This is basically a camera that slowly moves in a circle around an object, like a drone flying around a statue or a director capturing a dramatic shot in a movie. This type of animation is used in films, video games, and architectural visualizations to give viewers a complete view of a subject or as a tool for stoytelling. In this article, we will explain how to create a circular camera animation in Blender in simple steps. We will share useful tips, real-world examples, and troubleshooting ideas to help you get the best results.
What Is a Circular Camera Animation?
A circular camera animation is when the camera moves along a circular path around a specific object or point in your scene. This type of movement gives your animation a smooth, continuous view from every angle. It can be used to highlight an object, create dramatic effects, or show an entire environment. Think of a superhero movie scene where the camera circles around the hero as they stand on a rooftop, or a nature documentary where the camera slowly orbits around a majestic mountain.
Why Create a Circular Camera Animation?
There are many reasons to use a circular camera animation in your projects:
- Complete View: It allows you to show the object or scene from every side, giving the audience a full understanding of its shape and details.
- Cinematic Quality: Many blockbuster movies use circular or orbiting shots to create dramatic and engaging visuals.
- Smooth Movement: The continuous, fluid motion makes the scene feel natural and immersive.
- Versatility: This technique is great for product animations, architectural visualizations, game cinematics, and virtual tours.
- Creative Storytelling: By changing the pace or adding special effects, you can create a mood or focus on important details.
These benefits are similar to how directors use camera movements in films like The Matrix or Inception or The Avengers to build tension and reveal the full scope of a scene. In video games, smooth camera movements are essential for cutscenes and interactive tours. With Blender, you have the power to create these stunning visuals yourself.
How to Create a Circular Camera Animation in Blender
Follow these simple steps to create a circular camera animation in Blender. We will break the process down into clear, easy-to-follow parts.
Step 1: Open Your Blender Project
Start Blender and open the project you want to work on. Make sure your 3D scene is set up with the objects, lighting, and materials you wish to display. If you do not have a scene, create a simple one by adding an object (for example, a cube or a sphere) and some basic lighting.
Step 2: Add a Camera
If your scene does not already have a camera, add one by pressing Shift + A and selecting Camera. The camera will appear in your scene. You can find it in the Outliner or see it in the 3D Viewport. Select the camera to begin adjusting its settings.
Step 3: Position the Camera
For a circular animation, the camera should start at a point that would start the circular motion around the object you want to focus on. For example, if you want the camera to orbit around a central object (like a car or a statue), place the camera at one end of the car or statue while taking into account the circular path the camera would have to take. You can move the camera using the G key and rotate it with the R key. Press Numpad 0 to view the scene through the camera, so you can check the composition.
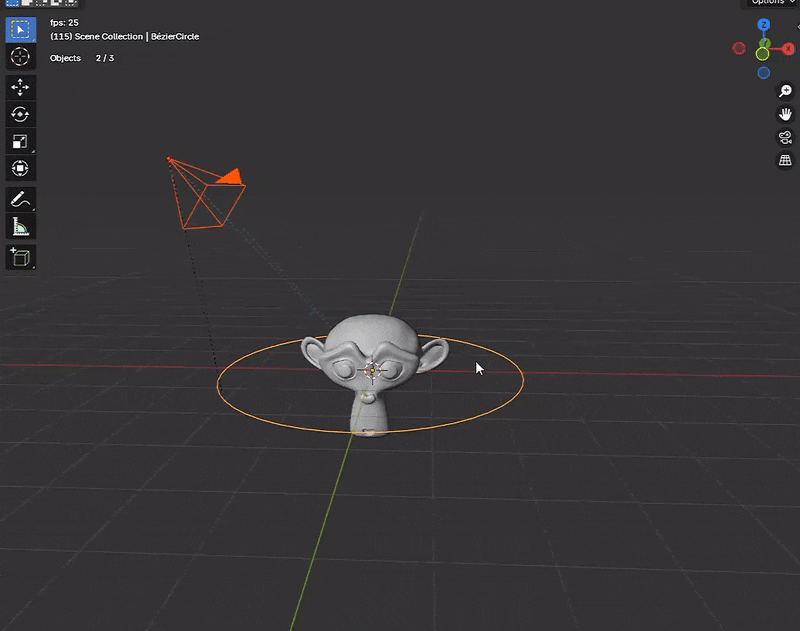
Step 4: Create a Circular Path
To make the camera move in a circle, you need to create a circular path. Here’s how:
- Press Shift + A and choose Curve > Circle.
This creates a circle curve in your scene that will act as the path for your camera. - Scale the circle to the size you need.
Use the S key and move your mouse to adjust the size of the circle. Make sure the circle surrounds the object you want the camera to orbit.
For instance, if you are filming a building, the circle should be large enough to capture the whole structure. - If needed, move the circle so that your object is at the center of the circle.
To do this, select the circle, press G, and then move it so that its center matches the object’s center.
Step 5: Apply the Follow Path Constraint to the Camera
Now that you have a circle, you need to make your camera follow it:
- Select the Camera:
Click on the camera to ensure it is selected. - Parent Camera and Follow Path:
With the camera selected, hold down shift and select the circe. The circle should be the active selection. Click Ctrl + P and select “follow path” - Animate the Path:
Blender will automatically add keyframes that make the camera follow the circle over time. However, you are completely free to customize this.
Step 6: Adjust the Camera’s Position on the Path
Once you have applied the Follow Path constraint, your camera will move along the circle. However, you may need to adjust the position and timing:
Evaluation Time:
In the curve’s data properties, you can adjust the Evaluation Time which is found in the Path Animation settings. This value determines how far along the path the camera is. By keyframing the Evaluation Time, you control the speed of the camera along the path.
Step 7: Set the Camera to Look at Your Object
A key part of a drone-like or circular animation is keeping the focus on the object. You can use a tracking constraint to make the camera always point at the object:
- Select the Camera Again:
With the camera selected, go back to the Constraints tab. - Add a Track To Constraint:
Click Add Object Constraint and choose Track To. - Set the Target:
In the Track To settings, set the Target to the object you want the camera to focus on. If you are orbiting around a building, select that building. - Adjust the Axes:
Typically, set the To axis to -Z and the Up axis to Y. This makes sure the camera remains level and always looks at the target.
Step 8: Fine-Tune Your Animation
Now that the camera is following a circular path and tracking your object, you may want to fine-tune the animation:
- Smooth the Motion:
Use the Graph Editor to smooth out any jerky keyframes for the Evaluation Time. Adjusting the curves can make the camera move more naturally. - Adjust the Speed:
Modify the keyframes on the Evaluation Time to control the speed. A slower speed creates a calm, detailed orbit, while a faster speed gives a dynamic, energetic feel. - Add Motion Blur:
In the Render Properties, enable motion blur to add a realistic touch to fast-moving shots. - Experiment with Camera Settings:
Try different focal lengths, sensor sizes, and depth of field settings to see how they change the look of your animation.

Step 9: Preview and Render
After you have set up your circular camera animation, it’s time to see it in action:
- Preview the Animation:
Press Spacebar or click the Play button in the Timeline to view your animation. Watch how the camera moves along the circular path and how it always looks at your target. - Make Adjustments:
If the animation is too fast, too slow, or if the camera does not stay focused on the object, go back and adjust the keyframes or constraint settings. - Render Your Animation:
When you are happy with the results, go to the Render Properties, set your output resolution and format, and press F12 to render a test frame or Ctrl + F12 to render the full animation.
Tips and Tricks for a Successful Circular Camera Animation
Here are some useful tips to make your circular camera animation even better:
Keep Your Path Smooth
The key to a great circular animation is a smooth path. Use a Bezier or NURBS curve and adjust the control points so that the path is gentle and continuous. Avoid sharp corners that can cause sudden camera movements.
Experiment with Different Camera Angles
Even though the camera follows a circle, you can adjust its height or tilt to create more dynamic shots. Try moving the camera higher for a bird’s-eye view or lower for a dramatic ground-level shot. Changing the camera’s position relative to the circle can give your animation a new look.
Use the Graph Editor
The Graph Editor is a powerful tool for fine-tuning animation curves. Use it to smooth out the Evaluation Time keyframes. This will help your camera move in a steady, natural way. The smoother the curves, the more professional your animation will look.
Combine with Other Camera Effects
For more advanced animations, consider combining your circular path with other camera effects. For example, you can add a slight shake to simulate a drone or use depth of field to keep the focus on your subject while blurring the background. These effects add realism and can make your animation more engaging.

Utilize The View Keeper
If you have The View Keeper, use it to save your camera settings and circular animation setups. This tool makes it easy to switch between different camera setups without having to reconfigure everything each time. It is especially useful for projects where you might want circular camera animations and also shots from different angles.

Plan Your Storyboard
Before setting up your animation, plan out the shots you want to capture. Sketch a storyboard or list the key scenes. Knowing what you want to achieve will help you design the perfect circular path. It is similar to how filmmakers plan their shots for a movie to ensure every angle tells part of the story.
Real World Examples and Inspirations
Circular camera animations are used in many creative fields. Here are some examples to inspire you:
Film and Television
Many blockbuster films use circular or orbiting shots to build drama and emphasize important moments. For example, in The Dark Knight, the camera sometimes circles around the characters during key scenes to create tension. Similarly, in films like Birdman, long, uninterrupted shots that move fluidly add to the immersive experience. In Blender, a circular camera animation can help you capture similar dramatic effects.
Video Games
Video game cutscenes often feature smooth camera moves to transition between gameplay and narrative. Games like The Witcher 3 use dynamic camera angles to follow characters. You also have Assassin’s Creed with it’s famous synchronization point camera animations which is used to show off stunning environments. A circular camera animation in Blender can simulate these effects and add a cinematic quality to your game cinematics.

Architectural Visualization
When creating virtual tours of buildings, a circular camera can give viewers a complete 360-degree perspective. Imagine a drone flying around a modern museum, capturing its sleek design from all angles. This technique is common in architectural presentations and helps clients visualize a space fully.
Product and Commercial Animation
In advertising, a circular camera animation can showcase a product from all sides. Think of a commercial where the camera rotates around a new smartphone or a stylish car. This method highlights every detail of the product and creates a visually appealing advertisement. In Blender, setting up a circular animation can give your commercial renders a professional, high-quality look.
Troubleshooting Common Issues
While creating a circular camera animation is straightforward, you may encounter some challenges. Here are common issues and how to fix them:
- Uneven Movement:
If your camera movement is uneven or jerky, check the curve in Edit Mode. Smooth out any sharp corners and adjust the control points to ensure a consistent path. - Camera Not Staying Focused:
If the camera does not stay focused on your target, verify that the Track To or Locked Track constraint is set up correctly. Make sure the target is correctly assigned and that the To and Up axes are configured properly. - Incorrect Speed:
If the camera moves too quickly or slowly, adjust the Evaluation Time keyframes. Open the Timeline or Graph Editor and fine-tune the timing for a smooth pace. - Path Not Visible:
If you cannot see the circular path, check that the curve is not hidden in the Outliner and that its visibility is enabled in the 3D Viewport. - Render Issues:
If your final render does not match what you see in the Camera View, double-check your render settings and ensure that all constraints and keyframes are set correctly.
People Also Ask
- How do I create a circular camera animation in Blender?
You can create a circular camera animation by adding a circular curve, parent the camera to the curve with the follow path option, and animating the camera along the curve. - How do I set up a circular path for the camera?
Press Shift + A, choose Curve > Circle, scale it to the desired size, and position it around your object. - How do I control the speed of the camera along the path?
Adjust the Evaluation Time in the curve’s data properties or modify the keyframe timing in the Timeline. - How do I ensure the camera stays focused on my subject?
Add a Track To or Locked Track constraint to your camera and set your target object. Adjust the To and Up axes for proper alignment. - Can I change the height of the camera during a circular animation?
Yes, you can keyframe the camera’s position along with the Follow Path constraint to change its height as it moves or by adjusting the circle shape. - What are some common issues with circular camera animations?
Common issues include uneven movement, camera misalignment, incorrect speed, and problems with tracking the target. These can be fixed by adjusting the curve shape, settings and keyframes. - How do I preview my circular camera animation in Blender?
Press Numpad 0 to view through the camera and press Spacebar to play the animation in the Timeline. - Can I use a game controller to adjust a circular camera animation?
Yes, you can use mapping software or Python scripting to control the camera with a game controller, though this is an advanced technique. - What software uses circular camera animations?
Films, video games and architectural visualizations often use circular camera animations to create dynamic and immersive scenes.
Bringing It All Together
Creating a circular camera animation in Blender is an exciting way to add movement and dynamic views to your 3D scenes. By following the steps above, you can set up a camera that smoothly orbits your object, capturing every angle in a continuous motion. This technique is useful for a variety of projects, from cinematic films and video game cutscenes to architectural visualizations.
The process begins by preparing your scene and adding a camera. Next, you create a circular path using a curve and then parent with the Follow Path option to the curve circle. With a few clicks, your camera moves along the curve. By adding a tracking constraint, you ensure that the camera stays focused on your subject. Fine-tuning the animation with keyframes, smoothing the motion in the Graph Editor, and adding effects like motion blur can further enhance the realism and impact of your animation.
This method not only makes your work more engaging but also saves time. Instead of manually animating every camera movement, you rely on the smooth, predictable motion of a circular path. Many creative professionals, from film directors to game designers, use similar techniques to create immersive visuals that capture the viewer’s attention. The same techniques can be applied in Blender to elevate your projects.
As you practice creating circular camera animations, experiment with different path shapes, camera heights, and speeds. Every project may call for a slightly different setup. Look to films, video games, and architectural presentations for inspiration. These real-world examples demonstrate how dynamic camera movements can transform a scene.
Advanced users might also explore combining the circular animation with other camera techniques and tools like The View Keeper for even more customization. You can animate changes in the camera’s position or rotation over time, add a slight camera shake for realism. You can even use The View Keeper to save and switch between multiple shots in your animation with precision without redoing your work every time.
Remember that the key to a great circular camera animation is practice and experimentation. The more you work with these techniques, the more natural and intuitive they will become. As you gain confidence, you can push the boundaries of your creativity and create animations that are not only technically sound but also visually stunning.
Final Thoughts
A circular camera animation in Blender is a powerful way to add cinematic flair to your projects. Whether you are showcasing a product, creating a dynamic game cinematic, or offering a virtual tour of a building, a smoothly moving camera can capture every detail from every angle. By following the steps outlined in this article you can achieve professional-looking results that enhance storytelling in your animation.
Thank you for reading this article on how to create a circular camera animation in Blender. We hope these clear instructions, practical tips, and real-world examples have inspired you to try this technique in your own projects. Enjoy your creative journey in Blender, and may your animations always orbit smoothly around the heart of your scene!


