


Intro: Auto retopology in Blender is the process of automatically rebuilding a messy, high-density mesh into a cleaner low-poly topology. This technique saves 3D artists countless hours by generating organized quads at the click of a button, instead of manually placing polygons. In this comprehensive guide, we’ll explore how to auto retopology in Blender for cleaner meshes – from understanding its purpose, to using Blender’s built-in remesh tools and popular add-ons, to best practices for animation and game engines. Whether you’re a beginner or advanced user, this step-by-step guide will help you master automatic retopology and integrate it into a faster workflow.
What Is Auto Retopology in Blender and Why Is It Useful?
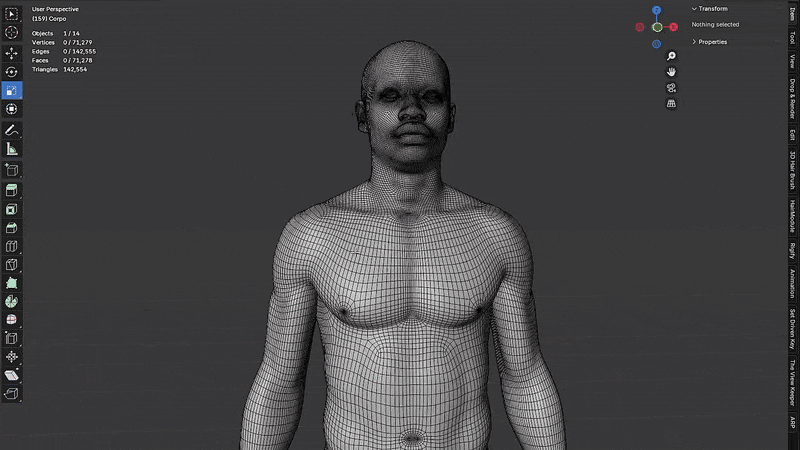
Auto retopology in Blender algorithmically simplifies and restructures a 3D mesh into cleaner geometry, creating a new mesh with proper edge flow over a high-poly model. High-resolution sculpts or scans have messy topology, unfit for animation or games, but auto retopology tools transform dense meshes into lower polycount, all-quad, well-distributed meshes without manual effort. Manual retopology is slow, yet clean topology is vital for deformation in rigging or physics.
Auto retopology accelerates this, producing evenly spaced quad meshes for UV unwrapping, animation, or game engine use—e.g., reducing a 2 million triangle sculpt to ~20k quads in minutes. It’s ideal for fast workflows or concepting. While not always perfect for animation edge loops, modern tools excel with organic forms, offering a base mesh for manual refinement in key areas. In Blender, auto retopology boosts modeling efficiency by delivering a clean starting point for further cleanup and detailing.

What Are the Best Automatic Retopology Tools in Blender?
Blender offers several automatic retopology tools, both built-in and via add-ons, each with its own approach. The best tool often depends on your needs (speed vs. quality vs. budget). Below is a comparison of the top auto-retopology methods available in Blender:
| Tool (Type) | Method & Features | Best Use Case | Notes |
|---|---|---|---|
| Voxel Remesh (Built-in, free) | Voxel-based remeshing (OpenVDB); uniform distribution of quads; no manual guides; options for preserving volume and some adaptivity. | Sculpting workflow (re-meshing during sculpt); merging boolean or separate parts into one mesh. | Extremely fast. Produces evenly sized quadsdocs.blender.org but no regard for edge flow. Fine details under the voxel size will be lost, so not ideal for final low-poly if detail is needed. |
| QuadriFlow Remesh (Built-in, free) | All-quad remeshing using the Quadriflow algorithm; supports symmetry, and options to preserve sharp features and mesh volumedocs.blender.org. You can target a specific face count or ratio. | Generating a cleaner final topology from sculpts or scans (especially organic shapes). | Higher quality output with edge loops following curvaturedocs.blender.org. Slower than voxel remesh. May struggle with very complex or non-manifold meshes (best if mesh is watertight and not overly dense). |
| Quad Remesher (Add-on, paid) | Quad Remesher by Exoside offers advanced auto-retopology with adaptive quad sizing, symmetry support, and guide options like vertex color density painting and material-based edge loops. | High-quality retopology for both organic models and hard-surface meshes (when you need the best auto result). | Produces highly accurate quad meshes, comparable to ZBrush ZRemesher. A commercial add-on with a trial available, it’s essential for serious artists seeking top-quality auto-retopo in Blender. |
| Instant Meshes (External app + free add-on) | Instant Meshes is an open-source remeshing tool with a Blender add-on for export and re-import. It allows users to guide edge flow by painting in its UI. | Free automatic retopology solution for those on a budget or who want more control than Blender’s built-ins. | Generates quad meshes quickly but with less clean edge flow than Quad Remesher. Small details may be lost, and it requires a separate app, adding steps to the workflow. |
| Tesselator (Add-on, paid) | An auto-retopology add-on with a custom algorithm that uses Grease Pencil strokes to guide edge flow. | Users who want to draw guide lines for topology directly in Blender before remeshing (for example, to ensure loops around eyes or hard edges). | Provides more control than unguided methods but is less consistent than ZRemesher or Quad Remesher, often requiring cleanup due to poles. |
| DynRemesh (Add-on, paid) | The “Dynamic Remesh” toolset by AlbertoFX automates decimation and quad remeshing, offering preset polycounts, weight painting, and Quadriflow for final output. | Quickly retopologizing Dyntopo sculpts or 3D scans inside Blender with minimal setup. | Quad Remesher offers an easy-to-use UI, supports vertex weight maps and symmetry, and provides a good first pass but may need manual tweaks in key areas. |
Blender offers free built-in auto-retopo tools (Voxel and Quadriflow) and paid add-ons (Quad Remesher) for varying levels of quality. External tools like ZRemesher and 3D-Coat’s auto-retopo are considered higher quality but require model export.
How to Use Blender’s Quad Remesher for Auto Retopology?
Blender’s Quad Remesher add-on (by Exoside) is a top auto-retopology tool. Here’s how to use it:
- Install the Quad Remesher Add-on: Install and activate it via Add-ons; find its panel in the 3D View sidebar or Object Data Properties. It’s a paid add-on needing license activation.
- Prepare your High-Poly Mesh: Apply transforms and ensure manifold geometry for optimal results. Use symmetry options for symmetrical models.
- Open Quad Remesher Settings: Select the object, set a target quad count in the Quad Remesher panel (e.g., 5,000–10,000 quads for a high-poly sculpt). Key settings:
- Quad Count: Target number of quads.
- Adaptive Size: Slider adjusts quad size by curvature—higher for detail in curves, lower for flat areas.
- Adaptive Quad Count: Prioritizes quality over exact count, possibly exceeding the target for detail.
- Use Vertex Color: Red vertex paint increases density, cyan reduces it.
- Use Materials / Polygroups: Guides edge loops via material slots or face maps.
- (Optional) Define Guides for Important Loops: For features like eyes or mouth:
- Assign materials to regions (e.g., lips vs. face) for edge loop guidance.
- Use Face Sets in Sculpt Mode, convert to materials with “Face Maps to Materials” option, aiding openings like mouths.
- Vertex Paint adjusts polygon density. Quad Remesher lacks direct guide curves, but these methods influence topology.
- Run the Remesh: Enable symmetry if needed, click “Remesh It.” Processing takes seconds to minutes, showing a progress bar; a new mesh is generated.
- Inspect and Tweak: Check the result for:
- Well-captured face loops (eyes, mouth, fingers).
- Minimal poles/spiral, placed discreetly by Quad Remesher.
- Polycount alignment with target; adjust Adaptive Quad Count or target if off.
Fixes: - Undo and tweak settings (e.g., quad count, vertex paint).
- Manually retopologize key areas (e.g., face) over the auto-mesh.
- Use Blender tools to slide edges, add/dissolve loops for cleanup.
Quad Remesher suits organic and hard-surface models, preserving sharp edges, and is user-friendly, though complex models may need manual tweaks. It’s a strong retopology tool.

How to Auto Retopology a Sculpted Model in Blender?
Retopologizing a high-poly sculpt is a key use for auto retopo in Blender. Here’s the workflow:
- Prepare the Sculpt: Start with a clean, closed high-poly sculpt. Apply Voxel Remesh for uniform topology and fill cavities pre-retopo. Refine complex areas and cut openings manually post-process for clean results.
- Choose a Retopology Method: Use Blender’s built-in Quadriflow remesher (accessible to all):
- In Object Mode, select the sculpt, go to Object Data Properties > Remesh, and pick Quad (Quadriflow) mode.
- Click QuadriFlow Remesh; adjust settings in the popup:
- Use Paint Symmetry: Enable for symmetrical sculpts.
- Preserve Sharp: Retains sharp edges/creases.
- Preserve Mesh Boundary: Keeps outer borders if unclosed.
- Preserve Paint Mask/Color: Retains vertex masks/colors (rarely used here).
- Faces (or Ratio): Set target face count (e.g., 10,000) or ratio (e.g., 0.02 of 1 million faces = ~20k).
- Seed: Adjust for varied topology outcomes.
- Click OK to run; it’s computationally heavy and slow on high-poly meshes.
- If Quadriflow struggles (e.g., millions of vertices), pre-decimate with Voxel Remesh or Decimate modifier to ~hundreds of thousands, speeding up the process.
- Inspect the Result: Quadriflow outputs a quad mesh, preserving shape with uniform quads, possibly losing fine details.
- Touch Up if Needed: For characters, auto-retopo may falter on face (eyes, mouth, ears) and hands, lacking ideal loops. Use a hybrid approach:
- Auto-retopo handles body topology.
- Manually retopo face/fingers with snapping/modeling tools, or tweak the auto-mesh, focusing effort on critical areas.
- Project or Bake Details: Post-retopo, bake details via normal maps or Multires. Clean the sculpt, run Quadriflow, and refine complex areas manually for a fast, animation-ready mesh.
How to Use the Remesh Modifier for Automatic Retopology?
Blender’s Remesh Modifier generates a uniform quad mesh matching the original shape, but it doesn’t produce animation-ready edge loops. Here’s how to use it:
- Add the Remesh Modifier: Select the object, go to the Modifiers tab, and add a Remesh (Generate) modifier. It defaults to Voxel mode (Blender 2.91+) or Smooth mode, depending on version.
- Choose the Mode: Options include:
- Blocks: Blocky, voxel-like output, not ideal for clean topology.
- Smooth: Averaged, smooth surface, good for removing small details.
- Sharp: Smooth with preserved sharp edges/corners, adding geometry via Sharpness factor.
- Voxel: Uses OpenVDB voxel grid (like Sculpt mode’s Voxel Remesh), set by Voxel Size (Blender 3.x).
- Set the Resolution: Adjust Octree Depth (Blocks/Smooth/Sharp) or Voxel Size (Voxel) for detail level; use Wireframe to preview density.
- Optional Settings:
- Adaptivity: Reduces polycount with triangles in flat areas; set to zero for all quads.
- Smooth Shading: Defaults to flat-shaded faces; enable for smooth appearance (normals only).
- Remove Disconnected Pieces (Threshold): Older versions had a slider to remove small, detached parts.
- In Voxel mode: Adaptivity (adds triangles), Fix Poles (reduces 6-valence poles).
- Apply the Modifier: Click Apply when satisfied, converting the new topology into actual geometry.
The Remesh Modifier swiftly creates uniform meshes for fixing manifolds, LODs, or base topology, but it lacks animation edge flow and may need high polycounts. It’s a quick cleanup tool, not a complete retopology solution.

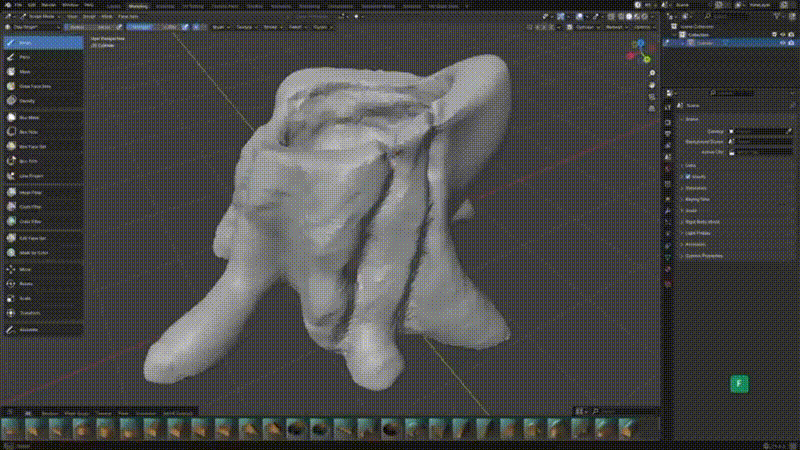
How to Use the Voxel Remesher for Auto Retopology in Blender?
The Voxel Remesher rebuilds meshes by volume, ideal for sculpting and uniform retopology. Here’s how to use it in Sculpt Mode:
- Switch to Sculpt Mode: Select a high-poly model (e.g., a Dyntopo sculpt with triangles), enter Sculpt Mode, and access Remesh options in the top header or Active Tool panel’s Voxel Remesh settings.
- Set the Voxel Size: Voxel Size determines detail—smaller values increase detail, with Blender previewing face count. Use the Eyedropper to set it to the average face size under the cursor. Half Adaptive (in some versions) adjusts resolution by detail, but voxel size is typically uniform unless Adaptivity is used.
- Execute the Remesh: Run Voxel Remesh (Ctrl+R) to generate a uniform quad grid, erasing prior topology while retaining shape.
- Adjust and Repeat if Necessary: Undo and reduce voxel size if details (e.g., protrusions, edges) are lost; increase it if too dense. Adaptivity raises flat-area face size, adding triangles (keep at 0 for all-quads). Fix Poles (if available) reduces edge-meeting points for better flow. Preserve Volume (default on) maintains shape accuracy.
- Continue Sculpting or Use the Result: Voxel remesh aids sculpting by avoiding Dyntopo lag. For final meshes, clean up post-remesh with Mesh Filter > Simplify or Decimate modifier to cut excess faces. It creates a grid without feature-specific loops (e.g., eyes), requiring manual edits or another tool. Large voxel sizes may subtly alter shapes—compare to the original and shrinkwrap if needed for precision.
Common Uses:
- During Sculpting: Merges objects (e.g., nose to head) into one surface.
- Before Quadriflow: Voxel remesh at moderate resolution preps a clean mesh for Quadriflow/Quad Remesher, easing quad solving.
- Stylized Low-Poly Looks: Voxel remesh plus decimation/Adaptivity creates blocky, triangulated styles.
The Voxel Remesher delivers fast, uniform quad retopology, suited for sculpting and simple meshes, but not animation-optimized.
What Are the Best Blender Add-ons for Auto Retopology?
Blender’s add-on ecosystem offers powerful tools that extend its retopology capabilities. We’ve already touched on some in the comparison table, but let’s look more closely at a few top add-ons for auto retopology and what makes each stand out:
- Quad Remesher (Exoside) – Quad Remesher is a top-tier, paid Blender add-on for high-quality, automatic retopology with features that minimize manual work.
- RetopoFlow – RetopoFlow is a paid (but open-source) Blender add-on that simplifies manual retopology with various tools, useful when auto-retopology is insufficient.
- Tesselator –Tesselator is a paid add-on that uses Grease Pencil lines to guide remeshing, offering more control over edge flow, but may still require cleanup.
- DynRemesh / AutoFlow – DynRemesh is a paid, one-click auto-retopo add-on for Blender that simplifies the process with features like weight painting for density control and automatic polycount adjustment.
- Instant Meshes Remesh (by Knekke) –The Instant Meshes Bridge is a free Blender add-on that uses the Instant Meshes program for automatic, all-quad retopology, including UV and material transfer.
- ZBrush & 3D-Coat (external, commercial) – ZBrush’s ZRemesher and 3D-Coat’s Auto-Retopo are powerful external retopology tools often used with Blender; if owned, they offer superior results, otherwise Blender add-ons are good alternatives.
Quad Remesher is the best for quality, other add-ons offer speed or control, and Instant Meshes is free. Manual fixes are often required.

How to Optimize Auto Retopology Results for Animation and Games?
Auto-retopologized meshes need optimization for animation and game use. Here’s how:
- Ensure Sufficient Density in Deformation Areas: Auto-retopo evenly distributes polygons, but animation requires more loops at joints—add manually or use density controls.
- Establish Proper Edge Flow for Animation: Auto-retopo lacks animation-ready flow; manually slide edges and cut loops for muscle/facial anatomy.
- Eliminate Poles and Complex Stars: Reduce poles (5+ edges) from auto-retopo to avoid deformation/shading issues, redirecting flow for mostly 4-way intersections.
- Check Face Normal Consistency: Auto-retopo may flip normals; ensure consistent orientation (Face Orientation overlay all blue, not red) via recalculation for proper shading and baking.
- Use Smoothing/Relaxation Tools: Relax tools even out polygon spacing post-retopo for better deformation, avoiding over-smoothing of details.
- UV Unwrap Thoughtfully: Post-retopo, create UVs with strategic seams, as auto-retopo doesn’t preserve them.
- Polycount Budget and Level of Detail (LOD): If too high-poly for games:
- Use Decimate modifier (Collapse, e.g., 0.8 factor) to reduce polys, monitoring topology for triangulation.
- Manually dissolve minor edge loops (e.g., fewer on pinky vs. thumb).
- Plan LODs: Keep auto-retopo as LOD0, simplify for LOD1 for distant views; clean topology aids engine LOD tools (Unity, Unreal).
- Consider Game Engine Requirements:
- Unreal: Single mesh per section, check shading, disable “Recompute Normals” if needed, use Weighted Normals modifier for low-poly shading.
- Unity: Imports Blender/FBX; scale matches 1:1 (2m in Blender = 2 units in Unity) if applied; assign materials by name.
- Maintain Symmetry if Needed: Fix auto-retopo asymmetry for rigging ease with Blender tools or mirroring, ideally pre-UV unwrapping.
- Test Deformations Early: Rig or use a lattice modifier to test bending (e.g., elbows), adding loops if collapse occurs, before baking/finalizing.
- Game Engine Specific Optimizations:
- Nanite: Handles high-poly static meshes, not skeletal ones; characters need optimized polycounts and normal maps.
- Mobile/VR: Requires aggressive simplification; auto-retopo may exceed budgets, needing lower-count retopo or manual cuts.
- Use Normal Maps and Baking: Normal maps add high-res detail to simpler topology; even quad sizes in retopo ensure quality baking.
Combine auto-retopo’s speed with manual tweaks for production-ready meshes, optimizing animation and game efficiency.
How to Fix Common Issues with Auto Retopology in Blender?
Auto retopology can sometimes yield less-than-ideal results. Here are some common issues you might encounter, and how to fix them:
- Issue: Collapsed or Merged Holes (Lost Openings) – Auto-retopo can merge thin parts; prevent by closing holes or separating parts. If merged, manually cut openings and rebuild. Use “Preserve” options or material/face sets to avoid merging.
- Issue: Ngons or Triangles where Quads expected –Auto-retopo tools mainly produce quads, but triangles or ngons can occur. To fix triangles, manually connect edges or use Alt+J (tris to quads). For ngons, use the knife tool to create quads. If triangles result from Remesh modifier’s Adaptivity, turn it off.
- Issue: Too Many Poles (Stars) – Auto-retopo can produce clustered poles (vertices with non-4 edge counts) and miss surface details. Fix poles by using Grid Fill after deleting faces, spinning edges, or using add-on pole reduction. Manual cleanup is often needed, especially from DynRemesh/Tesselator, as excessive poles hinder subdivision. Auto-retopo may also fail to capture subtle surface details.
- Issue: Inaccurate Surface Detail – Auto-retopo can lose subtle surface details. For small errors, use a Shrinkwrap modifier on affected areas or rely on baking normals/displacement. For large errors, increase polycount or manually adjust subdivided regions.
- Issue: Unwanted Symmetry or Asymmetry – Auto-retopo can incorrectly apply or omit symmetry. Fix unintended symmetry by manual vertex adjustment. Fix missing symmetry by mirroring or using the Symmetrize tool. Always verify symmetry settings before retopologizing.
- Issue: Self-Intersections or Non-Manifold Output –Auto-retopo can cause self-intersections or flipped faces. Fix by manually patching affected areas, using “Merge by Distance” and “Delete Loose” for non-manifold issues, and updating the tool.
- Issue: Uneven Density (too dense in some parts, too sparse in others) –Uneven quad density from auto-retopo can be fixed by painting density (Quad Remesher), segmenting the mesh (Quadriflow), or manually adjusting loops (dissolve/subdivide).
- Issue: Topology Not Suitable for Subdivision – Subdivision can reveal pinching in auto-retopo meshes due to poles or uneven quads. Fix by adjusting edge flow, removing poles, or adding control loops. Clean up excess poles for better subdivision.
- Issue: High-Poly Data Loss (UVs, Vertex Colors, etc.) –Auto-retopo loses UVs, vertex colors, and weight maps. Recover using Blender’s Data Transfer modifier or re-creating them. Quadriflow’s “Reproject Attributes” can help preserve data.
- Issue: Performance Problems Post-Retopology –High-poly auto-retopo can slow down performance. Decimate for viewport, or use Multiresolution with the original high-res for detail. For game engines, optimize with low poly counts and normal maps.
Summary of fixes: Auto-retopo provides a base, but manual fixes are essential for a clean, usable topology. Address issues early and learn to anticipate them.

What Are the Differences Between Auto and Manual Retopology in Blender?
Automatic and manual retopology are two paths to the same goal – a clean mesh – but they differ in significant ways. Let’s compare auto vs manual retopology on key aspects:
| Aspect | Automatic Retopology | Manual Retopology |
|---|---|---|
| Speed & Efficiency | Very fast – can generate a full new topology in seconds or minutes with minimal input. For example, one-click remesh can save hours. Great for quick iterations. | Time-consuming – retopology by hand can take hours or days for a complex model. Every polygon is placed by the artist. Much slower, but allows careful planning. |
| Required Skill | Auto-retopo is easy to use, requiring little topology knowledge, though understanding settings improves results. | Manual retopology is difficult, requiring strong topology, edge flow, and anatomy skills. |
| Topology Control | Auto-retopo provides limited direct control over loop placement and density, leading to potentially unpredictable results and loss of detail. | Manual retopology offers complete control over loop and polygon placement, enabling precise optimization of edge flow and critical loops for deformation. |
| Result Quality | Auto-retopo creates uniform quads but may need adjustments for animation due to poles or spirals. It’s a starting point for refinement. | Manual retopology by skilled artists ensures high-quality topology, optimized for deformation and clean subdivision. |
| Adaptability | Auto-retopo can struggle with complexity, causing artifacts or merges, making it a helpful but incomplete solution. | Manual retopology can handle any complexity, as artists can strategically decompose and retopologize complex forms, overcoming algorithmic limitations. |
| Use of Guides/References | Some auto tools allow guides (curves, paint, symmetry) to influence output, but it’s indirect. You can’t explicitly dictate each face placement, only hint. | Manual retopology ensures precise edge loops, fully capturing the sculpt and artistic intent. |
| Consistency | Auto-retopo ensures uniform quads but may misplace loops or miss small details. | Manual retopology ensures quality with skill but allows intentional inconsistency, like adding more loops in key areas and fewer elsewhere, which is beneficial. |
| When to Use | Auto-retopo is ideal for concepting, testing, and secondary assets, offering a quick start for further refinement. | Manual retopology is best for characters, hero assets, and models needing precise topology for deformation and optimization. |
| Artist Effort | Auto retopology saves time upfront but may require cleanup if the result isn’t production-ready. However, it often requires less effort overall. | Manual retopology is time-consuming but results in a clean mesh with little need for fixes |
Auto-retopo is fast but less controlled; manual retopo is slow but precise. A hybrid approach, using auto-retopo as a base and manually refining critical areas, is often the most efficient. Manual retopo skills remain vital for complex or detail-oriented work.
How to Bake High-Poly Details onto an Auto-Retopologized Mesh?
After auto retopology, bake maps like normal, ambient occlusion, or displacement to transfer high-poly details to the low-poly mesh, making it appear more detailed.
Here’s a step-by-step guide to baking high-poly details onto a low-poly (auto-retopo) mesh in Blender:
- Prepare the Low-Poly Mesh: UV unwrap the low-poly mesh, create a high-res image, and select it as the baking target in the Shader Editor.
- Set up the High-Poly: Position the high-poly to perfectly overlap the low-poly, apply transforms, remove non-deformation modifiers, and optionally organize it in a separate collection.
- Match Naming Conventions (Optional): Some artists like to name the low and high with suffixes (_low, _high) and use the Cage option. But in Blender, we can simply use selection for baking. However, if using the Cage method, ensure the low-poly has a cage or use ray distance.
- Baking Settings:
- In Blender’s Render Properties, find the Bake section.
- Choose Bake Type: Normal (since we want to capture detail normals).
- Enable Selected to Active. This tells Blender we will select the high-poly as well, and it should bake from the high (selected) to the active object (low-poly). The Ray Distance field appears – you may need to tweak this if the default cage distance doesn’t cover the offset between meshes.
- Set Extrusion (Ray Distance) to control how far rays project. Start with a small value like 0.1 and adjust as needed—too low causes holes, too high may capture unwanted surfaces.
- If your low-poly is already enveloping the high-poly, you could also use a custom cage object (a copy of low-poly slightly inflated). But usually adjusting ray distance is enough.
- Make sure Output is set to the image texture you created (having it selected in the Shader Editor is enough).
- Check the Normal Space: for most real-time uses, choose Tangent space normal. (World space normals are for specific cases like if the object won’t rotate; tangent is standard for games.)
- Leave Selected to Active ticked, and Invert Y if needed (Blender by default bakes +Y as up (OpenGL format). If your target engine uses DirectX format (like Unreal by default), you’ll invert the green channel later or bake accordingly).
- Perform the Bake:
- Select the high-poly first, then the low-poly as the active object. Click Bake to generate a normal map, with Blender casting rays from low to high-poly. Check progress, then view the purplish normal map in the UV Editor.
- Adjust ray distance or bake parts separately to prevent errors. Increase ray distance for holes, set a margin to fix seams, and flip the Y channel if normals look inverted (Unreal requires flipped Y from Blender).
- Apply the Normal Map to the Low-Poly: Save the baked image. Connect the normal map to a Normal Map node, then to the Principled BSDF’s Normal input, to apply high-poly details to the low-poly.
- Other Maps: Bake AO using the AO bake type. For height/displacement, use Diffuse/Emit or an external baker. For color, use Diffuse/Color Attribute.
- Use Cage if needed: If you had trouble with ray distances (especially in tight concave areas), an advanced step is to duplicate the low-poly, inflate it slightly (e.g., with a Displace modifier pushing normals outward a bit), and specify that as the Cage in bake settings. This can give more control over ray projection. But often not needed unless there are significant inward details.
- Verify in Engine or Render: Test the baked normal map in your target environment, checking for visual fidelity and adjusting as needed for lighting, seams, or inversions.
Troubleshooting common baking issues:
- If the normal map looks skewed or wrong, ensure you applied rotation/scale on both high and low poly (Ctrl+A in Object Mode) before baking. Non-applied scale can mess up ray casting.
- If the baked details are offset, maybe the meshes weren’t perfectly aligned. They must occupy the same space.
- Spikes or jagged artifacts can occur if your ray distance was too large (rays “shot through” and caught the back of the model). Reducing distance or using a cage fixes that.
- If you see the low-poly’s own shape shading (like you can tell where its edges are on the normal map), it might be because you didn’t set smooth shading on the low-poly. The low-poly should be smooth shaded before baking (Blender then uses the averaged normals for baking, which is what you want for a normal map).
Baking transfers high-poly details to a low-poly mesh, balancing performance and visual quality for game engines. With the right settings, the process becomes straightforward.

How to Export an Auto-Retopologized Model for Game Engines?
Once you have your low-poly model (with baked maps, if needed), exporting it to a game engine like Unreal or Unity is the final step. Here’s how to ensure a smooth export:
- Final Prep in Blender:Before exporting:
- Apply all transformations (Ctrl+A > Apply Rotation & Scale) to ensure consistent scale.
- Rename objects and materials clearly for engine compatibility.
- Remove unnecessary helper objects, rigs, or modifiers.
- Verify correct normals (outward facing).
- Decide whether to export multiple objects as one combined FBX or separate files, considering engine preferences (Unity vs. Unreal).
- Choose Export Format: The most common formats for game engines are FBX and glTF (or sometimes OBJ for static, but OBJ doesn’t support armatures or normals as well as tangents). FBX is the industry standard for Unreal and Unity.
- For Unity: Unity can actually import .blend files directly by converting them via Blender, but it’s not always reliable. Exporting FBX is generally safer.
- For Unreal: FBX is the typical format. glTF is gaining support (Unreal has a glTF importer plugin), but FBX is proven.
- FBX Export Settings (Blender): Go to File > Export > FBX (.fbx). In the export dialog:FBX Export Settings:
- Limit to Selected Objects: Check, select mesh/armature.
- Scale: 1.00.
- Apply Scalings: FBX All or All Local.
- Forward/Up Axes:
- Unity: -Z Forward, Y Up.
- Unreal: -Y Forward, Z Up (or use Blender defaults and “Convert Scene” in Unreal).
- Geometry: Smoothing: Face or Normals Only.
- Armature: Add Leaf Bones: Off.
- Bake Animation: Off (static/rig) or On (animations).
- Essentially, a straightforward export with applied transforms typically just works. Example: One common tip for Unreal was “select all and press Ctrl+A Apply > Scale”blender.stackexchange.com in Blender, then export FBX with scale 1.0, and in Unreal, import with uniform scale 1.0 – that yields correct size.
- Import into Game Engine:
- Unity: Unity FBX import: drag file, check normals and scale (should be 1). Adjust in Unity or Blender if needed.
- Unity will also automatically create materials for each material slot. Assign your textures (normal map etc.) to these materials. Remember to mark the normal map texture as a Normal Map in Unity’s import settings (so it knows to treat channels properly).
- If rigged, Unity will detect an Armature and you’d import as an Avatar for animating.
- Unreal Engine: In the Content Browser, use Import, select the FBX. In import options:
- For static meshes, just ensure “Import Normals and Tangents” is on (to use Blender’s normals, or you can let Unreal recompute normals, but with a normal map you usually keep your custom normals). Make sure “Transform Vertex to Absolute” is off (you want it relative to origin).
- For skeletal meshes, check the Skeletal Mesh box, assign skeleton if reusing or import a new one, etc.
- Scale: Unreal FBX import: scale 1.0, adjust to 100 or enable “Convert Scene Unit” if tiny, verify size with mannequin.
- Assign materials and textures in Unreal. Import your normal map (make sure to flip green channel if coming from Blender OpenGL normals – in Unreal, open the texture, check “Flip Green Channel” if needed). Apply the normal to the material.
- Unity: Unity FBX import: drag file, check normals and scale (should be 1). Adjust in Unity or Blender if needed.
- Double-Check in Engine: Once imported:
- Check for import issues like incorrect smoothing or normals. If shading is off, enable “Use MikkTSpace” or import tangents in Unreal. Both Unreal and Unity use MikkTSpace, like Blender does for baking.
- Scale & Orientation: Ensure the model is oriented correctly in Unreal. If rotated 90 degrees, adjust the forward axis on export or rotate it in-engine. Using -Y forward in Blender helps align with Unreal, while Unity usually imports correctly.
- Animations: (if relevant) If you exported animations or armatures, test that the skeleton came through properly. Unity will show bones, Unreal will show skeleton hierarchy.
- Collision (if static): The auto-retopo mesh might be too high poly for collision. In engines, you can set simple collision (box, capsule) or auto generate convex collision. If it’s a complex shape (like a detailed rock), consider creating a separate low-poly collision mesh or let the engine do a lower-poly collision hull. Auto-retopo should have given fairly clean geometry that the engine’s auto-convex collision can handle decently.
- LOD and Nanite Considerations:
- In Unity, if needed, use LOD Group and provide multiple FBX or use Unity’s Simplify utility or a third-party tool to generate LODs.
- In Unreal Engine 5, Nanite efficiently renders dense static meshes, removing LOD concerns. If your mesh is already game-ready (under 100k polygons), Nanite may be unnecessary. However, it only supports static meshes—skeletal animations still use traditional LODs.
- If not using Nanite, set up LODs in Unreal by generating or importing them. Creating multiple auto-retopo versions can improve quality over Unreal’s auto-generated, triangulated LODs
- Testing: Put the model in a test scene, apply animations if skeletal, or physics if needed. Check for any deformation oddities or physics explosions (could indicate a scale or weight issue). Generally, if everything was done right, the model should behave nicely.
Recap important points for export:
- Always apply scale in Blender (uniform scale = 1)blender.stackexchange.com.
- Use FBX for reliability.
- Set the correct axis conversion for the target engine (to avoid 90° rotations).
- Import with normal map and check that shading is correct (might need to flip green in Unreal).
- Manage scale differences between Blender’s metric and engine’s unit (for Unreal, either apply 0.01 scale at export or simply apply scale in Blender and let Unreal “Convert Units”).
By following these steps, your clean auto-retopologized model should arrive in Unity or Unreal Engine with minimal fuss, ready to be used in-game. The careful work of retopology, UVs, and baking culminates here: a model that looks high-res but runs efficiently, integrated into your game engine of choice.

Frequently Asked Questions (FAQ)
- What is the difference between auto retopology and decimation?
Decimation: quick, messy triangle reduction. Auto-retopo: slower, clean quad reconstruction. - Does Blender have a built-in auto retopology tool like ZBrush’s ZRemesher?
Blender has QuadriFlow for quad remeshing and Voxel Remesher. For ZRemesher-level quality, the paid Quad Remesher add-on is preferred. - Are there any free auto-retopology add-ons for Blender?
Free auto-retopo options: Instant Meshes add-on (requires external app), Blender’s remesh/decimate modifiers. Paid options like Quad Remesher offer better quality. Future Blender updates may add improved free tools. - How do I use symmetry with auto retopology?
It depends on the tool:- Blender’s Quadriflow: enable Use Paint Symmetry and set your symmetry axes in Sculpt Mode (e.g., X symmetry)docs.blender.org. It will then produce a symmetric retopo.
- Voxel Remesh: in Sculpt mode, voxel remesh automatically respects Sculpt symmetry (X/Y/Z) if enabled. So make sure symmetry is on before remeshing if desired.
- Quad Remesher add-on: it has X, Y, Z symmetry toggles in its options. Turn on the axis you want symmetry across.
- If auto-retopo lacks symmetry, retopo the whole mesh and mirror it. Be aware that forcing symmetry can change non-symmetrical sculpts. Symmetrize the sculpt before auto-retopo for better results.
- The auto-retopology gave me some really weird topology in one area. What did I do wrong?
Weird auto-retopo results are usually due to input mesh problems (thin surfaces, complex geometry, non-manifold edges, double vertices) or unreasonable target face counts. Clean the mesh, adjust settings, or retopo in stages. - How high-poly can my model be for auto-retopology?
High-poly meshes can crash or slow down auto-retopo. Quadriflow is limited; Voxel Remesh creates high-poly results. Quad Remesher is faster. Reduce mesh density before auto-retopo, or use optimized third-party tools. - My auto-retopo mesh is great, but can I use it for subdivision (for rendering)?
Auto-retopo meshes with even quads subdivide well, but triangles, n-gons, and clustered poles cause issues. Clean up problem areas. Test subdivision, and fix topology as needed. - When should I avoid auto retopology?
Avoid it (or use it with caution) for:- Highly mechanical models that need exact edges (auto-retopo might undesirably soften or change some edges, or not capture perfectly straight lines). Manual modeling or retopo might be better for, say, a complex hard-surface piece where edge loops matter for bevels.
- Models with critical topology requirements – e.g., if you are making a face for animation and need perfect loops around eyes, mouth, etc. Auto-retopo can get close, but if it’s a hero character, you might do it manually for full control.
- Very low-poly game models – Auto-retopo isn’t ideal for extremely low-poly meshes; manual methods are better for targeted optimization.
- Situations where the auto-retopo fails repeatedly – If you try and keep getting weird outputs or crashes, sometimes it’s faster to just retopologize by hand or try a different approach (e.g., retopo in sections).
- Learning purposes: ILearn manual retopology to understand good topology. Auto-retopo is useful for most assets, but not all.
- How do I retopologize only part of a model automatically?
Suppose you have a character and you only want to auto-retopo the body but do the head manually, or you have a model made of distinct parts. You have a few options:- For complex meshes, separate into parts, retopologize each part individually, then stitch them back together by merging border vertices.
- Use vertex groups or masking (if tool supports): To exclude areas during auto-retopo: try hiding (may not work), or duplicate, delete, retopo, and merge.
- Retopo the whole thing, then replace part with original: For selective retopology: project manual retopo onto auto-retopo, split and rejoin meshes, or use vertex painting for density control (with caution). Splitting and rejoining is often the best method.
- After auto-retopology, can I use Multires or sculpt on the new mesh?
Absolutely! This is actually a common pipeline:- Sculpt high detail with Dyntopo or on a high-res sphere, etc.
- Auto-retopo the sculpt to get a clean low/medium poly mesh.
- Use a Multiresolution modifier on that new mesh to subdivide it a few levels.
- Project the original high-frequency details onto the multires mesh (Blender’s Multires has a “Reproject Higher Subdiv” function if you have the high-res as a shape – or you can shrinkwrap).
- With a multires sculptable mesh and lower base topology, you can refine details while maintaining a clean, low-poly base for animation or export. Auto-retopology approximates the original, so some details may differ, but reprojection helps preserve them. Blender’s Shrinkwrap modifier (set to Project along normals) can align the subdivided mesh before adding new details.
Conclusion: How to Master Auto Retopology in Blender for Faster Workflow
Auto retopology in Blender streamlines your workflow by reducing manual retopology work. Tools like Voxel, QuadriFlow, and Quad Remesher offer different solutions, making the process more efficient. While not a one-click fix, it frees you to focus on creative tasks.
To master auto retopology in Blender, keep these final tips in mind:
- Know your tools’ strengths and weaknesses: Use Voxel Remesh for quick uniform topology during sculpting; use Quadriflow or Quad Remesher for final meshes that need better structure. Leverage add-on features like guide curves or vertex painting to influence results when needed.
- Integrate manual tweaks: Don’t be afraid to correct and refine auto-generated meshes. The fastest artists use a hybrid approach – auto-retopo for speed, manual retopo where precision is needed. For example, auto-retopo the body of a creature, but hand-retopo the face loops. This still saves a ton of time overall.
- Practice a variety of cases: Try auto-retopology on different models – organic sculpts, hard surface objects, scans – to learn how the algorithms respond. You’ll develop an intuition for “this area might confuse it, I should adjust the input or guide it”. Experience is key.
- Stay updated with community and tools: Blender’s retopology tools keep improving. The community often shares new workflows (for instance, using Geometry Nodes for retopo experiments, or new add-ons appearing on Blender Market). By following Blender forums and releases, you can catch enhancements like future integration of better remesh algorithms or improvements to Quadriflow. Also, listen to pros: many share tips on how they use ZRemesher vs Blender, etc., which can be applied with the tools you have.
- Optimize for your target platform: Always think about the end-use. If it’s for animation, ensure deformation loops (even if it means manual edits). If it’s for a game, keep polycount in mind and use baking. Auto-retopo is a means to an end – a clean mesh – but you must then carry it through UV, baking, export as we detailed.
Auto retopology speeds up modeling while maintaining quality by reducing manual work. With experience, you’ll balance automated and manual methods for optimal results. As Blender’s tools and add-ons improve, auto retopology will continue to enhance workflow efficiency.
Recommended
How to Create Realistic Hair Clumping in Blender: A Step-by-Step Guide
Flow Made With Blender Wins Oscar: Latvia’s Indie Animated Feature Film Making History
Can you zoom the camera in Blender?
How Do I Create a Cinematic Camera Shot in Blender?
Musgrave Texture Removed in Blender 4.1 – Workarounds and Alternatives
What is the camera’s field of view in Blender?
How do I set up a scene with multiple cameras in Blender?
Is Arcane 3D Animated? Unveiling the Secrets Behind Its Revolutionary Style
Understanding PixelHair: A Comprehensive Guide to Realistic 3D Hair Assets


