


Introduction
MetaHuman, Epic Games’ framework, creates high-fidelity, fully rigged digital humans for Unreal Engine animation. Achieving photorealistic MetaHumans in Unreal Engine 5 requires attention to detail due to human sensitivity to facial imperfections. This guide details techniques for real-time (games, virtual production) and offline (cinematics, film) rendering, covering customization, materials, hair, lighting, animation, and optimization. It notes differences for Unreal Engine 4 or early UE5 workflows, offering a roadmap for convincing digital actors.
Key Takeaways
- Realism relies on high-quality assets (models, textures) and accurate shading/lighting, blending artistic and technical tweaks.
- Real-time rendering balances fidelity and performance; offline rendering prioritizes visual quality.
- Topics include MetaHuman customization, skin/hair material optimization, realistic lighting, animation, and real-time performance tuning.
- An FAQ addresses skin realism, ray tracing vs. Lumen, custom textures, and avoiding the uncanny valley.
What Makes a MetaHuman Look Realistic?
Realism combines artistic and technical elements:
- High-Quality Model & Textures: MetaHumans use scanned geometry and high-res (2K, 4K+) textures for detailed facial features, pores, and natural color variations, with normal maps for micro-wrinkles and high-res eye/teeth textures.
- Physically-Based Materials: Skin requires subsurface scattering, specular reflections, and roughness; eyes need refractive corneas; teeth need translucency. MetaHuman shaders (e.g., Subsurface Profile) need tuning for specific lighting.
- Realistic Hair Groom: Strand-based Groom system ensures proper strand thickness, density, and movement, with eyebrows, eyelashes, and peach fuzz enhancing realism.
- Lighting and Rendering: Physically accurate lighting, shadows, and global illumination (Lumen for real-time, path tracer for offline) with HDRI environments or area lights integrate MetaHumans believably.
- Lifelike Animation: Natural facial/body animation via MetaHuman Animator (using iPhone capture) prevents uncanny valley, with subtle eye saccades, blinks, and micro-expressions.
- Post-Processing and Lens Effects: Depth of field, motion blur, film grain, and ACES tonemapper mimic real cameras, breaking CG sterility.
- Context and Composition: Realistic environments, matched lighting, and interactions (shadows, occlusion) ensure scene coherence.
Realism requires iterative refinement of these aspects.

Real-Time vs. Offline Rendering: Key Differences
One of the first considerations is whether your MetaHuman will be rendered in real-time (e.g. during gameplay or an interactive simulation at 30-60+ FPS) or in an offline context (e.g. a cinematic or film shot where each frame can be rendered slowly and composited). Both scenarios aim for realism.
Below is a summary of how approaches differ:
| Aspect | Real-Time (Games/Virtual Production) | Offline (Cinematics/Film) |
|---|---|---|
| Performance | Must hit target FPS (optimize polycounts, LODs, simplify shaders). | No FPS constraint (can use ultra-high poly, heavy shaders). |
| Lighting & GI | Lumen for dynamic GI; limited ray tracing for reflections/shadows. May use baked lighting for static scenes on older versions. | Full path tracing or multi-bounce ray tracing for accurate GI, soft shadows, and reflections. Lighting can be physically accurate (HDRI, area lights with proper shadows). |
| Skin Shading | Subsurface scattering via Subsurface Profile (approximation). Specular/roughness tuned for performance and stability (e.g., limit texture size on mobile). | True light scattering via path tracing. Can use highest quality Subsurface Profile settings. No need to simplify – every subtle map (specular, roughness, normal) at full res for close-ups. |
| Hair | Strand-based groom at close range; switches to cards or thinned strands at distance (LOD). Physics may be simplified. | Full strand groom for all shots. High simulation quality or artist-curated grooming per shot. No LOD switching needed (can force highest detail for consistency). |
| Post-processing | TAA/Upsampling for anti-aliasing; real-time bloom, lens flares, etc., at runtime. Some effects (depth of field, motion blur) tuned to be cheap. | High-quality motion blur and depth of field via Movie Render Queue. Optionally render at higher resolution or multi-sample for crisp detail. Post effects can be dialed up (e.g., high quality ray-traced DOF, cinematic bloom). |
| Output | Interactive output on screen or XR display. Needs to maintain responsiveness. | Image sequences or video output. Can afford to render each frame over seconds or minutes for final compositing. |
Neither approach is inherently superior; real-time rendering optimizes for performance while maintaining perceived realism, whereas offline rendering prioritizes uncompromising visual quality. The following sections will detail specific workflow adjustments to achieve realistic MetaHuman rendering tailored to each context.

Setting Up Unreal Engine 5 for Realistic MetaHumans
Configure UE5 for high-fidelity rendering:
- Rendering Features: Enable Lumen for dynamic global illumination, Generate Mesh Distance Fields for Lumen, and Force No Precomputed Lighting. Use Path Tracer and Ray Tracing (DirectX 12/Vulkan) for offline rendering.
- Lighting Settings: Increase shadow map resolution, enable ray-traced or high-res shadows, disable shadow culling for cinematics, and activate Contact Shadows for facial depth.
- HDRI/Skylight: Use Sky Light with HDRI for realistic ambient lighting and reflections, supplemented by area/Rect Lights for indoor scenes.
- Post-Process Volume: Apply Unbound Post Process Volume, disable Auto Exposure, set manual Exposure compensation, use ACES tonemapper, and add subtle Bloom/Ambient Occlusion.
- Material Quality: Set Material Quality Level to High, ensure subsurface scattering, and verify scalability settings for non-mobile platforms.
- Physics/Cloth: Increase Chaos Cloth/hair physics Solver Substeps, enable Physics Interpolation for real-time, and use Sequencer substepping for cinematics.
- Testing: Create a test level with varied lighting (daylight, night, indoor, backlit) to evaluate MetaHuman materials, using Content Examples for reference.
This setup ensures a robust foundation for realistic MetaHuman rendering.
Customizing Your MetaHuman for Realism and Uniqueness
Customize MetaHumans to avoid generic looks:
- MetaHuman Creator: Blend scanned presets, adjust nose shape, iris size, or skin tone, referencing real photos for plausible features.
- Imperfections: Add freckles, moles, scars, or makeup in Adobe Substance 3D Painter, with normal/bump maps for raised features, using asymmetry (e.g., one-cheek mole).
- High-Resolution Skin: Use default textures or project 8K scan-based textures (e.g., TexturingXYZ) for pores/wrinkles, wrapping to custom sculpts for advanced workflows.
- Morph Target Editing: Adjust face/body shapes in Maya/Blender, importing custom morph targets for precise jawline or muscle tweaks, preserving rig integrity.
- Custom Hair/Clothing: Import Maya XGen/Blender hair grooms and Marvelous Designer clothing, skinned to the MetaHuman skeleton, with physics or baked simulations.
- Export to DCC: Sculpt wrinkles or accessories in Maya/ZBrush, refine weight painting, and re-import via Mesh to MetaHuman or blendshapes, maintaining rig compatibility.
Unique imperfections and tailored assets enhance lifelike individuality.

Skin Material and Subsurface Scattering
Human skin has a unique appearance because light penetrates it and scatters within (subsurface scattering, or SSS). The MetaHuman skin material uses the Subsurface Profile shading model to simulate this effect. Here’s how to optimize skin:
- Base Color Map (Albedo): Ensure the albedo texture is high-resolution and captures realistic skin coloration with subtle variations, such as redness in cheeks or yellowness on the forehead. When adding custom details like scars, update the base color to reflect appropriate hues, like darker or redder tones for scars. Avoid overly uniform colors to maintain natural skin complexity. Overlay curvature-based tints in the shader to enhance depth in crevices and facial features.
- Roughness and Specular: Set the roughness value around 0.4, using a roughness map to vary shininess across the face, with oilier areas like the forehead having lower roughness. Maintain specular levels between 0.3–0.5, typically around 0.35, to achieve subtle, skin-appropriate reflectivity. Adjust roughness for custom features, like increased roughness for stubble areas, to ensure consistency. Avoid excessive shininess to prevent a plastic-like appearance that undermines realism.
- Normal Maps and Micro Detail: Import normal maps correctly, ensuring the green channel is properly configured to preserve fine details like pores and wrinkles. Utilize MetaHuman’s multiple normal maps for different detail levels, adding displacement maps for offline rendering close-ups if needed. For older characters, incorporate additional normal details like crow’s feet or forehead lines to enhance age-specific realism. Normal maps are essential for real-time rendering, providing depth without excessive computational cost.
- Subsurface Profile Settings: Adjust the Subsurface Profile’s scatter radius and color to match the character’s skin tone, with lighter skins showing more reddish subsurface and darker skins leaning toward brown-orange hues. Fine-tune these settings to balance the skin’s waxiness or hardness, ensuring a natural appearance. Ensure the base color remains effective at a distance when SSS effects diminish. This customization enhances the skin’s lifelike quality across various lighting conditions.
- Two-Sided SSS (Backscatter): Enable two-sided SSS for thin geometry like ears to allow realistic light bleed when backlit, a critical detail for authenticity. Verify that the material is configured for Subsurface Profile and two-sided rendering, as MetaHuman defaults support this. In real-time with Lumen, ensure backscatter is visible on thin areas, while path tracing handles this accurately. Confirm settings to maintain consistent light interaction across the model.
- Additional Maps (Cavity/AO): Incorporate cavity or ambient occlusion maps to darken deep facial areas like nostrils or eye sockets, adding depth to the skin’s appearance. Multiply an AO map in the material to enhance realism, particularly for custom textures. Pack maps efficiently, combining roughness, AO, and specular into single textures for performance. Ensure these maps align with any custom modifications to maintain visual coherence.
Start with MetaHuman’s scanned, high-resolution textures as a baseline, using Material Instances for real-time parameter tweaks, and test under varied lighting to ensure consistent realism.
Eye Shaders and Realistic Eye Appearance
The eyes are often cited as the most crucial element for a believable character. MetaHuman eyes are built with multiple layers: a diffuse iris, a normal-mapped iris detail, a translucent cornea with refraction, and a tear-line mesh. To enhance eye realism:
- Cornea Refraction and Brightness: Set the cornea’s refraction index to approximately 1.336 to ensure accurate distortion of highlights and reflections, mimicking a human eye. Position key lights or use HDRI environments to create visible catchlights, adding life to the eyes. Verify that the MetaHuman eye material’s clear coat or separate mesh supports this effect. Avoid dark, dull eyes by ensuring consistent light reflections across scenes.
- Iris Texture and Depth: Use high-resolution iris textures with intricate, photograph-based patterns to replicate the stroma’s complexity, avoiding flat or unrealistic colors. Leverage MetaHuman’s parallax mapping to simulate depth within the iris for a three-dimensional effect. Adjust iris size to enhance character expressiveness or youthfulness as needed. Ensure custom eye colors maintain detailed textures for authenticity.
- Pupil Dilation: Configure pupil size to correspond with scene lighting—smaller in bright conditions, larger in dim settings—to maintain realism. Animate pupil dilation for dynamic, lifelike effects during emotional or environmental changes. Ensure pupil sizing aligns with the scene to avoid subconscious viewer discomfort. This subtle detail significantly enhances the eyes’ believability.
- Tear Line and Wetness: Enable the tear-line mesh at the eye’s edge, ensuring its shiny, high-reflectance material simulates the wet boundary between eyeball and eyelid. Verify the eye occlusion mesh is active to prevent unnatural SSS glow around the eyes, particularly after head modifications. Confirm these elements are not disabled during customization. These technical details are essential for maintaining realistic eye appearance.
Proper configuration of eye materials, combined with dynamic movement and appropriate lighting, ensures a convincing and expressive gaze that anchors the MetaHuman’s realism.

Teeth and Oral Material
If your MetaHuman will be talking or smiling, the teeth and mouth become important. The teeth material should have some subsurface or translucency (teeth are slightly translucent in real life). MetaHumans have this built in – the teeth use a Subsurface Profile as well (different from skin’s). Things to check:
- Teeth Shade: Slightly tint teeth off-white to avoid an unnatural, overly bright appearance, incorporating subtle variations like hairline cracks or edge transparency. Ensure the shade complements the character’s design, avoiding excessive staining unless intentional. Test under different lighting to prevent glowing effects. This natural coloration enhances the teeth’s lifelike quality.
- Wetness inside Mouth: Apply specular highlights to the tongue, gums, and inner mouth to achieve a moist, realistic appearance, particularly visible in close-up shots. Adjust the shader to ensure adequate reflectivity for a wet look. Verify that these elements shine appropriately under lighting conditions. A glossy mouth interior reinforces the illusion of a living character.
- Self-Shadowing: Ensure external lights cast shadows within the mouth cavity to avoid a flat, unrealistic appearance, with ray tracing providing automatic accuracy. For raster lighting, consider adding a small light or ambient occlusion to darken the throat area. Prevent bright pink glows in the mouth interior that break immersion. Proper shadowing creates a natural, grounded oral cavity.
Iterative tweaking of MetaHuman materials under various lighting conditions, using high-resolution textures and Material Instances, ensures photorealistic skin, eyes, and teeth that elevate the character’s overall realism.
Hair and Grooming: Realistic Hair for MetaHumans
Hair is critical for realism, using UE’s Groom system:
- Highest LOD: Force LOD 0 in Sequencer/Blueprint for close-up strand detail, preventing popping.
- Strand Thickness/Density: Adjust strand width in Groom Asset Editor for natural appearance, using high anti-aliasing to avoid aliasing.
- Hair Shading: Use dual-scattering/transmission for root-to-tip gradients and rim glow, ensuring the hair lighting model is enabled.
- Groom Physics: Simplify real-time physics (stiffness, damping, collision) or use high-substep offline simulations, fixing clipping issues.
- Groom Card LODs: Set LOD swap distances to retain strands for close characters, using LODSync for alignment with body LODs.
- Custom Grooms: Import Alembic grooms from Maya XGen/Blender for unique hairstyles, binding to the MetaHuman skeleton with Groom Binding assets.
- Eyebrows/Facial Hair: Adjust density/shape for natural variation, add stubble via grooms or roughness maps, and scalp stubble for bald characters.
- Performance (Real-Time): Limit strand-based hair to primary characters, using card-based hair for background, optimizing with CPULodMode or Tick Every Other Frame.
Careful hair management ensures convincing, context-appropriate realism.

Real-Time Lighting (Games & Virtual Production)
For real-time applications, you need a lighting setup that is performant yet sells realism:
- Use Physically Based Lighting: Unreal Engine’s lights use physically accurate units, ensuring MetaHuman materials react realistically to light sources like a 100,000-lux sun or a few hundred-lumen bulb. Maintaining plausible intensity ranges prevents washing out subsurface effects or introducing noise from dim lighting. This approach aligns lighting with the character’s calibrated shaders for consistent realism. Proper calibration enhances the lifelike quality of skin and eyes in dynamic environments.
- Lumen Global Illumination: Lumen delivers real-time bounced lighting, enabling environmental color interactions, such as red wall reflections on skin, for immersive realism. Activate Lumen in Project Settings and pair with Sky Atmosphere, Skylight, and Directional Sun for outdoor scenes. Indoor scenes may require emissive materials or invisible lights to supplement bounce in enclosed spaces. This dynamic system ensures MetaHumans integrate naturally into varied lighting conditions.
- Shadow Quality: Enable Contact Shadows for fine details like eyelash or hair shadows, preventing a floaty appearance in close-ups. Adjust cascaded shadow maps or use ray-traced shadows for sharp, accurate facial shadowing, requiring DX12 and a capable GPU. Test shadows around eyelashes and under the chin to ensure natural, non-jagged results. High-quality shadows are essential for grounding MetaHumans in their environments.
- Three-Point Lighting for Characters: Employ a key light, softer fill light, and rim light to enhance character realism, mimicking portrait photography techniques. In Unreal, a Rect Light or Directional Light serves as the key, with a Skylight or low-intensity Rect Light as fill, and a backlight for silhouette definition. This setup ensures MetaHumans stand out naturally in game environments. Environment lighting can often fulfill these roles, simplifying implementation.
- HDRI and Reflections: Use an HDRI-backed Skylight to provide natural ambient light and realistic eye reflections, enhancing scene authenticity. Select cubemaps matching the scene’s mood, like studio or sunset, for cohesive lighting. This method instantly boosts realism compared to flat lighting without requiring extensive setups. It’s particularly effective in sparse scenes to maintain visual fidelity.
- Avoid Over-Polishing in Real-Time: Resist excessive bloom or rim lights that can blow out highlights or create unnatural glows, preserving dynamic range. Use Unreal’s Eye Adaptation cautiously, locking exposure for cinematic moments to avoid disruptive shifts. Balanced lighting maintains realism without masking flaws through over-stylization. Subtle effects ensure MetaHumans appear naturally integrated into the scene.
Cinematic and Offline Rendering (High Quality)
When using Unreal Engine for cinematics or still renders (where you can take time to render), you have additional tools at your disposal:
- Path Tracing for Ultimate Realism: The Path Tracer renders scenes with physically accurate lighting and shading, producing near-realistic MetaHuman visuals at the cost of render time. Use it via the Movie Render Queue, ensuring material compatibility and applying denoisers to clean hair and shadow noise. Temporal accumulation in UE5.1+ enhances quality for critical frames. This method is ideal for achieving film-quality results in high-fidelity renders.
- High Sampling and Motion Blur: Increase Temporal and Spatial Sample Counts in the Movie Render Queue for super-sampled images, reducing aliasing on hair and improving reflections. Enable Motion Blur with a 180° shutter angle for natural cinematic motion, respecting sequence camera settings. This smooths fine details like hair, minimizing popping or strobing. High sampling ensures polished, professional-grade sequences or stills.
- Cinematic Lighting Techniques: Add soft rect lights or bounce cards just out of frame to enhance eye highlights or fill shadows, acceptable in non-interactive cinematic shots. The Path Tracer or high-quality raster handles multiple lights, though shadow-casting lights may slow ray-traced renders. These “invisible” lights elevate character realism subtly. They emulate traditional film lighting for impactful visuals.
- Depth of Field and Focus: Use the Cine Camera with a low f-stop, like 2.8, to blur backgrounds and out-of-focus facial areas, mimicking real camera lenses. This directs viewer focus and enhances realism, though heavy DOF may fuzz hair edges, requiring super-sampling or Path Tracer. Check DOF in MRQ outputs, as real-time previews may differ. Cinematic DOF creates compelling, lifelike compositions.
- Color Grading: Apply Color Grading LUTs or adjust Post Process Volume settings for cinematic looks, like warm skin tones with cooler shadows, maintaining realistic color ranges. Test grades externally or via Unreal’s color wheels for shadows, midtones, and highlights, adding subtle vignettes for focus. Consistent grading enhances mood without breaking realism. This final touch refines the render’s emotional impact.
- Lens Effects: Add subtle chromatic aberration, film grain, or faint lens flares to mimic real optics, breaking digital perfection for authenticity. Configure Unreal’s bloom for anamorphic streaks if desired, keeping effects minimal to avoid exaggeration. These touches enhance the perception of a camera-captured image. Subtle lens effects elevate cinematic renders without overpowering the scene.
When lighting your MetaHuman, constantly compare to real references, ensuring shadows and highlights match real-world conditions for authenticity. A well-lit MetaHuman can achieve stunning realism, while poor lighting flattens the result, underscoring lighting’s critical role alongside character assets.

Animation and Facial Expressions: Bringing MetaHumans to Life
Even a perfectly modeled and lit MetaHuman will fall into the uncanny valley if its movements are robotic or unnatural. Animation quality is pivotal for realism, especially for interactive characters or cinematic close-ups of facial performance.
Here’s how to ensure your MetaHuman’s motion is as realistic as its appearance:
- MetaHuman Animator / Facial Capture: MetaHuman Animator captures nuanced facial performances via iPhone or stereo cameras, applying actor expressions to MetaHumans. It records subtle cheek raises, lip curls, and eye squints, producing believable lip-sync and expressions. The plugin converts captures into animation curves for high-fidelity results. This tool is a fast path to realistic facial animation, wowing audiences.
- Body Motion Capture: Use motion capture with the Epic skeleton for realistic body movements, capturing subtle weight shifts and finger gestures. Systems like Xsens or Vicon drive MetaHumans naturally, or keyframe with Control Rig and IK for quality results. Include eye tracking, head nods, and blinks every 3-5 seconds to avoid uncanny stillness. These details make characters feel alive and dynamic.
- Physics Simulations for Secondary Motion: Enable Chaos physics or ML Deformer for secondary elements like hair, earrings, or loose clothing, adding lifelike motion. In real-time, simplify simulations for performance; offline, sculpt corrective shapes for extreme poses. ML Deformer simulates muscle and skin sliding for advanced realism. These touches enhance authenticity, especially for dynamic characters.
- Avoid Over-Exaggeration: Keep facial expressions within human ranges to maintain realism, avoiding overly wide eyes or stretched smiles. Reference real human expressions by recording yourself to guide animation limits. Ensure expressions suit the MetaHuman’s face structure naturally. This prevents breaking the illusion of a lifelike character.
- Blendshape Corrections: Adjust blendshape weightings or sculpt corrective morphs in a DCC for odd deformations, like unnatural wrinkles during expressions. Import fixes to Unreal for seamless integration, critical for customized MetaHumans. This is vital for close-ups where minor flaws are noticeable. Correctives ensure smooth, realistic facial motion.
- Animation Timing and Easing: Apply ease-in/ease-out to movements, like head turns with slight overshoot or blinks with fast-down, slower-up curves, to obey physics. Fine-tune timing to eliminate mechanical feels, ensuring natural acceleration and deceleration. These subtleties enhance lifelike motion quality. Realistic timing is key to convincing animations.
- Eye Contact and Emotional Connection: Ensure accurate eye lines for interactions, using target objects to focus on cameras or characters, mimicking natural glance patterns. Animate eyes to shift between eyes and mouth in conversations for thoughtfulness. Avoid fixed or overly darting gazes to maintain natural rhythm. These movements convey emotional depth and engagement.
- Lip Sync and Speech: Align lip-sync with ARKit blendshapes for visemes, using Live Link Face or audio-to-animation tools, refining manually for phoneme clarity. Include jaw and subtle tongue movements for visible vowels to enhance realism. Precise sync ensures speech looks natural and believable. This alignment is critical for conversational authenticity.
- Gestures and Expressions Matching Voice: Coordinate facial expressions and body language with voice acting, ensuring calm voices pair with relaxed faces or angry tones with furrowed brows. Continuity between audio, visuals, and micro-expressions convinces audiences of genuine emotion. This harmony enhances storytelling impact. Matching gestures to context creates compelling performances.
Animating a MetaHuman realistically involves capturing authentic motion with tools like MetaHuman Animator, then polishing timing and expressions to ensure believable, story-driven performances.

Performance Optimization for Real-Time Realism
If you are aiming for real-time execution (a game, VR experience, or interactive simulation), all the realism improvements must be balanced against performance constraints.
Here are some tips to keep your MetaHuman realistic and efficient:
- Leverage LODs: MetaHumans include up to eight LODs, switching based on screen size to reduce complexity at distance. Tune LOD distances to ensure only close characters use LOD0, with others dropping to LOD1 or LOD2. Lower LODs use simplified materials, like hair cards, to save performance. This scalability maintains realism while optimizing resource usage.
- Simplify Materials on Lower LODs: Use simpler shaders for distant LODs, disabling subsurface scattering or switching to opaque materials after LOD2. Check MetaHuman material graphs for Quality Switch nodes to automate feature toggling. This reduces computational cost for background characters without noticeable quality loss. Simplified materials ensure efficient rendering in crowded scenes.
- Optimize Groom for Performance: Convert grooms to hair cards for lower LODs or reduce strand counts to lighten hair rendering demands. Disable physics simulations for background characters’ hair to save CPU/GPU cycles. These adjustments maintain visual quality for distant MetaHumans. Optimized hair is critical for performance in real-time environments.
- Use Hardware Features: Apply ray tracing selectively for character reflections and key shadows, using include/exclude lists to limit its scope. Ray-traced shadows for directional lights ensure detailed hair shadows without full-scene costs. This balances visual enhancements with performance efficiency. Selective ray tracing elevates realism affordably.
- Adjust Texture Streaming: Use 4K textures for heads but 2K for less critical body parts, with BC5 compression for normal maps to save memory. Monitor texture streaming to avoid pool overflows, adjusting resolutions if needed. Test on target hardware to ensure smooth performance. Efficient streaming maintains high visual quality within memory limits.
- LOD Sync Component: Use the LODSync component to synchronize head, body, and groom LODs, preventing mismatches like high-LOD hair with low-LOD heads. Verify its functionality in customized MetaHuman Blueprints for consistent visuals. This ensures cohesive rendering across character elements. LODSync enhances visual integrity and performance.
- Blueprint and Tick Optimization: Disable unnecessary blueprint ticks, like eye autofocus, for non-essential characters to reduce CPU load. Turn off cloth physics ticks when not needed, streamlining computations. These tweaks optimize performance in scenes with multiple MetaHumans. Efficient blueprints maintain smooth real-time execution.
- Crowd Strategies: Use imposters or simpler models for distant crowd MetaHumans, leveraging depth of field to blur low-LOD details. Limit LOD0 to primary characters, reducing resource demands in dense scenes. This approach ensures performance without sacrificing foreground realism. Crowd optimization is key for large-scale environments.
- ML Deformer vs Morphs Performance: Disable ML Deformer for secondary characters, as its GPU cost may outweigh benefits in non-hero roles. Evaluate its visual impact versus performance trade-offs in profiling. Reserve it for key characters requiring muscle simulation. This ensures efficient use of advanced deformation tools.
- Profiling and Scalability: Profile scenes with Unreal’s ProfileGPU and Stat Unit to identify bottlenecks, simplifying shaders or reducing bone counts as needed. Expose Scalability settings to force lower LODs or disable ray tracing on low-end hardware. Test on target platforms to confirm performance. Profiling ensures optimized, scalable MetaHuman rendering.
Optimization involves strategic sacrifices, leveraging MetaHuman’s scalable LODs and quality settings to balance cinematic realism with real-time performance, ensuring efficient deployment across platforms.
Having covered all the major aspects of creating a realistic MetaHuman in Unreal Engine 5, from asset prep to rendering and performance, we’ll now move to a FAQ section to answer specific common questions. Then we’ll provide sources and citations for further reading and verification.

FAQ (Frequently Asked Questions)
- How can I make my MetaHuman’s skin look more realistic?
Use high-resolution textures with Subsurface Scattering enabled for realistic light penetration, as MetaHumans utilize a subsurface profile. Set roughness to ~0.4 and specular to 0.3–0.5 to avoid a plastic look, enhancing natural sheen. Add imperfections like freckles, pores, and color variations (e.g., cheek redness) for authenticity. Test under varied lighting, disabling auto-exposure, to ensure consistent subsurface effects like glowing ears. - Do I need ray tracing to achieve realistic MetaHumans in Unreal Engine 5?
Ray tracing isn’t required, as Lumen’s real-time global illumination delivers high realism without hardware demands. Ray-traced reflections and shadows enhance eye and hair detail, usable with Lumen for hybrid effects. The Path Tracer offers superior accuracy for cinematic renders but is slower. Lumen suffices for games, with ray tracing elevating realism if hardware supports it. - What’s the difference between using Lumen and the Path Tracer for MetaHuman rendering?
Lumen provides real-time dynamic global illumination for interactive scenes, using approximations for bounced light. The Path Tracer, an offline renderer, computes precise lighting with multiple bounces and true reflections for cinematic quality. Path Tracing excels in skin translucency but is slow, unsuitable for gameplay. Lumen offers near-comparable realism for games with minor limitations in complex lighting. - How can I improve my MetaHuman’s hair quality and prevent it from flickering?
Use the highest LOD for strand-based Groom in close-ups, locking LOD 0 to maintain detail and prevent flickering. Increase anti-aliasing with Temporal Super Resolution or Movie Render Queue samples to reduce aliasing issues. Adjust physics settings, like damping, or disable simulation to stabilize strands. Enable motion blur for cinematic hair or use hair cards for distant shots. - My MetaHuman looks good in Unreal Engine 5, but how do I avoid the uncanny valley (that eerie feeling)?
Avoid the uncanny valley with motion capture for natural facial and body animations, ensuring lifelike micro-expressions. Sync expressions with dialogue to prevent emotional mismatches. Add asymmetrical imperfections in movement, like uneven smiles, for organic realism. Use cohesive lighting and high-quality eyes and teeth to ground the character naturally.
To avoid it:- Ensure natural animation: Use real human motion capture for face and body if possible. MetaHuman Animator or Live Link can imbue your character with lifelike timing and micro-expressions. Pay attention to eye movement and blinking – a common mistake is a beautiful model with a dead-eyed stare. Make sure the character blinks and the eyes track naturally.
- Match emotion and expression: If the character is speaking happy lines but has a neutral face, it will feel off. Sync up the facial expressions with the context.
- Add imperfections: Perfect symmetry or overly smooth movement can trigger unnatural feelings. We mentioned adding skin blemishes; similarly, in animation, maybe one side of the lip raises slightly more in a smile, etc. Those asymmetric, imperfect motions make the character feel more organic.
- Lighting and context: Sometimes uncanny valley is worsened by lighting that doesn’t match the character (like the character is lit too flat compared to the environment). Always light the MetaHuman as part of the scene so they don’t “float.” Also, subtle shadowing in eyes (using an eye occlusion mesh, which MetaHumans have) helps ground the eyes in the face.
- High quality eyes and teeth: People notice eyes and teeth a lot. If either looks CG (e.g., eyes not refracting light or teeth too white and diffuse), it can be unsettling. Make the eyes moist and glistening, the teeth slightly translucent.
Polishing animation, expressions, and rendering details ensures MetaHumans feel authentic and engaging.
- Can I use MetaHumans for film-quality renders?
MetaHumans achieve film-quality renders with high LODs, Path Tracer, and offline settings for photorealism. Customize with 4K/8K textures or DCC sculpting for VFX-comparable detail. UE5’s Movie Render Queue supports heavy rendering, with Maya exports for specific shots. Real-time iteration and path-traced outputs streamline cinematic workflows, blending game and film production. - How do I add custom textures (tattoos, makeup, scars) to a MetaHuman?
Customize MetaHuman textures using material blending, decals, instance controls, or full texture replacement for tattoos, makeup, or scars. Ensure consistency across diffuse, normal, and roughness maps for realistic results. Methods vary in complexity, from non-destructive decals to advanced texture edits. Community tutorials guide texture painting for seamless integration.
You have a few options:- Blend Materials: MetaHuman skin material allows blending of up to three skin texture sets (like face, arms, etc.). You can utilize masks to overlay a tattoo or makeup. For instance, export the character’s skin texture, paint the tattoo on in Photoshop or Substance Painter, then import it and use the material’s UV masks to apply it just on that area.
- Decals: For a quick non-destructive way, use mesh decals in UE5. You can project a decal of a tattoo or dirt onto the character. This is flexible if you don’t want to edit the base texture. The downside is decals can have sorting issues or shine differences if not perfectly setup.
- Material Instance Controls: Check if the MetaHuman material has parameters for things like makeup or roughness variation. Some versions of MetaHuman assets included preset masks for blush, etc., which you can toggle in the material instance. If not, you can extend the material – e.g., add a “scar” normal map input that you can turn on for a particular character’s material instance.
- Full Texture Replacement: For major changes (like giving the character a completely new face texture), you can export all the face textures (diffuse, normal, etc.) via Quixel Bridge or by finding them in the content browser, then edit them in an external program. After editing (say, adding age spots, changing eyebrows shape), re-import and assign them to a duplicate material instance so you don’t affect other characters. This is a bit advanced but gives total control. Just maintain the same UV layout.
- The MetaHuman looks different in Unreal Engine 5 compared to UE4. Are there workflow differences I should know?
UE5’s Lumen automates bounce lighting, unlike UE4’s reliance on baked Lightmass or manual fill lights. UE5’s hair rendering and Chaos physics surpass UE4’s NvCloth and shaders, enhancing realism. UE5 eye shaders integrate with Lumen, reducing UE4’s need for reflection captures. UE5-exclusive tools like Mesh to MetaHuman and MetaHuman Animator require more manual effort in UE4 for similar results. - What hardware do I need to render MetaHumans realistically?
Real-time rendering needs a mid-to-high-end GPU (e.g., RTX 3060), strong CPU, and 16-32GB RAM for Lumen and ray tracing. Offline Path Tracer rendering benefits from high-VRAM GPUs and multiple GPUs for faster Movie Render Queue outputs. An iPhone supports MetaHuman Animator facial capture. SSD storage ensures quick loading of high-res assets for smooth workflows. - Where can I find more resources or community tips on making MetaHumans realistic?
Epic’s documentation, Unreal forums, and YouTube tutorials provide core and practical guidance for realistic MetaHumans. 3D art communities like 80.lv and ArtStation offer artist breakdowns, while Blender forums share cross-platform tips. Resources cover shaders, lighting, hair, and MetaHuman Animator workflows. Community insights complement official guides for real-world applications.
There are many resources available:- Official Documentation & Tutorials: The Epic Developer Community pages and documentation have tutorials on creating realistic MetaHuman portraits, customizing MetaHumans, and technical guides on shaders (skin, hair).
- Community Forums and Answers: The Unreal Engine forums have sections for MetaHumans where developers and artists share techniques. For example, threads on hair flicker fixes, improving eye realism, etc. Searching the forums can uncover Q&As by people who faced similar challenges.
- 3D Art Communities: Sites like 80.lv, CGSociety, and ArtStation often have articles or breakdowns. For instance, 80 Level might have interviews with artists who did MetaHuman projects, explaining how they lit and shaded them.
- YouTube Tutorials: Many Unreal Engine YouTubers cover MetaHumans – from setting up a scene with Lumen to using the new MetaHuman Animator. Look for recent videos (2022-2025) to get the latest UE5-centric tips. Some specific topics include: “hyper realistic MetaHuman tutorial”, “MetaHuman lighting tips”, “MetaHuman hair tricks” etc.
- Blender/3D communities: Since you mentioned Blender, there are community members who take MetaHumans into Blender for rendering or editing. While our focus is Unreal, you might still glean tips on lookdev that apply generally (like how to best capture facial detail, which you can then apply back in UE). Blender Artists forum might have threads on MetaHuman workflows, and some use Blender to create custom morphs or textures for MetaHumans.
Epic’s resources and community forums offer comprehensive support for achieving photorealistic MetaHumans across various applications.

Sources and Citations
- Epic Games – MetaHuman Product Page (Official overview of MetaHuman framework)unrealengine.comunrealengine.com
- Epic Games Documentation – Creating Human Skin in Unreal Engine (Techniques for realistic skin shading)dev.epicgames.comdev.epicgames.com
- Epic Games Documentation – Groom Assets and Hair Rendering (Overview of strand-based hair in UE and performance tips)dev.epicgames.comdev.epicgames.com
- Epic Developer Community Tutorial – “Metahumans: A Practical Guide to Creating Realistic Portraits in UE” (Community tutorial emphasizing lighting and posing for realism)forums.unrealengine.com
- Epic Developer Community Tutorial – “Unlocking the Potential of MetaHuman Customization” (Advanced guide on customizing MetaHumans: morph targets, textures, garments, etc.)forums.unrealengine.com
- Epic Developer Community Tutorial – “Lumen vs. Path Tracer in UE5.5: A Comprehensive Comparison” (Article comparing real-time Lumen lighting with offline path tracing, includes MetaHuman considerations)forums.unrealengine.com
- Reddit Unreal Engine Community – MetaHuman Hair LOD Fix (Tip about forcing hair LOD to prevent popping/flicker in cinematics)reddit.com
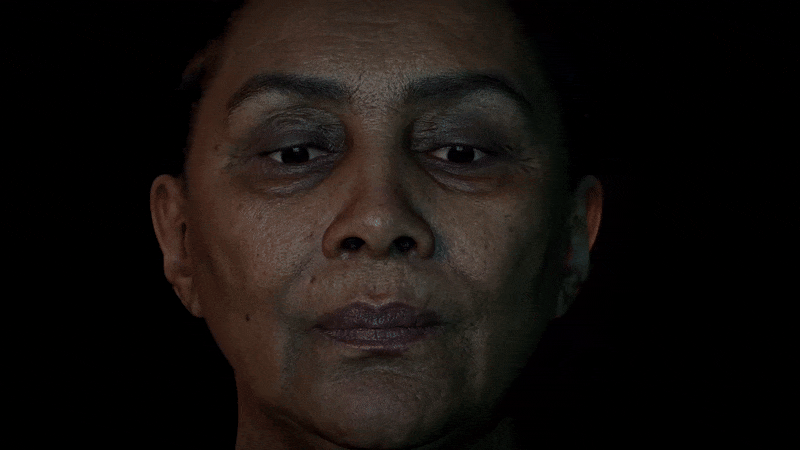
- Texturing.xyz Blog – “Making of Joel” (Industry example of using MetaHuman base with custom texturing and sculpting to achieve a real actor’s likeness in UE5)texturing.xyztexturing.xyz
- Unreal Engine Forums – Various MetaHuman threads (e.g., discussions on realistic skin settingsdev.epicgames.com, hair issues, etc., where developers share solutions).
Recommended
- How do I set a camera as the active camera in Blender?
- What Is the Purpose of the Camera View in Blender?
- How do I export a camera from Blender to another software?
- How to Save Blender Camera Settings: Complete Guide to Managing and Reusing Camera Views in Blender
- How to Create Metahuman Child Characters and Convert MakeHuman Models to Metahuman in Unreal Engine 5
- Intergalactic by Naughty Dog: Rumors, Leaks, and What We Know About the Studio’s Potential Sci-Fi Project
- How to Automate Blender Camera Switching with The View Keeper
- How to Animate a Camera in Blender
- How Do I Switch Between Cameras During an Animation in Blender?


