


Cameras are the unnoticed storytellers in animation. Without them, there’s no way to frame the narrative, conjure cinematic magic, or invite your audience into your 3D world. Yet in Blender, managing multiple camera angles manually can turn into a slog laborious, prone to mistakes, and a drain on your creative energy. This article dives into why automating camera switching is a game-changer, the shortcomings of Blender’s default methods, and how The View Keeper add-on revolutionizes your workflow. From unpacking the basics of the default system to step-by-step guidance, real-world examples, and best practices, we’ll show you how to save time and deliver professional-quality renders with ease.
Automating camera switching in Blender isn’t just a nice-to-have it’s a vital boost to both storytelling and efficiency. Capturing a scene from varied perspectives becomes effortless, letting you craft seamless transitions that guide the audience’s focus exactly where it needs to go. Instead of wrestling with duplicated cameras and endless keyframing, automation frees you from repetitive grunt work, leaving more room for creative decisions. It also keeps your project polished: consistent settings across shots mean visual continuity stays intact, no matter how complex the scene. For big projects be it still renders or full animations batch processing multiple angles in one go slashes production time significantly.
Here’s why it matters in a nutshell:
- Storytelling: Seamless viewpoint shifts sharpen your narrative focus.
- Time: Less manual tinkering means faster turnarounds.
- Consistency: Uniform quality ties your project together.
- Efficiency: Batch rendering tackles large-scale tasks with ease.
The View Keeper takes these benefits and runs with them, turning Blender’s clunky camera management into a streamlined, reliable process. Whether you’re framing a single shot or orchestrating a multi-angle masterpiece, this add-on delivers the tools to work smarter, not harder.
Understanding Blender’s Default Camera Switching Process
Before exploring automation, it’s worth understanding how Blender handles camera switching by default. The native system provides solid tools for creating and tweaking camera views, but when you’re juggling multiple angles, things can get messy fast. Typically, artists animate camera transforms position, rotation, focal length by setting keyframes manually. It’s precise, sure, but painstakingly slow. Another approach involves duplicating cameras for each shot and tying them to timeline markers to switch views at specific moments. This works for small-scale projects, but it quickly clutters your scene and risks inconsistent settings across cameras. Both methods demand heavy manual effort, hiking up the chance of errors and dragging down your workflow, especially in intricate scenes.
The process usually unfolds like this: you keyframe a camera’s movements and settings over time for full control, or you use markers to flag when a particular camera takes over. On a simple project, that’s manageable. But as shots multiply, the cracks show. Constantly duplicating cameras or keyframing every tweak eats time. The Outliner fills with duplicate objects, turning scene management into a headache. Manually re-entering settings invites inconsistencies focal length drifts, depth of field shifts, renders don’t match. Tie everything to timeline markers, and you’re locked in; adjust one thing, and simulations or physics can throw a fit. It’s a system that bends under pressure.
In larger projects, these flaws turn into serious roadblocks. Complex timelines with dozens of shots mean production slows to a crawl as you wrestle with each angle. Mistakes in keyframing or marker placement lead to jarring transitions or mismatched renders. Scenes with heavy simulations lag under manual switches, disrupting the flow. Worst of all, the grind leaves little room to experiment with creative camera moves you’re too busy keeping the basics afloat.
Here’s where it stumbles most:
- Time Sink: Repetitive adjustments and cluttered scenes slow you down.
- Errors: Inconsistent settings and misplaced markers derail quality.
- Rigidity: Timeline dependency limits flexibility in advanced setups.
For professional animators and studios, these pain points scream for a better way. The View Keeper steps in to automate the chaos, transforming a clunky process into something efficient and reliable letting you focus on the art, not the hassle.

What Is The View Keeper?
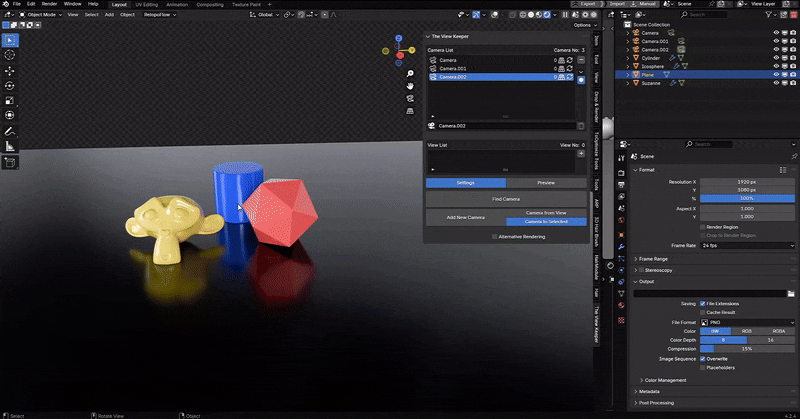
The View Keeper is a clever Blender add-on that takes the headache out of multi-camera workflows by automating camera switching and management. Instead of juggling duplicate cameras or painstakingly keyframing every angle, it lets you save, tweak, and recall multiple “views” or view records all within a single camera. This means your desired angles, complete with position, rotation, lens settings, and depth of field, are stored neatly, ready to be tapped with a click.
It’s a game-changer for how animators handle cameras in Blender. You can switch between saved views instantly, no manual keyframing or scene clutter required. Need to render every angle at once? The View Keeper’s batch rendering churns out all your saved views simultaneously, each with its own custom settings like resolution, file format, and output path. By keeping everything centralized in one camera, your scene stays clean and manageable, whether you’re crafting stills or full animations.
Built to mesh seamlessly with Blender, The View Keeper slots into the side panel (hit N in the 3D viewport) with a user-friendly interface that lists your view records at a glance. It plays nice with both Cycles and Eevee, adapting to photorealistic renders or quick previews without skipping a beat. The add-on doesn’t bulldoze Blender’s native tools it enhances them, layering on automation and control while preserving the flexibility you already know. Once installed, it feels like a natural extension of your workflow, no major adjustments needed.
For animators and visual storytellers, this is where it shines:
- Speed: Flip between camera views mid-playback without breaking stride.
- Consistency: Lock in uniform settings across angles for a cohesive narrative.
- Focus: Spend less time on technical tweaks and more on the story.
The View Keeper isn’t just a tool it’s a workflow overhaul. By automating the grunt work, it hands you the freedom to experiment with angles, nail consistent looks, and streamline production all while keeping your creative flow uninterrupted.
The Power of Automating Camera Switching with The View Keeper
Automating camera switching with The View Keeper transforms your multi-camera workflow in Blender, saving time and boosting creativity. This innovative add-on eliminates the need for manual keyframing by letting you switch between camera views instantly. Whether you’re an animator or a studio pro, The View Keeper streamlines your Blender workflow, ensuring every shot is precise and consistent without the hassle of traditional methods.
How The View Keeper Saves Multiple Camera Views
One of The View Keeper’s standout features is its ability to store multiple camera views within a single camera object. You can save view records complete with position, rotation, focal length, and depth of field without duplicating cameras. This keeps your scene clutter-free and organized, a major perk for anyone managing a complex Blender project. No more tedious adjustments; just save your angles and move on.
Switching Camera Views Seamlessly in Blender
Switching between stored views with The View Keeper is fast and intuitive. Using its simple interface, you can toggle between saved view records with a single click no manual repositioning required. It even supports real-time previews during playback, letting you fine-tune each angle before rendering. For animators seeking to automate camera switching in Blender, this seamless integration keeps your creative flow uninterrupted.

Automating Camera Changes in the Timeline
The View Keeper takes timeline management to the next level. Instead of setting markers manually, you can keyframe view record changes, and the camera will switch angles automatically at predefined points. This ensures smooth transitions that enhance storytelling, free of jarring cuts or misaligned shots. It’s a game-changer for creating fluid animations in Blender with minimal effort.
Why The View Keeper Stands Out for Animators
Here’s how The View Keeper optimizes your multi-camera workflow in Blender:
- Speed: Instantly switch views, skipping the keyframe slog.
- Precision: Automated settings ensure error-free, consistent shots.
- Creativity: Spend less time on setup and more on exploring angles.
Keeping Transitions Smooth and Professional
Smooth camera transitions are essential for polished animation, and The View Keeper delivers. By storing consistent settings in each view record, it eliminates errors like abrupt changes or mismatched renders. This automation lets you focus on the narrative, knowing the technical side is handled. For anyone looking to automate camera switching in Blender, The View Keeper offers an efficient, pro-level solution.
How to Automate Blender Camera Switching with The View Keeper
Automating camera switching in Blender doesn’t have to be a chore. The View Keeper, a powerful add-on that simplifies the process. With this tool, you can install it, save camera views, set up automatic switches, and batch render all in a few clicks. Whether you’re a beginner or a pro, here’s how to streamline your Blender camera workflow with The View Keeper.
Installing and Setting Up The View Keeper in Blender
Getting started with The View Keeper is quick and easy. First, download the latest version from the Yelzkizi.org. In Blender, head to Edit > Preferences > Add-ons, click “Install,” and select the downloaded ZIP file. Enable it by checking the box next to The View Keeper, then press N in the 3D Viewport to access its panel. Once installed, you’re ready to automate your Blender camera switching with minimal setup.
Saving and Naming Camera Records with The View Keeper
Saving camera views is a breeze with The View Keeper. Select your camera, adjust it to the desired angle, and click “Add New View Record” to store its settings position, rotation, focal length, everything. Rename each record (e.g., “Wide Shot” or “Close-Up”) using the “Rename Camera Record” feature for clarity. You can even attach custom render settings like resolution, file format, and output folder to each view, keeping your Blender camera workflow organized and shot-ready.
Keyframing Camera Records for Smooth Transitions
Forget manually keyframing every camera tweak. With The View Keeper, you save an entire camera state in one go then keyframe the view record switches in your timeline. This automates transitions between angles, delivering seamless cuts that elevate your animation. It’s a fast way to reduce manual work and keep your focus on creative storytelling.
Triggering Automatic Camera Changes in Blender
The View Keeper offers flexible ways to automate Blender camera switching:
- Timeline Keyframes: Add keyframes to switch view records at specific frames.
- Button Controls: Toggle views instantly via the add-on’s interface during playback.
- Custom Scripts: Advanced users can use Python scripts to customize automation.
This setup cuts down on manual intervention, letting your creative flow run uninterrupted.
Batch Rendering Animations with Seamless Camera Cuts
Ready to render? The View Keeper’s batch rendering feature outputs all saved view records at once, each with its own settings and folder. This ensures consistent quality across shots and organizes your exports automatically no post-render sorting needed. It’s the perfect finish to an efficient Blender camera workflow with The View Keeper.
Why Automate Camera Switching?
Automating camera switching with The View Keeper is a game-changer for Blender animation workflows, boosting efficiency and creativity. It cuts out the slog of manual camera management, letting you focus on storytelling instead of technical busywork. From faster setups to cleaner projects, here’s why automating camera switching matters and how The View Keeper makes it happen.
Speed Up Scene Setup and Editing
Manual camera switching slows you down, but The View Keeper turns that around. Save your go-to camera setups as predefined view records, then recall them instantly with a click no reconfiguring needed. This effortless editing speeds up your Blender animation workflow, slashing downtime and letting you tweak scenes on the fly. It’s a fast track to a smoother creative process.
Eliminate Mistakes with Consistent Settings
Inconsistent shots are a headache in manual camera work, but automation with The View Keeper fixes that. Every view record locks in uniform settings position, focal length, depth of field so each angle matches perfectly. By cutting out repetitive adjustments, it reduces human error, ensuring your renders stay polished and professional every time.
Keep Blender Projects Organized
Duplicating cameras for every angle clutters your scene, but The View Keeper keeps it lean. Store multiple views in a single camera object, leaving your Outliner clean and manageable. Fewer objects mean better performance too lighter scenes and faster renders making your Blender animation workflow as efficient as it is tidy.
Save Time on Revisions and Client Feedback
Revisions can drag on, but The View Keeper streamlines them. Update view records in seconds without rebuilding setups, then deliver multiple angles for client review fast. This quick-turnaround approach to feedback saves hours, boosting productivity and keeping projects on track.

Key Benefits of Automating Camera Switching with The View Keeper
- Speed: Instant view switches for rapid setups and edits.
- Accuracy: Consistent settings eliminate errors.
- Organization: Single-camera management for a clutter-free scene.
- Efficiency: Fast revisions accelerate project delivery.
Automating camera switching with The View Keeper frees you from repetitive tasks, letting your creativity shine in Blender. It’s the smart way to work smarter, not harder.
Real-World Scenarios Where Automated Camera Switching Saves Time
Automated camera switching with The View Keeper isn’t just a concept it’s a practical time-saver for Blender multi-camera workflows. Whether you’re animating dialogue, action, or product shots, this add-on delivers efficiency and polish. Here’s how it shines in real-world scenarios and transforms your animation process.
Everyday Uses of The View Keeper in Animation
The View Keeper makes complex scenes a breeze. For dialogue scenes, switch effortlessly between wide shots and close-ups no manual tweaks needed. In action sequences, automate dynamic cuts between views to heighten motion and drama with smooth transitions. Product animations? Capture rotating perspectives in one seamless render, showcasing every detail. Architectural walkthroughs benefit too move room to room with automated camera changes, keeping the narrative fluid and professional.
Boosting Multi-Camera Animation Workflows
Managing dozens of angles in Blender gets messy fast, but The View Keeper streamlines it. Store all camera views in one central interface, preserving unique settings like focal length and depth of field for each record. Revisions become painless update settings without digging through a crowded timeline. Plus, rendered files stay organized by view, simplifying post-production in your Blender multi-camera workflow.
Handling Multiple Angles with a Single Camera
Forget cluttering your scene with extra cameras. The View Keeper lets you save unlimited view records on a single camera, giving you flexibility to experiment with angles and find the perfect composition. This centralized approach keeps your Blender scene manageable, cuts render times, and boosts performance no more Outliner overload.
Key Ways The View Keeper Saves Time in Blender
- Dialogue: Instant switches between shot types.
- Action: Seamless cuts for dynamic sequences.
- Products: Continuous renders from all angles.
- Walkthroughs: Fluid room-to-room transitions.
Fine-Tuning Settings Without Starting Over
Each view record locks in detailed settings focal length, depth of field, and more ensuring consistent visual quality across shots. Need to tweak something? Hit “Refresh Record” to update a view instantly, keeping your workflow non-destructive. This eliminates the grind of resetting cameras manually, letting you adapt fast and stay creative with automated camera switching in Blender.

Best Practices for Rendering Seamless Multi-Camera Shots
Rendering seamless multi-camera shots requires a mix of organization, consistency, and smart workflows. Start by using clear, consistent naming conventions for view records think “Wide_Shot” or “Close_Up” to effortlessly track different angles. Pair this with designated output folders for each view’s renders, making post-production a breeze. When setting up your renders, balance sample counts, resolution, and denoising settings across all camera records to ensure uniform quality without wasting time. A quick pre-render preview of each view can also save headaches by catching errors before you commit to a full batch render.
For efficiency, consider batch rendering to streamline the process and minimize manual mistakes. This approach not only saves time but also ensures every shot meets a high-quality standard, ready for professional delivery. With a little upfront planning, you can turn a complex multi-angle project into a polished, client-ready video.
How to Keep Multi-Camera Renders Organized
Organization is the backbone of any multi-camera project. Assign each view record its own output folder to keep renders neatly separated. Pair this with descriptive file names like “Scene1_Wide” or “Close_Profile” to simplify sorting and editing later. Consistency is key: ensure all camera views share unified settings, from lighting to resolution, for a cohesive, professional style. This disciplined setup reduces confusion and speeds up your workflow, letting you focus on the creative side of production.
Delivering Professional Multi-Angle Videos
For a standout final product, prioritize quality and efficiency. Automated camera switching can help maintain optimal settings across every shot, ensuring a consistent look without extra effort. Batch rendering ties it all together, cutting down on time and errors while delivering crisp, high-quality output. Organized renders also make revisions a snap, allowing you to present polished, client-ready deliverables with confidence. By blending these practices, you’ll produce multi-angle videos that impress both clients and audiences.
Why The View Keeper Is Essential for Professional Animators
Why The View Keeper Is a Game-Changer for Professional Animators
For professional animators, juggling complex workflows is a daily challenge. Enter The View Keeper a tool that simplifies the chaos of multi-camera animation projects. By streamlining shot list management, accelerating production, and making camera handling effortless, it empowers animators to focus on what matters most: crafting compelling stories. Whether you’re managing intricate shot sequences or racing against tight deadlines, The View Keeper delivers the efficiency and precision that high-quality animation demands.
Tackling Complex Shot Lists with Ease
Managing a detailed shot list can feel overwhelming, but The View Keeper turns it into a strength. It centralizes all camera angles and settings in one hub, so you’re not scrambling through scattered files. Need to tweak a shot? Updates happen instantly, keeping your vision intact and your final animation aligned with your creative goals. Best of all, it slots seamlessly into your existing workflow, making shot management smoother without forcing you to rethink your process. For animators, this means less stress and more control over complex projects.

Boosting Production Speed Without Sacrificing Creativity
Time is precious in animation, and The View Keeper helps you reclaim it. With automated camera switching, setting up scenes becomes a snap predefined view records eliminate tedious manual adjustments. This automation ensures every shot matches your exact specifications, preserving creative consistency across the board. By cutting out repetitive tasks, you’re free to refine your narrative and polish visuals, not wrestle with technical busywork. The result? Faster production that doesn’t compromise your artistic vision.
Mastering Camera Management with Confidence
In professional animation, reliable camera work is non-negotiable. The View Keeper takes the guesswork out of the equation by automating camera switches, slashing the risk of human error. Switching between views is a breeze no more digging through complicated timelines just quick, intuitive toggles. Its unified interface ties camera and render settings into one organized package, keeping your project on track. For animators, this reliability translates to a streamlined workflow and consistently high-quality output, every time.
Common Questions About Automating Camera Switching with The View Keeper
- Why is automating camera switching important in Blender?
It saves time, reduces manual errors, and ensures consistent camera settings across multiple shots. - How does Blender’s default system handle camera switching?
The default system relies on keyframing and duplicating cameras with timeline markers, which is inefficient and prone to error. - What are view records in The View Keeper?
View records store complete camera configurations, including transform data, which can be recalled instantly. - How do camera records differ from view records?
Camera records specifically store render output settings (resolution, file format), while view records save the camera’s positional data. - Can The View Keeper batch render multiple camera angles?
Yes, its alternative rendering feature allows you to render all saved view records simultaneously. - Is The View Keeper suitable for both still renders and animations?
Absolutely its features integrate seamlessly with both static and dynamic projects. - How do I install The View Keeper?
Download the add-on, install it via Blender’s Preferences (Edit > Preferences > Add-ons > Install from Disk), and enable it. - Can I update a view record after saving it?
Yes, you can refresh a record to update its settings if changes are made. - How does automated camera switching improve workflow?
It eliminates repetitive manual adjustments, reduces scene clutter, and ensures consistent quality, allowing you to focus on creative storytelling. - Who benefits most from using The View Keeper?
Freelancers, studios, and agencies all benefit from its time-saving and error‑reducing features in complex multi-camera projects.

Conclusion
Automating camera switching in Blender is a critical step toward a more efficient, error-free workflow especially in projects that require multiple camera angles. Blender’s default methods, which rely on manual keyframing and duplicating cameras, are not only labor-intensive but also prone to errors and inconsistency. The View Keeper offers a revolutionary solution by allowing you to save unlimited view records within a single camera , automatically recall them, and batch render multiple outputs seamlessly.
This add-on integrates flawlessly into Blender, reducing scene clutter and ensuring that each shot retains its unique, high‑quality settings. Whether you’re working on dialogue scenes, dynamic action sequences, product animations, or architectural walkthroughs, The View Keeper streamlines the entire process from initial setup to final rendering saving you time and elevating your creative output.
By automating camera switching, you free up valuable time to focus on storytelling and artistic vision. The ability to manage and recall complex camera setups without repetitive manual adjustments is a game‑changer for animators, studios, and freelancers alike. With consistent, automated camera management, your projects will not only be more professional but also more enjoyable to create.
Embrace The View Keeper to unlock the full potential of your Blender projects. With its powerful features and seamless integration, you can deliver high‑quality, multi‑angle animations that captivate your audience and meet the demands of modern visual storytelling.
Recommended
The Ultimate Guide to the Most Popular Black Hairstyle Options
Redefining Representation: Authentic Black Hairstyles in Video Games
The Ultimate Guide to Hair for Games: Techniques, Tools, and Trends


