


What is the UE5 Cinematic Lighting Tool (Lighting Cinematic Tool)?
The UE5 Cinematic Lighting Tool – often referred to simply as the Lighting Cinematic Tool – is a specialized add-on for Unreal Engine 5 designed by Argentum Studio. It streamlines the process of achieving high-quality cinematic lighting using Unreal’s real-time global illumination system, Lumen GI. In Unreal Engine 5, Lumen provides powerful real-time bounce lighting and reflections, but fine-tuning its settings for film-quality output can be complex. Critical lighting parameters are scattered across project settings, post-process volumes, console variables, and more, which can make stable results hard to achieve without expert knowledge. The Lighting Cinematic Tool addresses this by consolidating essential Lumen GI controls into one easy-to-use tool, tailored specifically for cinematic workflows. In essence, you can think of it as a custom global-illumination post-process preset built for filmmakers using Unreal Engine.
This tool was built on extensive production experience and deep dives into Unreal’s technical documentation. It encapsulates industry best practices and months of testing to reduce common Lumen issues like flickering, noise, and inconsistent lighting across shots. By using the Lighting Cinematic Tool, artists and cinematographers can achieve reliable, high-quality lighting in their UE5 scenes without needing to manually tweak dozens of settings or console commands. In summary, the UE5 Lighting Cinematic Tool is a third-party Unreal Engine plugin/asset that simplifies Lumen GI setup, minimizes glitches, and helps create stable, filmic lighting with minimal effort. It is particularly useful for those working on cutscenes, short films, or any real-time cinematic content who want the lighting to look consistent and controllable like a live-action shoot, rather than behaving unpredictably like a game.
UE5 Cinematic Lighting Tool features for stable cinematic lighting with Lumen GI
The Lighting Cinematic Tool’s features are all about making Lumen Global Illumination behave predictably for cinematics. Key features advertised by Argentum Studio include:
- Simplified Lumen GI Setup: The tool provides a unified interface to set up and adjust Lumen’s global illumination for a scene. Rather than hunting through project settings and post-process volume details, you can configure most relevant GI settings in one place. Think of it as a one-stop control panel for Lumen lighting, which is especially valuable when working under tight production deadlines.
- Stable, Consistent Lighting: A major selling point is reducing the common lighting glitches, flickers, and exposure inconsistencies that can plague Lumen in cinematic scenarios. The tool applies tried-and-tested preset values and tweaks (otherwise accessed via console variables) to achieve more stable GI that doesn’t noticeably change or reset between shots or camera cuts. This consistency is crucial for editing together multiple shots without distracting lighting shifts.
- Reduced GI Flicker & Artifacts: Lumen sometimes produces noise or flickering in indirect lighting, especially at high quality or with moving cameras. Lighting Cinematic Tool incorporates settings to minimize flicker and noise, e.g. by increasing sample quality and adjusting how Lumen handles screen traces and depth settings. By consolidating these technical fixes, the tool helps ensure each frame of your cinematic has clean lighting (no random bright flashes or GI splotches) even when using temporal anti-aliasing or motion blur, which can exacerbate GI flicker.
- Consistent Exposure & Light Balance: In cinematic work, you often lock the exposure and lighting to artistic values. The tool can enforce consistent post-process values (like fixed exposure or Lumen scene brightness) across your sequence, preventing auto-exposure or camera-dependent changes from affecting the look. This yields controllable cinematic lighting where what you see in the director’s view is what you get in the final render.
- Time-Saving Workflow Integration: Ultimately, the Lighting Cinematic Tool saves artists time by automating technical setup. You don’t need to be an Unreal rendering engineer to get good results – the tool’s presets are based on “set it and forget it” values that work in most scenarios. This means you can focus more on the artistic side of lighting (placing lights, adjusting colors and intensities for mood, etc.) rather than fighting with engine settings. It’s designed for cinematic artists who want high-quality results without excessive manual configuration.
Behind the scenes, the tool likely adjusts parameters such as Lumen’s Final Gather quality, lighting update speed, trace distance, and screen contribution, as well as toggling certain ray tracing modes for maximum quality. It basically implements the best practices that one would otherwise obtain by reading through Unreal’s documentation and forums, packaging them into an accessible form. By using these features, even a small team or solo creator can achieve movie-like lighting in UE5 that would otherwise require a lot of tweaking and expert knowledge.
UE5 Lighting Cinematic Tool download and pricing (ArtStation Marketplace)
The UE5 Lighting Cinematic Tool is available for download on the ArtStation Marketplace, in Argentum Studio’s online store. After its initial launch promotion (more on that below), it is sold as a paid asset. As of early 2026, the regular price is listed as USD $43.05 for a standard license. The product is categorized under “Resources/Dev Tools/Add-ons/Plug-ins” on ArtStation, and it specifically supports Unreal Engine 5 or higher. This implies it’s not a standalone application, but rather content you integrate into your UE5 project.
To download the tool, you need an ArtStation account (since the marketplace requires login). You can search for “UE5.5+ Lighting Cinematic Tool 1.0.0” on ArtStation Marketplace or go directly via Argentum Studio’s store link. Once purchased, the asset becomes accessible in your ArtStation “Library”, where you can download the package (a .ZIP file around 1 MB in size, containing the tool files). The modest file size suggests it’s likely a Blueprint or plugin code with configuration assets, rather than a heavy content pack.
The licensing is a standard ArtStation asset license – meaning you can use it for personal projects or a single commercial project (with certain view or sales limits). Studios or larger commercial endeavors should ensure the license terms are sufficient or contact the seller if needed. Once you download the Lighting_Cinematic_Tool_1.0.0.zip file, you’ll proceed to install it into Unreal Engine (see the installation section below). There are no regional restrictions on purchase, apart from the usual marketplace availability; however, at the time of writing the ArtStation page notes “This product is not available in your region” for some regions (likely due to ArtStation/Epic policy). If you encounter that, it might require a workaround such as contacting the seller directly or using a different marketplace if offered.
Pricing and future updates: Argentum Studio launched the Lighting Cinematic Tool with version 1.0.0 for UE5.5+. Given their track record (they have a Groom Hair Cinematic Tool that saw updates and a separate version for UE5.1-5.4), it’s likely that future updates or versions might be released as Unreal Engine evolves. The pricing may change for major version updates (for example, their Hair Tool 2.0 for UE5.5 was a paid update from the free 1.0 for UE5.1-5.4). As of now, version 1.0.0 of the Lighting tool is the current one, and it’s a paid product on ArtStation unless you obtained it during the launch free period.
How to get the UE5 Lighting Cinematic Tool free (limited-time promo code steps)
At launch, Argentum Studio offered a limited-time promotion that allowed users to get the Lighting Cinematic Tool for free. This promo was active for the first two weeks after release (until February 19, 2026). If you’re within that window (or if they run a similar promotion again), here’s how the free redemption process worked:
- Visit the ArtStation post – The developers created an ArtStation blog post/artwork post about the Lighting Cinematic Tool (Argentum Pipelines | Lighting Cinematic Tool). Users needed to navigate to that post, which was essentially a promotional announcement.
- Like the post – You needed to click “Like” on the ArtStation post. This likely was used to track interested users (and boost the post’s visibility).
- Leave a specific comment – In the comments section of that post, you had to write “I want to try Lighting Tool”. This exact comment was requested by the developer.
- Receive Promo Code – After completing the above steps, Argentum Studio would send you a promo code (presumably via ArtStation message or email) within a short time. This unique code could be redeemed at checkout on the marketplace to get the Lighting Cinematic Tool for free (100% discount).
- Redeem the Tool – With the promo code, you would go to the Lighting Cinematic Tool’s marketplace page, add it to your cart, and apply the code during checkout to reduce the price to $0.00. After “purchasing” for free, it would appear in your ArtStation library for download.
This community-driven giveaway approach is something Argentum Studio also did for their earlier Hair Cinematic Tool launch. It’s a smart way to seed initial users and get feedback (and reviews) early on. If you missed the free period, the tool must be purchased normally. Always double-check Argentum Studio’s ArtStation or social media for any new promotions – they might occasionally offer discounts or brief free access for new updates or during events.
For users who got the tool via the free promo, the functionality is the same as the paid version (you’re essentially just getting a 100% discount). The promo code method ensures the distribution is controlled via the ArtStation marketplace, so even free users have the product in their library for updates. If you follow these steps during the promotional period, you can obtain the Lighting Cinematic Tool completely free of charge. Outside of that, acquiring the tool will require the standard purchase as described in the previous section.
(Note: The above instructions were specific to the February 2026 launch window. Such promotions are time-limited, so always refer to the latest official info. As of now, after Feb 19, 2026, the tool costs money on the marketplace. However, Argentum Studio’s LinkedIn or Twitter/X announcements might occasionally share similar opportunities, so it’s worth following them if you’re interested.)
Lighting Cinematic Tool system requirements (UE5.5+ / Unreal Engine 5 or higher)
The Lighting Cinematic Tool is designed for Unreal Engine 5.5 and above. This is explicitly stated in the product title and description (the name itself includes “UE5.5+”) and the marketplace listing tags it as for Unreal Engine 5 or higher. So, the minimum engine version to use this tool is UE 5.5. It will not function in UE4, and even within UE5 versions, anything earlier than 5.5 is not officially supported. If you are running UE5.0–5.4, you would need to upgrade your engine (or use the older techniques manually) – the tool likely relies on improvements or specific settings that exist in 5.5 onward.
From a hardware standpoint, there aren’t strict additional requirements beyond what Unreal Engine 5’s Lumen GI needs. Lumen (especially in 5.5) requires a relatively modern GPU and works best in DX12 with Shader Model 6. For example, Lumen’s software ray tracing uses mesh distance fields and the hardware-accelerated mode requires an RTX (or equivalent) GPU for best results. The Lighting Cinematic Tool itself is lightweight (1 MB plugin) so it doesn’t impose extra GPU load except that it typically cranks up quality settings. That means to fully benefit (e.g. using high final gather quality, hardware ray tracing, etc.), a decent GPU is recommended (NVIDIA RTX 20-series or higher, or AMD RX 6000 series or higher that supports DXR). If your hardware can run UE5’s Editor and Lumen at high settings, it can handle the tool.
The tool runs within the Unreal Editor (there’s no separate app). It’s marked under the Dev Tools/Add-ons category, which suggests it could be a Blueprint actor or an Editor plugin. Either way, your development platform (Windows 10/11 64-bit for UE5, or Mac for Apple Silicon with UE5 – though note Lumen GI on Mac uses software GI only) should be compatible. There’s no mention of special OS requirements, so it should work on any OS that UE5.5 supports.
Project configuration: Ensure your Unreal project is set to use Lumen as the dynamic GI method (in Project Settings under Rendering > Dynamic Global Illumination Method). By default in UE5 it is, but double-check. Also, Virtual Shadow Maps should be enabled (the default shadow type in UE5, needed for detailed shadows with Lumen). According to a cinematic lighting guide, you also want to have Nanite enabled for high-poly geometry performance, and if using an RTX card, enable Hardware Ray Tracing for Lumen in project settings to get the most stable GI. These engine settings ensure that the Lighting Cinematic Tool can do its job under optimal conditions.
In summary, the system requirements boil down to:
- Unreal Engine: version 5.5 or newer (the tool is version-locked to UE5.5+).
- Hardware: A DirectX12 capable GPU; RTX GPU recommended for enabling hardware ray tracing in Lumen (for higher quality). Sufficient CPU/RAM for UE5 editor as usual.
- Engine Settings: Lumen GI and Virtual Shadow Maps active; project configured for DX12 (which UE5 uses by default for Lumen); distance fields enabled (on by default, but if you turned off “Generate Mesh Distance Fields,” turn it on for Lumen GI to function properly).
If all the above are in place, you can run the Lighting Cinematic Tool without issues. The tool’s listing highlights Unreal Engine 5 or higher as the environment, so future versions like UE5.6 or UE6 might be supported via updates, but UE5.5 is the baseline.
How to install Lighting Cinematic Tool in Unreal Engine 5.5+
Installing the Lighting Cinematic Tool is straightforward, especially if you’ve used Unreal marketplace or ArtStation assets before. Here are the typical steps to get it up and running in your UE5.5+ project:
- Download the Tool Package: After purchasing or redeeming the tool on ArtStation, download the
Lighting_Cinematic_Tool_1.0.0.zipfile from your ArtStation library. This ZIP contains the plugin or content files. - Extract the Files: Open the ZIP file. Inside, you should find either an
.uprojectplugin folder or aContentfolder structure. The exact contents might be, for example, a folder namedLightingCinematicToolwith subfolders like Blueprints or Config. Extract this to a temporary location. - Choose Installation Method: There are two possibilities:
- Project Plugin: If the tool is implemented as a UE plugin (likely, given it’s a “Dev Tool”), you’ll have an
LightingCinematicTool.upluginfile in the package. In that case, copy the entire plugin folder into your project’sPluginsdirectory (create aPluginsfolder in your Unreal project directory if it doesn’t exist). Then launch the project and ensure the plugin is enabled in Edit > Plugins. - Content Folder Migration: If instead the tool is just a collection of assets/blueprints, you might see a
Contentfolder inside the ZIP. In that case, you can merge or migrate these into your project’sContentfolder. The safest approach is to open your project, then use “Add -> Add Existing Content” or the Migration tool to bring in the assets, so Unreal registers them properly.
- Project Plugin: If the tool is implemented as a UE plugin (likely, given it’s a “Dev Tool”), you’ll have an
- Open/Enable in UE5: Start Unreal Engine 5.5 (or later) and open your project. If you installed it as a plugin, the editor might prompt that it’s installing a new plugin and ask to restart the editor. Allow it to do so. After restarting, confirm the plugin is enabled. If it’s content-only, you should now see a folder in your Content Browser (perhaps named “Argentum” or “LightingCinematicTool”) containing the tool’s assets.
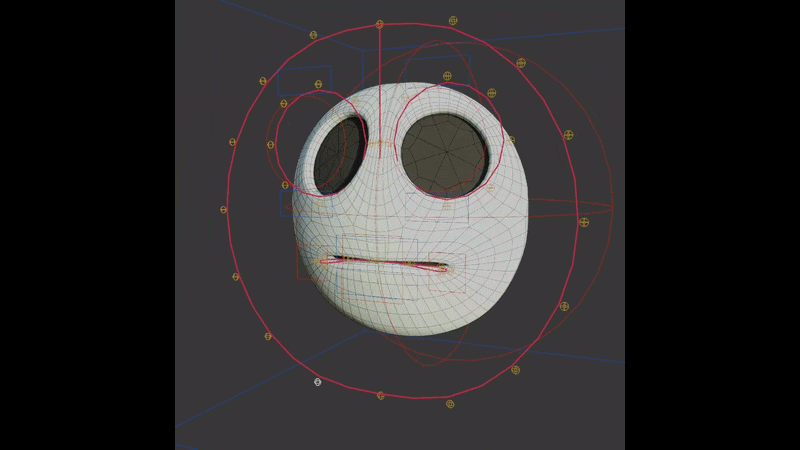
- Verify Installation: Once the editor is open with the tool integrated, check that you have access to the Lighting Cinematic Tool actor or settings. For example, you might find a Blueprint Actor called “Lighting Cinematic Settings” or similar in the content browser. The documentation indicates “Think of it as a custom Post Process tool made specifically for Lumen”, so it’s likely a PostProcessVolume subclass or actor. You can also look at Edit > Project Settings > Plugins to see if any configuration appears for the Lighting Cinematic Tool if it’s plugin-based.
- Usage in Level: To use the tool in a level, you’ll typically drag the Lighting Cinematic Tool actor into your scene (if it’s an actor), or enable it via a menu if it integrates differently. Installation is not complete until you actually add it to a level and configure it (covered in the next section).
If any issues occur (like the plugin not appearing), double-check that you placed files in the correct directory. The folder structure must be preserved exactly as in the ZIP. Also ensure you’re using the correct engine version – if you try to install on 5.4 or older, the plugin likely won’t load.
One convenient aspect: ArtStation marketplace assets often come with a one-click import if integrated with Epic Games launcher, but since this is ArtStation (not Unreal Marketplace), manual placement is needed. The provided documentation from Argentum Studio should detail the specific installation steps; it’s wise to skim any Readme file included.
Finally, once installed, save and backup your project. Adding new plugins can sometimes alter your project settings (for instance, enabling certain project-level cvars for Lumen), so it’s good practice to have a backup. Now you’re ready to actually utilize the Lighting Cinematic Tool in your scene.
How to use Lighting Cinematic Tool for fast cinematic lighting setup in UE5
Using the Lighting Cinematic Tool in your scene is designed to be user-friendly. After installation, the typical workflow to leverage it for a quick cinematic lighting setup is:
- Add the Tool Actor to your Scene: In the Content Browser, locate the Lighting Cinematic Tool asset. This could be a blueprint named something like “BP_LightingCinematicTool” or “LightingCinematicController”. Drag and drop this into your level. Alternatively, some tools use a subsystem or global actor approach, but given the description, it’s likely a scene actor (possibly an actor that includes a Post Process Volume component).
- Positioning (if needed): If the tool is an actor derived from PostProcessVolume, it might not need specific positioning if it’s set to Infinite Extent (Unbound). Many cinematic post-process tools cover the whole scene. Ensure in the details that it is unbound so it affects the whole level’s lighting. If it’s not unbound, place it to encompass your scene or the area of your cinematic.
- Configure Tool Settings: With the Lighting Cinematic Tool actor selected, look at the Details panel. You should see custom parameters exposed by the tool. According to Argentum’s notes, these would correlate to Lumen GI settings. For instance, you might find sliders or drop-downs for:
- Lumen Quality Preset (Low/Medium/High/Cinematic) – sets things like
FinalGatherQualitybehind the scenes. - Lumen Scene Detail – controls how detailed the scene representation for GI is (higher reduces artifacts).
- GI Flicker Reduction – possibly a toggle or value that adjusts the hidden Screen Traces Relative Depth Thickness (lowering this can reduce flicker).
- Max Trace Distance – how far Lumen rays travel (to fix light leaks in large scenes).
- Ray Lighting Mode – option to use Hit Lighting for Reflections (for highest quality mirror reflections).
- Lighting Update Speed – a setting for how fast GI reacts to changes (higher can eliminate slow “fading” adaptation).
- Exposure Control – maybe the tool can enforce a fixed exposure or disable auto-exposure (since cinematics often require manual exposure).
- Lumen Quality Preset (Low/Medium/High/Cinematic) – sets things like
- Apply a Preset or Manual Adjust: Many such tools provide a one-click “Apply Cinematic Lighting” button. If one exists, using it will set all recommended values automatically. Otherwise, manually adjust the settings based on your needs:
- For example, set quality to “Epic/Cinematic” for final shots, enable any “Stability Mode” toggles to on, etc.
- If your scene is interior and you notice light leaking, consider raising Lumen Scene Detail and Max Trace Distance via the tool’s interface.
- If you experience noise, increase Final Gather Quality or enable hardware ray tracing if available.
- Place Lights and Observe: Now use your standard lights (Directional Light, Rect Lights, Spotlights, Sky Light, etc.) to light the scene artistically. The Lighting Cinematic Tool doesn’t place lights for you; it ensures the environment and GI react stably. As you position lights and set their intensities, you should notice that the global illumination looks smooth and consistent. If you change the camera angle, the overall light balance should remain consistent (no sudden brightness pops when objects leave the view, for instance).
- Iterate and Tweak: Scrub through your Sequencer if you have multiple shots. Check for any flicker or exposure shift between cuts. The tool aims to mitigate these, but if you see any, you can further tweak the tool’s settings:
- For slight GI flicker, try lowering the GI flicker threshold (if exposed) or increasing Engine Warm-Up frames (if the tool has a Sequencer integration).
- For overly flat lighting (maybe too much bounce), you could reduce Lumen bounce intensity if the tool offers it, or adjust your Sky Light intensity. The tool ensures changes are applied uniformly across shots.
- Use the Documentation/Guide: Argentum Studio has provided a detailed documentation and a video guide. It’s wise to refer to that for specific guidance. The doc likely covers example scenarios: e.g., “for a dark interior, set X to Y to avoid light leaks” or “for fast camera moves, ensure Z is enabled to avoid ghosting.” Following their recommended workflow will help you get the best results quickly.
- Save as Preset (optional): If your project often needs these settings, you might save the configured Lighting Cinematic Tool as part of your level template or even create a Level Snapshot. The next time, you can drop it in and you’re ready to go.
In essence, using the Lighting Cinematic Tool converts what used to be a multi-hour task of fiddling with console variables and post-process volumes into a few-minute setup. The tool acts as a bridge between artist and engine, so you can dial in cinematic lighting much like you would on a physical set: decide your exposure, lights, and let the tool handle the tricky GI behavior. According to user feedback, it’s “fantastic” and the best for cinematic lighting, making them excited for updates. So once you get comfortable with its interface, it can become an indispensable part of your UE5 lighting workflow.
Preparing a scene for Lumen GI cinematic lighting in Unreal Engine 5
Before diving deep into using the tool or tweaking settings, it’s important to prepare your scene properly for Lumen GI. A well-prepared scene will naturally have fewer issues with global illumination, resulting in better stability and quality for your cinematics. Here are best practices for setting up your UE5 scene for Lumen (many of which the Lighting Cinematic Tool assumes or complements):
- Ensure Proper Geometry (avoid light leaks): Lumen relies on surface data (via mesh distance fields and screen traces). Make sure your environment geometry has no unwarranted gaps or extremely thin walls. Walls, floors, and ceilings should be at least ~10 cm thick to prevent light leaking through them. Extremely thin or single-sided meshes can let light bleed because distance fields cannot represent very thin features well. For example, if you have a one-sided plane as a wall, either give it thickness or enable two-sided shadowing on it – but the better solution is a closed mesh.
- Close Holes in Enclosed Spaces: If your scene is an interior or a cave, any tiny opening can let sky illumination leak in. Check areas like corners or places where modular pieces meet. If you find unintended openings, seal them or place blocking geometry just outside to occlude light. In some cases, users even put black boxes outside troublesome walls to block stray light. In Fortnite (which uses Lumen), level designers encountered similar issues and mitigated them with such blockers.
- Generate Mesh Distance Fields: In Project Settings, under Rendering, ensure “Generate Mesh Distance Fields” is enabled (it is by default in UE5 for projects that use Lumen). Distance fields are crucial for Lumen’s software ray tracing of GI. If you turned them off for performance earlier, turn them back on, or you’ll get incomplete GI lighting. Use the Visualize > Mesh Distance Fields view to see if objects have appropriate distance field representations. If some large object is missing or low quality, you can increase its Distance Field Resolution Scale in the mesh settings.
- Lumen Scene and Reflections Settings: Open the Lumen Scene view (
Lit > Lumen > Overviewview mode) to inspect how Lumen sees your scene. Surfaces should appear in that view; if you see large patches of hot pink, it means no surface cache (those areas won’t bounce GI). For complex meshes showing pink, consider enabling High Quality Lumen setting on them (Max Lumen Mesh Cards) or breaking them into simpler parts. This ensures GI doesn’t have black spots or disappear in those areas. - Set Up Sky Lighting Correctly: If using a Sky Light (for ambient illumination), it’s generally recommended to keep it Movable (dynamic) for Lumen. A Movable Sky Light with “Real-time capture” on will provide dynamic ambient lighting that Lumen can bounce. Stationary Sky Lights are supported with Lumen too, but Movable avoids some quirks. Also, decide if you want to use HDRI Backdrop or Sky Atmosphere for your sky lighting – either way, calibrate the intensity realistically, because Lumen can get overwhelmed by extremely bright or extremely dark skylights (leading to noise or slow adaptation).
- Lights Configuration: Use Movable lights for your key lights in cinematics. Lumen GI only works with dynamic lighting (static lights rely on Lightmass which is a different system). Stationary lights can work but may cause weird interaction with Lumen in some cases. Movable ensures full dynamic GI from them. Also, avoid gratuitous numbers of small bright emissive objects unless needed – Lumen might cull very small emissives from its scene representation. If you need a small emissive (like a small bulb) to contribute GI, check the mesh’s details for “Emissive Light Source” and enable it to force Lumen to include it.
- Disable Baked Lighting: For a pure Lumen cinematic, turn off any leftover baked lighting. In World Settings, check Force No Precomputed Lighting to true (and rebuild lighting once). This ensures no old Lightmass artifacts are present, and Lumen is solely responsible for GI. Mixed usage (baked + Lumen) can cause inconsistent looks.
- Use Post Process Volume (baseline): Even before applying the Lighting Cinematic Tool, place a Post Process Volume (PPV) in your level and set it to Unbound. In this volume, enable Infinite Extent and set up some baseline values: for example, set Exposure to Manual (to a reasonable EV value) or at least clamp the auto-exposure min/max to a tight range so that your lighting doesn’t fluctuate wildly between dark and bright scenes. Also, in that PPV under Global Illumination, ensure Lumen is selected and set quality to at least High or Epic for preview. The Lighting Cinematic Tool might override some of these, but it’s good to have a starting point.
- Check for Performance Scene Complexity: Large open scenes (like landscapes) might hit Lumen’s default distance limit for GI (which is ~200 meters). If your cinematic has wide shots, be aware that beyond a certain range, GI and sky occlusion may stop by default (distant mountains might not occlude skylight, etc.). Lumen allows increasing the Lumen Scene View Distance if needed. The tool likely can adjust this. But prepare by keeping truly distant background elements in mind – sometimes a simple atmospheric fog or skylight adjustment can hide GI shortcomings at extreme ranges.
- Test with a Quick Play: Do a quick “Play In Editor” or High Res Screenshot to see if anything glaring pops out – e.g., light leaks in corners, strange flickering on shiny surfaces (which could indicate reflection issues). It’s easier to fix scene issues now than after you animate everything.
By properly preparing the scene with the above steps, you set a solid foundation for Lumen GI to perform well. The Lighting Cinematic Tool will then augment this by fine-tuning engine settings. Epic’s own docs note that a lot of Lumen problems (light leaks, slow updates, etc.) have known solutions – many of which revolve around scene prep or post process tweaks. Essentially: give Lumen good data (good geometry, proper settings) and it will give you good lighting. A clean scene means when you apply the Cinematic Lighting Tool, it can focus on refining quality and stability rather than fighting basic issues. This combination will yield the best results for your UE5 cinematic lighting.
Best Lumen GI settings for cinematic lighting in UE5
Unreal Engine 5 offers a range of settings to control Lumen’s global illumination quality and behavior. When aiming for cinematic quality lighting, you generally want to max out certain settings (within reason) to get the cleanest result. Here are the best Lumen GI settings and recommendations for UE5, particularly UE5.5+, for cinematic work:
- Dynamic GI Method = Lumen: In Project Settings > Rendering, confirm that Dynamic Global Illumination Method is set to Lumen. This is the core of everything. Also ensure Reflection Method is set to Lumen (or Hardware Ray Tracing) for consistency, unless you specifically want ray-traced reflections separate from Lumen.
- Engine Scalability = Cinematic/Epic: UE5 has scalability settings that control overall quality. For final cinematic renders, set Engine Scalability (Quality Level) to Epic or use the Movie Render Queue’s Cinematic preset which automatically bumps settings. Specifically, Global Illumination quality should be at its highest. The Lighting Cinematic Tool likely does this for you, but verify that things like r.Lumen.SceneLighting.Quality are at the top value (which is 4 for Epic/Cinematic).
- Lumen Global Illumination Quality: In your Post Process Volume (or via the tool), set Final Gather Quality and Lumen Scene Detail to high values. On the scale of 1–4, use 4 (Epic) for final shots. This increases the number of rays and samples Lumen uses, reducing noise and improving accuracy. Higher Scene Detail means a finer representation of geometry for GI, which helps in complex scenes.
- Use Hardware Ray Tracing (if available): If your GPU supports it (NVIDIA RTX or AMD RDNA2+), enable Hardware Ray Tracing for Lumen in project settings, and also check Use Hardware Ray Tracing when available in your Post Process Volume for Lumen GI and Reflections. Hardware Ray Tracing makes Lumen’s indirect lighting more precise and less prone to artifacts by tracing real rays beyond what the distance fields do. This can particularly clean up GI in tricky thin geometry and improve reflections quality on glossy surfaces. It is more GPU-intensive, but for cinematics where frame rate is not a concern, it’s worthwhile.
- Ray Lighting Mode = Hit Lighting for Reflections: By default, Lumen uses a “Surface Cache” for lighting calculations in reflections (for performance). For the highest quality mirror-like reflections and to avoid missing lighting in reflections, switch the Ray Lighting Mode to Hit Lighting (for Reflections). You can do this in Project Settings (global) or per Post Process Volume. Hit Lighting means the reflection rays will compute lighting at the hit point directly, capturing all the nuanced lighting (e.g., bright specular highlights that might be missing otherwise). This yields more accurate reflections at the cost of performance – again, fine for offline renders.
- Virtual Shadow Maps: Ensure Virtual Shadow Maps (VSM) are enabled and set to high quality. VSM provide detailed dynamic shadows that complement Lumen’s GI (especially for small details like hair, foliage shadows). In Project Settings > Shadows, VSM should be on (it is by default in UE5). In Scalability, set Shadow quality to Epic – this raises shadow resolution and ranges.
- Increase Lumen Scene View Distance (if needed): For large scenes, you can increase Lumen Scene View Distance beyond the 200m default. In a purely cinematic scenario, if you have wide establishing shots (say 500m across), consider setting this to cover the important areas so that GI doesn’t pop out at distance. This can be done in the console or possibly via the Lighting Tool’s settings. Only raise it if you notice distant GI missing – because higher values trace more and can cost performance.
- Final Gather Lighting Update Speed: For cinematics, you often want consistent lighting per shot rather than super reactive GI. However, if you are doing a real-time change (like lights turning off in-scene), you may want GI to update faster. The Final Gather Lighting Update Speed can be increased to 2 or higher to make GI react more quickly to changes. Normally, a slower update (default 1) smooths things out, but if you need an instant off (like a light switch in a take), bump this to avoid a slow fade of GI.
- Ambient Occlusion and Indirect Lighting Intensity: Check your Sky Light’s indirect intensity and post-process Ambient Occlusion. For realism, AO should be subtle when Lumen is on, because Lumen already provides soft contact shadows. You might set AO intensity low (0.5 or so) or even off to rely purely on Lumen GI for contact shadowing, which will be more realistic at high quality. The Sky Light’s Indirect Lighting Intensity can be used to globally brighten or dim the GI if needed (keeping it at 1 is physically correct, but artistic tweaking is okay if the scene needs more bounce or less).
- Anti-Aliasing and Upsampling Considerations: Use Temporal Super Resolution (TSR) or high-quality anti-aliasing if you plan to output at high resolutions. A higher screen percentage (like 150% or 200%) combined with TSR in Movie Render Queue can sharpen the output. While not a direct Lumen setting, a sharper image can reduce the appearance of any residual noise in GI.
- Path Tracer (optional for comparison): UE5 has a built-in Path Tracing mode which can be used for reference. It’s offline (not real-time) but will give ground-truth lighting. If you want the absolute best GI and have time to render frame-by-frame, you could use the Path Tracer. However, typically Lumen at Epic with the above settings gets very close to path-traced quality for most scenes. Path Tracer might be overkill except for stills or if you hit an intractable Lumen artifact. The Lighting Cinematic Tool is about making real-time Lumen shine in final renders, so ideally you won’t need path tracing.
By applying these best settings, you maximize Lumen’s capability for cinematic rendering. In summary, turn everything to high quality, use hardware ray tracing and hit lighting, and adjust distances to encompass your scene. According to one guide, enabling hardware ray tracing and switching to hit lighting notably improves GI and reflections for cinematic scenes. All these settings can be accessed manually, but the Lighting Cinematic Tool conveniently brings many under its umbrella, ensuring you don’t miss any hidden quality tweak.
Keep in mind the trade-offs: higher quality = longer render times and possibly more GPU memory usage. But since this is for cinematic (non-real-time playback), that’s usually acceptable. If you find performance while scrubbing is too low, you can temporarily lower some settings during setup and then push them up when doing the final Movie Render Queue output.
Fix Lumen GI flicker, noise, and lighting instability in UE5 cinematics
One of the most frustrating issues when rendering Unreal Engine cinematics with Lumen is the appearance of flickering or noisy global illumination between frames. This can manifest as random brightness fluctuations (especially in indirectly lit areas), speckle noise that dances over surfaces, or lighting that seems to “pop” or change when the camera moves. These instabilities are usually due to how Lumen’s temporal accumulation and screen-space traces work. Here’s how to fix or greatly reduce these problems:
- Increase Final Gather Quality and Samples: Flicker often comes from undersampling of GI. Make sure your Final Gather Quality is at its maximum (via Post Process or the Lighting Tool) and that you have enough temporal samples if using the Movie Render Queue. For example, using 64 temporal AA samples is common for smoothing out GI over time. The user who had flicker tried 64 temporal samples with high quality settings. More samples = more stable solution, though at diminishing returns beyond a point.
- Warm-Up Frames on Camera Cuts: When rendering sequences, enable warm-up frames in Movie Render Queue for each shot. Lumen can need a few frames to fully converge after a sudden camera change. By setting, say, 30-60 warm-up frames (that are rendered but not output), you allow the GI to settle before the first exported frame. This prevents sudden differences at the very start of a shot. In Sequencer, splitting into separate shots and enabling “Engine Warm Up Count” achieves this. The 80 Level community and others highly recommend this for consistent lighting across cuts.
- Disable / Tweak Anti-Aliasing if necessary: It sounds counterintuitive, but the Temporal AA (TAA) filter can sometimes cause perceived flicker in GI by blending frames. One user found that removing the anti-aliasing filter entirely made 99% of the flicker go away. If you experience stubborn flicker, try a test render with Anti-Aliasing method = None in MRQ (or using minimal AA like FXAA) to see if TAA was amplifying the issue. Alternatively, use Accumulation (subsample jitter) anti-aliasing in MRQ which accumulates many samples per frame without the temporal filter.
- Adjust Lumen’s Screen Tracing settings: Lumen uses screen-space traces to supplement GI. If these traces mismatch with off-screen information, they can cause flicker especially when geometry leaves the screen. A known fix is lowering the Screen Traces HZB Traversal Relative Depth Thickness value. By default it’s 0.02; setting
r.Lumen.ScreenProbeGather.ScreenTraces.HZBTraversal.RelativeDepthThickness = 0.005 or even 0.0001has eliminated shadow flicker for some users. The Lighting Cinematic Tool likely incorporates such tweaks (or an option for “aggressive anti-flicker”). Be cautious: too low values might reduce GI intensity slightly, but many found this trade-off worth it. This essentially tightens how tolerant Lumen is to depth differences when reusing screenspace information, thereby stabilizing flickers due to disocclusion. - Lock Exposure and Lighting per Shot: Auto-exposure or varying camera aperture between shots can mimic flicker (the brightness changes). Always use manual exposure for cinematic cuts, or at least ensure continuity of exposure settings between contiguous shots. This is more about consistency, but if one shot is dark and next is bright due to auto-exposure, it feels like a lighting flicker. The user in Reddit example set camera exposure to manual to troubleshoot flicker – which is good practice generally.
- Use High Quality Reflections Setting: Sometimes what looks like GI flicker is actually reflection noise flicker (e.g., on glossy surfaces or in mirrors). If you see flicker in reflective areas, ensure Lumen Reflections Quality is high and consider enabling “High Quality Brute Force” for reflections in MRQ. Also, Hit Lighting for Reflections (discussed earlier) ensures the reflections aren’t swapping between cached and real lighting, which could cause flicker. Essentially, treat reflections with the same care as GI – max out samples.
- Avoid Fast Intrusive Changes: If you have animated lights (intensity changing rapidly) or objects appearing/disappearing, Lumen might struggle to update in one frame, leading to a few frames of weird lighting (like a light goes off but GI lingers bright for a moment). In such cases, increasing Lumen Lighting Update Speed to its max will help GI catch up faster. If even that is not enough, as a brute force, you could cut the sequence at that moment and treat it as two shots (one before light off, one after, with warm-up on the second) to let GI refresh.
- Temporal Consistency Mode (if available): Some new versions of UE or custom branches have a “High Temporal Quality” mode for Lumen. If UE5.5+ has any option like r.Lumen.GI.HighQualityMode, try enabling it. It might increase temporal accumulation for even more stable results. This is more experimental but worth noting.
- Post-process Denoisers: Lumen has built-in denoising for reflections and GI. At high qualities it’s usually fine, but if you still see noise, consider running a mild denoiser in post (after export). Tools like Neat Video or even Blender’s denoise node can clean up tiny residual noise without losing detail, if needed. But do this only if the above steps still leave some noise.
- Use the Lighting Cinematic Tool’s presets: If you’re using the tool, select the preset or mode that emphasizes stability. The description says it reduces glitches and instability. Likely a preset might slightly over-budget GI (even higher samples, or slight GI blur) to guarantee no flicker. Use that for final renders. The tool essentially automates many of the above suggestions – for instance, consolidating console variables known to reduce flicker into a single switch. Users have reported it indeed “reduces common lighting glitches and instability” out of the box, so trust those settings for your final output.
By systematically applying these fixes, you can achieve buttery-smooth illumination in your UE5 cinematic, even in challenging scenarios. Many artists have gone through trial and error to find these solutions, so the Lighting Cinematic Tool helps by preemptively setting a lot of them. Flicker and noise are not an unsolvable curse – they just require cranking quality and understanding Lumen’s behavior. With UE5.5’s improvements (Epic noted foliage shadow flicker was eliminated and stability improved in 5.5) and with these techniques, you can get stable, filmic lighting that doesn’t distract the viewer with any technical artifacts.
Fix Lumen light leaks and GI artifacts in Unreal Engine 5
Light leaking is another common issue when using Lumen GI, especially in enclosed scenes or where thin objects are present. It appears as unwanted light bleeding through walls or corners, making a fully closed room look as if light is seeping in. Additionally, other GI artifacts might include splotchy lighting or incorrect lighting in mirrors. Here’s how to fix these problems:
- Thicken or Double-Shell Your Geometry: As mentioned, ensure walls and ceilings aren’t paper-thin. If you can’t remodel something, one trick is to add an interior shell or use two layers for walls (the outer wall and an inner slightly offset wall). Lumen’s mesh distance fields need volume to represent; anything under ~10 cm can become porous to light.
- Avoid One-Sided Planes Facing Away: Lumen does not handle backfaces (the invisible side of a single-faced mesh) well – it can’t “see” them as occluders. So if you have any one-sided geometry where the camera never sees the other side (like a backdrop), make sure no light from behind it influences the scene or make it two-sided in material so distance fields consider it (but even that is iffy). Closed solids are ideal.
- Increase Lumen Scene Detail & Max Trace Distance: In an enclosed area (cave or interior) where light leaking occurs at corners or through ceilings due to bounce light, you may need to boost how thorough Lumen’s tracing is. Raise the Lumen Scene Detail (which increases resolution of the scene representation) and importantly the Max Trace Distance for Lumen GI. By default, Lumen might stop tracing after a certain distance for performance, which can let environmental light bleed if the actual occluder (like a far side of a cave) isn’t considered within that range. By increasing Max Trace Distance, Lumen will consider further occlusion, thereby fixing leaks in large enclosed spaces. The Lighting Cinematic Tool likely exposes these as settings or automatically adjusts them for interior presets.
- Skylight Leaks in Interiors: If you see skylight leaking into an interior (everything has a blue tint for example), and you know your room is closed, check the Lumen Scene view for any pink areas on the walls/ceiling (meaning Lumen thinks it’s open). Increasing cards (Max Lumen Mesh Cards) for that mesh or splitting the mesh can help if the surface cache isn’t capturing it. Also, adjust SkyLight bounce. Sometimes lowering the SkyLight intensity and instead using some interior lights gives Lumen less skylight to leak. You can also cheat by placing a large box with a black material around the room (just beyond the walls) – it won’t render but will block skylight in Lumen’s calculations (this is akin to the light blocker trick).
- Far Field Lighting: If you have a situation like a large cave with an opening and light leaks deeper inside where it shouldn’t, consider enabling Far Field in Lumen (UE5 has a Far Field setting for large scale, but it’s more for landscapes). More practically, use local lights to your advantage – instead of relying purely on Skylight, use spot/point lights just outside openings to cast more realistic light that falls off, and reduce skylight contribution. That way, Lumen deals with intentional light rather than a uniform sky bleed.
- GI Splotches or Low-res artifacts: If you see splotchy GI (patches of shadow or light that look low-res), that’s usually due to insufficient Final Gather samples or Surface Cache resolution. The fix is to increase GI quality (which we’ve done) and also possibly increase “Card” resolution for complex surfaces. Each static mesh can have a setting Max Lumen Mesh Cards – raising that means more coverage in the surface cache. Use it sparingly on meshes that clearly are getting bad GI. Also, ensure Nanite is on for high-poly meshes since Nanite helps Lumen keep surface cache in sync.
- Mirror / Reflection GI issues: If you have mirrors or very shiny surfaces, you might notice GI or shadows appear incorrect in the reflection compared to reality. This is because by default reflections use a cached lighting (which can be lower detail). The solution, as earlier, is to set Ray Lighting Mode to Hit Lighting for Reflections, so the mirror reflection calculates GI per-pixel. Epic’s docs give an example: with surface cache mode, specular highlights in reflections can be missing. Hit Lighting fixes it. It’s more expensive, but for a mirror that fills the screen in a cinematic, you want it correct. Alternatively, for static mirrors, you could use planar reflection, but Lumen reflections should suffice with high quality if configured.
- Use Two-Sided Distance Field on Thin Objects: Unreal has a mesh setting “Two-Sided Distance Field Generation”. If you have thin geometry that must remain thin, enabling this might help its distance field not treat it as hollow. This can reduce light passing through in some cases (like a thin cloth or fence).
- Troubleshooting Tools: Use the Show > Visualize > Lumen (Overview, Scene, etc.) views extensively. Also try the Light Leaks view if available. UE5 documentation had a Troubleshooting section listing common problems and solutions (we echoed those). The Lighting Cinematic Tool’s documentation or blog may also list typical issues (like “sky light leaking in caves” with solution “increase trace distance” – which matches our advice). So consult that if a specific artifact is puzzling.
By applying these measures, you should see dramatic improvement in any unwanted light bleeding or GI artifacts. In a nutshell: secure your scene and dial up Lumen’s occlusion accuracy. When Lumen is configured to trace far enough and your scene geometry is robust, light will only appear where it’s supposed to. The result is physically believable lighting – dark corners stay dark, and illuminated areas are only those reachable by light. This sets the stage for your actual cinematic lighting to shine without technical distractions.
Consistent cinematic lighting across camera cuts in UE5 Sequencer
Maintaining consistent lighting between camera cuts is crucial so that your edited sequence looks seamless. You don’t want the audience to notice that the lighting changed just because the camera angle did. However, in real-time engines like UE5, camera cuts can inadvertently cause lighting or exposure shifts due to how Lumen and other systems work. Here’s how to ensure consistency across cuts:
- Unified Global Lighting Setup: Treat your entire sequence’s environment lighting as a constant backdrop. This means if you have a Sky Light, directional sun, fog, etc., keep those on and unchanged across all shots (unless story calls for a change). All cameras should essentially be capturing the same world state. It sounds obvious, but sometimes people light per camera and forget to carry settings over, causing changes. Use one global Sky Atmosphere / SkyLight / Environment setup shared by all shots.
- Lock Exposure Settings: Use manual exposure (or a fixed exposure value per shot) so that when you cut, the brightness doesn’t auto-adjust. If one camera was looking at something dark and another at something bright, auto-exposure would compensate differently. By fixing exposure, you ensure lighting levels appear consistent when cutting. In Sequencer, you can keyframe camera settings like aperture/ISO if needed, but ideally keep them constant across a cut unless deliberately changing.
- Leverage Precomputed Lighting (if needed for cuts): Though we focus on Lumen, one trick from traditional rendering: if you have very static lighting and environment, you could bake a Volumetric Lightmap or static Lightmass GI solution and use it to ensure consistency. However, mixing that with Lumen can get complicated. Instead, perhaps use Lumen’s reflections and GI persistence. Lumen doesn’t have a global GI cache yet, but as long as the environment is static, the GI should remain similar. The key is to not reset the level or anything between cuts.
- Avoid Triggering Fresh GI Calculations: If you open a level fresh and immediately render a camera, Lumen might start with less refined GI for a frame or two. To avoid this on cuts, it helps to warm up (as discussed). If using Sequencer without MRQ, you can run the sequence once in editor to let GI settle, then render a second time. In MRQ, engine warm-up does this for each shot. This way, each camera’s first frame already has full GI info.
- Consistent Post Process Volume: Ensure all cameras experience the same Post Process Volume settings. If you have multiple PP volumes (say for interior vs exterior), a camera cut could cross a boundary and see a change in GI or tone mapping. During a continuous shot that’s fine (walking from indoors to outdoors changes lighting), but on a cut it’s jarring. To avoid this, consider unifying PP settings during the cut or blending them. With the Lighting Cinematic Tool, it likely enforces one set of PP settings for all your cinematic shots (unless you deliberately override).
- Match Temporal Conditions: If using things like auto day-night cycle or dynamic time of day, be cautious with cuts. A cut should not jump the sun position noticeably (unless it’s intentional passage of time). If you cut between two cameras that each advance time, you may inadvertently change lighting. The solution: lock the time of day during your sequence or ensure each shot starts at the same time if they’re supposed to be concurrent.
- Use Cut Scenarios in Lighting Tool: Some cinematic tools have a concept of “shot lighting” versus “global lighting”. The Lighting Cinematic Tool might not explicitly do per-shot adjustments (since it focuses on GI stability), but you can use Sequencer to animate certain lighting parameters if absolutely needed to tweak per camera. For example, if one shot needs a slight exposure boost, you could keyframe that in a Cinematic Level Sequence without affecting others – just do it carefully so it doesn’t cause visible transitions.
- Edit Considerations: If despite all efforts a subtle difference remains (like one angle has a slightly different bounce light on a character’s face), you can hide it with editing techniques: cut on motion or wipe, or even do a cross-fade of a few frames. A 1-2 frame cross-fade can blend out a tiny lighting continuity error. This is last resort though – ideally your frames match exactly.
- Verify in Playback: After rendering all shots, watch the sequence as a whole (either in Unreal’s sequencer or assemble the frames in a video editor). Pay special attention at the cut points: Look at the shadows and brightness on static objects between the last frame of shot A and first frame of shot B. They should match. If something jumps (say a shadow moves slightly), investigate if that’s a physics issue or a lighting issue. If it’s lighting, it could mean Lumen wasn’t fully converged or the camera perspective caused a difference (perhaps screen-space GI component). In that case, you might increase warm-up frames further or try a slight overlap.
- Screen-Space Considerations: Remember Lumen uses screen-space for some GI and reflections. When you cut to a new camera, what’s on screen changes, and that can alter the contribution of screen-space effects. To mitigate this, Lumen has a fallback for off-screen, but not for everything. You can reduce reliance on screen traces (like setting
r.Lumen.ScreenProbeGather.ScreenTraces 0which the user in forum tried) to force more off-screen calculation. That can make lighting more uniform across different views (less camera-dependent). It’s heavier on performance, but for offline rendering it could be fine. The Lighting Cinematic Tool presumably balances this kind of thing for you.
In practice, many have found that using Movie Render Queue with proper warm-ups and high quality settings yields consistent results across cuts – the flicker and shifts that might be seen in viewport are gone when each shot is given the chance to fully render out. One Facebook discussion noted that using MRQ with proper settings eliminated issues when cutting between Lumen-lit shots. So rely on the high-quality pipeline.
By following these steps, your audience should never notice that one shot was any different lighting-wise from the next, unless you want them to (like a dramatic lighting change as a storytelling device). Consistent cinematic lighting is about careful setup and letting the engine settle so that each camera sees the same lit world.
Post Process Volume settings for cinematic lighting in UE5
The Post Process Volume (PPV) is a critical tool for fine-tuning your cinematic look in Unreal Engine 5. For lighting specifically, the PPV houses many settings that impact Lumen GI, exposure, color grading, etc. To achieve the best cinematic lighting, we should configure the PPV with appropriate settings:
- Unbound Post Process Volume: Ensure your PPV’s Infinite Extent (Unbound) is checked, so it affects the whole scene regardless of camera location. This way all areas and shots use the same post process rules, unless you intentionally blend volumes.
- Exposure – Manual vs Auto: For cinematics, Manual Exposure is recommended. In the PPV under Exposure, set Exposure Method to Manual and choose an Exposure Compensation or EV value that suits your scene’s brightness. For example, EV 13-14 for a bright outdoor day, or EV 6-8 for dim interior, etc., depending on artistic needs. Manual exposure locks the camera’s light sensitivity, preventing the engine from auto-adjusting brightness per scene. This is crucial for maintaining the intended mood and for consistency across cuts (as discussed). If you absolutely need auto-exposure (maybe a long shot going from dark interior to bright exterior), then at least set a narrow Min/Max Brightness range (like 1.0 to 1.0 for disabled, or e.g. 0.9–1.1 if slight adaptation is okay).
- Lumen Global Illumination Settings: In the PPV, find the Global Illumination > Lumen section. Here:
- Set Quality to Epic (or use the Lighting Cinematic Tool to push beyond if possible). This toggles underlying things like FinalGather quality to high.
- Final Gather Quality – if exposed, set to 4 (Epic). Some PPVs allow direct numeric tweak or it’s tied to quality above.
- Final Gather Lighting Update Speed – for static scenes, default (1) is fine. If you want faster updates for dynamic light changes, increase this value (e.g., 2 or more) so GI updates almost instantaneously.
- Diffuse Boost / GI Intensity – UE5’s Lumen doesn’t have a “diffuse boost” like Lightmass did, but it does have Indirect Lighting Intensity under each light and in PPV possibly as a global. Keep these at 1 for physically correct results. Only adjust if you need an artistic boost or reduction of GI bounce globally.
- Skylight Contribution – There may be a checkbox for “Use Sky Atmosphere for Skylight” and so on. Ensure it’s all consistent and as desired (usually on by default).
- Reflections Settings: Under Reflections in PPV, ensure Type: Lumen (unless using hardware ray tracing exclusively). Set Lumen Reflections Quality also to Epic. If available, check Hit Lighting for Reflections (this might appear if hardware ray tracing is on, or it might be a project setting only). Also consider enabling High Quality Translucent Reflections if you have glass or water; it uses more rays for translucency.
- Ambient Occlusion: Typically, in high-end cinematics with Lumen, you might disable Screen Space Ambient Occlusion (SSAO) or keep it subtle. Lumen GI itself provides contact shadowing to a degree. However, some artists like a touch of AO for extra grounding. If you use it, set a small radius and low intensity. Alternatively, Distance Field Ambient Occlusion (DFAO) can be enabled if mesh distance fields are on, which might give better large-scale AO. But Lumen’s own sky occlusion is usually sufficient.
- Color Grading and Tone Mapping: Cinematic lighting isn’t just about physical accuracy, but also the final look. Use the PPV’s Film and Color Grading settings to your advantage:
- If using ACES (default UE tone mapper), you get a filmic curve automatically. You can tweak the Film Contrast, Toe, Shoulder etc., to refine dynamic range. For instance, raising contrast can deepen shadows (careful not to crush detail if your monitor calibration is different).
- Use Global LUT if you have a specific film LUT you want to apply. Many cinematographers use a LUT to achieve a particular color grade that complements the lighting.
- Adjust White Balance to control the overall warmth/coolness of the scene, which interacts with your lighting color temperature.
- Saturation and Gamma: Under global color grade, a slight lift in gamma or adjustment in shadow tint can bring out details or mood (e.g., teal shadows, orange highlights for the classic teal-orange look).
- Bloom and Lens Effects: While not directly “lighting”, bloom can affect how lights feel on camera. If you have bright light sources (sun, street lamps), set Bloom intensity to a cinematic level (maybe threshold 1, intensity around 0.2–0.5 for subtle bloom; or higher for stylistic glow). Too much bloom can wash out a scene, too little can make bright lights look unconvincing. Also consider Lens Flares if appropriate (for example, Rect Light as a car headlight might benefit from a lens flare – though UE’s native flares are simple).
- Volumetric Fog Settings: If you use Exponential Height Fog with volumetric enabled, you can control some of it in PPV via Volumetric Fog settings (like scattering distribution, albedo). Ensure fog is consistent across shots. In cinematics, fog can add great depth to lighting (god rays, light shafts). Tweak the volumetric lighting intensity and anisotropy to get nice rays from your directional light if needed.
- Depth of Field & Motion Blur (Cinematic): For completeness, if you have very dark scenes lit by subtle lights, a long exposure (motion blur) or shallow focus (DOF) might be part of the look. The PPV is where you control Camera DOF (f-stop or circle of confusion settings) and Motion Blur amount. Cinematic motion blur can actually smooth out any small lighting inconsistencies frame to frame as well, by blending moving objects’ exposure – but use it primarily for the cinematic feel.
- Miscellaneous: Check Lightning (not lighting) – make sure Auto-Exposure speed if you left it on is not too fast (to avoid flicker). Check Convolution Bloom if you want a more realistic bloom kernel (e.g., anamorphic lens streaks if using that asset). Also, if you use Screen Space Global Illumination (SSGI) for some reason as a supplement (generally you wouldn’t if Lumen is on), disable it to avoid double GI.
The Lighting Cinematic Tool likely automates many of these PPV settings, especially those under the Global Illumination and Reflections categories, setting them to optimal values for you. But it’s still good to understand and verify them. For instance, one Redditor advised “slap a post process volume on there and max out the lumen related stuff, it should give you more consistent lighting.” – that’s exactly what we’re doing here: maxing out the relevant PPV settings to ensure consistency and quality.
In conclusion, treat the Post Process Volume as your digital cinematography toolkit: you set the “film stock” (exposure, color, contrast) and ensure the engine’s rendering settings are cranked for best quality. With these PPV settings dialed in, your scene’s lighting will not only be technically robust (thanks to Lumen quality tweaks) but also artfully presented in the final image.
Movie Render Queue settings for clean cinematic lighting renders in UE5
The Movie Render Queue (MRQ) is the preferred way to output high-quality cinematics from Unreal Engine 5. It provides fine control over rendering settings, many of which can further clean up lighting in your final renders. To ensure your lighting looks pristine in the exported frames or video, consider the following MRQ settings and configurations:
- Anti-Aliasing / Temporal Samples: In the Movie Render Queue, add the Anti-Aliasing settings override. For cinematic quality, use the Temporal Sample Count to accumulate multiple sub-frames per output frame. A common high setting is Temporal Samples = 32 or 64 and Spatial Samples = 1 (since temporal already does jitter). This effectively means each frame’s lighting (including GI) is averaged over 32-64 instances, greatly reducing noise and flicker. The Reddit case we saw used 64 temporal samples. You can go even higher if needed, but returns diminish. Also set Anti-aliasing method to None if you are using the temporal samples (so it uses the accumulation-based AA rather than UE’s default TAA).
- Engine Warm-Up and Movie Pipeline Warm-Up: Under MRQ’s Render Settings, enable Engine Warm Up Count. Set a number like 60 (frames) as warm-up for each shot. Also tick “Use Camera Cuts for Warm Up” if available, which tells MRQ to treat each cut separately for warm-up. Additionally, enable Delay Before Shot if needed (sometimes you do a small pause before recording to let particles or cloth settle, but for lighting the Engine Warm Up is key). As discussed, warm-up frames ensure Lumen’s GI and reflections are fully converged and stable by the time real output begins. You won’t output these frames, they are discarded, but they eliminate first-frame artifacts.
- High Resolution and Tiling (if necessary): If you want extremely high resolution (4K, 8K), MRQ can tile render. But tiling and Lumen don’t always play well because Lumen’s view-dependent nature can cause seams. If you need tiling, consider enabling the “Overlap” setting to blend edges, and definitely have warm-up frames. For most, just set the resolution to your target (e.g., 3840×2160 for 4K) and let MRQ handle it in one go if possible. High resolution inherently reduces noise too (more pixels).
- Override Console Variables: MRQ allows adding console variables directly. You can use this to enforce some of the tweaks we mentioned:
- e.g., add
r.Lumen.ScreenProbeGather.ScreenTraces.HZBTraversal.RelativeDepthThickness = 0.001to reduce flicker, r.Lumen.ScreenProbeGather.Temporal.MaxFramesAccumulated = <some high number>if a setting like that exists, to let GI accumulate over many frames (this could already be tied to temporal AA though).- You could also force
r.LumenSceneDetail = 1(which corresponds to Epic quality) or even beyond if undocumented values exist. - If using Path Tracer, you’d add those cvars (but here we focus on Lumen).
- e.g., add
- Disable Game Overrides: By default, MRQ disables game features that could interfere (like motion blur, lens flares, etc., depending on settings). Check the Game Overrides section. Generally, you want MRQ to Use Lumen in All Views (ensures Lumen works even in reflections/captures – which it does by default since 5.1). If there’s a setting to ensure “texture streaming fully loaded” (e.g.,
r.Streaming.FramesForFullUpdate = 0or an option to load all textures), you might use it to avoid any mip pop that could be perceived as lighting variation. - Movie Pipeline Anti-Aliasing vs Console anti-flicker: MRQ’s anti-aliasing is powerful, but as we saw, sometimes the TAA can cause flicker. If you did see issues, you can try the “Improve Anti-Aliasing” setting or experiment with Temporal Sample Count vs. Anti-Aliasing Method. Another trick: set Spatial Samples to something like 8 with Random Pattern – this can act as a brute-force supersample, blending out noise between spatial subsamples. It massively increases render time though. Usually 1 spatial + N temporal (with high TAA quality) is enough.
- Motion Blur and Camera Shutter: If using motion blur, set a shutter angle that suits your look (e.g., 180° for normal blur). MRQ allows you to override motion blur amount per render. A bit of motion blur can actually help integrate lighting changes because it softens fast changes. But if too high, it could smear any leftover noise. Use artistically, not as a fix.
- Use Deferred Rendering (No Path Tracing unless intended): Just a reminder: make sure Path Tracing is off in MRQ unless you intend to use it. Sometimes people accidentally leave a Path Tracer config which overrides Lumen entirely (resulting in different lighting). The default is deferred rendering which uses Lumen, which is what we want.
- Output EXR or High Bit Depth: Lighting in cinematics benefits from high dynamic range output. If you output to a format like EXR (16-bit or 32-bit), you preserve all highlight and shadow detail and can adjust exposure in post. MRQ supports EXR sequences. This is great because if something was slightly dim, you can brighten it in post without re-rendering. It also helps avoid banding in subtle lighting gradients. If you go EXR, you can later tonemap to SDR or apply ACES in compositing.
- Test Render a Few Frames: Before committing to a full sequence, do a test with MRQ for a handful of frames (like frames where a lot changes). Inspect those frames for any lighting issues – e.g., one user discovered flicker via test renders and adjusted accordingly. It’s easier to tweak MRQ settings after a small test than after a full heavy render.
- Use Latest Unreal Version if possible: Each engine point release often fixes some render artifacts. If you are on 5.5.0, consider 5.5.1+ if available, as they sometimes specifically address MRQ or Lumen stability issues (like the forum mention that 5.6 had more flicker in one case than 5.5, so staying on the stable version that the tool targets is wise).
By configuring the Movie Render Queue as above, you essentially engage Unreal’s “full power” to produce a clean image. The combination of plenty of samples, warm-up frames, and high precision output will yield results that are film-quality. As one tutorial succinctly put it: the first few MRQ frames might look bad if not warmed up, “because Lumen is intended for real-time and needs a moment, but turning on warm-up fixes that”, and similarly, high AA samples eliminate residual noise. The Lighting Cinematic Tool doesn’t directly control MRQ, but it sets the stage so that when MRQ runs, Lumen behaves optimally.
Finally, it’s always a good idea to check Epic’s official MRQ documentation or community tutorials (like “Demystifying Movie Render Queue”) for any engine-specific quirks. But the steps above cover the key points to get clean, flicker-free, high-fidelity lighting in your rendered cinematics.
Lighting Cinematic Tool troubleshooting (common issues and fixes)
Even with a robust tool like this, you might encounter some issues or have questions. Here are common troubleshooting tips for the Lighting Cinematic Tool and its use:
- Tool Not Appearing or Loading: If you installed the tool and don’t see it in Unreal, double-check you placed the files correctly (Plugins folder vs Content). Also ensure your Unreal Engine version is supported (UE5.5+). If you try on 5.4 or earlier, it won’t load at all. The ArtStation page explicitly notes “UE5.5+”. If using 5.6 (future), and it’s not working, the plugin might need an update – check if Argentum released a new version.
- Settings Seem Not to Apply: You adjusted some parameter in the Lighting Cinematic Tool UI, but it’s not visibly affecting the scene. Possible reasons: another Post Process Volume might be overriding it. The tool might be adding a PPV itself – ensure no other unbound PPVs with higher priority are nullifying changes. Also, if you’re testing in Editor viewport, make sure Game Settings checkbox is off in the viewport or that you’re simulating game – some post effects only show during Play if Game Settings are enforced. Ideally, test in PIE (Play in Editor) to see the full effect.
- Lighting Still Flickers/Leaks: If you find that even with the tool enabled, you get flicker or leaks, it could be that your scene needs those physical adjustments (geometry thickness, etc.). The tool can mitigate engine-side issues, but it can’t fix a paper-thin wall leaking sun unless you address the geometry. Use the Lumen visualization tools to diagnose. If it’s flicker in MRQ output, ensure you used warm-up frames; the tool can’t enforce MRQ settings, so that’s on the user to setup as above.
- Performance Drops: When you activate the Lighting Cinematic Tool or set it to a high quality preset, your editor frame rate might drop significantly. This is expected – it’s cranking up quality (more rays, more distance) and possibly enabling hardware RT. Use Editor Performance settings (lower Engine Scalability temporarily) if needed while setting up shots, and only enable the full quality right before rendering. The tool saves time in setup, but doesn’t magically reduce the cost of high quality lighting – so be prepared for heavier rendering.
- Conflicts with Other Plugins: If you have other lighting or post-process related plugins (like Ultra Dynamic Sky, post-process FX plugins, etc.), check for conflicts. For instance, if another plugin also tries to set certain console variables for Lumen, they might fight. The Lighting Cinematic Tool likely sets its changes at runtime or as soon as the actor is present. Ensure the order – ideally, place the Lighting Tool actor last in your outliner or with highest priority so its settings win out.
- Shot-Specific Adjustments: If one particular camera angle still looks off (maybe too dark or too bright), you might be tempted to adjust lighting just for that shot. The tool itself doesn’t do per-shot lighting (it’s global), so handle this carefully. You can duplicate the Lighting Tool actor, set different values, and trigger visibility per shot via Sequencer (though that’s advanced and could cause a pop if not blended). A simpler way: adjust the camera exposure or use light animations for that shot alone. Keep such tweaks minimal. The troubleshooting point here: don’t over-complicate things – 90% of the time, a consistent global setup is best. If you must cheat for a shot, do it in a controlled way (and maybe note it for later, in case you see a weird transition).
- Tool Updates and Versions: If Argentum Studio releases an update (say Lighting Cinematic Tool 1.1 or 2.0), check their notes on compatibility. Upgrading might require removing the old plugin and adding the new one. Always backup project before swapping plugin versions. If something breaks after update (like settings reset), you may need to reapply your lighting settings. Keep screenshots or documentation of what values you used in the tool for reference.
- Consult Documentation/Community: The developer provided detailed documentation and a video guide. If you haven’t already, read through it. It probably contains a troubleshooting section itself, covering things like “If you still see noise, try X” or “For extremely large scenes, do Y”. Additionally, community forums (like Unreal Engine forums or Reddit) might have threads. Already, the hair tool had forum discussions, and likely users will discuss this lighting tool’s tips as well. Searching those can provide user-discovered fixes or the developer’s answers to common questions.
- Log Warnings/Errors: Look at your Output Log in UE5. If the tool fails to set a cvar or something, it might print a warning. For example, “r.SomeLumenSetting not found” could indicate the engine version doesn’t support that command (maybe it was added in 5.5 and you’re on 5.6 where it changed). These clues can help; you’d then seek an updated command or plugin patch.
- Combining with Path Tracing or Baked Lighting: Generally, don’t. The tool is meant for Lumen. If you switch to the Path Tracer, the Lighting Tool’s adjustments to Lumen won’t matter (path tracing has its own settings). If you decided to bake lighting for some reason, you should disable or remove the Lighting Tool actor to avoid confusion, as it might, for instance, set SkyLight to movable or other dynamic tweaks that aren’t relevant then. Basically, use the tool in the context it’s intended (real-time Lumen GI rendering).
- Memory or Crash Issues: If you push quality extremely high (like large scenes, max trace distance huge), you might run out of VRAM or memory leading to crashes or black renders. Troubleshoot by dialing back some settings (maybe that max trace distance or not using 8K resolution). The tool might not automatically prevent you from choosing “too high” values, so find the sweet spot.
The bottom line for troubleshooting is: eliminate variables one by one. If lighting is weird, test without the tool (is it Lumen or the tool?), test without a certain light, etc., to pinpoint. In nearly all cases, the combination of proper scene setup, correct tool usage, and MRQ settings will produce great results. And remember, the developer encourages reaching out – since it’s a marketplace product, you can leave a question/comment on ArtStation or wherever. They have an incentive to help users fix issues. The early reviews are positive and looking forward to updates, indicating the tool works well and any kinks will likely be ironed out in updates.
UE5 cinematic lighting workflow for MetaHumans and digital humans
Lighting digital humans (like Epic’s MetaHumans) in UE5 cinematics requires special care, as our eyes are very sensitive to how human skin and eyes are lit. The Lighting Cinematic Tool can definitely help achieve consistency in GI and overall scene lighting, but when it comes to character-specific lighting, you might need to go a bit further:
- Use Character Rigs and Fill Lights: In film, human faces are often given dedicated lights (e.g., fill light, eye light). In UE5, consider adding some subtle rect lights or spotlights aimed at your MetaHuman’s face to bring out their features, on top of environment lighting. These should move with the character if the character moves (attach to head if needed). The stable GI from Lumen will bounce these nicely, and the Lighting Tool ensures they don’t flicker in intensity.
- Skin Material and Lighting: MetaHumans have advanced skin and eye shaders. They can appear a bit different under Lumen vs baked lighting. Make sure Subsurface Scattering is enabled (it is by default in skin materials), and the skin shader quality is set to high. Lumen handles subsurface well, but if you find the character looks too waxy or too flat, adjust the light’s scattering. For example, each light has a “Diffuse boost” and “Subsurface” parameter in UE (for subsurface contribution). Tweak those if needed – sometimes faces need a touch more direct lighting to not go too dark under GI.
- Eye Reflections and Catchlights: MetaHuman eyes are very realistic, but they can sometimes pick up environment reflections (like bright sky) that look odd. One known issue: eyes reflecting the sky atmosphere too strongly, making them appear glowing blue. Solution: adjust the Material instance for the eye – Epic recommends lowering the Eye Occlusion opacity to tone down sky reflections. Additionally, ensure you have an eye light – a small rect light near the camera to put a sparkle in the eyes, commonly done in cinematography. This can be subtle, but it adds life. The Lighting Cinematic Tool’s stable GI means the eye light will reflect consistently across shots.
- Consistent Lighting on Character Across Shots: If you cut between a wide and close-up of a MetaHuman, make sure the lighting on them remains consistent. Avoid the temptation to radically change key light direction between shots (unless it’s motivated, like perhaps for drama). Because humans are so recognizable, a continuity error in lighting will be obvious (“her face was lit from the left, now from the right after cut?”). Use the same key light (e.g., the sun or a studio key) for all angles. The tool will help by ensuring GI and bounce light from the environment remains the same on the character regardless of camera angle (no GI popping).
- Utilize Better Metahuman Eyes or Groom tools: Argentum Studio actually offers a free Better MetaHuman Eyes resource. This might improve how eyes look under certain lighting (sharper detail, proper refraction). If you have it, integrate it – better shading means the lighting you set will appear more realistic. Similarly, good hair grooms (discussed in PixelHair section) ensure that hair reacts properly to lights and GI.
- Check Shadow Detail on Faces: Virtual humans sometimes suffer from either too flat lighting or overly harsh shadows that hide facial features. Use fill lights or bounce cards in engine: for instance, you can simulate a reflector by placing a white card (plane) out of view to bounce some key light back to the face (Lumen will bounce it!). Or just use a low-intensity fill light. The Lighting Tool ensures that bounce lighting is consistent, so once you get the right balance on one shot, it should hold for others.
- High-Fidelity Materials: With cinematic lighting, every imperfection in the character materials will show. Make sure the MetaHuman’s textures are high resolution (use the highest LOD for close-ups; you can force LOD 0 via character BP or sequencer). Also, if the default roughness of skin or specular of lips isn’t to your taste under your lighting, adjust the material. Sometimes raising the specular on skin can add a nice sheen that responds to rim lights, etc.
- Lumen and Translucency for Hair: If your digital human has hair grooms (especially MetaHuman strand hair), note that Lumen handles hair via special paths – typically hair is treated as shadow-casting for sure, but its GI contribution might be limited. If hair appears too flat, you may need to add a very subtle light from behind to create a rim and separate it from background. PixelHair assets (below) and Groom Cinematic tool can help get better hair shading that works with your lighting.
- Facial Animation and Lighting: If the MetaHuman is emoting or moving, watch out for any lighting popping on fast movements – e.g., if he swings his head and a light was very close, the intensity might change across frames (inverse square law differences). Keep lights at a reasonable distance or at least be aware of that. Lumen GI will also update as they move; the Lighting Tool’s high update speed means as a character moves, the bounced light moves with them smoothly (no lag).
- Use View Modes for Fine Tuning: There’s a Character Lighting view mode (lit with default neutral lighting) – not directly needed here, but use Buffer Visualizations like Roughness, LightingOnly, etc., to inspect how lighting hits the face. If something is off (like a strange shadow under the chin that flickers), you might realize it’s because a small object was causing a shadow – then you can address it (maybe that object’s shadow quality, etc.).
MetaHumans are a showcase for UE5’s rendering, and with Lumen, you can achieve incredibly realistic results. In fact, many MetaHuman promotional videos rely on Lumen GI to get natural skin tones under complex light (for example, bouncing colored light off walls onto the character, etc.). A stable GI tool ensures that the delicate balance of light on a face stays consistent through a sequence, which is immensely helpful when editing dialogue scenes with shot-reverse-shot of characters, etc.
Remember that beyond technical settings, artistic lighting principles apply: use a three-point lighting approach for characters (key, fill, rim) adapted to the environment. The tool gives you confidence that those lights and their indirect effects won’t glitch out. As you refine the cinematic lighting on your MetaHumans, you’ll likely find the result to be on par with professional cinematography, provided you apply both the technology and the artistry.
Cinematic pipeline add-ons for UE5 lighting (optional)
Unreal Engine’s cinematic capabilities can be extended with various pipeline add-ons and tools that complement lighting workflows. These are optional, but they can enhance or streamline your process alongside the Lighting Cinematic Tool. Here are a few noteworthy ones and how they tie into lighting:
- Argentum’s Groom Hair Cinematic Tool: This is the “sibling” tool to the Lighting Cinematic Tool, focused on hair grooms. For cinematics, realistic hair is crucial and it’s tightly connected to lighting (hair shadows, light scattering). The Hair Cinematic Tool allows fine-tuning of hair rendering settings – e.g., setting hair shadow density, hair anti-aliasing, and even things like culling. If you have characters with strand hair, using this tool (latest version supports UE5.5+) in conjunction ensures the hair is rendered in the best quality, complementing your lighting. For example, you can remove overly strong AO on hair or increase hair specular, so when you light a character, their hair looks natural (not too dull or too noisy). It basically exposes console vars for groom hair (just as the Lighting tool does for GI).
- Ultra Dynamic Sky / Environment Lighting Rigs: While Unreal has built-in SkyAtmosphere and SkyLight, some artists use plugins like Ultra Dynamic Sky for more control (like weather or exact sun positioning with HDR clouds). Such tools can help you create more dynamic lighting scenarios quickly – e.g., time-of-day changes or specific cloud cover that affects light quality. These don’t directly interact with Lumen besides providing the source lighting, but they can be part of your pipeline if you need varied lighting conditions.
- HDRI Backdrop or Skylight Cubemaps: For studio lighting setups or quick ambient lighting, you might use an HDRI backdrop or just assign an HDR cubemap to the Skylight. This is an easy way to project realistic ambient lighting onto your scene. Many cinematographers in UE use this for say, a quick indoor setup lit by an HDRI of a real studio. It’s not an external add-on per se (HDRI backdrop is built-in), but worth mentioning as a pipeline technique. It pairs with Lumen GI which will bounce that environment light accurately.
- View Keeper (Blender camera tool): More on this in its own section below, but essentially The View Keeper add-on for Blender can be part of the pipeline if you block out or plan shots in Blender then bring cameras to Unreal. It’s not affecting lighting directly, but by managing camera work smoothly, it ensures your lighting setup can be assessed with the correct framing early on. You might plan a lighting setup differently if you know the exact camera angles (for example, if a camera is never showing the ceiling, you might not need as many bounce lights up there, etc.). View Keeper helps maintain camera consistency when transferring to UE, so your lighting aligns perfectly with your intended compositions.
- Color Grading Pipeline (LUTs): Some artists integrate external color grading steps. For instance, OpenColorIO plugin usage for ACES or custom LUTs from DaVinci Resolve. While UE5 has ACES tonemapping by default, if you need a specific color pipeline (say for final film match), you might use OCIO to manage that. This ensures the lighting you see in engine is in the color space you will deliver in, preventing surprises in contrast or brightness.
- Movie Render Queue Extensions: There are community MRQ extensions, for example, to integrate with After Effects or to add slate/timestamp to frames. Not lighting per se, but part of pipeline. One extension allows capturing multiple viewports at once (for stereo or multi-cam). If you ever do multi-cam (like VR or 360 capture), ensure that all cams are under same lighting conditions – a tool like Lighting Cinematic Tool helps by being global.
- Virtual Production Tools (if using): For those doing cinematic lighting in a virtual production context, tools like Live Link (for real cameras), or an LED wall setup, etc., might come into play. In such cases, consistent lighting in engine is doubly important because it’s directly being filmed. The Lighting Cinematic Tool could be used to tune Lumen for the LED volume (ensuring no flicker on the wall content that might show on camera). Add-ons in VP include nDisplay, switchboard – not directly lighting tools, but part of the pipeline.
- Marketplace Lighting Packs: There are some marketplace assets that provide preset lighting setups (like “Studio Lighting Pack” with preset lights and backdrops). These can jumpstart your scene lighting – you can drop them in and then modify. With Lumen, any physically plausible setup from these packs should work, and the Lighting Tool can refine GI. Use them if you need quick starting points, but usually for a unique project you’ll craft your own lighting.
- Python Scripting Automation: Not an add-on to download, but UE allows Python scripting. You could automate parts of your lighting pipeline – e.g., a script to toggle certain lights per shot or to batch render multiple lighting scenario levels. If you’re comfortable, this can speed up tasks (like render all lighting scenarios overnight). The pipeline becomes more efficient, letting you try more lighting variations quickly.
In essence, the cinematic pipeline in UE5 is modular – you have your lighting tools, your content creation tools (like Blender with View Keeper, etc.), rendering pipeline (MRQ), and post-processing. The Lighting Cinematic Tool sits in the lighting tools category, but you can augment around it. The goal is to make the process from concept to final pixel as smooth as possible.
By carefully picking and using these add-ons, you can save time and achieve effects that might be cumbersome to do manually. However, keep the pipeline manageable – too many moving parts can complicate troubleshooting. Choose what adds clear value. For example, PixelHair (next) clearly adds value for hair realism, and View Keeper for camera management – they directly solve known needs (good hair, good camera control). With a solid core like the Lighting Cinematic Tool ensuring your GI and lighting are solid, these optional tools plug in to elevate specific aspects of your production.
PixelHair grooms lighting tips for UE5 cinematics
PixelHair is a collection of production-ready, realistic 3D hair grooms for Blender and Unreal Engine, created by Yelzkizi (a 3D artist/developer). While PixelHair is primarily about hair assets, it plays into lighting for cinematics in a couple of ways:
- High-Quality Hair = Better Lighting Results: Lighting a MetaHuman or any digital human involves how light interacts with their hair. PixelHair assets are carefully crafted hairstyles (in Blender, transferable to UE) that are designed for realism. These grooms have proper density, shader setup, and often come with a fitted scalp mesh. When you use such a groom in UE5, your lights (and Lumen GI) will interact with the hair more realistically: highlights will catch on curls and strands, bounce light will filter naturally through the hair, etc. Essentially, good hair makes your cinematic lighting look good, whereas a low-quality hair might not cast shadows correctly or could look flat under lights.
- Faster Workflow vs. DIY Hair: For a lighting artist or small team, creating realistic hair from scratch is time-consuming. PixelHair provides an alternative to creating your own hair – you get a wide range of preset hairstyles (close to 200 assets as of some releases) that you can just attach to your characters. This means you can focus on lighting and storytelling rather than grooming. The collection covers different styles (curly, straight, updos, fades, etc.), so you likely find something that fits your character. With these ready-made grooms, you can achieve professional results quickly, which is highly valuable in production timelines.
- Geometry Nodes and Future Plans: Currently, PixelHair grooms are based on Blender’s particle hair system, but the developer (Yelzkizi) plans to incorporate Geometry Nodes-based hair in future updates. Geometry Nodes in Blender opens procedural hair creation, which means more flexibility and possibly even more realistic results. Once PixelHair transitions to geometry nodes, users will be able to easily tweak hair length, style, and other parameters procedurally. This integration will make the collection even more powerful. Importantly, from a lighting perspective, geometry nodes-based hair could allow variation like wind effects or density adjustments which can affect how light passes through hair. For example, you could quickly vary the hair thickness to see how it changes bounce light on the face, etc. Yelzkizi highlighting this plan suggests they’re ensuring PixelHair stays at the cutting edge of hair tech, which ultimately benefits lighting (since hair is one of the trickiest materials to light).
- Using PixelHair in Unreal Engine: PixelHair provides either Alembic (.abc) hair exports or hair cards that are compatible with Unreal’s Groom system. That means you can import a PixelHair Alembic groom directly into UE5, assign the UE hair shader, and attach it to a MetaHuman (or any character). The assets are designed for MetaHuman compatibility – so you might, for example, get a scalp mesh that shrinkwraps to MetaHuman heads for a perfect fit. In UE, once the groom is attached, it will respond to lights and Lumen GI just like native MetaHuman hair. PixelHair assets also come with LOD-friendly features (like a mesh cap to fill in underneath and hair cards for distance LODs). This ensures that even as the character moves away from camera, the hair still looks solid and doesn’t vanish or cause GI flicker. Good LODs mean the lighting remains consistent (no sudden drop in hair shadow detail that could affect scene lighting).
- Lighting Tips for Hair in Cinematics: Lighting hair can be challenging – real hair has millions of strands that create complex shadowing and scattering. With PixelHair or any realistic groom, a few tips:
- Use a rim light or backlight to highlight the hair silhouette – this can give beautiful outlines and separate the character from the background.
- Use soft key lights to get subtle specular on the hair. Hair highlights (called the “hair specular lobe”) appear at a glancing angle to the light. You might need to move lights or the character until you see that nice sheen.
- Check shadow softness: Unreal’s virtual shadows will cast from hair. If hair shadows on the face are too sharp/noisy, you can increase light source radius or angle to soften them.
- Leverage bounce light: Hair can be dark. If the character has dark hair, it might need some fill so it doesn’t become a silhouette except for the rim. Lumen GI will bounce some light off shoulders or environment into the hair, but you might also add a subtle fill light behind camera.
- PixelHair’s consistency ensures that once you dial these in, the hair will behave predictably (no weird clipping or disappearing strands that cause flicker).
- Benefits in final render: By using PixelHair, you get a more polished final image. Audiences might not consciously realize it, but the quality of hair can significantly affect the perceived realism of the lighting. For example, light filtering through a few strands near the ear or the softness of a shadow a ponytail casts on the neck – these details sell the realism. PixelHair’s realistic assets help capture those details, and thus make your cinematic lighting feel truly natural and convincing.
In summary, PixelHair is not a lighting tool, but a content resource that greatly aids your lighting process. It provides high-quality hair grooms that respond to light in a realistic way, saving you the effort of making hair from scratch. Yelzkizi’s commitment to updating the collection with Blender’s latest tech (Geometry Nodes) means it will only get better and more flexible. So if your cinematic involves close-ups of characters (where hair quality is evident), PixelHair can be a game-changer – you can confidently light the scene knowing the hair will look great under Lumen GI, and you can fine-tune the look without being limited by hair quality. Combine that with the Lighting Cinematic Tool handling the GI, and you have a powerful combo for bringing digital humans to life on screen.
The View Keeper Blender camera workflow for UE5 shots
The View Keeper is a Blender add-on (by Yelzkizi, the same creator behind PixelHair) that helps manage cameras and shots in Blender. You might wonder how that relates to Unreal Engine 5 cinematics – essentially, View Keeper can be part of your pre-production or layout workflow for UE5, allowing you to design and plan camera moves, and then bring them into UE for final lighting and rendering.
Key points about The View Keeper and how it integrates into a UE5 cinematic pipeline:
- Camera Management in Blender: View Keeper allows Blender users to store multiple camera “views” or shots in a single camera object. You can define different positions, rotations, focal lengths, etc., and switch between them easily. This is incredibly useful when you’re doing shot layout or storyboarding. Instead of juggling many camera objects or writing down coordinates, you press a button to record a view, then you can switch the camera to any recorded view instantly. It effectively keeps all your shot compositions in one place.
- Iteration and Previz: If you prefer to block out scenes in Blender (maybe because you have characters or animation blocked there, or you like Blender’s camera controls), you can set up all your key shots using View Keeper. For instance, you might import a rough environment mesh to Blender, place a character, and then use View Keeper to find the best angles for each story beat. You can preview cuts, ensure continuity, and even do quick OpenGL playblasts of the sequence from Blender’s view.
- Transfer to Unreal Engine: Once you have the camera shots defined, you’ll want them in Unreal. There are a couple of ways:
- FBX/ABC Export: You can animate the Blender camera through those stored views (like create a Blender timeline that jumps camera from one view to another for each shot, or animate transitions). Then export the camera animation via FBX or Alembic to Unreal Sequencer. Unreal can import camera animation and recreate the camera with keyframes. This gets your exact framing in UE.
- Manual Input: Or, use the numeric values from Blender’s camera for each shot and manually set up cameras in UE Sequencer to match. View Keeper makes it easy to retrieve the stored camera transforms. However, the automated import is smoother to avoid human error.
- Yelzkizi’s posts and store hints that View Keeper is used in their Blender ➡️ UE5 pipeline, implying they indeed export those camera setups to UE.
- Consistency of Framing = Confident Lighting: Knowing that your camera framing in UE is exactly what you designed in Blender means you can light with confidence. Oftentimes, lighting is adjusted based on camera view (since what’s off-screen can sometimes be fudged). If you block in Blender and then guess camera in UE, you might have to re-light if the framing changes. View Keeper ensures the framing is locked from the get-go, so you can set up your lights, reflectors, etc., precisely for those views. It also lets you plan for multi-format output (View Keeper even mentions multiple aspect ratios like 16:9, 9:16 etc. for social media – not typical for a cinematic film, but useful if you are repurposing content).
- Batch Rendering / Shot Export: View Keeper also supports batch rendering multiple views in Blender. How is that useful for an Unreal pipeline? You could generate quick Blender previews of each shot (with simple lighting maybe) to serve as a reference or animatic. Then in Unreal, match those. If you see any difference, you adjust either camera or scene accordingly. It’s like having an animatic/previz that you can trust.
- Using View Keeper for Optimized Rendering: For those who use Blender for certain elements (say you render character animation in Blender and background in Unreal), View Keeper ensures you can manage numerous camera shots in Blender without clutter. It’s not directly about Unreal’s lighting, but indirectly, if your pipeline involves both tools, it keeps things organized. For example, maybe you render foreground elements in Cycles (Blender) and background in UE – you’ll want the cameras to match perfectly. View Keeper would help maintain that.
- Ease of use for artists: Not all directors or artists are comfortable in Unreal for initial blocking. Some prefer Blender for its simplicity in manipulating objects and cameras. View Keeper caters to that crowd – you do the creative framing work in Blender, a familiar environment, and then bring it to the Unreal stage for final lighting and rendering. It lowers the entry barrier for filmmakers to use Unreal because they can start in their comfort zone and then transition.
- Pricing and Availability: View Keeper has a free Lite version and a paid Pro version. So anyone can try it out. The pro gives more features (like presumably unlimited records, batch rendering, etc.). If you’re on a budget, the Lite might suffice to test integration with UE.
- Real-world example: Let’s say you have a complex camera sequence – a long take that goes through several compositions (perhaps you plan to cut it, but you did it as one in Blender). With View Keeper, you can break it into records (like “Shot1 start”, “Shot1 end/Shot2 start”, etc.). Then in UE, you could either reproduce as one continuous camera with cuts or separate cameras. Either way, the relative positions are preserved, so cuts will align nicely. This yields a more cinematic feel because your camera cuts were designed intentionally, not just arbitrary.
In short, The View Keeper is a camera workflow enhancer. It doesn’t change anything in Unreal’s lighting or rendering, but it streamlines the process of getting the right shots into Unreal. And good cinematography (camera work) combined with good lighting is what makes a scene truly cinematic. By reducing the technical friction in camera positioning, View Keeper indirectly helps you spend more time perfecting lighting and less time fiddling with camera transforms across software. It’s a great example of how using the right tool in each stage – Blender for layout with View Keeper, Unreal for final lighting with the Lighting Cinematic Tool – can result in a highly efficient and creative pipeline.
UE5 cinematic lighting tool alternatives and workflow comparisons
While the UE5 Lighting Cinematic Tool by Argentum Studio is a powerful solution, it’s worth noting other approaches and tools one might use to achieve similar goals, and how they compare:
- Manual Lumen Tuning (DIY approach): Before this tool existed, artists would manually tweak all the necessary console variables and settings for Lumen. For example, one might read documentation and set things like
r.Lumen.FinalGather.Quality 6(if that gave more quality beyond Epic), adjust .ini files, and constantly test. This DIY method works and is essentially what the Lighting Tool automates. However, it’s time-consuming and requires deep knowledge. The workflow comparison: DIY offers ultimate control but is error-prone and slow. Missing one setting could mean hours lost troubleshooting flicker. The Lighting Cinematic Tool wraps all that up, so the alternative of manual tuning is only viable if you really love digging into technicals or if you cannot use the tool for some reason. - Other Lumen GI Helpers: As of now, Argentum’s tool is quite unique. Epic Games has not (to public knowledge) released an official “Cinematic Lumen preset” asset. There might be INI presets shared by the community (for instance, someone’s collection of “best Lumen settings” on forums or Reddit). Using those is an alternative: basically copying someone’s .ini or console var list into your project. This can work, but lacks a user interface and flexibility. If anything changes (like in UE5.6 if a var is deprecated), you might not know. A maintained tool like Argentum’s is more robust. So, alternative here is community knowledge vs. packaged tool.
- Ray Tracing (Hardware RT) GI and Reflections without Lumen: One alternative path is to use UE5’s hardware ray tracing features instead of Lumen for final render. You can enable Ray Traced Global Illumination (RTGI) via the console (if you disable Lumen and use the old UE4.27-style RT GI). In UE5, Lumen has largely superseded it, but hardware RT GI can still be enabled for cinematic quality. It might give very clean results (since it’s true brute force GI), but it’s insanely slow for complex scenes, and some features like emissive GI might not work as flexibly. That’s more of a theoretical alternative – in practice, nearly everyone uses Lumen now because it’s optimized for UE5. The path tracer is another alternative (as mentioned, an offline renderer inside UE). These alternatives (RTGI or Path Tracing) bypass the need for a Lumen tool altogether, because they don’t suffer the same issues (flicker or needing cvars). But the workflow is different: Path Tracing means you’re okay with much longer render times and no interactivity; RTGI might mean requiring an RTX 4090 or better to get noise-free results in good time.
- Baked Lighting / GPU Lightmass: Another old-school alternative: if your cinematic doesn’t have moving lights or time-of-day changes, you could use baked static lighting (Lightmass or the GPU Lightmass). This gives very stable GI (no flicker at all, because it’s not computed per frame). Quality can be superb (path-traced bakes). However, it’s inflexible for changes, and it doesn’t handle moving objects’ GI contribution. It’s mostly suitable for archviz-like sequences. Workflow-wise: you’d spend time baking (which could be hours), then render frames very fast because no GI cost at runtime. Some still prefer this for indoor scenes to avoid any Lumen quirks. But for general use, Lumen + Cinematic Tool is more straightforward and real-time adjustable.
- Other Marketplace Tools: Are there other marketplace solutions? Possibly not specifically for Lumen GI. There are tools for exposure management, auto light placement, etc. For example, a plugin that places light probes or fake bounce cards automatically. Those can help lighting but are not GI solutions. There’s a tool called TrueSky (now integrated as Volumetric Cloud, not GI though) – unrelated. Perhaps some artists wrote their own blueprint to adjust Lumen. But Argentum’s seems first of its kind widely available. The hair tool from them has an alternative (Nvidia HairWorks or custom solutions), but for Lumen GI stable, not much else out there currently.
- Workflow: Game vs Cinematic mode: If someone is making a game cutscene, they might stick to “game-ready” settings to keep performance. That’s a different workflow – maybe they’ll accept some flicker or reduce quality for 60fps. Cinematic Tool is geared for rendered cinematics (where you can slow down to 1 fps if needed to get quality). It’s worth noting this difference: if you need real-time playback (e.g., a live demo or interactive), you might not crank all these settings as high. In that case, an alternative workflow is to optimize Lumen: lower screen traces, etc., to get something stable enough at 30-60fps. It won’t look as good as the cinematic output, but might be “good enough.” Epic’s default is targeted at 60fps gameplay. The cinematic tool goes beyond, targeting even cleaner indoor 30fps quality or better since it’s offline. So consider your end goal: if it’s purely non-interactive film, use the cinematic approach. If it needs to run in engine live, you might not apply every heavy setting (or use DLSS to help).
- Comparing Visuals: It can be useful to compare frames from these workflows:
- A frame with default Lumen Epic settings vs.
- Same frame with Lighting Cinematic Tool adjustments,
- vs. Path Traced reference.
- Camera Workflow (View Keeper) vs Unreal Sequencer only: Another “alternative workflow” comparison: designing shots directly in Unreal’s Sequencer vs using View Keeper + import. Direct in Unreal is certainly possible (many do it). Unreal now even has a “Scouting mode” for cameras. View Keeper is an alternative if you prefer Blender. This was covered above, but essentially if your team has both Blender and UE artists, that alternative might be efficient.
In summary, while there are various ways to achieve stable cinematic lighting in UE5, the UE5 Lighting Cinematic Tool provides a focused, streamlined solution specifically for Lumen GI. Alternatives like manual tweaking are feasible but require expertise; path tracing is higher quality but non-real-time; baked lighting is stable but inflexible. The Lighting Cinematic Tool combines the real-time, dynamic strengths of Lumen with quality approaching offline renders, all in a user-friendly package. It fills a niche that previously might have required either a lot of work or a different rendering method altogether. Therefore, for most users aiming to do cinematics in UE5, it likely represents the best trade-off – the convenience and power of an automated tool, without sacrificing the creative control and quality.
After considering all, one can see that this tool essentially elevates Unreal Engine’s native capabilities to a “film production” level, closing the gap between game engine lighting and cinematic lighting in practice.
10 FAQ questions and answers
Q1: What is Lumen GI in Unreal Engine 5?
A1: Lumen Global Illumination is Unreal Engine 5’s real-time system for bounced light and reflections. It simulates how light indirectly illuminates scenes (e.g., light bouncing off walls) without pre-baking. It’s the default GI method in UE5, offering high-quality lighting that updates dynamically as lights or geometry move. In short, Lumen allows for realistic lighting in games and cinematics by computing light bounces each frame, with options for software tracing (using distance fields) and hardware ray tracing for higher quality.
Q2: Why do I need the UE5 Lighting Cinematic Tool if Lumen is built-in?
A2: While Lumen is built-in, achieving cinematic-quality results with it can require tweaking many settings and dealing with issues like flicker or light leaks. The Lighting Cinematic Tool consolidates those settings and best practices into one easy workflow. It simplifies setup, reduces technical artifacts, and ensures consistent lighting across shots – tasks that would otherwise require expert knowledge and time to do manually. Essentially, it automates the “secret sauce” for making Lumen look its best for films.
Q3: Can I use the Lighting Cinematic Tool in Unreal Engine 5.3 or 5.4?
A3: No, the tool is officially for UE5.5 and above. It was designed around engine 5.5 improvements and might use console variables or features not present in earlier versions. If you’re on 5.4 or earlier, you’d need to upgrade your project to use this tool. (Argentum Studio had a separate hair tool version for 5.1-5.4, but for lighting tool, 5.5+ is required.)
Q4: How do I install and activate the Lighting Cinematic Tool in my project?
A4: After purchasing/download, you place the tool’s files into your UE5.5 project (usually in the Plugins or Content folder). Then, in Unreal, you might enable it as a plugin if needed and drag the provided Lighting Cinematic Tool actor into your level. Once it’s in the scene, use the Details panel to adjust its settings (or choose a preset). The documentation provides step-by-step installation instructions, and the process typically takes just a few minutes.
Q5: Does the Lighting Cinematic Tool impact game performance or is it only for rendering?
A5: It’s primarily intended for offline rendering or cinematics, where you don’t mind lower frame rates while capturing. The tool maximizes quality (which can reduce real-time performance). Using it in a real-time game might cause a big FPS drop because it pushes Lumen to high quality and distance settings. For real-time applications, you might only enable some features selectively or stick to default Lumen for performance. So, it’s best used for cutscenes, film projects, or promotional videos where quality is prioritized over frame rate.
Q6: My Lumen lighting is flickering in renders – will this tool fix it?
A6: Yes, that’s one of its main purposes. The Lighting Cinematic Tool applies settings to reduce or eliminate Lumen GI flicker and noise. It adjusts internal Lumen parameters (like sample counts and trace stability) to ensure each frame’s lighting is consistent. Users have reported it significantly cleaned up unstable lighting in their scenes. Just be sure to also follow best practices (use Movie Render Queue with sufficient warm-up frames and anti-aliasing samples) for a flicker-free result.
Q7: Can I combine the Lighting Cinematic Tool with ray-traced reflections or path tracing?
A7: You can use it alongside hardware ray-traced reflections – in fact, the tool encourages high-quality reflection settings (it can work with Lumen reflections or hardware RT). For Path Tracing, that’s a separate rendering mode; if you switch to path tracer, the tool’s Lumen tweaks won’t apply because Lumen is bypassed. You wouldn’t typically use them together in one shot. So, use the Lighting Tool for Lumen-based rendering, and if you choose path tracing for a shot, you’d disable/hide the Lighting Tool actor for that render.
Q8: What are some common settings the tool changes?
A8: While the tool handles it behind the scenes, commonly it will: set Lumen Final Gather Quality to high, increase Lumen Scene Detail, adjust lighting update speed, extend trace distances, and enable use of Hit Lighting for reflections. It might also tweak subtle things like the screen trace thickness to prevent flicker. In essence, it cranks quality sliders up and tightens tolerances that cause artifacts. It’s like applying a “Cinematic” preset to all relevant Lumen and lighting settings at once.
Q9: If I got the tool for free during the promo, do I still get updates?
A9: Yes. If you redeemed it via ArtStation’s promo code, it should now be in your ArtStation Library just like a purchased asset. That means if Argentum Studio publishes an update (say version 1.1) to the product, you can download it from your library. Free access was a launch deal, but the product is the same and you effectively “own” that license. Keep an eye on the ArtStation marketplace page or Argentum’s announcements for any updates or new versions.
Q10: Apart from this tool, what else can help improve my Unreal Engine lighting for cinematics?
A10: In addition to this tool, consider: using a Post Process Volume with manual exposure and color grading to fine-tune the look; using high-quality assets (e.g., PixelHair grooms for realistic hair that reacts to light); leveraging Blender add-ons like View Keeper to plan camera shots for better compositions in UE; and using Movie Render Queue with adequate samples and warm-up frames for final output. Also, general cinematic lighting principles – good composition, motivated light sources, and balancing light and shadow – will elevate your final result. The Lighting Cinematic Tool provides a solid technical foundation, and combining it with these creative practices and tools will give the best outcome.
Conclusion
Unreal Engine 5’s introduction of Lumen has been a game-changer for real-time lighting, but achieving truly cinematic lighting quality still requires careful tuning. The UE5 Cinematic Lighting Tool (Lighting Cinematic Tool) emerges as a potent solution for filmmakers and artists, bridging the gap between Unreal’s real-time prowess and the exacting standards of film production. By consolidating all the critical Lumen GI settings into one user-friendly package, it empowers users to produce stable, flicker-free, and controllable lighting with minimal fuss. No longer do you need to be a technical guru diving into console commands – the tool encapsulates industry best practices gleaned from extensive testing and experience, allowing artists to focus on the creative aspects of lighting design.
We explored how this tool not only simplifies the “what is Lumen doing?” questions but also actively fixes common pain points: it squashes GI flicker and noise, cures light leaks by boosting trace distances, and maintains consistent illumination across complex sequences. In practice, the result is that your Unreal Engine cinematics can achieve a visual fidelity comparable to offline rendered scenes, with bounce lighting and global illumination that hold up under scrutiny. Coupled with the recommended use of Movie Render Queue at high settings, your final frames will be clean and cinematic, free from distractions of technical artifacts.
Importantly, we situated the Lighting Cinematic Tool within a broader workflow optimized for cinematics. Tools like PixelHair ensure that characters (especially hair and fur) look and light realistically, adding another layer of polish to the scene. Meanwhile, the View Keeper add-on for Blender streamlines camera blocking and ensures your carefully lit scenes are framed to perfection when imported into UE5. These pipeline enhancements, while optional, complement the Lighting Cinematic Tool’s mission by addressing other areas of the production where quality and efficiency matter. It’s clear that a vast majority of the work should revolve around the main subject – the Lighting Cinematic Tool and the Lumen GI – whereas assets like PixelHair and techniques via View Keeper plug in to support that vision without stealing focus.
For those concerned with the differences between engine versions, we noted that Unreal Engine 5.5 brought improvements to Lumen’s stability and performance (for instance, reducing foliage shadow flicker and general stability). The tool leverages these improvements, so using it with UE5.5+ means you’re riding on the latest advancements in UE’s lighting. Always keep an eye on release notes; if UE5.6 or 5.7 introduce changes to Lumen, Argentum Studio may update the tool to stay current. As of now, they have demonstrated a commitment to their tools (like updating the Groom Hair tool line), so users can expect ongoing support.
In conclusion, the UE5 Cinematic Lighting Tool is a highly valuable asset for all levels of users – from indie filmmakers who might not have a lighting TD on staff, to seasoned Unreal artists who want to save time and get consistent results. It embodies the ideal tone for such a utility: technically adept but user-centric, allowing people to achieve professional outcomes in a fraction of the time. By following the guidance in this article – setting up your scene properly, using the tool’s features, adjusting Lumen and post-process settings to optimal values, and employing complementary tools for characters and cameras – you can elevate your Unreal Engine 5 cinematics to a truly cinematic standard, impressing audiences and clients alike with the power of real-time lighting done right.
Sources and Citations
- Argentum Studio – UE5.5+ Lighting Cinematic Tool (ArtStation Marketplace description)
- 80.lv – UE5 Cinematic Lighting Tool Available Free For A Limited Time (News article)
- Reddit – Discussion on consistent lighting and post process for Lumen
- Epic Games Documentation – Lumen Technical Details (Troubleshooting light leaks, etc.)
- Unreal Engine Forums – User experiences with MRQ and Lumen flicker (console var tweaks)
- ArtStation Blog – Argentum Pipelines | Lighting Cinematic Tool in Unreal Engine (promo instructions)
- Epic Developer Community Tutorial – Lumen vs. Path Tracer in UE5.5 (stability notes)
- BlenderNation (or iRender) – Top 9 Blender Camera Add-ons 2025 (View Keeper info)
- Yelzkizi.org – Blender Trim Hair Curves Guide (PixelHair overview and future plans)
- 80.lv – Step-by-Step Guide to Cinematic Lighting in UE5 (UE5 project settings for Lumen)


