

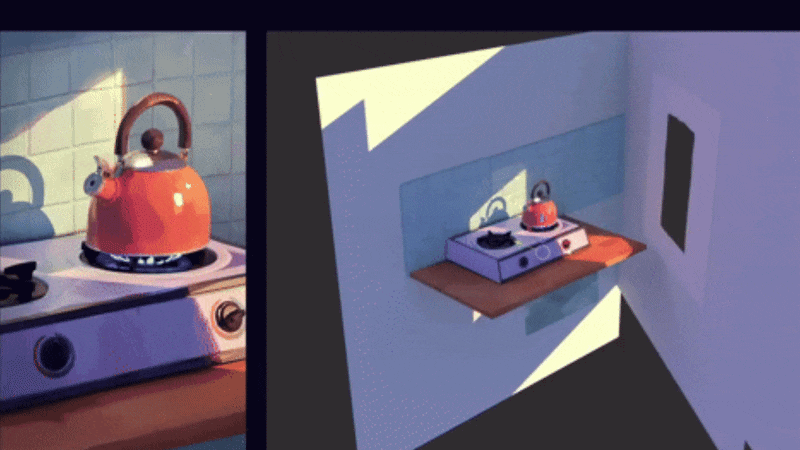


A bird’s-eye view (or top-down view) is a powerful perspective used in various projects. Which ranges from architectural visualizations and game level designs to animated infographics and technical illustrations. This view provides a comprehensive, overhead look at a scene, revealing spatial relationships and layout details that might be missed from ground level.
In Blender, setting up a bird’s-eye camera view involves carefully positioning and configuring your camera. It also includes adjusting its settings, and utilizing advanced tools like The View Keeper to improve storytelling by giving your audience multiple perspectives of a scene. This comprehensive guide will walk you through everything you need to know about creating a bird’s-eye view in Blender, including detailed step-by-step instructions, advanced techniques, troubleshooting tips, and answers to common questions.
Introduction
A bird’s-eye view offers a unique and comprehensive perspective by capturing the scene from above. This top-down view is essential for visualizing spatial arrangements and relationships, making it a popular choice in many creative and technical fields. In Blender, you can create a bird’s-eye camera view with just a few steps, but achieving a polished, professional look might require additional tweaks and adjustments.
In this article, we will explain how to set up a bird’s-eye view in Blender. We’ll cover everything from initial camera placement and configuration to advanced adjustments using Blender’s tools and add-ons like The View Keeper. Whether you’re a beginner or an experienced 3D artist, this guide will provide you with the detailed insights and practical tips you need to master bird’s-eye camera views in Blender.
Understanding Bird’s-Eye View
A bird’s-eye view is essentially a top-down perspective that provides an overhead look at your scene. This view is often used to:
- Reveal Spatial Layouts: It shows how objects are arranged relative to one another.
- Highlight Patterns and Designs: Particularly useful in architectural visualization and landscape design.
- Create Tactical or Strategy Shots: Common in strategy games and animated infographics.
- Offer a Unique Narrative Perspective: In film or VR, a bird’s-eye view can provide dramatic, cinematic effects.
When set up correctly, this view allows you to see your entire scene as if you were hovering directly above it. A perspective that is both informative and visually engaging.
Why Use a Bird’s-Eye View?
Comprehensive Scene Overview
A bird’s-eye view captures the entire layout of a scene in one shot. This is particularly useful in architectural visualization, where understanding the spatial arrangement is critical.
Dramatic and Cinematic Effect
In film and animation, switching to a bird’s-eye view can emphasize the scale of an environment or create dramatic transitions. It provides a break from traditional ground-level shots, offering a fresh perspective that can add visual interest and narrative depth.
Effective in Game Design
For games, especially those in the strategy or simulation genres, a bird’s-eye view is essential for planning and gameplay. It allows players to see an entire battlefield, city, or level, helping them make strategic decisions. In games like Assassin’s Creed it is also used as part of storytelling and gameplay elements

Enhancing Virtual Reality and Interactive Media
In VR and interactive experiences, a bird’s-eye view can serve as an overview map, helping users orient themselves within a complex environment.
Efficient Storytelling
Switching to a bird’s-eye view during a cutscene or narrative sequence can provide context, show spatial relationships, and highlight the environment in a way that enhances storytelling.
Preparing Your Scene in Blender
Before you create a bird’s-eye camera view, ensure your Blender project is properly set up:
- Open Your Blender Project:
Launch Blender and load the project you’re working on. Make sure your scene includes all necessary elements such as objects, lighting, and materials. - Organize Your Scene:
Keep your Outliner tidy by grouping objects into collections. Name your objects and cameras clearly (e.g., “BirdsEye_Cam”) for easy identification. - Set Up Lighting:
Good lighting is essential. Ensure that your scene’s lighting highlights the features you want to emphasize in the bird’s-eye view. - Check Scene Scale:
Verify that your scene is accurately scaled. A realistic scale is crucial for a proper bird’s-eye view, as it affects the overall perception of your layout.
Setting Up the Camera
Creating a bird’s-eye view in Blender starts with the camera. Follow these steps to set it up:
Positioning the Camera for a Top-Down Perspective
- Add a Camera:
If your scene does not already have a camera, press Shift + A and choose Camera. - Position the Camera:
Move the camera to a position directly above your scene. A common method is to use the 3D Viewport’s top view:- Press Numpad 7 to switch to the top view.
- Using the mouse wheel, adjust the camera’s position so that it is high enough to capture the entire scene from above.
- Align the Camera Orientation:
To ensure the camera is aligned with the top view:- With the desired view active, press Ctrl + Alt + Numpad 0. This snaps the active camera to your current viewport perspective.
- Alternatively, you can manually adjust the camera’s rotation if needed (using the R key) so that its local Z-axis points downward.
Adjusting Camera Settings
- Fine-Tune Clipping Distances:
Adjust the near and far clipping distances in the Camera Properties panel to ensure that the entire scene is captured without unwanted cropping or clipping.- Clip Start: Set to a low value (e.g., 0.1 meters) so that objects close to the camera remain visible.
- Clip End: Increase this value (e.g., 1000 meters) to ensure distant objects are included.
- Adjust Focal Length (for Perspective Mode):
For perspective mode, set the focal length to a value that gives you the desired field of view. A shorter focal length creates a wider view, which is typically preferred for bird’s-eye perspectives. - Test the Camera View:
Press Numpad 0 to see the final camera view. Make adjustments as needed until you are satisfied with the framing.

Enhancing the Bird’s-Eye View
To further refine your bird’s-eye view, consider the following techniques:
Using Orthographic vs. Perspective Mode
- Orthographic Mode:
For a true bird’s-eye view without perspective distortion, switch the camera to orthographic mode. In the Camera Properties panel, change the lens type from Perspective to Orthographic. Use this mode for technical illustrations and architectural visualizations where perspective distortion is undesirable. The orthographic view will render objects without any perspective, giving a clean, flat look. - Perspective Mode:
If you prefer a slight sense of depth, stick with perspective mode but adjust the focal length accordingly. This mode is more cinematic and can make your render appear more dynamic.
Leveraging The View Keeper for Bird’s-Eye Setups
The View Keeper is an advanced add-on that can significantly enhance your workflow when managing multiple camera setups, including bird’s-eye views.
Benefits of using The View Keeper in Bird’s-Eye Views
- Store Multiple Camera Configurations:
Save different bird’s-eye camera setups as records. For example, one record might capture a wide-angle overview, while another might focus on a specific character or prop. It also lets you switch between a bird’s-eye view camera and a different camera setup like a dolly camera setup. - Quick Switching and Comparison:
Instantly switch between different camera setups in one click in order to compare different viewpoints. This is done without manually repositioning the camera or changing any settings. - Render Multiple Views Simultaneously:
Each view and camera is stored as a record in The View Keeper. These records can retain its own render and camera settings (resolution, file format, output folder, aspect ratio, focal length etc). The View Keepers allowing you to render all of these camera setups with different settings, all at once. - Maintain Consistency:
Use The View Keeper to ensure that all your bird’s-eye views are consistent, making it easier to manage complex projects where multiple outputs are required.
Integrating The View Keeper into your workflow is a game changer for efficient and organized multi-camera management.
Real-World Inspirations and Applications
Architectural Visualization
A bird’s-eye view is ideal for showcasing entire layouts and floor plans in architectural projects. This perspective provides clients with a clear understanding of spatial relationships and the overall design.
Strategy and Simulation Games
Many strategy games use a bird’s-eye view to allow players to see the entire battlefield or city layout. This perspective is crucial for gameplay that requires tactical planning and spatial awareness.
Cinematic Overviews
Filmmakers often use overhead shots to set the scene or to provide context during dramatic sequences. A well-executed bird’s-eye view in Blender can create visually stunning cinematic sequences that capture the scale and layout of a scene.
Virtual Reality
In VR projects, a bird’s-eye view can serve as an overview map or a navigational tool, allowing users to orient themselves within a virtual environment.
Data Visualization and Infographics
For technical presentations and infographics, a bird’s-eye view can effectively communicate spatial data and design layouts. This perspective is useful for showing relationships between different elements in a complex scene.
Troubleshooting Common Issues
Even with careful planning, you might run into some challenges when creating a bird’s-eye camera view in Blender. Here are common issues and their solutions:
Camera Misalignment
Issue: The camera isn’t perfectly aligned with the top-down view.
Solution: Use the Ctrl + Alt + Numpad 0 shortcut while in top view (Numpad 7) to snap the camera to the current view. Adjust manually if necessary using the G and R keys.
Inconsistent Clipping Distances
Issue: Parts of the scene are cropped out unexpectedly.
Solution: Double-check the Clip Start and Clip End values in the Camera Properties panel. Adjust them to ensure the entire scene is visible.
Overcrowded Scene
Issue: Multiple camera setups clutter your Outliner.
Solution: Organize your cameras using collections and clear naming conventions. Use The View Keeper to store and recall setups without duplicating objects in the scene.
Perspective Distortion in Perspective Mode
Issue: Perspective mode introduces unwanted distortion in a bird’s-eye view.
Solution: For technical and architectural renders, switch the camera to Orthographic mode. If perspective is desired, adjust the focal length carefully to balance the wide field of view with minimal distortion.
Render Inconsistencies
Issue: The final render does not match the viewport.
Solution: Ensure your render settings (resolution, sampling, etc.) match your viewport configuration. Preview your camera view frequently using Numpad 0.
People Also Ask
- What is a bird’s-eye view in Blender?
It is an overhead, top-down perspective that captures the entire layout of a scene. - How do I set a camera to bird’s-eye view in Blender?
Position the camera above the scene, switch to the top view (Numpad 7), and use Ctrl + Alt + Numpad 0 to snap the camera to that view. - Should I use orthographic or perspective mode for a bird’s-eye view?
Orthographic mode is ideal for technical and architectural visualizations, while perspective mode can be used for a more dynamic, cinematic look. - How do I adjust clipping distances for a bird’s-eye camera?
In the Camera Properties panel, modify the Clip Start and Clip End values to ensure the entire scene is captured without unwanted cropping. - Can I animate a bird’s-eye view in Blender?
Yes, you can animate the camera’s position and rotation to create dynamic overhead shots. - What are the benefits of a bird’s-eye view?
It provides a comprehensive overview of a scene, useful for visualizing spatial relationships, designing layouts, and creating cinematic sequences. - How do I prevent distortion in a bird’s-eye view?
Use Orthographic mode for a flat, undistorted view, or carefully adjust the focal length in Perspective mode. - Can I save my bird’s-eye camera settings for future use?
Yes, tools like The View Keeper allow you to store and reuse camera configurations, making it easy to switch between different setups. - What are common challenges when creating a bird’s-eye view?
Challenges include misalignment, incorrect clipping settings, and scene clutter. Using viewport snapping and The View Keeper can help overcome these issues. - How do I render a bird’s-eye view for architectural visualization?
Set your camera to an overhead position, adjust clipping distances, and choose Orthographic mode for a clear, undistorted render.
Bringing It All Together
Creating a bird’s-eye view in Blender is a versatile technique that provides a comprehensive, overhead perspective of your scene. By carefully positioning your camera above your scene. Aligning it using viewport snapping techniques such as switching to top view (Numpad 7) and using Ctrl + Alt + Numpad 0. You can capture a precise, undistorted image that highlights the spatial layout and design details of your project.
Adjusting camera settings like focal length, sensor size, and clipping distances is crucial to achieving the perfect bird’s-eye view. Once you have a perfect shot, save it using The View Keeper. For technical and architectural visualizations, orthographic mode is often preferred. It eliminates perspective distortion and presents the scene in a flat, accurate manner. However, if you desire a cinematic look, perspective mode can also be used with careful adjustments.
The workflow becomes even more efficient when you integrate tools like The View Keeper. By saving multiple camera configurations as records, The View Keeper allows you to quickly switch between different bird’s-eye setups, compare various perspectives, and render multiple views at the same time. This organized approach not only saves time but also opens up a range of creative possibilities, ensuring that every render is precisely tailored to your vision.
Final Thoughts
Creating a bird’s-eye camera view in Blender is an essential skill for any 3D artist or designer looking to showcase an entire scene from a top-down perspective. This view is invaluable in architectural visualization, game design, virtual reality, and cinematic storytelling, as it provides a clear, comprehensive overview of spatial relationships and design layouts.
By following the detailed steps outlined in this guide (preparing your scene, positioning your camera, adjusting key settings) and leveraging advanced tools like The View Keeper you can achieve a professional bird’s-eye view that meets your creative needs. Whether you’re rendering an expansive urban landscape or an interactive VR experience, a well-executed bird’s-eye view can dramatically enhance the impact and clarity of your work.
We hope this comprehensive guide has equipped you with the knowledge, techniques, and practical tips needed to create stunning bird’s-eye views in Blender. Enjoy your creative journey, and may your renders capture every detail from above with precision and style!


