


Introduction: The Importance of Exporting Metahumans to Maya
Exporting MetaHumans to Maya allows 3D artists and studios to enhance digital characters beyond Unreal Engine’s capabilities. MetaHuman technology provides realistic, rigged digital humans, but they are designed for Unreal Engine. Integrating them into Maya unlocks advanced customization and control for character animation, visual effects, and creative workflows. This guide explains the step-by-step process of exporting a MetaHuman to Maya and its benefits.
Maya, an industry-standard 3D software, offers powerful modeling, rigging, and animation tools. Transferring MetaHumans to Maya enables custom rig adjustments, detailed facial animation, bespoke clothing and hair, and high-quality rendering, which are valuable for character animation and customization. Studios and agencies can integrate MetaHuman characters into existing Maya-based pipelines for films, game cinematics, or advertising, ensuring seamless integration with other assets. Exporting MetaHumans to Maya combines Epic’s digital humans with Maya’s creative toolkit.
Understanding Metahumans and Their Role in Digital Character Creation
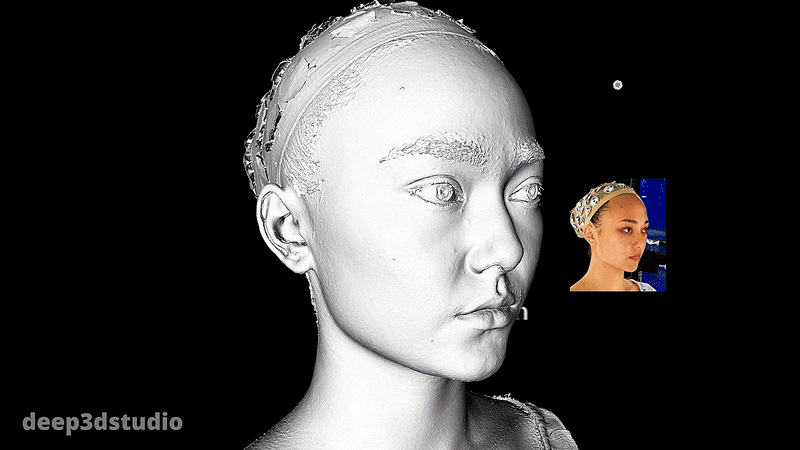
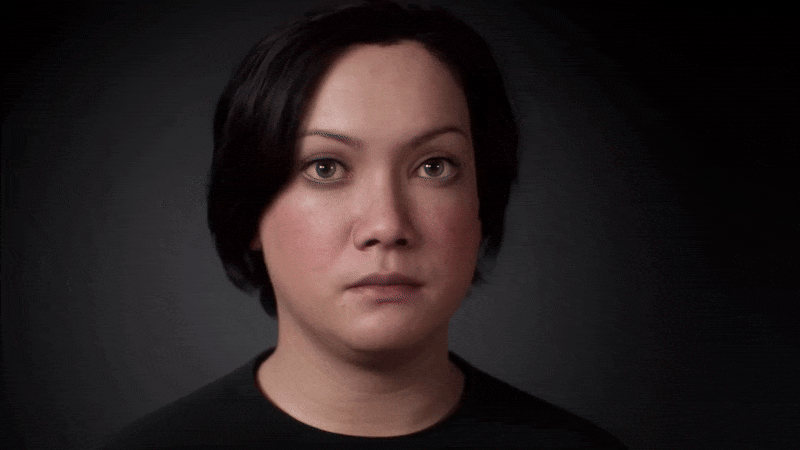
Before exporting, understanding MetaHumans is essential: Epic Games’ MetaHumans are high-fidelity, photorealistic 3D human characters, fully rigged and textured, created via the cloud-based MetaHuman Creator. They enable rapid generation of unique digital humans with realistic features, body types, hair, and clothing, based on scanned real-life data.
“Animation-ready” with facial and skeletal rigs, they render in real-time within Unreal Engine. MetaHumans are used across industries: games, VTubing, virtual production, previs, and film. They accelerate realistic NPC/character creation for game developers, provide digital doubles and on-set visualization for filmmakers, and serve as a high-quality starting point for animation and VFX, allowing artists to focus on storytelling. Epic’s MetaHuman technology democratizes realistic digital human creation, enabling creators to leverage MetaHuman realism in any project or pipeline by exporting to Maya.

Why Choose Maya for Metahuman Animation?
Maya is preferred for animating MetaHumans due to several key reasons:
- Industry-Standard Rigging and Animation: Maya excels at complex character rigs and nuanced animations, making it ideal for professional productions (films, AAA games). Integrating MetaHumans into Maya allows teams to use proven workflows and tools.
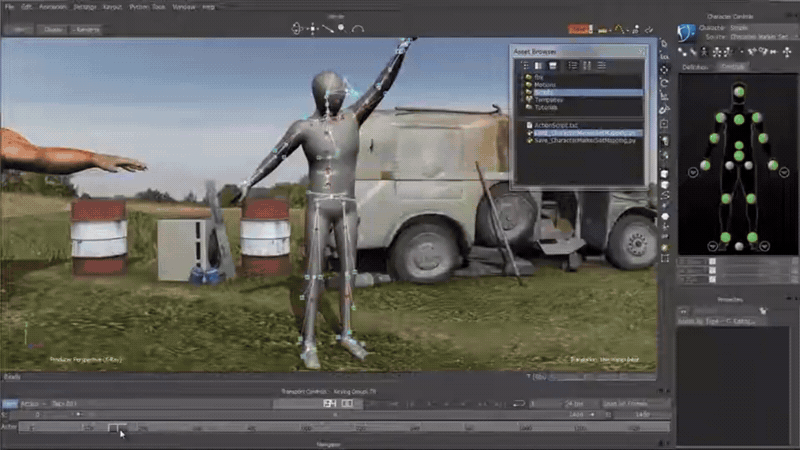
- Robust Toolset and Plugins: Maya’s modeling, UV, and deformation tools are powerful for refining characters. Users can adjust skin weights, add deformers, and utilize the graph editor for fine animation curves. Maya supports plugins and scripts (AdvancedSkeleton, mGear, HumanIK) that streamline rigging and retargeting. If the MetaHuman’s rig is minimal, control rigs can be applied using tools like AdvancedSkeleton.
- Comparing Maya with Other 3D Programs: While Blender and 3ds Max can be used, Maya offers more refined control for character specialists. Major studios prefer Maya for stability and direct middleware support. Epic provides official MetaHuman export to Maya via Quixel Bridge, which is not available for other programs. Maya’s pipeline integration and familiarity to animators make it a top choice.
- Rendering and Pipeline Integration: Maya provides access to high-end renderers (Arnold, V-Ray, Redshift) for offline rendering. Studios with established Maya pipelines can easily integrate MetaHumans with scene elements. Maya offers good interoperability (FBX) for round-tripping animations to Unreal.
- Maya’s character animation advantages, combined with Epic’s support, make it the preferred choice.
Preparing Your Metahuman for Export
Before exporting a MetaHuman to Maya, preparation is essential:
- Finalize Character in MetaHuman Creator: Design and refine the character’s appearance, including face, skin, hair, eyes, body, and clothing. Ensure satisfaction with the base look and proportions, as MetaHuman Creator offers intuitive adjustments.
- Choose Appropriate Level of Detail (Textures and Mesh): Determine texture resolution (up to 8K) and LODs based on project needs. Select lower resolutions (2K or 4K) for performance in Maya. Choose resolution in MetaHuman Creator or Quixel Bridge before export.
- Account for Rig and Animation Data: MetaHumans include a facial rig and body skeleton, but the full body control rig is not included. Animations applied in Unreal won’t automatically transfer unless baked and exported separately via FBX. Plan to animate in Maya.
- Set Up Quixel Bridge and Maya for Export: Install Quixel Bridge and Autodesk Maya. Install the Bridge plugin for Maya and ensure Maya has the PyMEL Python library, which may require manual installation in Maya 2024+. Epic’s documentation requires that PyMEL is installed.
- Plan for Missing Elements: Understand that clothing, hair, and the full Maya control rig for the body are not included by default. Hair/groom often does not export at all. Expect to add or recreate these in Maya. Export with a neutral outfit or minimal clothing, as clothing won’t transfer. Plan to create hair solutions in Maya.
- By taking these preparation steps, you will ensure a clean and optimized export.

Exporting Your Metahuman Using Quixel Bridge: Formats and Methods
This section details the step-by-step process of exporting MetaHuman assets from MetaHuman Creator (via Quixel Bridge) to Maya, covering file formats and data transfer.
- Launch Quixel Bridge and Select the MetaHuman: Open Quixel Bridge, locate your MetaHuman, and open its detail panel.
- Configure Bridge Export Settings for Maya: Set Maya as the export target and install the Maya plugin. Ensure Maya is closed during installation.
- Configure MetaHuman Download Options: Select desired Texture Resolution and set “MetaHumans” to “UAsset + Source Asset” in Download Settings.
- Download the MetaHuman Assets via Bridge: Click Download, wait for completion.
- Open Maya and Prepare to Import: Launch Maya, open a new scene, and allow the Bridge plugin if prompted. Ensure PyMEL installation is resolved.
- Export from Bridge to Maya: Click Export in Bridge.
- Accept Import in Maya: Confirm the import in Maya.
- Verify the MetaHuman in Maya: Check the MetaHuman in the Maya viewport, including materials and facial rig controls.
The export uses FBX for meshes and skeleton and image files for textures. The Bridge plugin automates the import. The downloaded Source Asset may contain a Maya or FBX file for manual import. Textures are in a local directory.
Data considerations: Bridge’s method is recommended. Manually, FBX (2018+) is used for mesh and skeleton, with textures in a folder.
Hair, clothing, and some rig controls will be absent. Save the Maya scene immediately after import.
Importing Metahuman Assets into Maya
After importing a MetaHuman into Maya via Quixel Bridge, verification and troubleshooting are essential.
Verifying the Import:
- Check for body mesh, face, eyes, teeth, etc.
- Verify the Outliner for root joint, skeleton joints, and bound meshes.
- Ensure materials are applied; skin should not be default gray.
Orientation and Scale:
- MetaHuman should be upright and scaled correctly (170-180 units tall).
- Bridge plugin handles orientation conversion (Unreal Z-up to Maya Y-up).
- If issues arise, check Maya’s FBX import settings or manually rotate the root node.
- Verify Maya’s system units are centimeters.
Texture and Material Paths:
- Confirm textures are linked; skin should have color and eyebrows visible.
- If textures are missing, relink them via Hypershade, browsing to the Bridge download directory.
- Set Maya project to Bridge export folder or copy textures to the project’s sourceimages folder to avoid relinking.

Common Import Issues & Solutions:
- Nothing Appears in Maya:
- Check PyMEL installation and Bridge plugin loading.
- Ensure “Allow” was clicked on plugin security warnings.
- Attempt manual import of .fbx or .ma file from Bridge’s library.
- Character Parts Misaligned:
- Verify accepted prompts during import.
- Reset and re-export.
- Ensure MetaHuman was not posed in MetaHuman Creator before download.
- Materials Look Different:
- Shading models differ between Maya and Unreal.
- Textures are present; adjust shader values.
- Error Messages:
- Ensure a fresh empty scene was used.
- Use the latest Bridge plugin.
- Network drive issues or multiple maya instances can cause issues.
The Bridge import is designed to be straightforward, automating scale/orientation and texture paths. Verify everything is correct after import.
Optimizing Your Metahuman in Maya
After importing a MetaHuman into Maya, optimization is needed for functionality, appearance, and performance.
1. Adjusting the Rig and Skin Weights:
- Apply a Control Rig: Use tools like AdvancedSkeleton or mGear to create IK/FK controls. Alternatively, use Maya’s HumanIK for a quick control rig. Avoid modifying original joint names/orientations for Unreal compatibility.
- Skin Weight Checks: Tweak skin weights using Maya’s Paint Skin Weights tool for odd deformations, especially in shoulders, elbows, knees, and neck. Corrective blendshapes can help with extreme rotations.
- Facial Rig Optimization: Ensure facial controls function correctly. Create custom attributes or a GUI for complex facial poses (sliders for “Smile,” “Frown”).
2. Optimizing Materials and Shaders:
- Skin Shader Tweaks: Add subsurface scattering (SSS) for realistic skin. Adjust roughness and specular values. Ensure the normal map is correctly applied.
- Eyes, Teeth, Hair: Use cornea refraction for eyes, add SSS or glossy specular for teeth, and apply hair textures with alpha channels for hair cards. Create hair in Maya using XGen or similar.
- Clothing Materials: Adjust materials for clothing or body parts that came through.
- Lighting and Rendering Tests: Test renders with Arnold or other renderers to refine shaders. Match Unreal’s look through shader adjustments.
3. Performance Optimization:
- Use LODs if available: Use lower LOD meshes for animation and high LOD for rendering.
- Display Layers: Organize rig controls and high-res meshes on display layers to optimize viewport performance.
- Cleanup Unneeded Nodes: Remove unused nodes (shading networks, constraints) to improve scene evaluation speed.
By refining the rig, adjusting skin weights, and perfecting materials, the MetaHuman becomes production-ready in Maya.

Advanced Customization: Enhancing Your Metahuman’s Features in Maya
Bringing MetaHumans into Maya allows for advanced customization:
1. Editing Facial Expressions and Features:
- Custom Blendshapes: Sculpt new expressions using Maya’s tools, adding them as blendShape targets to expand facial range.
- Facial Feature Adjustments: Adjust facial proportions by moving vertices or scaling bones, propagating changes to blendshapes.
- Facial GUI or Controllers: Create a user-friendly facial interface with sliders or controls to drive multiple joints for simplified animation.
2. Adjusting Body Proportions and Rig Enhancements:
- Scaling Bones: Adjust body proportions by scaling joints, ensuring correct mesh scaling.
- Re-modeling Body Parts: Reshape the character’s silhouette by editing the mesh in Maya or ZBrush, preserving vertex order for skinning.
- Adding Rig Elements: Add extra bones or deformers for additional control (ponytail joints, helper joints, muscle systems, lattice deformers).
3. Integrating Custom Animations:
- Manual Animation: Animate the MetaHuman rig manually using keyframes, animation layers, and the graph editor.
- Motion Capture Data: Retarget mocap data to the MetaHuman skeleton using Maya’s HumanIK, and apply facial mocap data.
- Animating Props and Interactions: Animate interactions with other elements, such as picking up objects or reacting to physics.
- Dynamic Simulations: Add physics-based secondary motion using nCloth, nHair, or plugins like Ornatrix for clothing and hair simulations.
Real-world example:
- A studio exported MetaHumans to Maya for custom clothing and hair for the short film “The Well.” They designed clothing in Marvelous Designer, imported it to Maya, copied skin weights, and created hair grooms in XGen.
Advanced customization in Maya allows for unique character variations and realistic simulations, breaking free from the MetaHuman template.
Troubleshooting and Best Practices
Working with MetaHumans and Maya can present challenges, but these can be resolved with best practices.
Common Challenges and Solutions:
- Export/Import Failures:
- Verify Quixel Bridge version, “UAsset + SourceAsset” setting, and PyMEL installation.
- Ensure correct Export Target (Maya) and plugin installation.
- Close/re-open Maya and re-export; use a new empty scene.
- Missing Hair or Clothing:
- Hair and clothing don’t export by default.
- Create or import hair separately; model or simulate clothing.
- Rig Incompatibilities:
- Maintain original skeleton structure for Unreal compatibility.
- Export animations with correct settings; use proper retargeting in Unreal.
- Facial Animation Transfer:
- Export as morph target or bone animations; match namespaces.
- Test simple animation exports; use Live Link or Faceware.
- High Poly Count and Scene Slowdown:
- Toggle off textures; use wireframe/shaded views.
- Turn off Evaluation for facial rig; use Evaluation Manager.
- Hide or remove unnecessary nodes.
- Texture Memory:
- Downscale textures for animation; use two texture sets.
- Skin Weight Painting:
- Paint skin weights in Maya’s Component Editor.
- Use Geodesic Voxel binding.

Best Practices for Asset Integrity and Performance:
- Keep a Master File: Maintain a clean original file for reference.
- Work Incrementally: Save versions to backtrack if needed.
- Use Layers and Namespaces: Organize the scene for clarity.
- Neutral Pose Backup: Maintain a T-pose/A-pose for re-skinning and animation export.
- Follow Updates from Epic: Stay informed about MetaHuman pipeline updates.
- Leverage the Community: Seek help on forums and communities.
These practices ensure asset integrity and smooth performance, enabling efficient MetaHuman workflows in Maya.
Case Studies: Real-World Examples of Metahuman Integration in Maya
Real-world examples demonstrate MetaHuman and Maya integration:
Case Study 1: Treehouse Digital – “The Well”:
- Used MetaHumans for an Unreal Engine animated short.
- Exported MetaHumans to Maya for customization.
- Designed custom clothing in Marvelous Designer and bound it to the MetaHuman skeleton in Maya.
- Copied and fine-tuned skin weights from the MetaHuman body to the clothing.
- Created hair grooms and a woolen hat using Maya’s XGen.
- Imported customized assets back into Unreal Engine for final rendering and physics.
- Leveraged MetaHuman’s base, Maya’s customization, and Unreal’s rendering.
Case Study 2: Lucas Ridley’s Workflow:
- Demonstrated a MetaHuman Maya workflow in a tutorial.
- Rigged and animated a MetaHuman in Maya, then sent it back to Unreal Engine.
- Carefully set up Live Link Face workflow in Unreal and Maya.
- Emphasized naming conventions and skeleton matching for round-tripping.
- Showed successful integration by an individual creator.
Case Study 3: Virtual Production and Previz (Hypothetical):
- Previs studios use Maya for blocking character performances and camera moves.
- Animators use Maya for faster keyframing, exporting animations to Unreal.
- Performance capture in Unreal can be exported to Maya for animation cleanup.
- Hybrid approach for polished final results.
Key Learnings:
- Hair and clothing customization in Maya is often necessary.
- Rigging tweaks are typically required.
- Customization in Maya enhances character quality.
- Seamless integration is achievable.
- Copying skin weights and using control rig tools are helpful.

Expert Tips and Future Trends in Metahuman Animation
To finalize the guide, here are expert insights and future trends shaping MetaHuman usage, especially with Maya:
Expert Tips:
- Leverage Rigging Toolsets: Use plugins like AdvancedSkeleton or HumanIK for faster, animator-friendly rig setups.
- Maintain Clean Naming Conventions: Avoid arbitrary renaming; use a consistent system for new controls and meshes.
- Use Reference Workflows: Reference the character rig into animation scenes for easier updates.
- Finesse the Blendshapes: Add corrective blendshapes for enhanced facial realism.
- Profile Performance: Cache animations (Alembic, Geometry Cache) and use GPU caches for large scenes.
- Stay Organized with Versions: Keep versioned exports for easy reversion.
Future Trends and Emerging Tools:
- MetaHuman Animator and Live Linking: Expect workflows combining MetaHuman Animator’s fast facial capture with Maya’s fine-tuning.
- Improved Hair and Clothing Pipelines: Development of easier hair and clothing transfer, with tools like Ornatrix bridging gaps.
- Deep Integration Between Maya and Unreal: Potential for real-time syncing of changes between Maya and Unreal.
- AI-driven Animation and Rigging: AI-assisted rigging and animation generation, streamlining workflows.
- MetaHumans in Other DCCs: Potential for increased MetaHuman portability to Blender, Cinema 4D, etc.
- Enhanced Realism and Complexity: Expect increased realism (pore-level details, advanced shaders), requiring Maya artists to keep up with shader technology.
Conclusion:
- Experts emphasize proper rigging, organization, and leveraging platform strengths.
- Tools are becoming more powerful and interconnected.
- Embrace new features like MetaHuman Animator while honing Maya skills.
- The fusion of real-time and offline animation tools is the future.
FAQ Questions and Answers
To address common queries, here are 10 frequently asked questions about exporting MetaHumans to Maya and working with them, along with clear answers:
- How do I export a MetaHuman from MetaHuman Creator to Maya?
To export a MetaHuman to Maya, use Quixel Bridge. Install Quixel Bridge, set the Export Target to Maya, and install the Maya plugin. In Bridge, select your MetaHuman, configure Download Settings to include “Source Asset,” and download the MetaHuman. Open Maya, then click Export in Bridge. Accept the import prompt in Maya, and the character will appear in your scene. Quixel Bridge facilitates the export from MetaHuman Creator to Maya. - Do I need Unreal Engine installed to get my MetaHuman into Maya?
You don’t need Unreal Engine to export MetaHumans to Maya. Use the standalone Quixel Bridge application, which downloads MetaHumans from the cloud. You do need an Epic Games account and MetaHuman Creator access. If you have Unreal Engine 5, Bridge is integrated there. Unreal Engine is not required for the export to Maya. - What assets are included when exporting a MetaHuman to Maya?
Exporting a MetaHuman provides the mesh(es), skeleton, skin weights, facial rig (blendshapes/joints), and textures, including materials with texture maps. The base body and face geometry with a full skeletal and high-fidelity facial rig are included. Hair, clothing meshes, and the advanced body control rig are notably missing. The export focuses on the character’s base body and face. Clothing, hair, and the body rig are intentionally not exported, leaving only joints for body movement (no IK controllers). - Why don’t I see my MetaHuman’s hair or clothing in Maya after export?
This is normal. MetaHuman hair and clothing do not transfer to Maya. The exported MetaHuman will be bald and wear default undergarments, though facial hair textures may remain. Epic’s pipeline exports the core character and facial rig; hair and clothing are separate assets in Unreal. To add hair or clothing in Maya, create them manually or use alternative export methods (e.g., export hair as Alembic or hair cards from Unreal, or model clothing in Maya). Artists often use XGen for hair and model or simulate custom clothing in Maya. - What file format does the MetaHuman export use (FBX, Maya file, etc.)?
Quixel Bridge uses FBX to transfer the skeletal mesh and potentially Maya ASCII/MB for the rig structure. The downloaded “Source Asset” is often a Maya file with the rig. Bridge effectively opens or imports this file in Maya. The downloaded files include an .fbx for the body and .json or .ma files for the rig. Textures are standard image files (PNG, JPEG, or EXR). FBX is the core format for the export. Manually, you’d import the FBX and assign textures, but Bridge automates this process. - Maya says the MetaHuman exported successfully, but nothing shows up in my scene. What went wrong?
If Bridge shows a successful export but the Maya scene is empty, the likely causes are a missing PyMEL Python library in Maya or the Bridge plugin failing to run. Maya 2023+ often requires manual PyMEL installation for the Bridge script. Verify PyMEL installation by running a Python command or checking Maya’s script editor for errors. Check for an “untrusted plugin” pop-up in Maya and ensure you clicked “Allow.” Try re-exporting after addressing these issues. Another possibility is the MetaHuman being exported to Maya’s default namespace and hidden if scene units are large; try framing in the viewport or checking the Outliner. The most common issue is the script not running, so reinstall the plugin and reattempt the export. - Can I change my MetaHuman’s appearance (face/body) in Maya after export?
Yes, you can adjust MetaHuman features in Maya by modifying the mesh or using deformers. Sculpting faces, scaling body parts via joints, and adding blendshapes are possible. The mesh consists of polygons with skin weights, allowing traditional modeling edits. Significant neutral mesh changes may require adjustments to the facial rig’s blendshapes or bone positions. It’s best to make these changes before extensive animation. For Unreal compatibility, avoid drastic mesh changes to maintain correspondence with the original MetaHuman. However, for Maya rendering, full customization is possible, and the MetaHuman can be treated as a base mesh for refinement in ZBrush or Maya. - How do I animate a MetaHuman in Maya and bring that animation back into Unreal Engine?
To transfer animations from Maya to a MetaHuman in Unreal Engine, animate the MetaHuman in Maya, using the same skeleton hierarchy. Select the skeleton hierarchy and facial animation curves (bake to skeleton or export morph targets if needed), and export as FBX with “Animation” checked. Import the FBX into Unreal Engine, selecting the MetaHuman’s skeleton asset as the target. Apply the imported Animation Sequence to the MetaHuman in Unreal Engine. Match skeleton names between Maya and Unreal. Bake custom control rig animations to deforming joints before export. Disable “convert scene” in Unreal’s FBX import options if units and rotations are correct. Adjust FBX export settings (uniform scale, “Force front X axis”) if the animation looks incorrect. Test with a simple motion before full animations. - Is it better to animate MetaHumans in Maya or in Unreal Engine’s Control Rig?
The choice between animating MetaHumans in Maya or Unreal Engine depends on team skills and project needs. Maya offers a traditional, rich animation environment favored by experienced animators, excelling in keyframe animation and deep customization. Unreal Engine’s Control Rig and Sequencer are rapidly improving, allowing direct in-engine animation with real-time feedback. Interactive or game-driven animation may benefit from staying in Unreal. Complex character animation is often easier in Maya due to its timeline, graph editor, and scripting/rigging capabilities. Many studios use a hybrid approach: blocking and polishing in Maya, then using Unreal for tweaks and final rendering. For individual creators or small teams, Maya is suitable if they are already comfortable with it. Unreal’s MetaHuman Control Rig is powerful for performance capture workflows (Live Link face), while Maya might be more intuitive for hand-key cartoonish performances. Neither is universally “better”; use Maya for depth and Unreal for real-time convenience or heavy mocap usage. - Can I use MetaHuman characters in other software (Blender, 3ds Max) via export, or only Maya?
While Epic officially supports Maya, MetaHuman assets can be used in other 3D software with manual effort. The downloaded “Source Asset” provides an FBX and textures usable in Blender or 3ds Max. The rig transfers, but control rigs and facial controls may require recreation. Community tutorials exist for using MetaHumans in Blender. While import is possible, it lacks Maya’s convenience. Be prepared for setup work or consider animating in Maya or Unreal and transferring a baked mesh. Blender users can animate MetaHumans, but it’s outside official documentation.
These FAQs cover some of the most common questions. Whether you’re troubleshooting an issue or planning your approach, they should clarify the key points. If you have a question that’s not listed here, consider checking Epic’s MetaHuman documentation or community forums, as new tips and solutions emerge over time with updates to the MetaHuman toolset.

Conclusion: Unlocking the Full Potential of Metahumans in Maya
Exporting MetaHumans to Maya allows 3D artists to leverage MetaHuman’s realism with Maya’s customization capabilities. This guide provides a roadmap for seamless integration, covering character preparation, export via Quixel Bridge, refinement in Maya, and animation transfer to Unreal. The workflow combines MetaHuman’s base realism with Maya’s creative tools, enabling the transformation of stock MetaHumans into unique digital actors with custom attire, hairstyles, animations, and lighting.
The guide covers the benefits of using Maya, like its industry-standard rigging and customization flexibility, and the practical steps for exporting and setting up assets, including texture resolutions and plugin installation. Initial challenges, such as missing hair and clothing, and import quirks are addressed, followed by optimization techniques like weight painting, shader tuning, and rig improvements.
Advanced customization options, including reshaping features, rigging new elements, and adding physics, are explored, treating MetaHumans like high-end character models. Case studies demonstrate real-world applications and production viability. Expert tips provide insights into efficient workflows and future technologies.
MetaHumans and Maya complement each other, with MetaHumans providing a robust base and Maya offering creative freedom. Studios and individual creators can use this workflow for animated shorts, game cutscenes, or VFX. The guide emphasizes staying updated on tool developments and experimenting with new techniques.
Ultimately, maximizing MetaHuman potential in Maya involves utilizing the strengths of both platforms, creating lifelike digital humans and integrating them into creative visions. The guide empowers users to seamlessly bring their digital characters to life.
References & Additional Resources
- Epic Games Official Documentation – Exporting MetaHumans to Maya: Epic’s step-by-step guide on how to export a MetaHuman to Maya, including Bridge setup and limitationsforums.unrealengine.com. (MetaHuman Documentation, Epic Games)
- Unreal Engine MetaHuman Creator Overview: Official Unreal Engine page explaining MetaHuman technology and featuresunrealengine.com. Provides context on what MetaHumans are and how they’re rigged and ready for use.
- Rokoko Blog – “How To Use MetaHumans To Make Epic Content”: An insight article discussing MetaHuman usage in animation, including use cases in games, VTubing, virtual production, etc., and emphasizing how MetaHumans are fully rigged digital humansrokoko.comrokoko.com.
- Treehouse Digital The Well – Unreal Engine Spotlight: Case study on how Treehouse Digital used MetaHumans in their short film, exporting to Maya for clothing and hair customizationunrealengine.com. Great for understanding a production workflow.
- Lucas Ridley’s MetaHuman to Maya Tutorial (3DArt Article/YouTube): A tutorial by Lucas Ridley demonstrating exporting a MetaHuman to Maya, setting up a rig, and round-tripping animation back to Unreal. Summarized on Lesterbanks as welllesterbanks.com. Useful for seeing the process in action.
- Epic Developer Community Forums – MetaHuman Maya Pipeline Q&A: Threads like “Maya Control Rig for the body” where users and Epic staff discuss what exports (face rig, etc.) and how to rig the body in Mayaforums.unrealengine.com, and troubleshooting tips for scale issues when re-importing animationsforums.unrealengine.com.
- MetaHuman Animator – Epic Games Blog (June 2023): Announcement and explanation of MetaHuman Animator, the technology for capturing facial animation via iPhoneunrealengine.com. A forward-looking resource to incorporate high-fidelity facial animations into your workflow.
- Community Tutorials & Forums: For example, the Unreal Engine subreddit and CG forums often have threads like “How to export MetaHumans to Blender” or Maya, etc. One such resource is the Reddit Q&A where users discuss missing the gear icon in Bridge and the updated interfacereddit.com. These community solutions can provide quick fixes to small roadblocks.
Recommended
How The View Keeper Improves Blender Rendering Workflows
Saving Render Settings for Multiple Cameras in Blender with The View Keeper
How to Fix Missing Textures/ (or Linked) Files Detected in Blender: A Complete Troubleshooting Guide
How do you change the render resolution of a Blender camera?
Advanced Camera Switching Techniques with The View Keeper in Blender
How do I set a camera as the active camera in Blender?
How do I add a background image to the camera view in Blender?
Camera View Preservation in Blender: Why Use The View Keeper?
How do I make the camera follow a character in Blender?
PixelHair on Stylized Characters in Blender: Achieving Studio-Quality Hair with Ease


