


Creating a convincing 90’s anime style in Blender involves blending non-photorealistic 3D techniques with the charm of hand-drawn animation. The retro 2D aesthetic of 1990s anime is beloved for its warm analog feel, distinctive color palette, and hand crafted imperfection. In this comprehensive guide, we’ll explore the entire workflow from setting up Blender and crafting 2D shader effects, to lighting, composition, animation, and post-processing all the processes and tips needed to achieve an authentic 90’s anime look. Whether you’re a beginner or a pro, this guide will help you bring the retro anime style to life with modern 3D tools. Let’s dive in!
Understanding the 90’s Anime Aesthetic: Key Characteristics and Visual Elements
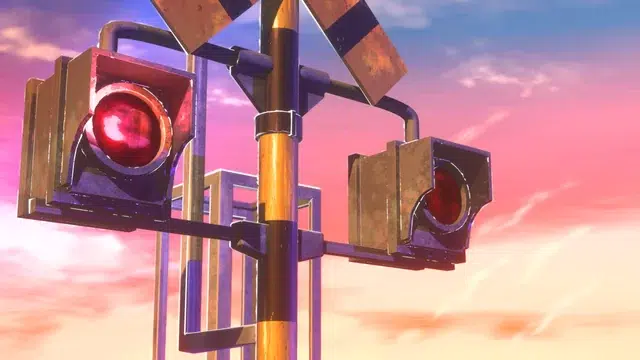
The 1990s anime aesthetic is characterized by a distinctive visual style shaped by the technological and artistic constraints of its time. Its hallmark features include bold, flat colors paired with sharp, high-contrast shadow edges and thick, dark ink outlines, resulting in a striking, hand-drawn cel appearance. Characters typically employ minimal shading often just a single shadow layer and feature prominent, heavy line art, as exemplified in iconic series like Outlaw Star and Cardcaptor Sakura. This creates a graphic, high-contrast look with hard shadow boundaries, setting it apart from the smoother, gradient-heavy shading of modern anime.
Another defining trait is the analog “lo-fi” warmth inherent to the medium, stemming from hand-painted cels captured on analog cameras. This process introduces subtle imperfections such as gentle grain, slight blur, or color bleed, imparting a soft, nostalgic glow. Colors often appear slightly muted or exhibit tint shifts due to the properties of film stock, producing warm tones like saturated oranges or cool hues like cyans, which enhance the retro charm. Animation was typically done on “twos,” meaning character motion was rendered at approximately 12 frames per second, resulting in a choppy, distinctly hand-drawn cadence. This, combined with dramatic held poses and dynamic camera angles, forms the stylistic backbone of the era.
In summary, 90s anime visuals are defined by flat cel shading, bold outlines, a vibrant yet constrained color palette, and analog imperfections that coalesce into a timeless 2D charm. Understanding these elements, rooted in the traditional cel animation process, provides the foundation for recreating this aesthetic in Blender.
Setting Up Blender for 90’s Anime Style Projects
To prepare Blender for a retro anime style, configure it for non-photorealistic (NPR) rendering with the following setup steps:
- Blender Version & Engine: Opt for Blender 2.8 or later, with 3.x versions recommended for access to advanced NPR features. Select the Eevee render engine for its fast, real-time rendering capabilities, which are ideal for iterative styling of toon shading using tools like the Shader to RGB node and real-time Line Art modifiers. While Cycles can also produce anime-style results, Eevee’s speed makes it preferable for this workflow.
- Color Management: In the Render properties panel, change the Color Management setting from Filmic to Standard. This ensures colors remain bold, saturated, and vibrant, preventing the washed-out effect of Filmic tonemapping, which is critical for replicating the flat, vivid hues typical of anime aesthetics.
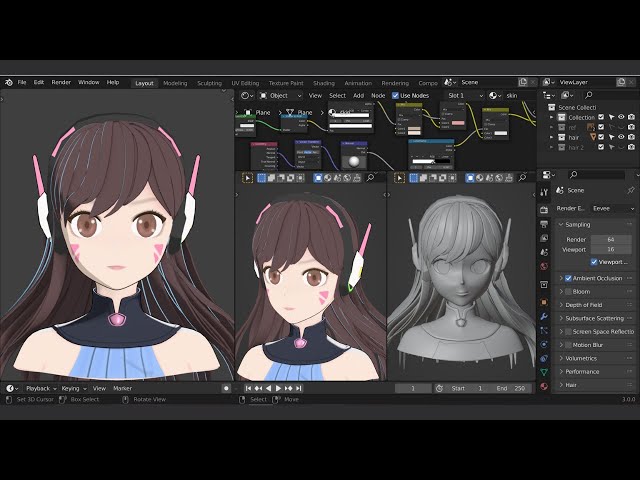
- Viewport Workspace: Organize your workspace to facilitate shading tasks by opening a Shader Editor alongside a 3D Viewport set to Rendered or Material Preview mode. This setup allows for immediate visual feedback when adjusting node-based shaders, such as toon ramps or outline settings, streamlining the creative process.
- Enable Line Art or Freestyle: Choose between Grease Pencil with a Line Art modifier for real-time stroke outlines or enable Freestyle in Render settings for contour lines generated at render time. Either method is essential for achieving the iconic inked outline look of anime, with Grease Pencil offering more interactivity for animation projects.
- Lighting Basics: Start with a simple lighting rig, such as one strong key light (e.g., a Sun lamp) and a faint fill light, to produce the hard, high-contrast shadows required for cel shading. This basic setup helps establish material properties before refining lighting further.
- Useful Add-ons: Enable the built-in Node Wrangler add-on to accelerate node editing tasks, such as adding texture setups with shortcuts like Ctrl+T. For animation, consider AnimAide to simplify keyframe timing for stepped frames, or use View Keeper to manage multiple camera angles efficiently, though these can also be handled manually.
- Model Preparation: Prepare models for a toon pipeline by simplifying geometry, using smooth shading for organic forms like characters, and enabling Auto Smooth for hard edges on mechanical objects. Avoid overly detailed geometry, such as micro bevels, and ensure models have anime style proportions, like exaggerated hair or large eyes, to align with the aesthetic.
By implementing these settings, you create an NPR-optimized environment in Blender, leveraging Eevee’s efficiency, Standard color management, outline tools, and simplified models for a seamless toon-ready workflow.

Creating 2D Shader Effects in Blender for Retro Anime Looks
Cel shading, the cornerstone of the anime aesthetic, transforms 3D surfaces into flat, hand-painted cels. Here’s how to craft retro anime shaders in Blender:
- Toon Shading via Nodes: In Eevee, construct a shader using a Diffuse BSDF (or Principled BSDF with zero specular) connected to a Shader to RGB node, followed by a ColorRamp node. Set the ColorRamp to constant interpolation to create sharp transitions between lit and shadow areas, mimicking the uniform color blocks of cel shading. Adjust the ramp’s color stops to define distinct light and shadow tones for a classic anime effect.
- Shadow Color and Hue Shift: Replicate the nuanced shadows of 90s cels, which often featured slight hue shifts (e.g., blue-tinted grays or purplish tones) rather than pure dark versions of the base color. In the ColorRamp, set shadow stops to complementary, subtly shifted hues, such as a blue-gray for neutral objects or brownish red for skin, enhancing the hand-painted aesthetic.
- Minimal or Stylized Highlights: Minimize or eliminate specular highlights to maintain matte surfaces, as 90s anime rarely used realistic shines except for stylized effects. For highlights, like hair gleams, either paint them directly into textures for fixed placement or use an Emission shader masked to specific areas via textures or geometry, ensuring highlights appear deliberately crafted rather than dynamic.
- Multiple Tones and Gradient Shading: For added depth, incorporate multiple shadow tiers by adding extra stops in the ColorRamp, such as a second darker shade for deeper shadows. For subtle gradients, like airbrushed effects on mecha or backgrounds, mix in low-opacity noise textures to introduce granulated speckles, simulating hand-crafted shading while keeping gradients minimal to preserve the retro feel.
- Cycles vs Eevee Implementation: In Cycles, the Toon BSDF shader offers built-in toon shading controls for smoothness and shadow size, suitable for high-quality renders. In Eevee, use the Shader to RGB and Diffuse BSDF setup for greater flexibility in customizing ramps. Both approaches can achieve comparable results with proper adjustments, though Eevee’s real-time feedback is advantageous.
- Outline via Inverted Hull (optional): For quick outlines, duplicate a mesh, scale it slightly outward, flip its normals, and apply a black shader to create a rim effect. This real-time method works in Eevee and viewports but is less robust for complex shapes or inner lines, making Freestyle or Line Art preferable for authentic ink-style outlines.
These shader techniques convert 3D models into flat, cel-like visuals, laying the groundwork for lighting and outlines to finalize the anime appearance.
Utilizing Blender’s Grease Pencil for Hand-Drawn Line Art
Outlines are critical for anime’s iconic inked aesthetic. Blender’s Grease Pencil (GP) Line Art modifier provides flexible, editable, hand-drawn-style lines:
- Grease Pencil Line Art vs. Freestyle: Grease Pencil Line Art generates real-time strokes visible in the viewport, offering editable objects ideal for animation projects, unlike Freestyle, which produces lines only at render time and is better suited for static images. GP’s interactivity allows for dynamic adjustments, while Freestyle may flicker with geometry changes.
- Setting up GP Line Art: Create a Blank Grease Pencil object, add a Line Art modifier, and target specific collections or objects to generate strokes along visible edges. Style these strokes via GP materials, adjusting color and thickness, and apply a Noise modifier to introduce a slight waver, mimicking the imperfect, hand-drawn lines of traditional animation.
- Editing and Layering Lines: In Draw/Edit Mode, manually refine GP strokes by removing unwanted lines, reshaping outlines, or adding details like inner creases that the modifier might miss. Use multiple GP layers or objects to separate line types, such as thicker outlines for silhouettes and thinner lines for details, with modifier filters to exclude unwanted edges like intersections.
- Line Style and Thickness: Set stroke thickness to 1-3 pixels for 1080p renders, maintaining uniformity to emulate 90s cel inking. Use dark strokes for characters and main subjects, while assigning colored lines (e.g., dark green for trees) to background elements to enhance depth, a technique seen in retro anime to make foregrounds pop.
- Animating Line Art: GP Line Art updates strokes per frame for animated scenes. To prevent popping during fast movements, bake strokes to keyframes for manual editing of problematic frames. Animate stroke properties like thickness or opacity for dynamic effects, and apply subtle Noise modifier animation for a hand-drawn wobble, ensuring minimal jitter to avoid distraction.
GP Line Art seamlessly integrates 2D drawing with 3D scenes, delivering precise outlines with the charm of hand-inked cels.

Lighting Techniques to Mimic 90’s Anime Scenes in Blender
Anime lighting prioritizes artistic, flat shading over realism. Use these Blender techniques to achieve a 90s aesthetic:
- Use a Strong Key Light: Position a Sun or Spot lamp at a 45-degree angle to cast dramatic, hard shadows that toon shaders convert into sharp, cel-like regions, defining the primary lighting direction for characters and objects.
- Minimal Fill Light: Apply a faint ambient or Hemisphere light, paired with subtle Ambient Occlusion in Eevee, to prevent pure black shadows while maintaining high contrast, avoiding the muddy gradients of excessive fill lighting.
- Rim Lighting for Highlights: Place a low strength Area light behind subjects to create a thin highlight along their silhouette, replicating the drawn rim effects used in dramatic anime scenes to accentuate shapes and separate characters from backgrounds.
- Colored Lighting for Mood: Use colored lights, such as warm orange for sunset or cool blue for moonlight, to evoke specific atmospheres. Adjust ColorRamp shadow tones to counteract unintended hue shifts from saturated lights, ensuring a cohesive palette.
- Shadow Sharpness and Resolution: In Eevee, enable Contact Shadows for fine details and use high-resolution shadow maps with a light size of zero to produce crisp, hard-edged shadows, mirroring the painted shapes of 90s anime.
- Indoor and Special Lighting: Simplify indoor lighting with a single point or spot light, minimizing falloff to create bold shadows. Use soft shadows sparingly, such as for diffused light through paper walls, keeping transitions stylized.
- No Global Illumination / Faked GI: Disable global illumination to avoid realistic gradients, using manually placed fill lights to simulate subtle bounce effects, providing greater artistic control over the flat shading style.
- Light Linking (Advanced): Utilize Light Groups in Cycles or view layers in Eevee to independently light characters and backgrounds, ensuring optimal visual impact for each element without compromising the other.
- Ambient Effects: Incorporate subtle volumetric light rays or fog in Eevee for atmospheric depth, using low samples for grainy, dusty effects. Apply mild depth of field, noting that GP outlines remain sharp over blurred backgrounds, a stylistic quirk mimicking anime compositing.
These lighting techniques craft a graphic, narrative-driven aesthetic, replicating the bold, painted shadows of 90s anime.
Composing Scenes with a 90’s Anime Perspective in Blender
90s anime composition emphasizes 2D like framing to maintain its hand-drawn illusion. Apply these principles in Blender:
- Use Moderate Camera Angles: Employ 35mm to 50mm focal lengths for wide, medium, or close shots, avoiding extreme wide-angle distortion to preserve the moderate perspective typical of anime’s straightforward cinematography.
- Limit Camera Motion to Avoid Artifacts: Prefer static or simple camera movements, planning shots via storyboards to minimize outline flicker or 3D artifacts that could disrupt the 2D illusion during fast or complex motions.
- 2D Composition Techniques: Adhere to the Rule of Thirds for character placement, incorporating foreground elements to create depth. Arrange objects on layered planes at varying depths to simulate multiplane camera parallax, enhancing the sense of a painted background.
- Match Background Perspective: Align the Blender camera’s perspective with 2D painted backgrounds using reference images or orthographic cameras for flat, stylized looks, ensuring 3D characters integrate seamlessly with the backdrop.
- Use Aspect Ratios Deliberately: Render in 4:3 to capture the retro CRT aesthetic of 90s TV anime, adding vignetting for authenticity, or use 16:9 for modern widescreen interpretations, maintaining balanced, airy compositions.
- Multi-Plane Depth of Field: Use depth of field sparingly for cinematic flair, such as slight foreground or background blur, with sharp GP outlines over blurred areas creating a stylistic effect seen in some anime compositing.
- Apply Artistic Composition Principles: Ensure character colors contrast with backgrounds for clarity, using lighting to separate elements. Hold steady shots for emotional or impact moments, emulating anime’s deliberate pacing and frame holds.
These composition techniques create scenes that resonate with the painterly, deliberate framing of 90s anime.

Animating Characters with a Retro Anime Feel in Blender
90s anime animation is characterized by stylized, limited motion. Use these Blender techniques to capture its essence:
- Animate on “2s” (12 FPS Look): Keyframe character movements on twos using constant interpolation or the AnimAide add-on to achieve a choppy, hand-drawn cadence at approximately 12 frames per second, switching to 1s for rapid actions to enhance dynamism.
- Pose-to-Pose, with Holds: Prioritize strong, expressive key poses held for several frames, transitioning quickly to the next pose. Keep bodies static during dialogue, animating only mouths or minimal breathing, to mirror anime’s labor-saving limited animation techniques.
- Motion Timing and Exaggeration: Employ linear or near-linear interpolation with sharp ease-outs for snappy movements, using smear frames created by stretching meshes via shape keys or posing for fast actions like punches to simulate drawn motion effects without realistic blur.
- Physics and Secondary Motion: Bake physics simulations for cloth or hair to match stepped frame timing, or animate secondary elements manually for simple bounces, ensuring they align with the choppy style and avoiding overly smooth, full-frame-rate motion.
- Consistent Shading During Motion: Stabilize cel-shaded shadows by parenting key lights to characters or keyframing ColorRamp thresholds, preventing flickering and mimicking the consistent shadow placement of drawn cels across frames.
- Line Art Stability: Ensure outline stability by baking GP strokes or marking Freestyle edges to always render, manually editing frames where lines pop in or out due to camera or model movement, accepting minor flicker as a hand-drawn quirk if subtle.
- Lip-Sync and Facial Animation: Use three basic mouth shapes (closed, half-open, open) animated on 2s or 4s, employing texture sequences or shape keys. Apply stepped blinks and expression changes, holding poses to emulate anime’s limited facial animation.
- Action Timing and Effects: Vary action timing with quick bursts followed by slow-motion holds, using Grease Pencil to draw speed lines, impact flashes, or sprite-based effects like explosions, animated frame-by-frame for authentic anime flair.
These animation methods replicate the rhythmic, pose-driven style of 90s anime, balancing 3D precision with 2D limitations.
Texturing Fundamentals for 90’s Anime Style in Blender
Texturing in anime distinguishes flat character cels from richly painted backgrounds. Apply these fundamentals in Blender:
- Keep Character Textures Simple: Use flat, solid colors for character materials, painting minimal gradients like cheek blushes or limb shading to enhance depth while maintaining the cel aesthetic, avoiding high-detail or photographic textures that clash with hand-drawn simplicity.
- Avoid Noisy or Photoreal Patterns: Opt for clean, graphic patterns, such as stripes or checks, or stylized effects like halftone dots for manga-style shading. Simplify details to what would be drawn frame-by-frame, avoiding noisy procedurals or realistic textures like rust.
- Background and Environment Textures: Create detailed backgrounds with hand-painted or digitally filtered textures, applying paint-overs to break tiling or using camera mapping to project paintings onto geometry, achieving the watercolor-like richness of anime backdrops.
- Matching 2D and 3D Elements: Harmonize color palettes between character shaders and background paintings, adjusting lighting or painting shadows into backgrounds to ensure consistency, aligning 3D characters with 2D environments for a cohesive look.
- UV Mapping and Painting Workflow: Unwrap key assets with clean, distortion-free UVs to facilitate painting in external editors or Blender’s texture paint mode, enabling precise placement of details like facial features or clothing patterns.
- Hair Texture and Shading: Simplify hair textures with flat colors and subtle root-to-tip gradients, using anisotropic shaders or painted highlights for anime-style shines. Apply colored outlines (e.g., brown for blonde hair) via GP or Freestyle to soften the look.
- Texture Like You Draw: Texture characters as flat, graphic cels and backgrounds as artistic paintings, introducing subtle variations via vertex colors or secondary textures to avoid obvious CG tiling, emulating the human touch of anime artwork.
- Facial Features and Decals: Incorporate anime tropes like sweat drops or anger veins using Grease Pencil overlays or texture swapping, adding 2D symbols as objects or textures for comedic or expressive effects.
These texturing principles ensure assets align with the distinct cel and painted aesthetics of 90s anime.

Incorporating PixelHair for Authentic 90’s Anime Hairstyles
90s anime hair is iconic for its exaggerated shapes, wild spikes, and voluminous designs. PixelHair, a Blender resource offering pre-made 3D hairstyles, simplifies creating authentic anime hair. Here’s how to use PixelHair and other techniques for retro hairstyles:
- Using PixelHair Assets: PixelHair provides a library of hairstyles, built from hair particles or curves converted to mesh, designed for realism but adaptable for anime. Import a hairstyle matching your character’s design, like spiky hair for a shounen lead or flowing locks for a heroine. Adjust the mesh in Edit Mode or with proportional editing to fit the head and exaggerate features like spikes or bangs to align with anime’s bold silhouettes.
- Simplifying Hair Material: PixelHair models often include complex, realistic shaders. For NPR, replace these with a toon shader, using Shader to RGB and a ColorRamp for flat, solid-color shading, turning detailed strands into a unified mass. If the model has multiple strands, convert to a single mesh or apply a uniform flat material to treat hair as one cohesive shape, mimicking anime’s stylized look.
- Adjusting Hair Geometry: Anime hair features distinct clumps, like ahoge or thick bangs. Simplify realistic PixelHair geometry by merging strands or deleting excess to form larger locks, such as turning a detailed afro into cartoonish clumps. Use Sculpt Mode with tools like Inflate or Grab to reshape the silhouette, breaking symmetry or exaggerating asymmetry to match 90s designs.
- Hair Outline and Coloring: Ensure clean outlines with Grease Pencil Line Art, adjusting topology to avoid excessive internal lines. Set Line Art to outline silhouettes only if needed. Use colored outlines (e.g., dark brown for blonde hair or maroon for red) via separate GP layers or materials to soften the look, emulating anime’s nuanced inking for hair.
- Animating Hair: PixelHair models are typically static, but anime hair often has subtle bounces. Add a simple rig with a few bones for ponytails or long sections, keyframing minimal sway on 2s for a retro feel. Alternatively, keep hair static relative to the head for an older anime style where hair moves only with the head.
- Custom Modeling without PixelHair: Without PixelHair, model hair using polygon strips or solid shapes, extruding from the scalp to form clumps, then sculpting for style. This is time-intensive but precise. Use PixelHair as a base and remodel specific areas, like bangs, for a hybrid approach, leveraging its volume for complex styles like curls or afros.
- Creative Stylization: Embrace exaggerated silhouettes, like giant buns or gravity-defying spikes, ensuring hair looks bold from all angles. Check profile and 3/4 views to maintain natural volume and avoid flatness, tweaking for a larger-than-life 90s aesthetic.
PixelHair saves time by providing high-quality meshes, which you adapt with toon shading and stylization for authentic 90s anime hair, enhancing character recognizability.
Tips and Tricks for Achieving Authentic 90’s Anime Effects in Blender
To elevate your Blender renders to a true 90s anime aesthetic, use these community-inspired techniques:
- Add Subtle Imperfections: Introduce analog imperfections in compositing, like fine film grain or light flicker at frame edges, to break digital cleanliness. Add slight RGB noise or chromatic aberration on highlights to mimic CRT or film bleed, and consider minimal blur for a composite video look, enhancing the retro vibe.
- Use Reference Stills for Color Grading: Compare your render to 90s anime screenshots, adjusting for muted palettes or tints. Apply global color grading to raise black levels or add warm tints, or use LUTs from anime stills, ensuring lighting consistency for a cohesive, film-like palette.
- Create Custom “Cels” in Compositing: Render characters and backgrounds separately, applying effects like background blur or posterization in compositing. Overlay subtle paper textures on backgrounds for painted authenticity, treating layers like stacked cels for nuanced adjustments.
- Frame Rate Tricks: Animate characters on 2s, but use 1s for effects like flames for smoother motion. Add motion holds by duplicating frames in editing to mimic anime’s extended reaction shots, creating a production artifact feel.
- Use Smear Frames and Stylized Motion Effects: For fast actions, create manual smears by stretching meshes or drawing streaks with Grease Pencil, avoiding realistic motion blur. Overlay ghosted frames or swoosh lines in compositing for hand-drawn motion effects.
- Freestyle/GP Line Tweaks: Add noise to Freestyle line thickness for pen pressure variation or adjust thickness by depth for perspective. Ensure foreground lines are bold, tweaking per-material thickness for clarity, like thicker eye outlines.
- Match Animation Conventions: Limit motion during dialogue to mouth and blinks, keeping the body static for economy. Use looped effects, like a 3-frame flame cycle, for a cartoonish, period-correct feel.
- Camera Cuts and Transitions: Emulate anime editing with quick cuts, zip pans, or fake camera shake in post for impacts, using motion blur on backgrounds for dynamic pans while keeping characters sharp.
- Use of Speed Lines and Overlays: Add Grease Pencil speed lines or animated textures behind static poses, like power-up screams, to convey energy, a classic anime trope for action moments.
- Audio and Timing: Time visuals to sound effects or music cues, like pauses on dramatic beats, to enhance the anime feel, masking minor visual flaws with immersive audio-visual synergy.
These techniques refine details, embracing anime’s limitations for a nostalgic, hand-drawn aesthetic.

Using Blender’s Compositor for Post-Processing Retro Anime Scenes
Blender’s Compositor enhances retro anime renders with post-processing effects, mimicking a studio pipeline:
- Bloom and Glow: Use a Glare node (Fog Glow) for subtle bloom on bright areas, like sunlight or auras, simulating film halos. Keep bloom minimal to preserve flat colors, noting that Freestyle/GP lines may remain sharp, a common anime trait.
- Depth of Field (DOF): Apply DOF in compositing with the Z-pass and Defocus node for flexible focus tweaks. Combine character and background layers before applying DOF to blur lines and colors together, or accept sharp lines over blurred backgrounds for stylization.
- Color Tweaking and LUTs: Use Color Balance or RGB Curves for grading, pushing shadows blue or highlights warm to mimic film. Apply anime-derived LUTs, ensuring Standard view transform for accurate color output in 8-bit formats.
- Layered Compositing: Render elements (characters, effects, backgrounds) as separate layers, using Mix/Add nodes to combine. Blur or dim backgrounds, overlay shadows, or adjust specific layers independently, emulating layered cel compositing.
- Line Art and Compositing Order: Render GP line art as a separate pass for flexibility, applying filters like Dilate/Erode to adjust thickness. Overlay lines sharply or with slight tinting, avoiding heavy processing to prevent artifacts.
- Media Artifact Filters: Add noise via Texture nodes or scanline images at low opacity for CRT effects. Simulate VHS with chromatic aberration (offset RGB channels) or Displace node distortions for tape wobble, keeping effects subtle for retro authenticity.
- Combining 2D Elements: Import hand-drawn assets (e.g., Krita skies or GP effects) via Image nodes, matching their style to renders with reduced colors or blur for seamless integration.
- Final Output and Quality: Output to lossless formats to avoid banding in flat colors, adding slight noise to gradients like skies to reduce compression artifacts, ensuring high-quality results.
- Speed vs. Quality: Preview compositing effects on stills with the backdrop, disabling it for faster sequence rendering. Offload complex grading to external editors if needed, keeping most effects lightweight.
Compositing acts as a digital film lab, polishing renders with glow, grain, and layered effects for a 90s anime aesthetic.
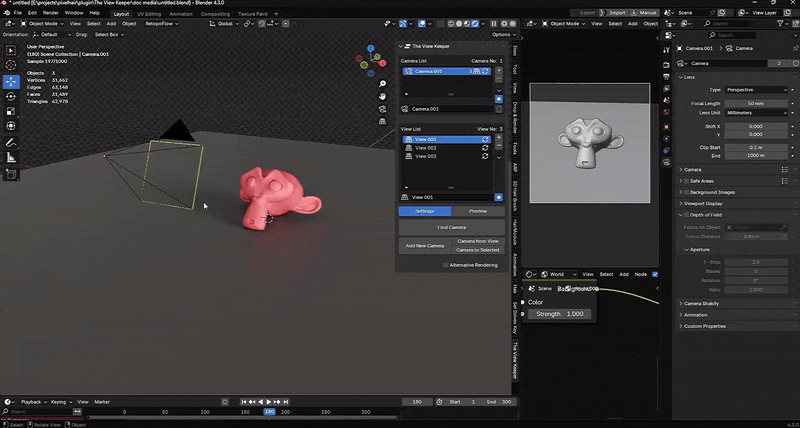
Leveraging the View Keeper for Consistent Camera Angles in Anime Projects
The View Keeper add-on streamlines camera management for anime-style projects, ensuring consistent angles:
- Store Multiple Camera Views: Save specific camera positions and settings with names (e.g., “Hero_MidShot”) for reuse across scenes, maintaining identical framing and orientation for visual continuity.
- Switch Between Angles Easily: Quickly toggle between preset views in the viewport to test compositions, like over-the-shoulder dialogue angles, speeding up layout and ensuring consistent visual language.
- Consistent Render Settings Per Angle: Store camera-specific settings, like depth of field or focal length, with each view, ensuring technical consistency across shots, such as blurred backgrounds in close-ups.
- Efficient Multi-Shot Workflow: Manage multiple cameras via a single interface, simplifying complex sequences and reducing manual camera adjustments, especially for beginners navigating Blender’s single active camera system.
- Use Cases in Anime Projects: Apply saved views for action cuts or dialogue scenes, adding extra shots without guesswork, ensuring storyboarded angles remain consistent for professional pacing.
- Batch Rendering and View Keeper: Queue multiple camera views for batch rendering, creating storyboards or animatics efficiently by rendering key frames from stored angles.
View Keeper enhances cinematography control, mimicking anime’s layout consistency for a polished workflow.
Common Challenges in Creating 90’s Anime Style in Blender and How to Overcome Them
Artists face hurdles in achieving a 90s anime look in Blender. Here are common challenges and solutions:
- Challenge 1: “The 3D looks too smooth/clean compared to hand-drawn frames.” Renders feel CG due to fluid motion or perfect surfaces. Solution: Animate on 2s for choppy motion, add compositing imperfections like grain or noise, and apply wobble to outlines via GP noise for a hand-drawn vibe.
- Challenge 2: “Freestyle lines or line art are flickering or inconsistent.” Lines pop in/out during animation. Solution: Mark Freestyle edges as always visible or use GP Line Art for real-time adjustments. Tweak modifier settings or manually edit baked GP strokes for problem frames, testing in sketch renders.
- Challenge 3: “Shadows/shading don’t look right when the character moves.” Sliding shadows break the cel look. Solution: Parent key lights to characters or keyframe ColorRamp thresholds to stabilize shadows, mimicking drawn consistency, or adjust light rigs to minimize shifts.
- Challenge 4: “Hard to match 2D background art with 3D characters (they look separate).” Characters appear pasted on. Solution: Match ambient light colors, add contact shadows, or adjust background tones to ground characters. Mimic background line styles on 3D elements for cohesion.
- Challenge 5: “Materials with depth (like glass, reflections) break the illusion.” Realistic effects look out of place. Solution: Simplify materials with drawn highlights or blurred reflections, using opaque sheens or animated textures for effects like glass glares or water ripples.
- Challenge 6: “Rendering and performance issues with stylized setup.” High-poly hair or Freestyle slows renders. Solution: Use GP Line Art for speed, simplify hair geometry, and render layers separately, reusing static backgrounds to optimize Eevee or Cycles performance.
- Challenge 7: “Too many manual tweaks needed – workflow is tedious.” NPR requires frequent adjustments. Solution: Plan animation before fixes, use add-ons like View Keeper or AnimAide, and build reusable node groups or assets to streamline future projects.
These solutions address common pitfalls, refining techniques for a convincing retro anime aesthetic.
Case Studies: Successful 90’s Anime Style Projects Created in Blender
Examining successful Blender projects offers insights into achieving a 90s anime look:
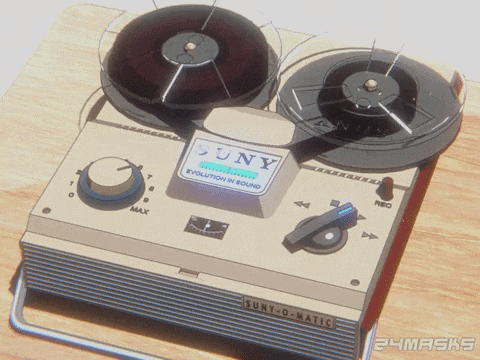
- Case Study 1: “Tape Recorder 90s Anime-Style Animation” by Jonathan Thielens: In 2024, Thielens created a cassette recorder animation with flat shading in Blender, using After Effects for grain, blur, and chromatic distortion to mimic cels. Takeaways: External compositing tools enhance analog imperfections, and combining Blender with After Effects tutorials yields authentic results.
- Case Study 2: Blender NPR “90s anime shader” by taro8: Taro8 developed a pipeline with simple node-based shaders, sampling anime stills for blue-shifted shadows and relying on compositing for glow and grain, sharing a .blend file on GitHub. Takeaways: Accurate color referencing and heavy compositing simplify material complexity, with reusable setups aiding replication.
- Case Study 3: Stylized Anime Renders by Community Artists: Artists like veryveig created Akira-inspired scenes, mixing Grease Pencil lines with hand-painted textures, iterating through test renders and touch-ups. Takeaways: Hybrid 2D/3D approaches, with painted details or GP effects, enhance authenticity, emphasizing iterative refinement.
- Case Study 4: Professional Studio Adoption – Khara/Project Studio Q: Studio Khara adopted Blender in 2019 for hybrid 3D/2D anime production, leveraging Grease Pencil. Takeaways: Blender’s professional viability supports anime workflows, with ongoing tool improvements fostering confidence in NPR projects.
These case studies validate flat shading, compositing, and hybrid techniques, proving Blender’s capability for deceptive 2D-like anime renders.

Community Feedback and Insights on 90’s Anime Style Creations in Blender
The Blender NPR community shares valuable insights on achieving a 90s anime style, drawn from forums, Reddit, and YouTube discussions. Here are key takeaways reflecting collective wisdom:
- Nail the Frame Rate and Timing: Community members emphasize animating at 12 FPS or on twos using stepped interpolation to avoid overly smooth motion, which can feel like a “soap opera effect.” Working in 24 FPS with doubled frames or a 12 FPS timeline ensures the choppy, hand-drawn cadence essential for authenticity.
- Use After Effects or Video Editing for Final Touches: Many artists combine Blender’s Compositor with tools like After Effects for effects like chromatic aberration or VHS noise, citing easier controls and faster workflows. This approach, seen in Jonathan Thielens’ work, adds authentic analog degradation.
- Grease Pencil vs. Freestyle: Grease Pencil’s Line Art modifier is favored for animation due to real-time visibility, preventing render-time surprises, and easy noise modifiers for line boil. Freestyle offers cleaner lines for stills with advanced thickness controls but requires more tweaking, making GP preferred for dynamic projects.
- Focus on Color and Value Consistency: A constrained palette, sampled from 90s anime or pre-defined, keeps colors authentic. Using Standard color management preserves vibrant hues, avoiding HDR blowouts, while posterizing or ColorRamps enforce limited palettes.
- Challenges with Hair and Eyes: For eyes, use shadeless emissive materials to maintain flat, drawn-like brightness, excluding them from lighting for consistency. Simplify hair into broad shapes, leveraging tools like PixelHair or curves, focusing on silhouette over strand detail.
- Less is More in Movement: Embrace 90s anime’s strategic stillness, like static shots with minimal camera pans, as a stylistic choice. Some add fake dust or scratches for extra retro flair, though this leans more 70s/80s.
- Positive Reception and Nostalgia: Successful renders evoke nostalgia, often fooling viewers into thinking they’re hand-drawn, as seen in ResetEra threads praising Blender anime videos. Targeting emotional triggers like grain or Cowboy Bebop-inspired palettes amplifies impact.
These insights reinforce using stepped animation, external polish, Grease Pencil, and tight palettes to evoke 90s anime’s nostalgic feel.
Comparing Blender’s Tools with Other Software for 90’s Anime Style Rendering
Blender’s toolset for 90s anime-style rendering compares favorably to other software, offering unique strengths:
- Blender vs. Traditional 2D Animation Software (Toon Boom, Clip Studio Paint): Toon Boom and Clip Studio excel at hand-drawn frames, offering organic line quality but requiring extensive manual effort. Blender automates 3D animation with 2D-like output, ideal for complex scenes like mecha, while Grease Pencil enables 2D drawing within 3D space. Blender’s efficiency suits solo creators, though 2D software provides unmatched artistic control for pure drawing.
- Blender vs. Other 3D Software (Maya, 3ds Max): Maya and 3ds Max require costly NPR plugins like Pencil+ for toon shading, while Blender’s built-in Shader to RGB, Line Art, and Grease Pencil are free and robust. Studio Khara’s switch to Blender highlights its flexibility and cost-effectiveness. Game engines like Unity excel at real-time toon shading but are less suited for linear animation. Blender’s community-driven NPR support surpasses Maya/Max.
- Goo Engine and Blender Forks vs. Base Blender: Goo Engine, a Blender fork, optimizes anime-style rendering with enhanced outlines and shadow controls but lacks base Blender’s latest features. Base Blender suffices for most, with add-ons like VRM converters or shader packs as alternatives, offering versatility without fork limitations.
- Compositing: Blender Compositor vs. After Effects/Nuke: Blender’s Compositor handles core effects like bloom and grain, with Cryptomatte for precise tweaks. After Effects and Nuke offer intuitive controls and faster GPU acceleration for complex grading or VHS effects. Blender suits pure pipelines, but external tools provide polish convenience.
Blender’s integrated modeling, animation, rendering, and 2D capabilities make it a leading choice for 90s anime-style projects, supported by a vibrant community and professional adoption.
Best Practices for Maintaining Consistency in 90’s Anime Style Projects
Consistency ensures a cohesive 90s anime aesthetic. Follow these best practices:
- Establish a Style Guide: Define a palette for colors, shadows, and lines early, sampling from 90s anime or creating a test frame. Standardize line thickness and coloring (e.g., black outlines, lighter for bright objects) to avoid visual discrepancies across shots.
- Use the Same Lighting Rig: Reuse lighting setups for recurring scenes, appending collections to maintain uniform sun angles or sky tones. Adjust for story changes like weather, ensuring consistent shadow lengths and color tones.
- Keep Animation Timing Uniform: Apply 2s animation universally for characters, avoiding mixed frame rates. Standardize motion conventions, like using smears instead of blur, ensuring deliberate exceptions (e.g., 1s effects) fit the style.
- Continuity of Line Art Jitter: Use consistent line boil via GP noise across all shots, maintaining uniform grain or filter settings to emulate a single analog medium, like Ghibli’s consistent background textures.
- Coordinate 2D and 3D Elements: Match Grease Pencil effects to 3D outlines in thickness and color, animating at consistent frame rates. Ensure 2D elements integrate stylistically, avoiding mismatched line styles or lighting.
- Quality Control via Test Renders: Periodically compile test renders in a video editor to spot inconsistencies, like varying hair colors or lighting. Use LUTs for environments to align colors, minimizing heavy grading if rigs are consistent.
- Avoid Unnecessary Complexity: Stick to a unified design, like flat or painterly backgrounds, avoiding abrupt style shifts unless intentional. Deliberate stylistic changes, like dream sequences, should feel purposeful.
- Documentation: Record settings (e.g., outline thickness, color profiles) in notes or a template .blend file for replication, vital for teams or future project phases.
These practices create a unified framework, mimicking anime studios’ art bibles for a polished, intentional retro look.

Frequently Asked Questions (FAQs)
- Can Blender make 3D renders look like 2D anime?
Yes, Blender’s toon shaders, Freestyle, and Grease Pencil Line Art create convincing 2D-like renders. Stepped animation on 2s and analog post-processing, like grain, enhance authenticity, as seen in community projects fooling viewers. - Do I need special add-ons for this style?
Vanilla Blender’s toon shading and line art tools suffice. Add-ons like PixelHair or View Keeper are optional for convenience, but community shader packs or external editors like After Effects can streamline workflows. - How do I get black outlines around models?
Use Freestyle for render-time lines or Grease Pencil Line Art for real-time, editable strokes. GP is beginner-friendly, offering noise for hand-drawn wobble, while Freestyle suits stills with advanced thickness controls. - Can I use Toon BSDF in Eevee?
No, Toon BSDF works only in Cycles. In Eevee, use Diffuse -> Shader to RGB -> ColorRamp for toon shading. Cycles suits stills, but Eevee’s speed is ideal for animation. - How do I make animation less smooth?
Animate on 2s with constant interpolation, spacing keyframes for 12 FPS motion. Disable motion blur, using smears or holds to mimic anime’s choppy, economical style, aided by tools like AnimAide. - How do I achieve an analog/film look?
In compositing, add subtle grain, bloom, RGB noise, or chromatic aberration. Use Blender’s Noise Texture or Filter nodes, or After Effects for VHS effects, keeping settings consistent for a uniform analog feel. - How do I handle eyes and facial features?
Use shadeless emissive textures or planes for eyes, ensuring flat brightness. Animate mouths with shape keys for limited shapes, adding Freestyle lines for details, keeping features bold and graphic. - Why do my shadows look dull?
Adjust shadows via ColorRamp in Shader to RGB, using blue or purplish tints sampled from anime. Use Standard color management and subtle ambient light to lift shadows, avoiding Filmic’s desaturation. - Can I mix 2D hand-drawn elements with Blender scenes?
Yes, Grease Pencil allows 2D effects like speed lines within 3D scenes, matching outline styles. Import external drawings for compositing, ensuring consistent line thickness and frame rates. - Where can I find resources for anime styles in Blender?
Explore YouTube tutorials (e.g., veryveig), Blender Artists forums, r/blenderNPR, and GitHub .blend files like taro8’s. Blender’s manual, paid courses, and social media (ArtStation, X) offer additional tips.

Conclusion
Creating a 90s anime style in Blender blends artistry and technique for a nostalgic result. Key points:
- Embrace the Aesthetic: Use flat colors, bold outlines, and analog warmth, leveraging Blender’s toon shaders and line art for cel-like visuals.
- Utilize Blender’s Tools: Employ Eevee’s Shader to RGB or Cycles’ Toon BSDF, with Freestyle or Grease Pencil for outlines, animating on 2s for retro timing.
- Focus on Details: Adjust shadow hues, maintain consistent line thickness, and reference 90s anime frames to ensure authenticity.
- Incorporate Hybrid Techniques: Blend 3D with Grease Pencil 2D effects for authentic details like glints or speed lines, enhancing the hand-drawn feel.
- Polish in Compositing: Add grain, blur, and color grading to evoke analog film, transforming digital renders into nostalgic cels.
This workflow requires iteration test renders, feedback, and tweaks but yields a pipeline for consistent anime-style creations. Embrace the process, balancing technical precision with creative flair, to craft scenes that resonate as authentic 90s anime.
In closing, Blender empowers us to become both the animator and the cinematographer of our own retro anime. By marrying its modern capabilities with the timeless artistry of 2D animation, we can create works that feel both fresh and nostalgically familiar. So, gather your references, set up your shaders, and start crafting those retro frames. With patience and practice, you’ll soon be rendering scenes that look like they stepped right out of a classic 90s anime, ready to evoke that warm sense of nostalgia in a new generation of viewers. Good luck, have fun, and 遠慮しないで (enryo shinai de) – don’t hold back your creativity!
Sources and Citations
- yelzkizi.orgyelzkizi.org – Blender NPR Guide: Yelzkizi’s complete guide on anime-style rendering in Blender, detailing key features like flat shading, outlines, and color usage (2025).
- medium.commedium.com – Medium Article: Rowegn’s “Appreciating the 90s Anime Aesthetic” explains the analog feel, thick lines, and simpler shading that distinguish 90s anime (2021).
- github.com – GitHub – taro8: Notes from taro8’s blender-90s-anime-shader project, highlighting the deliberate blue hue shift in shadows based on sampled anime stills (2023).
- blenderartists.org – BlenderArtists Forum: User CGFreek’s remark on animating on 2s to achieve a more 2D feel in a VFX animation (2023).
- yelzkizi.orgyelzkizi.org – Blender Documentation: Guidelines on using Freestyle/Line Art for outlines and Shader to RGB for toon shading in Eevee, from official Blender docs and tutorials.
- reddit.com – Reddit (r/blender): User feedback emphasizing adding image degradation in After Effects on top of Blender’s compositor to achieve a vintage anime look (recent discussion).
- 80.lv – 80.lv Article: Theodore McKenzie’s piece on Jonathan Thielens’ retro anime tape recorder animation, noting use of After Effects to emulate hand-drawn cel style and citing inspiration from Veryveig and Ben Marriott’s tutorials (2024).
- yelzkizi.org – Yelzkizi – View Keeper Guide: Description of The View Keeper add-on’s function to save and switch between camera setups, aiding consistent cinematography (2025).
- 3dcinetv.com3dcinetv.com – 3DCineTV Blog: “How to create the classic Anime style look” by 3Director – outlines adding media artifacting (RGB displacement, noise, scanlines) and noting analog imperfections like light leaks and grain to replicate retro feel (2023).
- yelzkizi.org – Blender Grease Pencil in Animation: Suggestion from Blender community about using Freestyle lines to define the mouth in flat-lit faces for clarity in anime-style renders (via forum example, 2024).
(These sources provide further reading on techniques and examples we’ve discussed, reinforcing the confirmed methods and community-tested practices for creating 90s anime style art in Blender.)
Recommended
- Marvel Studios Lays Off Staff Across Departments: Visual Development Team Among the Most Affected
- The Steam Deck Is Out of Stock – What Does It Mean? (US, Canada & Asia Shortage Explained)
- How Baki-Dou: The Invincible Samurai Will Continue in a “Very Scary” Part 2 – Musashi Miyamoto’s Dark Evolution Explained
- How to Fix Blender Unsupported Graphics Card or Driver Error: A Step-by-Step Guide
- Best Render Farm: Guide to Top Cloud Rendering Solutions for 3D Artists & Game Developers
- Moosa Dirty Fate – World Premiere Trailer | Xbox Partner Preview Showcase 2026: Gameplay, Story, Release Date & Everything We Know
- Overwatch’s Most Annoying Tank Is Getting Rebalanced in Season 2: Roadhog Nerfs, Perk Changes, and What It Means
- High-Level Metahuman Mocap Workflow: Professional Techniques for Unreal Engine 5 Animation
- How to Render Anime Style Art in Blender: A Complete Guide for Stylized 3D Renders
- Atmospheric platformer Origament: A Paper Adventure has just launched on Steam


