


What Is Retopology in Blender and Why Is It Important?
Retopology in Blender involves reconstructing a high-poly or messy mesh into a cleaner, low-poly, quad-based topology that retains the original shape. It simplifies geometry while preserving details, making models suitable for animation, texturing, and rendering. High-poly meshes with uneven or triangular topology deform poorly, complicate UV unwrapping, and strain performance in real-time applications. Retopology ensures even quads and logical edge loops for smooth deformations in rigging and animation, and optimizes polygon counts for faster rendering and game engine efficiency, preventing hardware issues in mobile devices. It’s essential for creating animation-friendly, efficient, and manageable assets across various 3D workflows.

What Are the Best Methods for Retopology in Blender?
Blender supports manual and automatic retopology, each with distinct strengths:
- Manual Retopology: Involves crafting a new mesh by hand, placing vertices, edges, and faces for precise edge flow and polygon count control, ideal for animation with tailored loops around joints and facial features. It’s time-intensive, requiring skill for complex models, and uses Blender’s poly modeling tools with snapping or shrinkwrap, enhanced by free add-ons like F2 and LoopTools.
- Automatic Retopology: Uses tools like Voxel Remesher, Quadriflow, or add-ons like Quad Remesher to generate quad meshes quickly, suitable for game-ready assets or base meshes. It’s fast but may produce suboptimal topology for complex areas like faces, often requiring manual cleanup. Built-in remeshers are free but limited; paid add-ons like Quad Remesher (~$100) offer better results.
Comparison:
- Control: Manual offers complete control over edge loops and density, perfect for character animation. Automatic has limited control, with algorithms potentially creating messy loops in critical areas.
- Speed: Manual is labor-intensive, taking hours for detailed models. Automatic delivers results in seconds, ideal for quick drafts.
- Topology Quality: Manual ensures high-quality, animation-ready topology with even quads. Automatic varies, often producing poles or twisted geometry on complex shapes.
- Use Cases: Manual suits deforming models (characters, hero assets) needing specific edge flow. Automatic is great for static objects, concept stages, or base meshes for refinement.
- Tools & Cost: Manual uses free Blender tools and add-ons. Automatic relies on free built-in remeshers or paid add-ons for superior results.
A hybrid approach—using automatic retopology for a base mesh and manual adjustments for critical areas—balances speed and quality. Manual retopology is preferred for animation-ready models, while automatic suits quick visualizations or non-critical assets.
How to Prepare a High-Poly Model for Retopology in Blender?
Preparing a high-poly model ensures an efficient retopology workflow:
- Finalize the High-Poly Sculpt: Complete all shapes and details, applying mirror modifiers for symmetry to retopologize half the model if possible.
- Organize and Simplify: Separate complex models into parts (e.g., body, clothing) for individual retopology, hiding or isolating sections. Decimate extremely high-poly meshes to reduce density without losing detail, or use a “garbage mesh” to consolidate overlapping surfaces.
- Position and Scale: Center the model, apply scale/rotation for predictable snapping, and adjust size to avoid viewport clipping issues.
- Set Up Reference Display: Make the high-poly wireframe or semi-transparent, disable its selectability, and use “In Front” for the retopo mesh to ensure visibility. Organize meshes in separate collections.
- Enable Snapping or Shrinkwrap: Use Face Snapping with projection or a Shrinkwrap modifier to align vertices to the high-poly surface.
- Prepare Retopo Tools: Activate add-ons like F2, LoopTools, or BSurfaces, and use a MatCap shader for clear surface visualization.
Proper preparation streamlines retopology by ensuring the high-poly is manageable and tools are ready, allowing focus on creating clean topology.

How to Use the Quad Remesher Add-on for Automatic Retopology?
Quad Remesher, a paid add-on (~$100, with a free trial), automates retopology with high-quality quad meshes:
- Install and Activate: Install via Preferences, enable, and access in the N-panel or Object Data Properties.
- Prepare Your Model: Select a manifold high-poly mesh, apply scale, and save a backup.
- Choose Remeshing Settings:
- Target Quad Count: Set desired quads (e.g., 5,000–10,000 for game assets).
- Adaptive Size: Use smaller quads in detailed areas, larger in flat ones.
- Detect Hard Edges: Mark sharp edges for hard-surface models to preserve creases.
- Symmetry: Enable for symmetrical models to ensure consistent topology.
- Painting Guides: Optionally use vertex paint to guide edge flow for complex cases.
- Run the Remesher: Click Remesh to generate a quad mesh, processing in seconds to minutes.
- Evaluate and Clean Up: Inspect for spiral loops or misplaced poles, manually adjusting critical areas like faces or hands.
- Preserve Details: Bake normal maps from the high-poly to capture fine details, using Shrinkwrap to refine silhouette alignment.
Quad Remesher delivers ZBrush-quality auto-retopology, ideal for organic and hard-surface models, though animation-critical areas may need manual tweaks. It’s a time-saver for clean, usable meshes.
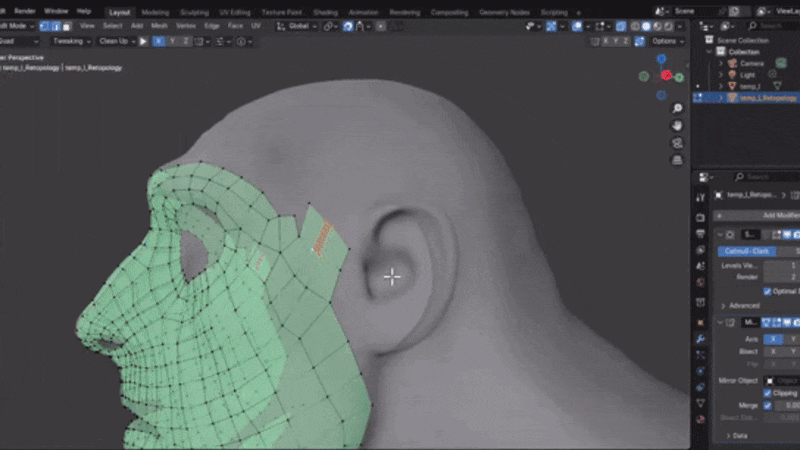
How to Retopologize a Model Manually Using Blender’s Tools?
Manual retopology in Blender offers precise control over topology:
- Set Up the Scene: Lock the high-poly, enable Face Snapping or Shrinkwrap, and create a new retopo mesh (starting with a plane or single vertex).
- Enable Snapping: Use Face Snap with projection or a Shrinkwrap modifier, and enable Auto Merge to avoid duplicate vertices.
- Lay Down Polygons: Use Poly Build to drag edges or Ctrl+click for new faces, or extrude edges with F2 for quick face filling. LoopTools’ Bridge function fills gaps between loops.
- Use Symmetry: Apply a Mirror modifier with clipping for symmetrical models to halve the workload.
- Adjust Topology: Slide edges, use Relax for even spacing, and add/dissolve loops to balance density. Place triangles or n-gons in low-deformation areas.
- Use Additional Aids: BSurfaces converts Grease Pencil strokes into quad patches for complex surfaces.
- Continually Snap and Project: Ensure vertices align with the high-poly using snapping or periodic Shrinkwrap application.
- Finish and Clean Up: Merge duplicates, fill holes, recalculate normals, and verify manifold geometry, adjusting polygon count as needed.
Manual retopology, though time-consuming, produces tailored, animation-ready meshes using Blender’s robust tools like Poly Build, F2, and BSurfaces, ensuring clean, deformable topology.

How to Use the Shrinkwrap Modifier for Retopology in Blender?
The Shrinkwrap modifier snaps a retopo mesh to a high-poly surface:
- Basic Setup: Add Shrinkwrap to the retopo mesh, set the high-poly as the target, and choose Nearest Surface Point for simple projection or Project for axis-based snapping. Use a small offset (e.g., 0.0001) to avoid Z-fighting.
- Workflow: Keep Shrinkwrap live for continuous snapping during modeling or apply periodically after manual snapping. Apply before UV unwrapping or baking.
- Multiple Shrinkwraps: Use additional modifiers for complex models (e.g., separate projections for outer/inner surfaces like mouth cavities).
- Common Issues & Solutions:
- Wrong Surface Snapping: Hide inner surfaces or use Project mode with positive/negative direction to target correct surfaces.
- Artifacts at Corners: Add geometry or use Above Surface to prevent folding at sharp edges.
- Webbing: Keep retopo vertices close to the target initially to avoid unintended snapping.
- Modifier Order: Place Shrinkwrap after Mirror/Subdivision for correct projection.
- Deciding to Apply: Apply when manual tweaks are needed off the surface or before finalizing for UVs/baking, re-adding if necessary.
Shrinkwrap simplifies retopology by automating vertex alignment, ensuring the low-poly mesh conforms accurately to the high-poly, with careful management of settings to avoid snapping errors.
How to Retopologize a Face or Character for Animation?
Retopologizing characters, especially faces, requires topology that supports natural deformation:
- Key Topology Principles for Faces:
- Eye Loops: Concentric loops around eyelids (1-2 close loops, more radiating outward) for blinking and expressions.
- Mouth Loops: “O” loop around lips, additional loops for mouth area to support opening and expressions.
- Nose and Cheek: Nasolabial loop from nostril to chin for smile lines, connecting moving mouth parts to cheeks.
- Eye-to-Mouth Loop: Loop from nose bridge under eye to cheek, redirecting eye loops to prevent spiraling.
- Forehead and Brow: Loops from eyes over brow, with simple grid across forehead for frown lines.
- Jawline and Chin: Loops from mouth to jaw, with poles under chin or jaw sides to minimize deformation issues.
- Body and Limbs:
- Joint Loops: 3+ loops around elbows, knees, and other joints for smooth bending.
- Muscle Flow: Align edges with muscle/bone directions, fanning loops at armpits or hips.
- Avoid Triangles in Deforming Areas: Place triangles in static areas like the back of the head.
- Even Distribution: Concentrate loops in deforming areas (lips, joints), use simpler grids elsewhere.
- Pole Placement: Position poles (5-edge junctions) in low-deformation areas like mouth corners or under chin.
- Retopology Process: Start with eye and mouth loops, add nasolabial loop, connect via cheek, and fill forehead/jaw. Create an inner mouth “bag” for open-mouth animations. For bodies, loop around torso/limbs, adding extra loops at joints and fanning at shoulders/hips.
- Deformation Tests: Test with a simple rig or shape keys to ensure loops support expressions and poses without collapsing.
Manual retopology is critical for animation, mimicking muscle structures with loops around eyes, mouth, and joints to ensure believable deformations, producing meshes that animate cleanly and effectively.

What Are the Best Edge Flow Techniques for Retopology in Blender?
Edge flow refers to the arrangement of edges in a mesh to follow the model’s natural contours, ensuring smooth deformation and shading. Here are key techniques for achieving optimal edge flow during retopology in Blender:
- Follow the Model’s Curvature: Edges should align with the model’s features, such as muscle lines on organic models or panel boundaries on hard surfaces. This enhances detailing and normal baking by matching polygon flow to the shape’s highlights and shadows, similar to how Blender’s Quadriflow remesher automatically follows surface curvature.
- Strategic Pole Placement: Poles (vertices with 5+ edges) redirect or terminate edge loops. Place them in flat or low-deformation areas, like the side of a cheek, to manage topology transitions without causing shading issues or pinching during animation.
- Maintain Even Quad Spacing: Aim for uniformly sized quads to prevent stretching, which can distort shading or deformation. Use Blender’s LoopTools Relax or Sculpt mode’s smooth brush to even out vertex spacing while preserving the model’s shape.
- Loop Redirection: Manage dense topology by terminating or merging loops using patterns like T-joins or diamond quads. For example, merge a leg loop into a waist loop to reduce density, creating a pole at the junction if needed, to maintain clean flow.
- Align with Deformation Axes: Place edge loops perpendicular to areas of bending, such as around elbows or mouths, to support smooth animation. This prevents quads from shearing into distorted shapes during movement.
- Minimize Stretch and Pinching: Use a glossy MatCap shader to inspect reflections, revealing uneven flow as wobbles. Adjust edges to ensure smooth curvature distribution, avoiding clusters of tight edges next to large gaps unless detail requires it.
- Hard Surface Edge Flow: For mechanical models, ensure edges align with straight lines or creases, using minimal polygons on flat surfaces. This maintains clean shading and supports sharp features without zig-zagging topology.
- Support Loops for Subdivision: In subdivision workflows, add extra loops near sharp edges to hold their shape when smoothed, particularly for hard surfaces, ensuring the subdivided mesh retains crisp details.
- Reduce Excessive Poles and N-gons: Limit poles to 5 edges and convert n-gons to quads or triangles in curved areas to avoid shading artifacts. N-gons are acceptable on flat, non-deforming surfaces but disrupt flow in dynamic areas.
- Facilitate UV Mapping: Design edge loops to follow natural model sections, creating logical UV islands that simplify unwrapping and improve texture packing efficiency.
These techniques produce topology that is visually appealing, deformation-friendly, and optimized for downstream tasks like animation and texturing.
How to Retopologize a Hard Surface Model in Blender?
Retopologizing hard surface models (e.g., vehicles, weapons) focuses on simplifying geometry while preserving sharp edges and primary shapes:
- Preserve vs. Bake Details: Retain major forms in geometry, like panel edges, while baking small details (e.g., bolts, grooves) into normal maps to reduce polygon count and maintain visual fidelity.
- Decimation and Dissolve: For static models, apply the Decimate modifier or Limited Dissolve to reduce density, accepting triangles or n-gons on non-deforming surfaces to quickly optimize high-poly CAD imports or boolean-heavy sculpts.
- Manual Retopology: Trace key ridges and sharp edges with edges, using snapping or Shrinkwrap to align vertices to the high-poly surface. Use minimal polygons for flat areas to keep the mesh efficient.
- Handle Sharp Edges: For game assets, mark edges as sharp and rely on normal maps to simulate bevels. For subdivision models, add support loops near edges to maintain crispness when smoothed.
- Topology Patterns: Allow triangles or n-gons on flat, non-deforming areas, like cylinder caps, to save polygons. Use even loops for curved surfaces to preserve roundness with fewer segments.
- Leverage Symmetry and Arrays: Retopo one section of symmetrical or repeating elements, using Mirror or Array modifiers to duplicate, ensuring precise alignment with the high-poly.
- Plan for Animation: Separate topology for moving parts (e.g., robot joints, car doors) to support articulation. For deformable parts, include loops like organic models.
- Custom Normals for Shading: Use Weighted Normals or Auto Smooth to enhance shading, marking sharp edges to maintain crispness without adding geometry, optimizing for game engines.
- Boolean-Based Retopo: For complex boolean-heavy models, remodel simple shapes with booleans to approximate the high-poly, then clean up for cleaner topology faster than manual retopo.
- Ensure Flatness and Straightness: Verify flat faces are planar and straight edges align in orthographic view, adjusting vertices to prevent shading issues or unintended curves.
- Optimize Polycount: Use long polygons on flat surfaces and concentrate detail where shapes change significantly, balancing silhouette fidelity with performance needs.
This results in clean, efficient meshes suitable for games or high-quality rendering, maintaining essential shapes with minimal geometry.

How to Optimize a Retopologized Mesh for Games and Animation?
Optimizing a retopologized mesh ensures it performs efficiently in games or deforms well in animation:
- Clean the Mesh: Eliminate n-gons, merge duplicate vertices using Merge by Distance, and fix inconsistent normals to create a clean, manifold mesh free of errors.
- Reduce Polygon Count: Dissolve non-essential edge loops in low-detail areas, like a character’s torso, while ensuring the silhouette and deformation zones remain intact, using wireframe views to assess necessity.
- Create LODs: Generate multiple detail levels (e.g., 20k, 10k, 5k triangles) for games by duplicating and simplifying the mesh with Decimate or manual edits, optimizing for distance-based rendering.
- Efficient UV Unwrapping: Unwrap with minimal stretch, organizing UV islands to maximize texture space, reducing memory usage and enabling engine optimizations like part-specific texture swaps.
- Bake Texture Maps: Bake normal, ambient occlusion, or curvature maps from the high-poly to capture fine details, allowing the low-poly to appear detailed without extra geometry.
- Streamline Materials: Combine materials into a single texture atlas for games to minimize draw calls, or use fewer materials for animation to simplify rigging workflows.
- Triangulate for Games: Manually triangulate quads before export to control diagonal placement, preventing engine-induced shading issues, while keeping a quad version for editing.
- Optimize for Rigging: Add edge loops in deformation-critical areas (e.g., mouth, shoulders) to ensure smooth skinning, adhering to engine-specific bone weight limits (e.g., 4 bones per vertex).
- Cull Invisible Geometry: Remove faces hidden by other elements (e.g., body under clothing) to lower polycount, ensuring no impact on visuals or collision detection.
- Use Simplification Tools: Apply Limited Dissolve on flat areas to reduce edges, taking care to preserve loops needed for deformation or silhouette definition.
- Balance Polycount: Adjust to fit engine budgets, trimming excess polygons or adding detail where visually impactful, like extra knee loops for smoother bends.
- Test in Context: Import into game engines or animation software to verify normals, lighting, and deformation, addressing issues like flipped normals or insufficient topology.
This creates efficient, visually accurate meshes tailored for their intended use, balancing performance and quality.
How to Use the Retopology Tools in Blender Like Poly Build and BSurface?
Blender’s retopology tools enhance manual retopology efficiency:
- Poly Build Tool: In Edit Mode, select Poly Build from the toolbar. Drag an edge to extrude a new quad, Ctrl+click to add vertices or fill triangles, and Shift+click to delete faces. With snapping or Shrinkwrap, it allows rapid, intuitive topology creation directly on the high-poly surface.
- BSurfaces Add-on: Enable in Preferences, then draw Grease Pencil strokes on the high-poly surface to outline desired edge loops. In Edit Mode, use BSurfaces to convert intersecting strokes into quad patches, ideal for filling large, smooth areas like a creature’s back.
- F2 Add-on: Activate in Preferences; press F to auto-fill faces from selected vertices or edges, extending topology strips contextually, speeding up patch growth.
- LoopTools Add-on: Use Bridge to connect edge loops with quads, Relax to even out vertex spacing, or Circle to perfect circular loops, refining topology after initial placement.
- Snapping and Shrinkwrap: Enable Face Snapping or apply a Shrinkwrap modifier to ensure new geometry aligns with the high-poly, used alongside Poly Build or BSurfaces for accuracy.
- Integrated Workflow: Combine tools for efficiency—Poly Build for detailed areas, BSurfaces for broad surfaces, F2 and Bridge for connecting sections, and LoopTools for polishing, creating a streamlined retopology process.
These tools transform manual retopology into a faster, more creative task, reducing tedious vertex placement.

How to Fix Common Retopology Problems in Blender?
Common retopology issues and their solutions include:
- Snapping Issues: Verify Face Snapping or Shrinkwrap settings (Nearest Surface Point, correct target). Move stray vertices closer to the high-poly manually, check retopo mesh normals, or adjust Shrinkwrap direction (positive/negative).
- Unwanted Poles: Move poles to flat, non-deforming areas by dissolving edges, using the Knife tool, or rotating edges to redirect flow, preventing shading dimples in areas like cheeks.
- Triangles/N-gons: Convert to quads by adding edges or welding, placing triangles in static areas if unavoidable, using mesh cleanup to eliminate degenerate faces.
- Flipped Faces: Recalculate normals (Shift+N) or flip manually (Alt+N), using Face Orientation overlay to spot inconsistencies affecting shading or Shrinkwrap.
- Shrinkwrap Collapse: Apply “Above Surface” or Vertex Groups to control projection, hide interfering high-poly parts, or retopo in stages to avoid snapping to wrong surfaces.
- Poor Deformation: Add edge loops at joints or realign loops to match bending axes, testing with a quick rig to identify collapse points.
- Shading Artifacts: Use Weighted Normals, split non-planar quads, adjust Auto Smooth angles, or transfer high-poly normals to correct shading without altering geometry.
- Overlapping High-Poly Parts: Hide elements like eyes or clothing during retopo, using separate collections or X-ray mode to maintain visibility of the retopo mesh.
- Performance Lag: Use a decimated high-poly proxy for snapping, disable unnecessary modifiers, or retopo in sections to reduce viewport load.
- UV Stretching: Balance topology by reshaping skewed quads or adding loops, manually pinning UVs to reduce stretch during unwrapping.
- Shape Misalignment: Apply a final Shrinkwrap or use Data Transfer to align normals, manually adjusting vertices to match the high-poly silhouette.
- Holes/Non-Manifold Edges: Select non-manifold elements and fill with edges or faces, ensuring a watertight mesh for baking and rendering.
Regular inspection in wireframe, MatCap, or subdivision modes helps catch and resolve issues for a clean mesh.
What Is the Best Topology for Different Types of 3D Models?
Topology requirements vary by model type and purpose:
- Animated Characters: Use all-quad topology with edge loops following muscles and joints, denser in deformation areas (e.g., face, elbows), and poles in low-stretch zones (e.g., hairline) for smooth animation and easy UV mapping.
- Rigid Characters/Robots: Allow triangles or n-gons for non-deforming segments, aligning topology with hinges or pivots for mechanical motion, treating deformable parts like organic models.
- Hard Surface (Subdivision): Employ all-quad topology with support loops near edges to maintain crispness when subdivided, ensuring edges follow contours for smooth rendering.
- Hard Surface (Game): Use quads with triangles/n-gons on flat, non-deforming areas, marking sharp edges for normal-based crispness, optimizing polycount with long polygons on flat surfaces.
- Architecture: Opt for large planar n-gons or quads for flat surfaces, minimizing tessellation, adding loops only for cuts or deformable sections in destructible models.
- Terrain/Organic Environments: Use triangulated topology for static rocks via decimation, or quad grids for displacement-based terrains, ensuring enough density for silhouette without thin triangles.
- Sculptures/3D Prints: Allow flexible, decimated triangle topology, prioritizing manifoldness for printing, with quads preferred for texturing or minor posing.
- Low-Poly Style: Emphasize minimal polygons, using triangles and n-gons for flat-shaded silhouettes, strategically placing edges to define shapes clearly.
- Cloth Simulation: Use even quad grids to mimic fabric, avoiding triangles to prevent simulation pinching, with loops in bending areas for bone-animated cloth.
Topology should align with the model’s role, ensuring clean deformation, rendering, or performance as needed.

Frequently Asked Questions (FAQs)
- Do I always need to retopologize a high-poly sculpt?
Retopology is essential for animation or game assets to reduce polycount and ensure clean deformation. For still renders, decimation may suffice, but retopology simplifies UV unwrapping and rigging. - What’s the difference between Blender’s Remesh and manual retopology?
Voxel/Quadriflow Remesh automates quad generation but lacks precise edge loop placement. Manual retopology crafts deformation-friendly loops, often refining auto-remesh results for animation or games. - How many polygons should my retopo model have?
Game characters range from 5k–10k triangles for mobile to 20k–100k for current-gen, depending on platform. VFX models use 10k–30k quads, subdivided for rendering, balancing silhouette and deformation needs. - Can I use Decimate instead of retopology?
Decimate reduces polys but creates messy triangles, unsuitable for animation or UVs. It’s useful for static models or as a base for manual cleanup, not a complete retopo replacement. - Why are quads important, and are triangles okay?
Quads ensure smooth deformation and subdivision. Triangles are acceptable in static, flat areas (e.g., game props) but should be avoided in deforming zones to prevent pinching. - How do I retopo symmetrical models?
Use a Mirror modifier with clipping to retopo one side, ensuring symmetry. Apply at the end for asymmetrical tweaks, aligning center loops for seamless mirroring. - What tools speed up retopology?
Poly Build for quick face creation, F2 for auto-filling, BSurfaces for stroke-based patches, Shrinkwrap for snapping, and Quad Remesher for fast auto-retopo enhance efficiency. - How to ensure a clean normal map bake?
Align low/high-poly shapes, unwrap UVs with minimal stretch, use a cage for baking, match smoothing settings, and align UV seams with hard edges to prevent artifacts. - How to fix shading artifacts without a normal map?
Apply Weighted Normals, split non-planar quads, adjust Auto Smooth angles, smooth vertices lightly, or transfer high-poly normals to correct shading issues. - How to stay motivated during retopology?
Use efficient tools, break work into stages, listen to music or podcasts, focus on the end goal of a functional model, and combine auto/manual methods to see quick progress.
Conclusion
Mastering retopology in Blender creates clean, efficient models ready for any pipeline:
- Understand the Purpose: Retopology optimizes meshes for animation, games, or rendering by improving deformation, UV mapping, and performance.
- Practice and Learn: Retopo diverse models and study industry wireframes to internalize optimal topology patterns for faces, bodies, and hard surfaces.
- Use Blender’s Tools: Leverage Poly Build, BSurfaces, F2, LoopTools, and Shrinkwrap to streamline workflows, combining manual precision with automated speed.
- Tailor Topology: Design edge flow for the model’s purpose—animation requires deformation-friendly loops, games need minimal polys, and subdivision needs quads with support loops.
- Polish Edge Flow: Achieve even quads, strategic pole placement, and smooth shading, using MatCaps to identify and fix flow issues.
- Test and Refine: Verify deformation with rigs or subdivision previews, addressing artifacts early to ensure a robust mesh.
- Stay Updated: Engage with community resources to adopt new tools and techniques, enhancing retopology skills.
With practice, retopology becomes a blend of technical precision and artistic design, producing models that perform flawlessly in animation, games, or rendering, elevating your 3D artistry.
So, dive in and start retopologizing! With the step-by-step guide and techniques provided, you have a roadmap to follow. Combine that with hands-on practice and you’ll master retopology in Blender, creating clean, efficient 3D models that are a joy to animate, texture, and render. Happy retopoing – may your meshes be ever clean and your edge loops ever flowing!
Sources and Citations
- Blender Manual (Retopology Section):
- Blender Stack Exchange (Retopology Tag):
- Polycount (Technical Talk/Topology Thread):
Recommendations
- The Original Final Fantasy 7 Gets a New Re-release for PC on Steam: New Features, Free Upgrade, and Known Issues
- Blender Smooth Hair Curves Geometry Nodes Preset
- Kingdom Come: Deliverance Developer Donation to Real-Life Castle Explained
- Physics in Unity: Complete Guide to Rigidbodies, Colliders, Joints, FixedUpdate, and Performance
- The Witcher 4: Everything We Know About CD Projekt Red’s Next Epic RPG
- The 9th Dragon – Official Announcement Trailer Breakdown (Story, Setting, Gameplay, Platforms)
- Your Guide to Making 3D Models for 3D Printing
- Founders of Gearbox Québec Announce New Studio Studio Ricochet to “Create Original, Premium Games on Our Own Terms”
- Marvel’s New Avengers Crossover to Include Exclusive Magic: The Gathering Card: Everything to Know About Avengers: Armageddon #1
- Faces of Death Review: Is the 2026 Horror Reboot Worth Watching?


