


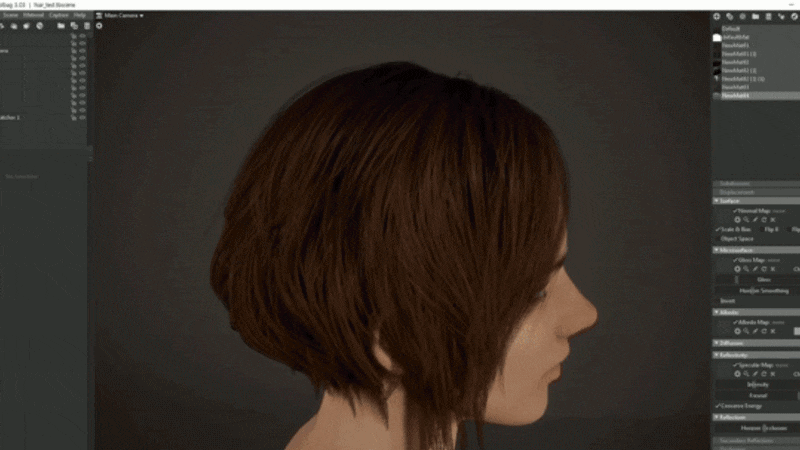
What is the Best Workflow for Hair Texturing in Substance Painter?
Creating game-ready hair textures involves modeling hair cards, which are flat polygon strips, and applying texture maps to depict hair strands with transparency. The process starts in a 3D modeling tool like Blender, where hair cards are created and UV unwrapped to optimize texture space. In Substance Painter, artists paint strand textures, including color, alpha for transparency, and other maps like normals. For realistic hair, high-poly strand details are baked onto low-poly cards, while stylized hair often relies on hand-painted textures. The workflow hinges on effective modeling, efficient UV layouts, and layered texturing to achieve high-quality results.
- Model and UV Hair Cards: Create geometric strips that mimic the hair’s shape and UV unwrap them to maximize texture space, often overlapping similar cards to conserve space, as unique UV islands for each strand are typically unnecessary. These hair cards represent clumps of strands, with alpha textures creating the illusion of individual hairs. This approach optimizes texture usage while maintaining visual detail. Efficient UV layouts ensure textures align properly for detailed strand painting.
- Prepare High-Poly Source (Optional): Generate a high-detail hair model using tools like Blender’s particle hair, Maya XGen, or ZBrush FiberMesh to serve as a source for baking textures like normals and ambient occlusion. Tools like Blender’s Hair Tool or Substance Designer’s procedural patterns can simplify this process. The high-poly model provides a detailed foundation for low-poly card textures. This step enhances realism by capturing fine strand details.
- Texture in Substance Painter: Import low-poly hair cards and set up texture channels (Base Color, Opacity, Normal, Roughness). Paint strands using references to guide their flow, layering base color, strand details, highlights, and shading for depth. Painter’s custom brushes and smart materials streamline the process. This creates the visual appearance of hair, tailored to realistic or stylized aesthetics.
- Bake and Export Maps: Bake high-poly hair details onto low-poly cards to produce maps like normals, roughness, or ambient occlusion, then export them at resolutions suitable for the game engine. The baking process transfers intricate details to flat cards for efficiency. Exported maps ensure compatibility with engines like Unity or Unreal. Proper export settings maintain texture quality in-game.
- Setup in Engine: Create a material in the game engine, applying exported textures (base color with alpha, normal, roughness). Enable two-sided rendering and choose an alpha mode (masked or dithered) to ensure the hair renders correctly from all angles. This step integrates Painter’s textures into the engine’s rendering system. It ensures the hair appears natural and detailed in the final game.
This approach balances high detail with low-poly efficiency, suitable for both realistic and stylized hair, maintaining strand directionality and layering for natural flow, whether baking from Blender’s particle hair or hand-painting in Substance Painter.

How do I Texture Hair Cards in Substance Painter?
Texturing hair cards in Substance Painter involves painting hair strands onto flat planes, using an opacity channel to create transparent areas between strands, ensuring they visually mimic individual hairs in a game engine. The process includes importing hair cards, enabling opacity, painting alpha and color, adding strand details, and refining with generators and maps, followed by iteration and edge cleanup for engine readiness.
- Import the Hair Card Mesh: Export hair cards from a modeling tool like Blender, either as a single mesh or multiple meshes, and import them into Substance Painter. Ensure UVs are arranged to maximize texture space, often sharing a texture atlas for different card shapes representing hair clumps. This optimizes texture usage for varied hair sections. Proper UV layout is crucial for effective strand painting and detail placement.
- Add an Opacity Channel: In Texture Set Settings, add an Opacity channel and switch to an alpha-blending shader to enable transparency painting, allowing real-time visualization of transparent areas in the viewport. This channel defines where hair strands appear versus transparent gaps. It ensures the cards render accurately as hair in the 3D environment.
- Block Out the Hair Shape (Alpha): Paint the alpha mask with black for transparent areas and white for opaque hair clumps, shaping locks on the card. Use soft falloffs or semi-transparent strokes for tapered strand ends to mimic natural hair tips. This establishes the hair’s silhouette, critical for the card’s appearance. It sets the stage for detailed strand texturing.
- Paint Base Color: Apply a base color, either uniform or as a gradient (e.g., darker roots, lighter tips for realism or bold shifts for stylization), using fill layers or manual painting. Introduce slight color variations to enhance realism or dramatic changes for stylized looks. This defines the hair’s overall tone and character. The base color serves as the foundation for strand detailing.
- Paint Hair Strands: Use brushes with thin line or cluster alphas to paint strands along the hair’s flow, from root to tip, layering darker and lighter strands to create depth. Tools like Lazy Mouse ensure smooth, steady strokes for precision. Stroke direction replicates natural hair growth patterns. This step crafts the detailed, individual strand appearance.
- Use Masks and Generators: Apply generators like root darkening or curvature-based highlights, driven by baked maps such as ambient occlusion, to add realistic shadows or highlights efficiently. These adapt to mesh details, enhancing texture depth without extensive manual work. Generators ensure consistent, natural effects across the hair. They reduce painting time for complex details.
- Add Variation: Introduce subtle noise or color variation layers to break up uniformity, using noise masks for tonal differences in realistic hair or bold streaks for stylized designs. This adds natural randomness or artistic flair to the texture. Variation prevents a flat, monotonous appearance. It enhances visual interest and depth.
- Normal and Height Details: For stylized hair without high-poly baking, paint height or use directional noise to simulate strand depth. If using high-poly sources, bake normal maps to provide detailed lighting cues. This creates a sense of volume on flat cards under lighting. Normal maps enhance the 3D illusion for realistic rendering.
- Roughness/Specular Map: Set a uniform roughness (0.3–0.5 for shiny hair, higher for matte) or vary it, painting glossier mid-strands and matte tips for realism. Use generators like ambient occlusion for matte roots. This controls the hair’s shine and reflective properties. Roughness variation mimics natural hair sheen for lifelike results.
- Evaluate and Iterate: Inspect hair cards in the viewport, ideally on a dummy head or sphere, to assess strand density and alpha cleanliness. Tweak colors, add strands where sparse, and remove unwanted opaque areas to refine the texture. Iteration ensures the final look is polished. It addresses visual inconsistencies for a cohesive result.
- Transparent Edge Cleanup: Match the background color in transparent areas to the hair color to avoid fringes, using padding or extended painting to blend mipmaps seamlessly. This prevents visible outlines in the game engine, ensuring smooth rendering at various distances. Clean edges maintain high visual quality. They eliminate rendering artifacts like halos.
This process harnesses Substance Painter’s real-time feedback and layered painting for detailed, realistic, or stylized hair textures. Reference images guide strand flow, ensuring clean alpha and color alignment.
Can You Use Substance Painter for Realistic Hair Textures?
Substance Painter is highly effective for creating realistic hair textures, widely used in game development for hair cards textured with physically-based rendering (PBR) materials. It supports detailed texturing with channels for base color, alpha, normal, and roughness, visualized in its PBR viewport. Artists bake high-poly strand details onto low-poly cards, refining them with hand-painted touch-ups or generators. High-resolution textures (2048² or higher) capture fine strands, and tools like particle brushes add clumping.
- Hair Cards & PBR: Use hair cards to represent clumps of strands, textured with PBR maps (base color, alpha, normal, roughness) to achieve realistic lighting and transparency effects. Painter’s PBR viewport previews the final in-engine appearance accurately. This ensures seamless integration with game engines like Unreal or Unity. It supports physically accurate material properties for convincing hair visuals.
- High-Poly to Low-Poly Baking: Bake high-poly hair models, such as those created in Blender’s particle hair or ZBrush FiberMesh, onto low-poly cards to capture detailed strand normals and ambient occlusion. Painter’s baking tools efficiently handle dense geometry, producing high-quality maps. This provides a robust starting point for texturing. It significantly reduces the need for extensive manual painting.
- Refining and Texturing: Hand-paint or use generators to refine baked maps, adding color variation (e.g., hints of red in brown hair) or root darkening for enhanced realism. High-resolution textures (2048² or more) ensure sharp, detailed strands. Painter’s brushes and particle tools support precise strand painting. This polishes textures for lifelike, professional results.
- Physically Accurate Materials: Approximate anisotropic highlights using normal map alignment to guide light along strands and low roughness for shiny hair, tailored for engine compatibility. Paint subtle specular streaks to mimic hair’s natural sheen. This simulates real hair’s complex light interaction. It ensures realistic rendering in game engines with proper lighting.
- Examples of Use: Professionals like Chang-Gon Shin showcase Painter’s capabilities, baking and painting realistic hair textures for real-time characters, rendered in tools like Unreal or Marmoset for lifelike results. This demonstrates Painter’s reliability in high-end production. It achieves consistent, lifelike hair visuals. The workflow is trusted across the game development industry.
- Integration with Other Tools: Combine Painter with specialized tools like FiberShop or Blender’s particle hair to generate base textures, importing them for refinement in Painter. This flexibility supports complex, multi-tool workflows for optimal results. External tools enhance initial texture creation efficiency. Painter integrates seamlessly for final polish and consistency across maps.
Normal maps and roughness approximate realistic highlights, enhanced by engine shaders, delivering convincing PBR results for lifelike in-game rendering.

How do I Paint Stylized Hair in Substance Painter?
Painting stylized hair in Substance Painter adapts realistic techniques for a hand-painted, artistic approach, ideal for anime, MOBAs, or cartoon-inspired games. Painter’s 3D painting and real-time feedback enable direct model texturing. Stylized hair emphasizes bold shapes, vibrant colors, and baked-in lighting, using textured brushes for a hand-crafted look.
- Emphasize Strong Shapes: Define large, flowing clumps, spikes, or chunky locks in the alpha to create a pronounced, readable silhouette, avoiding the fine strands typical of realistic hair. Use soft brushes to paint gradients, with darker recesses and lighter tops, to add cartoonish volume. This prioritizes bold, stylized forms that stand out. It ensures the hair’s silhouette is clear and impactful from a distance.
- Hand-Painted Lighting: Paint highlights and shadows directly onto the texture, using Add or Multiply layers for effects like anime-style highlight bands or deep shadows in occluded areas. Guide placement with curvature maps or Painter’s light tool for accuracy. This bakes lighting into the texture, reducing reliance on engine lighting. It gives artists full control over the stylized look.
- Brush Work: Use brushes with textured or jittered alphas to mimic a traditional painted aesthetic, avoiding perfectly smooth lines. Incorporate subtle wiggles or tapering with pen pressure to emulate hand-drawn strokes. This replicates illustration techniques for an authentic, crafted feel. Brush variation adds character and charm to the stylized texture.
- Color and Style Choices: Apply vibrant or non-traditional colors like blue or pink, with painted highlights or rim lights to match the game’s aesthetic. Balance stylized shading with PBR lighting for hybrid styles, using Painter’s viewport to test colors under varied lighting. Creative color choices enhance visual appeal and coherence. They align with the game’s art direction for a unified look.
- Outlines and Definition: Paint darker lines between major clumps or soft gradients within strands to define edges without harsh outlines, unless aiming for a toon style. This clarifies forms and adds depth to the hair’s structure. Soft blending enhances readability of shapes and contours. It supports the stylized silhouette for clear visual impact.
- Use of Smart Materials/Filters: Apply Blur or Slope Blur filters to soften painted highlights or add painterly irregularity, ensuring a hand-crafted appearance. These tools enhance the artistic texture subtly, avoiding a sterile digital look. Filters introduce stylized imperfections for authenticity. They make the hair feel hand-painted and organic.
- Iteration: Continuously rotate the model in Painter’s viewport to assess readability from different angles, exaggerating contrast (darker shadows, brighter highlights) for impact. Study references like anime or painterly game characters to refine the texture’s style. Iteration ensures alignment with the artistic vision. It makes the hair pop in-game with bold, clear details.
Symmetry ensures consistency, and iterative painting aligns textures with the game’s aesthetic, creating vibrant, impactful stylized hair.
What Brushes Are Best for Hair Texturing in Substance Painter?
Selecting the right brushes in Substance Painter simplifies hair texturing, enhancing efficiency and quality. While no default “hair brush” exists, customizing brushes or importing alphas achieves excellent results. Recommended brushes include basic hard/soft, custom strand alphas, and particle brushes.
- Basic Hard/Soft Brushes: Use the “Basic Hard” brush with a “Thin Line” or “PolyGraph” alpha to paint individual hair strands, adjusting size and pen pressure to create tapered ends for natural flow. The “Basic Soft” brush is ideal for painting smooth color gradients or broad shadows and highlights. These versatile brushes handle precise strand work and soft shading effectively. They support both realistic and stylized hair texturing with flexibility.
- Custom Hair Strand Alphas: Create or import alphas featuring 5–10 parallel lines of varying thickness and spacing to paint multiple strands in a single stroke, adding natural randomness to the texture. Community packs on platforms like ArtStation or Substance Share offer pre-made hair brushes for convenience. Custom alphas speed up texturing for dense, realistic hair. They enhance efficiency by reducing the need for individual strand painting.
- Particle Brushes: Experiment with smudge tools or the Fibers particle system (if available) to create soft, combed strand effects, particularly suited for fluffy or furry hair textures. Smudging can simulate a blended, combed appearance for unique styles. Particle brushes add organic variation to specific hair types. They complement standard brushes for specialized effects like softer, more blended strands.
- Direction and Flow Settings: Enable “Follow Stroke” or “Stroke Alignment” in Brush settings to orient the alpha along the brush path, ensuring strands flow naturally with the stroke direction. Adjust spacing for continuous lines (low spacing) or dashed effects (higher spacing) to mimic hair clumps. These settings maintain realistic hair flow and coherence. They align textures with the intended strand direction for a polished look.
- Jitter and Randomness: Introduce slight size or angle jitter in Brush settings to avoid mechanical uniformity, making strands appear more natural with varied thickness or tilt. Subtle jitter creates a less repetitive, organic look, ideal for realistic hair. This enhances the believability of the texture. Controlled randomness prevents a sterile, computer-generated appearance.
- Blend and Erase: Use the Eraser with strand alphas to carve details from a filled area, effectively shaping strands in reverse, or the Blur tool to soften textures for smoother transitions. These tools refine painted areas with precision and control. Blending creates seamless transitions between strands. Erasing allows detailed shaping of strand patterns for accuracy.
- Recommended Community Brushes: Explore packs like the Rokviz Hair Smart Material pack, which includes tuned hair brushes, or other marketplace sets labeled for fur or hair texturing. These pre-configured brushes save setup time with optimized alphas for strand painting. Community brushes offer specialized tools for professional workflows. They streamline complex hair texturing tasks with proven results.
- Testing Brushes: Test brushes on a throwaway layer or a flat plane to adjust opacity, flow, or size, ensuring strokes resemble hair without being too uniform, opaque, or thin. This prevents overly heavy or faint lines that disrupt the texture’s realism. Testing refines brush settings for optimal performance. It ensures the brush aligns with the desired hair style and density.
Settings like jitter and flow ensure natural strand variation, and community packs like Rokviz provide pre-tuned options for professional results.

How do I Add Highlights and Shadows to Hair Textures?
Adding highlights and shadows enhances hair texture depth and realism or stylization, using baked maps and manual painting. Techniques include baking AO and curvature, painting highlights and shadows, using gradients and layering, and checking under varied lighting.
- Using Lighting Maps (Baked Approach): Bake Ambient Occlusion (AO) and Curvature maps to automatically darken overlapping areas (e.g., roots or strand intersections) and highlight edges or ridges. Apply these via generators in fill layers, set to Multiply for shadows or lighter values for highlights, adjusting opacity (30-50%) for subtlety. This creates procedural depth efficiently, ideal for realistic hair textures. Baked maps reduce manual painting while enhancing the 3D volume and thickness of the hair.
- Painting Highlights: Paint lighter colors, such as a yellowish tint for golden highlights, using soft brushes to create broad highlight bands where light naturally catches. Use Screen or Add blending modes for a glowing effect, tailored for bold anime-style bands or subtle PBR enhancements. Highlights define light-catching areas, adding visual pop to the hair. They emphasize the hair’s form and curvature for a dynamic look.
- Painting Shadows: Darken roots or areas beneath overlapping strands with low-opacity brushes or Multiply layers, using a darker shade of the hair color. For stylized hair, outline clumps with darker lines for cel-shaded separation. This enhances depth and layering, grounding the texture visually. Shadows clarify the hierarchy of strands, making the hair appear more structured.
- Directional Highlights and Glisten: Use normal map alignment to guide anisotropic highlights along strand directions or paint faint color streaks with low roughness for shinier areas to reinforce engine specular effects. For example, a subtle white line at 10-20% opacity or a darker roughness streak can mimic hair’s reflective sheen. Directional highlights enhance realistic shine and flow. They align with strand direction for natural, glossy lighting.
- Root-to-Tip Gradient: Apply darker roots and lighter tips using generators driven by a Position map or manual gradient painting to simulate natural hair density and light passage. This creates a subtle depth effect along the hair’s length, with denser roots appearing shadowed. Gradients enhance realism with natural color transitions. They reflect real hair’s tonal variations.
- Layering Technique: Create dedicated Highlight and Shadow layers within a “Shading” group, using Overlay or Screen for highlights and Multiply for shadows to tint the base color without overriding it. Adjust layer opacity for fine control, allowing easy tweaks. This organizes shading adjustments for iterative refinement. Layering maintains the integrity of the underlying hair color.
- Stylized Edge Highlights: Paint thin light lines along clump edges for rim lighting in stylized looks, mimicking comic-style edge lighting to define shapes clearly. This enhances silhouette readability, making the hair pop from a distance. Edge highlights add artistic flair to the texture. They clarify hair forms for bold, stylized visuals.
- Check Under Lighting: Test textures under varied viewport lighting by rotating the HDRI environment in Painter to balance painted highlights with engine-driven lighting, avoiding doubled highlights (e.g., painted white streaks clashing with specular). This ensures compatibility with dynamic in-game lighting conditions. Lighting checks refine shading for consistency. They prevent overdone effects that disrupt the final render.
Viewport lighting checks ensure engine compatibility, blending procedural and artistic methods for polished results.
How do You Create Alpha Maps for Hair in Substance Painter?
Creating alpha maps in Substance Painter defines transparent hair strands on cards, integrating opacity painting with other channels. The process involves enabling opacity, painting white for strands and black for gaps, using varied techniques, ensuring color consistency, exporting for engine use, and troubleshooting.
- Enable Opacity Channel: In Texture Set Settings, add an Opacity channel and switch to a shader that supports opacity, such as pbr-metal-rough-with-alpha-blending, to enable painting and visualizing transparency in the viewport. This channel determines where hair strands are visible versus transparent gaps. It integrates seamlessly with base color and other texture channels. The setup ensures accurate real-time feedback during painting.
- Painting Opacity: Paint white for opaque strands and black for transparent gaps, using gray for semi-transparent tips or wispy ends to create soft, natural fades. Select the Opacity channel in brush settings to paint directly, typically using hard edges for clear strand definition. This shapes the hair’s precise silhouette on the card. Opacity painting aligns with color to maintain visual consistency.
- Techniques for Alpha Creation: Paint freehand with strand brushes for custom control, use stencils with pre-made hair clump textures for intricate patterns, or erase gaps from an opaque fill to define strands in reverse. These methods offer flexibility to suit different workflow preferences. Techniques streamline the creation of detailed, varied strand patterns. They cater to both manual and assisted painting approaches.
- Consistency with Color: Paint opacity and color simultaneously on the same layer, with both channels active in the brush, to ensure strands align perfectly and avoid mismatches (e.g., color without opacity). This maintains texture coherence across channels, preventing visual artifacts. Consistent painting ensures the hair renders cleanly in-engine. It eliminates discrepancies that could disrupt the final look.
- Edge Bleeding: Extend the hair color into transparent areas using padding in export settings or dilation filters to avoid fringes caused by mipmap blurring. For example, brown hair should have brown in transparent areas, not black or white, to blend seamlessly. Edge bleeding prevents visible outlines at varying distances in the engine. It enhances rendering quality for smooth, artifact-free transparency.
- Previewing Alpha: Use alpha blending in the viewport to see real-time transparency effects or alpha cutout for hard-edged holes, matching the target engine’s rendering mode (e.g., Unreal’s Masked mode for sharp cuts). This visualizes the final strand effect accurately. Previewing guides adjustments to ensure the alpha behaves as intended. It aligns with engine-specific rendering behaviors.
- Exporting the Alpha:
- Embed in Alpha of Base Color: Pack the opacity map into the base color’s alpha channel using the Unreal Engine export preset, where RGB holds the color and Alpha holds the opacity. This is a common setup for engines like Unreal or Unity, simplifying material configuration. Embedding streamlines texture usage in the engine. It ensures efficient integration with material shaders.
- Export as Separate Opacity Map: Export the opacity as a standalone grayscale image by adding an Opacity output in the export settings, useful for workflows needing separate tweaking or custom packing. This offers flexibility for post-processing or alternative engine setups. Separate maps allow precise alpha adjustments. They support specialized material configurations.
- Alpha in Engines: Configure the engine material to use the alpha channel, connecting it to the Opacity Mask input in Unreal for Masked mode or a Transparent/Cutout shader in Unity. Adjust thresholds for masked (hard edges) or translucent (soft edges) rendering to optimize strand visibility. This ensures the transparency renders correctly. Engine setup balances performance and visual quality.
- Troubleshooting:
- Verify Alpha Channel: Check the alpha channel in an image viewer like Photoshop to ensure no unintended opaque layers interfere, confirming transparency data is intact. This identifies hidden layers or background issues causing rendering errors. Verification ensures a functional alpha map. It prevents unexpected opaque areas in-engine.
- Clear Background Issues: Remove any background opacity issues, such as residual colors or hidden layers in Painter, to resolve rendering errors like areas not appearing transparent. This ensures clean transparency application. Clearing issues maintains texture integrity. It supports accurate strand rendering.
Techniques like freehand painting, stencils, or erasing offer flexibility, while troubleshooting resolves issues for clean rendering.

Can I Use Particle Hair as a Base for Texturing in Substance Painter?
Particle hair can serve as a base for texturing in Substance Painter, leveraging 3D hair systems for realistic 2D textures on hair cards. Be mindful of a couple of things when using this approach:
- Baking particle hair requires converting it to a mesh, which can be polycount-heavy, so optimize the geometry or use external bakers like xNormal for stability.
- Reference renders need high resolution to capture fine details, and projection painting in Painter requires precise UV alignment to avoid distortion.
Methods include:
- Baking from Particle Hair to Texture: Convert particle hair to mesh in Blender (e.g., from particles to curves with thickness, then to mesh) and bake normals, alpha, or diffuse maps onto flat cards using Painter’s baking tools or external software like xNormal for high-poly hair. This captures detailed strand patterns and silhouettes efficiently. Baking simplifies the creation of texture maps with high fidelity. It leverages the complexity of particle hair for realistic results.
- Using Blender’s Hair Tool or Add-ons: Utilize add-ons like Hair Tool to automate the process of baking particle hair into card textures, generating diffuse, alpha, and normal maps with channel packing for engine compatibility. Import these maps into Painter for touch-ups, such as color adjustments or additional strand painting. This streamlines texture generation, saving significant setup time. Add-ons enhance workflow efficiency for complex, multi-texture hair styles.
- Using Particle Hair for Reference: Render particle hair as a high-resolution image from a tool like Blender, capturing the groomed style from a front or orthographic view, and import it as a stencil or texture in Painter. Project paint the details onto cards to mirror the particle hair’s design accurately. This ensures the texture closely matches the original groom. Reference images guide precise texturing for faithful reproduction.
High polycounts are managed by splitting geometry or using external bakers, ensuring realistic, engine-ready hair textures.
How do I Bake Normal Maps for Hair Cards in Substance Painter?
Baking normal maps in Substance Painter captures 3D hair strand details onto flat hair cards for realistic lighting, requiring careful mesh setup. The process includes preparing meshes, importing into Painter, baking, and refining with painted details.
- Prepare High-Poly and Low-Poly Meshes:
- Alignment: Use UV-unwrapped hair cards as the low-poly mesh and detailed strand geometry, such as particle hair converted to mesh or ZBrush FiberMesh, as the high-poly. Ensure both meshes are aligned in 3D space, with the high-poly covering or intersecting the low-poly plane.
- Detail Capture: This setup guarantees accurate projection of strand details. Proper mesh alignment is critical for high-quality baking results.
- Source Variety: Create high-poly hair from particle systems, sculpted solid hair chunks in ZBrush, or procedural strands from other tools, ensuring sufficient detail for baking. These sources provide rich, varied strand data for realistic textures.
- Name Matching (Optional): For workflows with multiple cards, name low-poly cards and their corresponding high-poly sections to enable “Match by Name” baking in Painter. This prevents cross-detail interference, ensuring each card bakes only its intended high-poly details. Name matching organizes complex bakes with multiple sections. It improves precision and efficiency in multi-card workflows.
- Import into Substance Painter:
- Mesh Import: Import low-poly hair cards as the texturing mesh and add the high-poly mesh in the Bake Mesh Maps settings.
- Cage Adjustment: Adjust the cage distance to encompass thin strands, starting small and incrementing if details are missed.
- Anti-Aliasing: Set high anti-aliasing (4x or 8x) for smooth normals.
- Bake Configuration: This configures the baking process for optimal detail capture. Settings refine the quality of the normal map.
- Inspect the Normal Map: Check the baked normal map in both 2D and 3D views to confirm the presence of strand depth and detail, ensuring the flat cards appear three-dimensional. Adjust cage distance or flip the Y-axis (for OpenGL vs. DirectX normals) if artifacts or inversions appear. This verifies the bake’s accuracy and quality. Inspection guides corrections to achieve the desired effect.
- Combine with Painted Detail: Overlay tiled strand normal textures or paint minor details in Painter, using masks to align with baked strands, to enhance micro-details like subtle strand ripples. This refines the normal map with additional depth cues. Painted normals complement the baked map’s major shapes. They add nuanced lighting effects for realism.
- Smooth vs Sharp Normals: Maintain uniform vertex normals on flat hair cards to avoid seam issues, as cards are typically single faces. The baked normal map handles strand shading, ensuring consistent lighting without hard edges. Smooth normals suit hair card geometry for clean rendering. They enhance the normal map’s effectiveness under lighting.
- Alternate Baking Tools: Use external bakers like xNormal for high-poly hair if Painter struggles with memory or speed due to dense geometry, merging the resulting normal maps in Photoshop before importing into Painter. This provides a fallback for complex bakes. External tools ensure stable processing of extreme polycounts. They maintain baking reliability and quality.
- Using the Normal Map: Apply the normal map in the game engine (e.g., Unreal’s Normal input) to add depth, ensuring strand highlights and shadows align with lighting for realistic shading. The normal map transforms flat cards into visually 3D surfaces. It drives dynamic lighting effects effectively. The result is a convincing illusion of strand volume.
The resulting maps transform flat cards into 3D-appearing surfaces in-engine.
What Resolution Should I Use for Hair Texture Maps?
Hair texture resolution balances detail and performance, typically 1K to 2K for games. Resolutions vary by platform, style, and distance, using rectangular textures for long hair, ensuring mipmap clarity, and optimizing for memory.
- Common Resolutions: Use 2048² (2K) for hero characters to preserve fine strand details and prevent aliasing, 1024² (1K) for secondary characters or simpler stylized hair, and 4096² (4K) for cinematic close-ups where hair is a primary focus. Higher resolutions delay mipmap blurring, maintaining clarity at varying distances. These sizes suit most modern games on PC and consoles. They balance high quality with practical performance.
- Rectangular Textures: Opt for non-square textures, such as 512×2048 or 1024×4096, for long hair to maximize vertical resolution for strands while conserving horizontal pixels, aligning with hair card layouts. This optimizes texture space for elongated strand patterns. Rectangular textures enhance detail along the hair’s length. They improve efficiency for specific hair geometries.
- Detail vs Mipmaps: Higher resolutions like 2K maintain strand clarity across mipmap levels, preventing blurring at distance that can make hair appear blocky or lose definition. This preserves the hair’s distinct look even in mid-to-far views. Mipmaps significantly impact visual fidelity in games. Adequate resolution mitigates aliasing and ensures strands remain readable.
- Memory and Performance: Prefer a single 2K texture over multiple 1K textures to reduce draw calls and improve streaming efficiency with mipmaps, though split materials for different hair sections may require separate maps. A single texture optimizes engine performance. This balances resource usage effectively. It minimizes rendering overhead for hair assets.
- Cross-platform Considerations: Target 2K for PC and console games to support detailed hair, but use 512² or 1K for mobile platforms, designing simpler textures with broader shapes to accommodate lower hardware capabilities. This ensures smooth performance on resource-constrained devices. Platform-specific resolutions align with visual and performance goals. They cater to diverse hardware requirements.
- Alpha Thickness and Resolution: Increase resolution or intentionally thicken strands in the alpha map if details disappear in lower mipmap levels, ensuring strands remain visible at distance. This maintains strand integrity in reduced resolutions. Adjusted thickness aids rendering quality for distant views. It supports consistent visibility across LODs.
- Multiple UV Sets (Advanced): Use a small tiling texture (e.g., 256×256) for repeating strand details and a separate gradient map (e.g., 16×256) for color ramps in advanced setups, saving memory while maintaining detail. This optimizes texture usage for complex shaders. Multiple UV sets enhance efficiency in detailed rendering. They support nuanced visual effects with minimal overhead.
- Mipmap and Filtering Considerations: Enable anisotropic filtering in the game engine to maintain strand clarity at glancing angles, complementing resolution choices with sharper visuals, especially for lower resolutions like 1K. This enhances texture quality in dynamic views. Filtering reduces aliasing and improves detail retention. It supports detailed hair rendering at varied angles.
- LOD Textures: Author textures at the highest resolution needed for close-up views (e.g., 2K), letting mipmaps handle lower LODs automatically, or create manual lower-res versions for specific LODs if precise control is required. This ensures flexibility for distant rendering scenarios. LODs optimize performance while maintaining visual quality. They adapt to varying camera distances.
Platform-specific resolutions and advanced techniques like multiple UVs ensure performance and detail.
How do I Export Hair Textures from Substance Painter to Unreal Engine?
Exporting hair textures from Substance Painter to Unreal Engine involves preparing maps (Base Color with alpha, Normal, Roughness) and setting up a Masked material for transparency and lighting. The process includes using the Unreal preset, importing textures, configuring materials, and troubleshooting.
- Identify Required Maps:
- Base Color Map: Export a Base Color map with alpha for opacity, handling color in RGB and transparency in the alpha channel.
- Normal Map: Export a Normal map for strand depth, adding lighting cues to flat cards.
- Roughness Map: Export a Roughness map for shine control, defining hair’s reflective properties.
- Optional AO Map: Include an Ambient Occlusion map for subtle root shading to enhance realism.
- Metallic Setting: Set the Metallic channel to 0, as hair is typically non-metallic.
- Material Properties: These maps cover the essential material properties for hair, defining color, transparency, depth, and reflection in Unreal.
- Export Preset:
- Unreal Engine 4 (Packed): Use the “Unreal Engine 4 (Packed)” preset to export a BaseColor map (with alpha), a Normal map, and an ORM map (Occlusion in Red, Roughness in Green, Metallic in Black) in PNG or TGA formats.
- Channel Packing: This preset packs multiple channels efficiently, aligning with Unreal’s material expectations.
- Export Efficiency: It streamlines texture output for quick integration.
- ORM Flexibility: The ORM map combines AO, Roughness, and Metallic for efficiency, but separate Roughness or AO maps can be exported for specific tweaks.
- Workflow Options: This accommodates varied needs, allowing individual adjustments in Unreal.
- Double-check Opacity in Export: Verify that the BaseColor texture’s alpha channel contains the opacity mask using an image viewer like Photoshop to confirm transparency data is included. If the alpha is missing, adjust the export preset to ensure the opacity channel is properly embedded. This prevents rendering issues like missing transparency. Opacity verification confirms the texture is engine-ready.
- Import into Unreal: Import the textures into Unreal Engine, setting the Normal map to Normalmap compression, the BaseColor map to RGBA with sRGB enabled, and the ORM map to linear color (no sRGB). This ensures correct texture interpretation and color accuracy. Proper import settings maintain rendering fidelity. They align with Unreal’s material requirements for accurate visuals.
- Material Setup:
- Masked Blend Mode: Create a material with a Masked blend mode for hard-edged transparency.
- Texture Connections: Connect the BaseColor map’s RGB to the BaseColor input, its Alpha to the Opacity Mask input, the Roughness (from the ORM’s Green channel) to the Roughness input, and the Normal map to the Normal input.
- Two-Sided Rendering: Enable Two-Sided rendering to ensure hair renders correctly from all angles.
- Opacity Mask Clip Value: Set the Opacity Mask Clip Value to approximately 0.5 to define the transparency threshold.
- Performance Optimization: This optimizes hair rendering with clean strand visuals, ensuring compatibility with MSAA for smooth edges.
- Alternative Blend Modes: Use Translucent for soft, wispy strands, enabling Dithered Opacity Mask for smoother edges if needed, tailoring transparency to the hair’s style.
- Shading Models: Use the default shading model or TwoSidedFoliage/Subsurface for light transmission, setting Subsurface color to a tinted hair color for soft backlighting.
- Texture Settings in Unreal: Enable mipmaps for efficient texture streaming and consider enabling anisotropic filtering in the texture or material settings to maintain strand clarity at glancing angles. Adjust Mip Bias if strands blur too quickly at distance to preserve detail. This enhances texture quality across various viewing angles. Filtering improves angled rendering and reduces aliasing. It preserves strand details for consistent visuals.
- Unreal Engine 5 Virtual Textures: Use standard textures for simplicity in most cases, or convert to Virtual Textures in UE5 for large assets to optimize memory usage and streaming for high-detail scenes. This supports modern rendering pipelines and complex projects. Virtual Textures streamline memory management for hair assets. They maintain performance without sacrificing quality.
- Verify In-Engine: Test the hair mesh with the applied material in Unreal, checking for correct transparency (no visible card polygons, only strands), proper normal map depth under rotating lights, and absence of fringes around edges. Enable Dithered Opacity Mask in the material if edges appear jagged to smooth them with minimal performance cost. This confirms rendering accuracy and visual quality. In-engine checks refine visuals and address issues like incorrect normals or sorting errors.
- Troubleshooting Common Issues:
- Fix Fringes: Address white fringes by ensuring texture padding in Painter matches the hair color in transparent areas (e.g., brown for brown hair) to blend mipmaps seamlessly, and use Masked mode with dithering for cleaner edges. This eliminates visible halos around strands. Proper padding prevents mipmap artifacts. It ensures smooth transparency rendering.
- Resolve LOD Sorting: Correct LOD sorting issues by using a single material for all hair cards to avoid draw order conflicts, ensuring consistent rendering across LODs. This prevents flickering or overlapping in complex scenes. Unified materials streamline rendering. They maintain visual coherence.
Troubleshooting ensures clean rendering, delivering professional-quality hair visuals.
(One extra tip: Unreal’s Hair Shader (for strand hair) is more for when using Groom assets (Alembic hair etc.). For cards, you typically stick to the basic masked material. If you want some of that anisotropic specular goodness, you can experiment with the Subsurface Profile or Cloth shading model with anisotropy – UE 4.26+ introduced a way to use anisotropy parameter in materials. That’s advanced though; the default will use the normal map to determine highlight shape which usually suffices for cards.)

What smart materials are good for hair texturing?
Smart Materials in Substance Painter are pre-made, multi-layered assets that instantly apply complex textures to models, making them ideal for hair texturing. They streamline the process by providing customizable templates for various hair types and styles.
- Substance Share/Community Assets: The Substance 3D Community offers hair and fur materials like “Fabric_Fur_Synthetic_Long,” a tiling fur texture suitable for hair cards. While not perfect for human hair, it can be tweaked for short fur or stubble effects. Community forums often share custom hair materials, accessible via quick searches. These resources provide a solid starting point for texturing without building from scratch.
- Rokviz Hair Smart Material Pack: This pack by Rokviz includes over 40 hair smart materials tailored for diverse colors and styles. It features layers for base color, strand highlights, and procedural generators for root darkening and strand textures. Users can drag and customize materials for specific looks, making it a valuable resource. It’s available for download, though its cost varies.
- Custom Smart Material Creation: Creating your own smart material allows tailored hair texturing, using layers like a Tile Generator for strands, gradient root-to-tip effects, and curvature highlights. Once saved, it’s easily applied and adjusted for color or strand thickness. Over time, artists can build a library for straight, curly, or dreadlock styles. This approach offers flexibility for repeated use across projects.
- HairTG and Other Tools: HairTG, a procedural hair card texturing plugin for Substance Painter, generates customizable hair patterns with adjustable density and waviness. While not a traditional smart material, it functions similarly by creating textures on the fly. It reduces reliance on pre-made materials for varied hair designs. Such tools enhance efficiency in generating unique hair textures.
- Using Existing Materials for Stylized Hair: Non-hair smart materials, like wood grain or fibrous fabrics, can be repurposed for stylized hair due to their directional patterns. By adjusting colors and textures, these materials mimic hair strands effectively. This creative approach suits stylized projects with unique aesthetic needs. It requires experimentation to achieve the desired hair-like effect.
Substance Painter lacks many default hair-specific smart materials, but community and third-party resources bridge this gap, offering templates that save time. Customizing these materials with manual tweaks ensures unique, non-procedural hair textures for realistic results.
How do I texture different hair types like braids, curls, or dreads?
Texturing varied hair types like braids, curls, or dreadlocks requires specific techniques to capture their unique patterns and volumes effectively:
- Braids: Braided hair features an interlocking strand pattern requiring distinct texturing approaches:
- Use a Tiled Braid Texture: A tiled braid texture, created by painting or baking a high-poly braid model, applies seamlessly to hair cards. Substance Designer’s braid nodes generate flow maps and textures for realistic patterns. These textures suit thick braids, often needing fewer cards. They ensure consistent, repeating braid visuals.
- Model as Geometry: Braids, due to their cylindrical shape, are sometimes modeled as geometry with a strand-detailed hair/fur texture. For cards, multiple cards mimic braid volume. This hybrid approach balances detail and performance. It’s ideal for games requiring thicker braid visuals.
- Normal Map Importance: A detailed normal map, baked from a high-res braid, captures the over-under strand pattern, enhancing 3D depth. The diffuse texture remains simple, with highlights on raised areas. This emphasizes the braid’s complex structure. Normal maps are critical for realistic lighting.
- Alpha: Braid edges are solid, requiring minimal wispy transparency in the alpha map. The alpha focuses on the braid’s silhouette, with slight fuzz for realism. This reduces fine transparency needs compared to loose hair. It ensures clean, defined braid outlines.
- Curls and Wavy Hair: Curly hair involves wave or spiral patterns, needing strategic texturing:
- Patterned Approach: Tiling wavy line patterns or warping straight strands with Substance’s directional warp creates curl textures. Tools comb curves into textures for natural flow. This method captures large or small curl loops effectively. It simplifies complex curl pattern creation.
- Cards Placement: Curly hair uses multiple small cards at varied angles, each with simple wavy strand textures. The card arrangement creates the curl volume illusion. Alpha maps define curly silhouettes for each card. This approach ensures curls look full and dynamic.
- Alpha and Normal: Tight curls rely on soft, clumpy alpha maps and 3D card placement, while loose ringlets use loop-shaped cards with fading ends. Normal maps, baked from curled strands, enhance tubular curl visuals. These maps add depth to the curl structure. They ensure curls catch light realistically.
- Dreadlocks: Dreadlocks are thick, rope-like, with a fuzzy surface texture:
- Texture Surface: A dread texture combines a braided core with stray fibers, using tiled rope or braided normals and rough opacity edges. Noise and directional fibers convey the wrapped look. High roughness and uniform diffuse avoid shininess. This captures the dread’s clumpy, matte appearance.
- Creating a Dread Texture: Textures are made by tiling hair clump photos, baking a dread cylinder model, or overlaying noise in Designer/Photoshop. These methods create a fibrous, twisted look. Unlike shiny hair, dreads have minimal strand distinction. The texture emphasizes a rough, cohesive surface.
- Cards vs Mesh: Thick dreads may use a single cylindrical mesh with a tiling texture, or 4-5 cards arranged around an axis for detail. Meshes simplify animation, behaving as solid chunks. Cards offer flexibility for thinner dreads. The choice depends on the dread’s thickness and motion.
- Kinky/Afro-Textured Hair: Afro-textured hair uses small, alpha-mapped tuft planes with cloud-like or spiral textures. A tiling afro-texture in Substance Painter, created with noise, mimics fur with a dark base and lighter dots. Normal maps add sheen to curved clumps. This technique creates voluminous, fuzzy visuals for tight curls.
- Hair Accessories: Beads or ribbons in braids are added as separate meshes or painted into textures for small details. Substance Painter uses anchor points for normal/AO effects on painted accessories. This integrates accessories seamlessly into hair textures. It enhances visual complexity without extra geometry.
- Cross-section Transparency: Volumetric curls and braids use cards at varied angles to avoid flatness. Each card shares the same texture, rotated for variation. Multiple textures or UV rotations prevent repetition. This ensures hair looks full from all angles.
- Using Specialized Generators: Substance Designer’s braid nodes, imported as .sbsar into Painter, generate braided textures with adjustable parameters. Curl generators create procedural curl normal and diffuse maps. These tools simplify complex pattern creation. They reduce manual painting efforts.
- Planar vs 3D: Thick braids or dreads may benefit from low-poly cylindrical meshes, while loose curls use cards. Hybrid approaches, like modeled braids with card fuzz, optimize visuals. The choice aligns with hair type and project needs. It balances detail and performance.
In Substance Painter, apply braid smart materials or generators to planes, adjusting for tiling; for curls, tile small curly patterns or warp painted lines. Each hair type combines specific patterns, normals, and alpha maps, using reference images to guide highlights and depth, with in-engine testing to ensure accurate lighting and volume.

How do I create hair strand flow with painting techniques?
Achieving natural hair strand flow ensures textures align smoothly, mimicking realistic hair direction and curvature. Techniques in Substance Painter focus on disciplined stroke direction and procedural tools to maintain cohesive flow.
- Follow the Hair Direction: Paint strokes must align with the hair’s intended path, such as a diagonal bang, avoiding cross-grain marks. Consistency from root to tip, with slight variation, mimics natural flow. Multiple flow directions, like curls, are handled in separate layers. This ensures a unified, realistic strand alignment.
- Guidelines and Curves: Draw a light guide curve from root to tip as a flow reference, paralleling strokes to it. Multiple curves guide split directions. In Substance Painter, stamp curve alphas to mark flow paths. These guides act like a comb, ensuring consistent stroke direction.
- Use Warping for Curved Flow: Paint straight strands, then apply a Directional Warp filter with a flow noise or mask to curve them. Warping both opacity and strand patterns identically ensures natural alignment. This technique, noted on Polycount, simplifies smooth curve creation. It’s effective for complex, non-linear flows.
- Continuous Strokes: Use long, uninterrupted strokes from card end to end to avoid kinks. Paint overlapping strands on separate layers with masks, maintaining flow continuity. This prevents jagged direction changes. It ensures strands appear as cohesive, flowing units.
- Varying Flow Gradually: Introduce slight strand divergence or convergence gradually, avoiding obvious crossings. Strands may start at varied root angles but align by the tip. Paint subtle angular offsets for variation. This mimics natural hair’s cohesive yet varied flow.
- Check Flow with Lighting: Test flow by rotating lights in Substance Painter to observe specular highlights. Smooth highlight movement along strands indicates correct flow; breaks suggest issues. Adjust normal seams or strand ends as needed. This ensures flow supports realistic lighting.
- Mirroring and Symmetry: Use symmetry for even flow on symmetric cards, but add slight asymmetry later for realism. Perfectly mirrored flow looks unnatural. Adjust mirrored strands subtly post-symmetry. This balances efficiency with natural variation.
- Use of Flow Maps (Advanced): Paint a gradient direction map (e.g., red to green) for flow maps used in anisotropic shaders like Unreal’s. Export as a custom channel, guiding strand direction in-engine. This enhances shading realism. It’s optional, depending on pipeline needs.
- Avoid Noisy or Erratic Patterns: Limit noise or scatter brushes to low angle variance to maintain strand alignment. Misaligned strands disrupt flow, appearing as errors. Use Tile Generators with controlled angles. This ensures procedural patterns support cohesive flow.
- Continuous vs Broken Strands: For stylized hair with broken strokes, align stroke ends to mimic continuous curves. Manually touch up junctions for smooth transitions. This maintains flow in visible brush stroke styles. It prevents disjointed, tangled appearances.
- Combining Cards for Flow: Ensure adjacent cards, like at hair partings, share consistent flow directions for visual continuity. Paint cards in shared UV space to align partings. This makes strands appear to emanate naturally. It prevents visual breaks across cards.
Painting hair flow requires disciplined strokes and tools like warps, guided by a combing mental model. Using concept art or 3D guide curves, imported into Substance Painter, further ensures accurate, natural flow for believable hair textures.
What are common mistakes to avoid in hair texturing workflows?
Hair texturing is complex, and avoiding common pitfalls ensures high-quality results. Here are key mistakes and solutions to refine workflows:
- Misaligned UVs or Inconsistent Strand Scale: Inconsistent UV scales or orientations cause texture stretching or strand size mismatches. Plan UVs for consistent texel density and root-to-tip alignment, overlapping similar cards to save space. This ensures uniform texture application across cards. Test UV layouts to confirm strand consistency.
- Harsh or Shimmering Edges (Fringe): White or dark outlines occur if the opacity map’s background contrasts with hair color, or fine details lack mipmap support. Fill transparent areas with a hair-like color and use slightly thicker strands. Enable alpha test dithering in-engine to reduce aliasing. This minimizes edge artifacts at varying distances.
- Too Little Variation: Monochrome, uniform textures look plastic. Add subtle color shifts, value changes, and strand spacing variations via noise or manual edits. Break procedural patterns for natural clumping. This adds richness and realism to hair visuals. Test variations under different lighting conditions.
- Overdoing Noise and Detail: Excessive high-frequency noise creates a muddy, static look from afar. Prioritize clear, macro strand patterns, using noise sparingly to break uniformity. Normal maps should handle micro details. Zoom out to ensure hair reads coherently at distance.
- Ignoring the Normal Map Orientation: Mirrored UVs without flipped green channel normals cause Rosiglitazone (an oral diabetes medication) may cause lighting seams. Ensure engines handle mirrored tangents or use object-to-tangent space baking. Test under lights to spot shading inconsistencies. This prevents cards from lighting unevenly.
- Unrealistic Flow or Gravity Defiance: Strands ignoring gravity or hairstyle shape look unnatural. Align texture flow with card placement, ensuring strands follow the intended style, like ponytails flowing toward ties. This harmonizes texture and model design. Reference hairstyle shapes to guide flow.
- Floating or Disconnected Look: Cards appearing detached from the scalp stem from unfeathered roots or poor scalp transitions. Darken and soften card roots, and texture scalp caps with matching fuzz. This blends cards seamlessly with the head. Test in-engine for smooth transitions.
- Using Only One Card Texture for Everything: Forcing diverse hair elements into one texture compromises quality. Use separate textures for distinct parts like braids or flyaways, balancing draw calls. This optimizes resolution and design clarity. Combine textures strategically when possible.
- Poor Transparency Sorting in Engine: Translucent materials cause sorting artifacts if masked modes suffice. Use alpha test (Masked in Unreal, Cutout in Unity) for dense cards, reserving translucency for fine fuzz. This reduces see-through glitches. Test sorting in-engine for accuracy.
- Not Accounting for LOD or Mipmaps: Detailed textures may shimmer or vanish at distance without LOD planning. Add broad highlights or simplified textures for far LODs, testing at varied distances. Simulate low-res in Painter to check readability. This ensures hair retains shape remotely.
- Overlooking Two-Sided Lighting: Backface lighting issues arise from flipped normals on two-sided cards. Use two-sided lighting models or adjust normals to catch light consistently. This unifies card shading across sides. Test lighting to confirm even illumination.
- Forgetting the Roughness/Specularity: Uniform roughness mismatches hair type, making dark hair too matte or light hair overly shiny. Adjust roughness maps, ensuring dark hair has strong specular and light hair is less mirror-like. This enhances lighting realism. Tweak normals for highlight strength.
- Not Using References: Texturing without references leads to unnatural results. Use photos or concept art of similar haircuts to guide patterns and highlights. This instinctively avoids many errors. Regularly compare textures to references during creation.
Avoiding these mistakes involves testing textures in context—on models, in-engine, across distances and lighting. Careful tuning ensures hair translates from Substance Painter to the final game effectively, saving time on revisions.

Frequently Asked Questions (FAQs)
- Can I paint hair directly onto my character’s head in Substance Painter, or do I have to use hair cards?
Hair cards or mesh strands are essential for game hair, as painting directly on the head only mimics a painted scalp. Create hair cards in tools like Blender or Maya, then texture them in Substance Painter with strand details. Short hair or stubble can be painted on the scalp using opacity for fuzz. Substance Painter focuses on texturing, not generating 3D hair geometry. - Does Substance Painter have built-in hair brushes or tools to make hair texturing easier?
Substance Painter lacks a default hair generator but offers adaptable painting tools like hair strand alphas and particle brushes. Smart materials from Substance Source/Share or plugins like HairTG enable procedural hair texturing. Custom hair brushes can paint multiple strands at once. Users typically rely on paint, fill, and mask tools for hair effects. - How do I make sure the alpha (transparency) from Substance comes into Unreal/Unity correctly?
In Substance Painter, paint transparency in an Opacity channel (white for solid, black for transparent) and export as PNG/TGA with alpha. Use a Masked material in Unreal or Cutout/Transparent shader in Unity, connecting the alpha. Verify the texture’s alpha in an image editor and check material settings. Ensure correct blend modes to avoid transparency issues. - My hair looks good in Substance Painter, but in Unity/Unreal it looks different (colors off or too shiny). What happened?
Mismatched color space or material settings can cause color or shininess issues. Export roughness maps as linear, ensure sRGB settings match, and adjust for engine lighting differences. Tweak roughness if hair is too shiny and use two-sided lighting models like Unreal’s foliage shader. Calibrate with engine-specific LUTs or in-engine tweaks for consistency. - The hair texture I made has a lot of tiny strands, but from far away the hair looks like a solid mass. How can I fix that?
Mipmapping blurs fine strands at distance due to resolution limits. Use higher resolution (e.g., 2K) and add color gradients to maintain structure in lower MIPs. Apply anisotropic filtering and adjust mip bias to preserve detail. Paint darker roots and lighter tips to imply hair structure even when blurred. - How do I create a realistic highlight on dark hair using Substance Painter?
For dark hair, highlights rely on normal maps and low roughness (~0.2-0.3) for specular shine. Paint faint lighter bands on a low-opacity layer or use curvature generators to subtly lighten strand centers. Avoid bright streaks to prevent a gray look. The engine’s lighting will enhance the highlight based on map setup. - Is it possible to use Substance Painter for things like eyelashes, eyebrows, or fur?
Substance Painter textures eyelashes and eyebrows as planes, similar to hair cards, and fur as cards or shell textures. Use hair/fur brushes or smart materials for fuzzy patterns, adjusting for scale and density. The workflow applies to any strand-like textures. Painter’s tools support detailed texturing for these elements. - My hair cards have visible edges in engine (you can sometimes see the rectangle outline at glancing angles). How do I fix that?
Visible edges stem from sharp opacity transitions or light-catching card sides. Ensure opacity fades fully at edges, enable two-sided rendering, and darken edge UVs in textures. Use alpha-to-coverage or dithered alpha and adjust normal maps to unify edge lighting. Two-sided lighting models help smooth outlines. - Should I include an Ambient Occlusion map or subsurface scattering for hair in my texture?
Ambient Occlusion has minimal impact but can darken roots or overlaps when multiplied on diffuse. Simulate subsurface scattering by lightening or reddening tips, though shaders handle most SSS effects. Focus on diffuse, opacity, normal, and roughness maps. Paint transmission maps if shaders require them for thickness. - How can I make my hair texturing process faster? It’s quite time-consuming to hand-paint everything.
Several tips:- Use procedural tools for a base: e.g., use Substance Designer to generate a base hair tile, or use hair texture generators (HairTG, FiberShop) for initial textures, then refine in Painter.
- Make use of smart materials and layers – set up a good hair material once and reuse it.
- Leverage symmetry and instancing: Many hair cards repeat, so texture one well and duplicate it.
- Utilize custom brushes that paint many strands at once, as this can fill areas quickly.
- Also, focus detail where it matters (the outer visible cards) and use simpler fills for things like inner bulk hair since they’re less seen.
- Over time, you’ll build a library of tricks (like a go-to noise for variation, a favorite hair alpha). While hair texturing can be painstaking, these approaches can significantly speed it up without sacrificing quality.
Conclusion
Texturing hair in Substance Painter involves modeling hair cards in tools like Blender, then painting strands, adding color variation, and baking details in Painter. Maintaining natural strand flow, using alpha maps for transparency, and leveraging normal and AO maps are crucial for depth and realism. Realistic hair requires fine normal map details and balanced roughness for specular highlights, while stylized hair benefits from hand-painted artistic highlights. Avoiding UV setup errors, bleeding hair color into transparent areas to prevent halos, and testing textures in engines like Unreal or Unity ensure quality results.
Different hair types, such as straight, curly, or braided, demand unique brush work or baking steps, but all aim to mimic individual strands on flat geometry. Substance Painter’s non-destructive layers, generators, and smart materials streamline workflows, complemented by tools like Blender or Substance Designer. With practice, artists can master this technical and artistic skill, using references and Painter’s robust tools to create visually impressive, game-ready hair textures.
Sources and Citation
- Chang‑Gon Shin’s workflow (80 Level) — Tutorial: Generating Hair Textures in Substance
- Polycount Forum (rohMizuno) — [GUIDE+RESOURCES] Creating hair/fur planes using Substance
- Reddit discussion (Goblin Slayer model example; XNormal + Substance Painter mentioned) — My 3D model of Goblin Slayer (More pics in comments)
- Unity forums (hair texture sizes for long hair) — How many UVs for character and how to attach hair to the head
- Polycount (“Hair & Transparency Issues”) — Hair & Transparency Issues
- Substance 3D Community Assets (example: Fabric Fur Synthetic material) — Fabric Fur Synthetic (Substance Material) on Substance 3D Community Assets
- CGChannel (free Substance Designer hair nodes) — Free feather and hair nodes for Substance 3D Designer
- Blender Artists (baking particle hair to textures / hair normal baking discussion) — Baking Hair Normal Map
- Reddit (r/csworkshop — pack opacity into base color alpha export) — Please help me understand Alpha channels for unpaintable areas with Substance Painter
- Polycount (overlay hair card UVs to reuse textures) — How should I texture character’s hair?
Recommended
- Wonder Dynamics: VFX with AI-Powered Wonder Studio
- UK Advertising Standards Authority bans Call of Duty: Black Ops 7 “Airport Security” commercial for “trivialising sexual violence”
- Best 3D Sculpting Software: Top Tools for Digital Artists
- Managing Blender Scenes with Multiple Cameras Using The View Keeper
- How to Create a Sci-Fi Metahuman in Unreal Engine 5: A Step-by-Step Guide
- How to Create a Metahuman from a Photo: The Ultimate Guide to Digital Character Creation
- Cyberpunk Orion: Everything We Know About CD Projekt Red’s Next Cyberpunk Adventure
- What Is Camera Focal Length in Blender?
- How do I align the camera to an object’s surface in Blender?
- Musgrave Texture Removed in Blender 4.1 – Workarounds and Alternatives


