


Blender’s Grease Pencil opens up a world of possibilities for animating 2D illustrations, allowing artists to bring Vocaloid characters and J-Pop inspired anime figures to life. In this comprehensive guide, we’ll explore step-by-step workflows, best practices, and creative techniques for animate 2D illustration using Blender. Whether you’re aiming for real-time puppeteering or polished offline renders for music videos, this guide covers everything you need to animate anime-style 2D characters in a J-Pop context. Let’s dive in!
How to Animate 2D Illustrations in Blender Using Grease Pencil

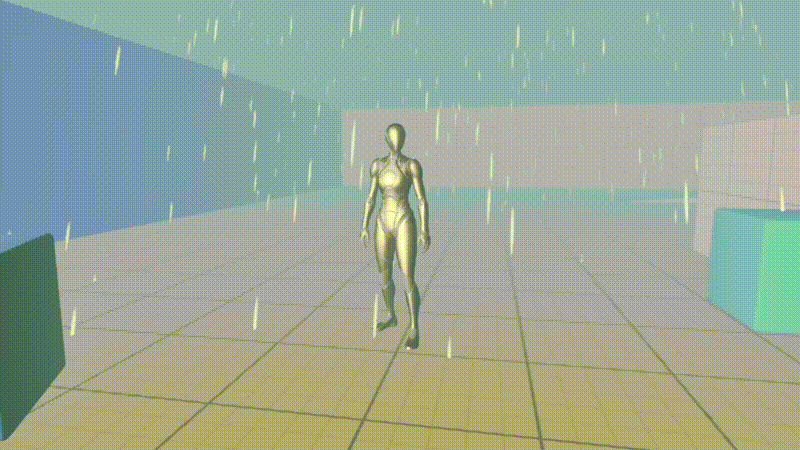
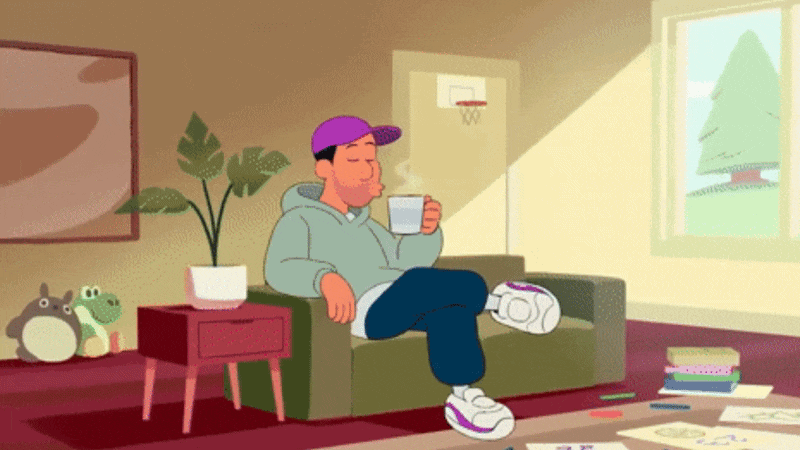
Blender’s Grease Pencil is a powerful toolset for 2D animation integrated into the 3D software, enabling artists to draw and animate directly within the 3D viewport for seamless blending of 2D and 3D elements. To begin, open Blender and select the 2D Animation template, which automatically sets up a Grease Pencil object and a flat lighting environment tailored for 2D work. This object supports creating traditional frame-by-frame drawings, cut-out style rigs, and motion graphics. Key features include layers to organize strokes, onion skinning to view previous and following frames for reference, and the ability to parent Grease Pencil drawings to 3D objects for hybrid visual effects. You can import existing 2D illustrations, such as characters drawn in Clip Studio or on paper, to use as references or convert them into editable Grease Pencil strokes using the Trace Image to Grease Pencil tool. For optimal results, convert the source image to black-and-white with moderate resolution to avoid overly dense strokes, and adjust settings like stroke thickness and resolution to capture the desired level of detail.
Once a character is created or traced as a Grease Pencil object, animation begins by setting keyframes on Blender’s timeline, where each keyframe stores a drawing or multiple layered drawings at specific frames. By default, a Grease Pencil drawing remains visible until a new drawing is introduced on a later frame, simplifying pose-to-pose animation workflows. Onion skinning displays faint outlines of previous and next drawings, helping artists create smooth in-between frames and maintain consistent motion. For basic movements like a character blinking or waving, draw key poses on separate frames and use the Interpolate tool to generate in-between frames by morphing strokes, though complex motions may require manual refinements. The Build modifier can animate strokes to appear or disappear, ideal for effects like a drawing being written. Organize artwork into layers, such as for line art, fills, or body parts, and leverage onion skinning and interpolation to produce fluid traditional animation suitable for hand-drawn films, cut-out animations, and storyboards.
Creating Anime-Style 2D Characters in Blender for J-Pop Projects
Blender’s Grease Pencil enables designing anime-style J-Pop or Vocaloid characters with vibrant colors and bold outlines. You can draw directly in Blender or import sketches from programs like Krita, then use Grease Pencil to ink and color, preserving the hand-drawn anime look. Characters should be structured in layers (e.g., arms, head, torso) for animation, with Grease Pencil’s layers supporting opacity and blending. Line art sits on top, with fill colors below, and the Materials system ensures consistent stroke and fill colors like skin or hair.
J-Pop characters need bright, cute, striking designs with bold accessories, using neon highlights or Grease Pencil’s Glow effect for effects like LED trims. Disable “Use Lights” in Grease Pencil for flat, anime-style colors unaffected by 3D lighting. Import layered PSD/PNGs as planes for rigging or convert inked drawings to SVG in Inkscape for vectorized Grease Pencil strokes. Blender’s Trace Image tool can convert bitmaps to strokes, requiring cleanup. Plan for animation with separated parts and consistent linework, capturing the Vocaloid pop idol vibe.
Step-by-Step Guide to Animating Vocaloid Characters in Blender
Let’s walk through a practical example workflow: animating a simple Vocaloid character (imagine a chibi version of a singer) in Blender using 2D techniques. This step-by-step guide covers both the setup and the animation process.
- Step 1: Initial Setup – Start by using File → New → 2D Animation to get a Grease Pencil-friendly startup. Import or draw your Vocaloid character illustration as described earlier. If you have a layered image of the character (for example, separated into body parts), you can import each part onto a Grease Pencil layer or as reference images. Alternatively, use Trace Image to Grease Pencil for a quick conversion of a clean line art drawing to strokes. After import, organize the Grease Pencil layers (e.g., head, hair, torso, arms, legs). Proper layer naming will help keep track of parts when animating.
- Step 2: Rigging (Optional) – For complex 2D character animations like dance moves, rig Grease Pencil objects with bones using an Armature modifier. Add an Armature to the scene, create bones for limbs and torso, and bind stroke points to bones via vertex groups (e.g., arm strokes to an “Arm” vertex group controlled by an “Arm” bone). This allows smooth limb movement without redrawing each frame. Use Weight Paint mode to adjust stroke-bone assignments. For simple animations, skip rigging and animate by redrawing or moving layers manually.
- Step 3: Key Poses – To block out main poses for a 2D animation, such as a music video scene, decide the character’s actions (e.g., a pose on a lyric or dance step on a beat). In Draw Mode, draw the first pose at frame 1 (or use an existing drawing). At a later frame (e.g., frame 10), enable Auto Keyframe for Grease Pencil and adjust the character to the next key pose—rotate bones for a rigged character or sketch a new drawing for a hand-drawn approach. Blender will insert a Grease Pencil keyframe with the changes. Repeat for all main poses and play back to review the pose-to-pose sequence.
- Step 4: In-betweens and Timing – To refine a 2D animation, adjust timing in the Dope Sheet (Grease Pencil mode) by sliding keyframes to match the music’s pacing. Add in-betweens on frames between key poses by copying and modifying strokes, drawing from scratch, or using the Interpolate tool to generate and tweak in-between strokes for minor movements like hair or eyes. Enable onion skinning to maintain consistent volumes and arcs.
- Step 5: Facial Animation & Lip-sync – To animate a Vocaloid character’s face, use separate layers for expressions. For lip-sync, draw a set of mouth shapes (e.g., open, closed, wide) on a mouth layer and use the Grease Pencil Time Offset modifier in Fixed Frame mode to switch between them by animating the Frame value, reusing drawings efficiently. Alternatively, draw mouths frame-by-frame, using the audio waveform to match syllables. For eye blinks, draw closed eyes on specific frames or use a duplicate eye object to hide/show. Reuse limited facial drawings with strategic timing for an anime-style effect.
- Step 6: Secondary Motion – To enhance organic motion in a 2D animation, incorporate follow-through and overlapping action. For example, animate long twin-tails (e.g., Hatsune Miku style) to swing a few frames after the body moves by hand-drawing delayed motion or using Grease Pencil Delay or Smooth modifiers on the hair layer. Apply a Noise modifier with low strength to layers like hair or clothing, animating its influence for subtle, randomized swaying to mimic natural movement.
- Step 7: Preview and Refine – To review a 2D animation, use Material Preview or Rendered viewport shading (Eevee) to check final colors and effects. Scrub or play the timeline, adjusting easing in the Graph Editor by setting keyframes to Bezier for smooth motion, unless a snappy effect is needed. Tweak F-curves for bone rotations/transforms if rigged, or adjust layer opacity and object movement. Fix off-model drawings in Grease Pencil Sculpt mode using Smooth or Grab tools to correct stroke volumes without redrawing.
- Step 8: Incorporate Music (Sync) – For a Vocaloid/J-Pop animation, sync to music by importing the audio track (e.g., WAV) into Blender’s Video Sequencer or Timeline. View the waveform in the Video Sequencer, enable AV-sync, and mark key beats or lyrics with markers (press M). Align animation to markers, retiming keyframes to match beats or emotional cues. For precise lip-sync, zoom into the waveform to time syllables manually, as Blender lacks automatic lip-sync.
- Step 9: Final Touches – Add background elements or any additional visual effects layers (like glow, particles, etc., discussed further on). Ensure the scene’s camera is set up (for 2D animation, an orthographic camera is often used to avoid perspective distortion on flat art). Do a test render of a few frames or a viewport playblast to check the final look. Iterate on any areas that feel choppy or off-tempo.
Following these steps, you’ll have an animated Vocaloid character ready for prime time. This workflow balances traditional hand-drawn animation techniques with Blender’s digital conveniences (like rigging and modifiers). Next, we will discuss best practices and tips that can further improve your 2D character animation process.

Best Practices for 2D Character Animation in Blender
Creating a polished 2D animation in Blender requires not just the right tools but also solid animation principles and workflow habits. Here are some best practices to keep your project running smoothly and your animation looking its best:
- Plan and Reference: Even though you’re animating digitally, treat it like traditional animation. Plan out your key poses (thumbnails or storyboards) before diving in. Use reference footage or images for complex motions. For instance, if your character is dancing, watch dance clips or record yourself for reference. In Blender, you can load a reference video in the background of the camera view, helping you trace or match poses frame by frame (a form of rotoscoping).
- Layer Organization: Keep your Grease Pencil layers well-organized and locked when not editing them. Name layers descriptively (e.g., “Hair_back”, “Eye_left”, “Mouth”) so you don’t accidentally draw on the wrong layer. Grease Pencil allows you to lock layers to prevent editing them; use this to your advantage. Also utilize layer grouping via collections if your character comprises multiple GP objects (though usually one GP object with many layers suffices for a single character).
- Onion Skin and Ghosts: Always leverage onion skinning while animating frame-by-frame. Adjust the onion skin range (number of frames before/after) as needed – sometimes seeing two frames back and forward is enough to judge motion arcs. You can also customize onion skin colors for different layers if that helps clarity (Blender lets you set custom onion skin tint per layer, which is useful if, say, you want to see the previous pose of just the character’s arm in a distinct color).
- Smooth Interpolation vs Hand-drawn Feel: For the animation style in Blender, I suggest ultra-smooth motion on ones to match the cinematic, high-energy vibe of GTA 6’s Jason and Lucia story, ensuring fluid action and emotional nuance. To save effort, animate on twos and use motion blur in renders to smooth transitions without drawing every frame. Start with Constant interpolation for keyframes to block out a stepped feel, especially for Grease Pencil objects or bones, then refine with Bezier curves for polished ease-ins and ease-outs. This balances efficiency and a premium, immersive look for the narrative.
- Use of Grease Pencil Modifiers: Blender offers a range of Grease Pencil modifiers that can non-destructively alter your drawings over time. A few key ones to explore:
- Simplify: Reduces detail of strokes for performance or stylistic effect.
- Smooth: Smooths the stroke shapes over time – can be used subtly to even out jitter in hand-drawn lines across frames.
- Time Offset: As discussed, allows reuse of drawings (looping cycles or switching pieces) which is great for repetitive motions like a walk cycle or blinking loop.
- Build: Animates strokes appearing in the order they were drawn, useful for “drawing-on” effects (like writing text or animating a signature or fancy swirls).
Use modifiers to save labor but don’t over-rely on them to replace fundamental frame drawing where needed. For example, a Noise modifier can jiggle your strokes randomly for a wiggly line effect (simulating boiling lines often seen in hand-drawn animation), but keyframing a few drawn variations yourself might look more intentional.
- Rigging and Meshes for 2D: If you rig your 2D character with bones, follow rigging best practices. Ensure your bone hierarchy is logical (e.g., arms parented to torso, etc.) so posing is intuitive. Use IK (Inverse Kinematics) on legs if doing a walking sequence to keep feet planted easily. Also, consider using deformers like Lattice or Mesh Deform modifiers on Grease Pencil via the armature: you could parent a GP stroke to a lattice and animate the lattice for squash-and-stretch effects. These are advanced techniques but can yield very smooth deformations that hand-drawing each frame would make tedious.
- Markers and Scene Management: When syncing to music or a storyboard, use timeline markers as guideposts (e.g., mark “Verse 1 start”, “Chorus hit pose”, etc.). They show up in all animation timelines and help you plan transitions. Additionally, if your project is long or complex, break it into scenes. In Blender you can organize different shots in different scenes or blend files and later combine them in video editing. This prevents one file from getting too unwieldy.
- Playback Performance: Heavy Grease Pencil scenes can slow down (due to many strokes or high-res strokes). For better viewport FPS, you can:
- Switch to Workbench engine for viewport while animating (flat shading).
- Disable anti-aliasing and any post-processing on Grease Pencil in viewport options to speed up drawing refresh.
- Hide layers that you aren’t working on currently.
- Enable Only On Keyframe Onion Skin (so it’s less to draw).
These measures help maintain a responsive workflow. (Grease Pencil performance has improved over Blender versions, but complex scenes still benefit from optimization.)
- Save Versions Frequently: This is more project management, but worth noting: as you animate, save incremental versions (project_v1.blend, project_v2.blend, etc.). It’s easy to make a mistake or want to rollback a big change in animation; having versions helps. Blender’s auto-save and File → Recover options are also a safety net.
By following these best practices, you’ll reduce technical hiccups and ensure your creative process stays front and center. Good planning, organization, and clever use of Blender’s features will make animating your J-Pop anime character more efficient and enjoyable. Next, we’ll focus specifically on Grease Pencil’s capabilities for anime-style art, including how to leverage it to achieve that authentic look.
Using Blender’s Grease Pencil for Anime-Style Animations

Blender’s Grease Pencil is uniquely well-suited for anime-style animation because it lets you draw in a 3D space but with a 2D result, merging the best of both worlds. Here’s how you can harness Grease Pencil’s features to create animations that look like they came straight out of a 2D anime studio, while also taking advantage of Blender’s 3D environment where appropriate.
- Traditional Anime Workflow in Grease Pencil: For a GTA 6-inspired Blender animation, use Grease Pencil as a digital pencil and paper, hand-drawing keyframes and in-betweens. Vector strokes ensure crisp, editable lines at any resolution (tweak points in Edit Mode). Sketch roughs in one color, trace clean line art on a new layer, and hide/delete roughs, mimicking traditional cleanup with infinite zoom/pan and unlimited undos.
- Consistent Line Work: Achieve clean, anime-style outlines for Vice City’s vibrant aesthetic with consistent line weight. Use Screen Space stroke thickness for uniform pixel width across camera distances, preventing zoom-induced thickening. Set fixed stroke thickness for characters, adding subtle pressure-sensitive variations for effects (e.g., Lucia’s dynamic poses, Jason’s intense actions) to support the narrative’s emotional and action-driven tone.
- Combining 2D Characters with 3D Environments: Integrate 2D Grease Pencil characters (Jason, Lucia) into 3D scenes for a dynamic Vice City vibe. Employ a dynamic camera (e.g., forward trucking) for parallax, layering 2D drawings at different depths (foreground, midground, background). Use 3D props, lights, or particles, with the Line Art modifier to outline 3D objects (e.g., cityscape) in Grease Pencil style, blending 2D animation with 3D depth for vibrant, narrative-driven energy.
- Anime Coloring and Shading: Create anime-style visuals with flat colors and sharp shadows. Draw flat colors on a character layer (or with line art fills) and add a Multiply blend mode “shadow” layer with grey/shadow color shapes for editable vector shadows. Alternatively, paint shadows into fills, using Tint/Colorize for global shifts, though manual painting is more precise. Disable “Use Lights” for flat character aesthetics, enabling it for special effects layers with glow or shading, as 3D lighting is rare in anime.
- Effects for Anime Style: Anime often has stylized effects: speed lines, impact flashes, glittering stars around an idol, etc. Grease Pencil can generate many of these:
- Speed lines: Draw one and use the Array Modifier and Tilt to repeat strokes into a burst. Or draw a bunch of lines manually on a frame.
- Focus lines (radial lines): You can draw them or use a particle system of line objects in 3D and then use Line Art modifier to get their outlines.
- Glowing elements: Use the Glow visual effect on a GP object to make it bloom. For example, if your character holds a glowing microphone or a magic item, draw it on a separate GP object and add the Glow effect. You can adjust threshold and strength to get a nice bloom.
- Camera shakes or quick zooms: Because you’re in Blender, you can animate the camera for dramatic effect (like a quick zoom-in with a slight rotation to emulate that anime intense close-up shot). Use motion blur in Eevee to accentuate these fast moves.
Factual Methods: Standard Grease Pencil techniques for anime-style GTA 6-inspired animation in Blender include drawing, layering, and using modifiers like Line Art. These are proven methods for creating cohesive 2D/3D visuals.
Experimental Techniques: Speculative approaches involve untested methods like using Geometry Nodes with Grease Pencil for effects or future Grease Pencil v3 features for 2D/3D interpolation. These require deep Blender node system knowledge and are not standard.
Most anime-style effects can be achieved with existing tools, leveraging Blender’s camera work and integration for a hand-drawn look. Artists have created short films indistinguishable from traditional animation using these methods. For Vocaloid-themed projects, this approach supports unique 2D/3D character visuals. Next: importing and rigging Vocaloid character illustrations for cut-out or puppet-style animation.
Importing and Rigging Vocaloid Character Illustrations in Blender
If you have a pre-existing illustration of a Vocaloid or J-Pop character (perhaps provided by a character designer or drawn in another software), you’ll want to import and possibly rig it for animation. There are a couple of distinct workflows here: cut-out style animation using images, or converting the illustration into a Grease Pencil object for a more drawn approach. Let’s explore both.
Importing as Images (Cut-Out Method): In cut-out animation (think along the lines of anime motion comics or tools like Live2D), the character’s parts are separate images that you animate like puppets. To do this in Blender:
- Slice your character artwork into pieces (head, forearms, hands, biceps, torso, thighs, calves, feet, hair sections, eyes, mouth, etc.) using an image editing program. Make sure each part has a transparent background.
- Enable the add-on Import Images as Planes (built into Blender). Use it to import all these parts. Each part will come in as a flat mesh plane with the image texture applied.
- Position the parts together to reconstruct the full character in Blender’s 3D view (you might import them all at once and they maintain their relative positions if the source images share alignment).
- Now, add an Armature and create bones for each part. Parent each image plane to the appropriate bone (either with automatic weights or simply by object parent if you want no mesh deformation). Since each limb piece is distinct, you can often just parent the whole object to a bone (e.g., parent the forearm image to a forearm bone).
- This gives you a 2D puppet: rotating a bone moves the image part. With careful layering (e.g., ensure the “front arm” image renders in front of the torso, etc., by adjusting each plane’s Z position or using collections), you can animate as if it’s a drawn character. You might need to slightly bend joint areas – one trick is to overlap pieces (hide the cut) or use a mesh deform if bending is needed (for example, if an image of a limb needs to bend, you could rig it with multiple bones and allow some mesh deformation, but that gets into hybrid techniques).
This image-based method is great for real-time use as well, such as in game engines or live performance avatars, because it’s essentially using textured polygons (lightweight for engines). It’s analogous to how some Vocaloid concert animations or rhythm games use animated sprites. Blender can animate these in real-time in the viewport (Eevee) smoothly, and you can even export the rigged planes to other software if needed (via FBX or glTF, if you ever wanted to use the animation in a game engine).
- Pros: Maintains the exact look of the original illustration, fairly quick to set up for simple motions.
- Cons: Movements can look stiff if not enough pieces (no bending in the middle of a piece without distortion), and extremities like hair or clothing still need lots of parts or separate animations for fluidity.
- Importing as Grease Pencil Strokes: To animate Vocaloid character illustrations in Blender for a GTA 6-inspired project, convert illustrations to Grease Pencil for deformable strokes. Import vector (SVG) files via File → Import → SVG and convert to Grease Pencil using Object → Convert to → Grease Pencil. For bitmap images, use Trace Image to Grease Pencil, tracing parts (e.g., arm) separately for layer separation. Rig strokes by weight painting to an armature, assigning weights to stroke points (e.g., upper arm to upper arm bone, lower arm to lower arm bone, with a gradient for smooth bending). The Grease Pencil Armature modifier binds points to bones using vertex groups for joint-like deformation.
This approach effectively gives you a bone-deformable vector drawing. It is a bit finicky to weight paint stroke points (they’re sparse compared to a mesh), but for relatively simple shapes it works. An upside is that the strokes will interpolate bending more smoothly than a single rigid image piece. Also, you can still draw new frames on top of this if needed – e.g., if a certain pose doesn’t look perfect with pure deformation, you could add a correction draw.
- COA Tools Add-on: The Cut-Out Animation Tools (COA Tools) add-on enhances 2D cut-out animation in Blender, ideal for a GTA 6-inspired Vocaloid project. It offers a streamlined UI for importing 2D character parts, arranging bones, and attaching images, mimicking workflows of Spine or Live2D. Features include sprite switching (e.g., for hands or mouth shapes), making it efficient for frequent 2D animations. As a maintained open-source community tool, it provides a robust, Spriter-like workflow.
- Rigging Tips: For rigging a 2D Vocaloid character, position bone pivots accurately (e.g., elbow joint for elbow bone). Apply IK constraints for legs and copy rotation for symmetrical parts like twintails. For facial animation, skip bones and toggle visibility of pre-drawn mouth images (via keyframing or Time Offset modifier for Grease Pencil) or use shape keys for image-plane faces. This ensures precise, efficient animation tailored to the vibrant, dynamic style.
- Testing the Rig: After rigging, do a quick test animation (you can just wiggle limbs or do a quick walk cycle) to ensure everything moves correctly and the parts layer properly (e.g., the arm doesn’t suddenly appear behind the body when it should be in front). Adjust bone layer ordering or object draw order if needed (Grease Pencil has a Stacking order for layers; image planes have to be positioned in 3D space slightly offset on the Z axis to layer in render).
By importing and rigging your Vocaloid character illustration, you transform static art into an animation-ready puppet. This is particularly useful for live performances or interactive applications, where real-time control is needed. But it’s equally valid for making music videos when you want to preserve the original art style exactly. Many official Vocaloid music videos mix still illustrations with subtle animations – using these rigging methods, you can achieve those subtle movements (like flowing hair or bouncing motions) on your character’s art.
Next, let’s discuss specific tips for achieving a J-Pop aesthetic in your animations – beyond just the character, focusing on the overall style and vibe.
Tips for Achieving J-Pop Aesthetics in 2D Animations with Blender
J-Pop and Vocaloid music videos are known for their energetic, colorful, and sometimes whimsical visuals. To capture that aesthetic in your Blender animations, consider the following tips:
- Vibrant Color Palettes: For a GTA 6-inspired J-Pop Blender animation, use bright, saturated neon or candy-toned colors for characters and backgrounds to match the high-energy vibe. Set color management to Standard (instead of Filmic) for accurate color vibrancy. Apply Grease Pencil Glow effects to elements like stars, musical notes, or accessories (e.g., glowsticks) to enhance the concert feel with emissive pops.
- Dynamic Camera Motion and Cuts: Create rapid, music-synced camera cuts or movements. Animate camera zooms, shakes, or FOV changes on beat, using timeline markers for alignment. For example, on a beat drop, keyframe a quick camera zoom with slight rotation shake, leveraging Blender’s 3D space for dynamic moves traditional 2D animation simulates.
- 2D Motion Graphics Elements: Add music video flair with animated Grease Pencil motion graphics like floating musical notes, lyric text, or pulsating shapes. Draw doodles (e.g., hearts, exclamation marks) and animate with keyframes or modifiers like Wave for wobbling effects, enhancing viewer engagement.
- Use of Particles for Effects: Use Blender’s particle system for 2D-style background effects like confetti showers. Emit colored planes or custom star shapes, rendering them as flat 2D elements or converting to Grease Pencil via Line Art for outlines. Alternatively, manually animate confetti in Grease Pencil, duplicating shapes with Time Offset for randomized patterns.
- Synchronized Lighting and Effects: Sync lighting to music with animated color overlays or Compositor stage lighting. Keyframe colored fill layer opacity to blink on beat or use 3D lights with “Use Lights” enabled on Grease Pencil layers for hue shifts. Bake Sound to F-Curves to drive effects like glow intensity or background scaling with music’s waveform (e.g., bass frequencies) for automated bouncing.
- Kinetic Typography: For lyrics or emphasis words, use Grease Pencil for handwritten/stylized text or convert Blender Text objects to GP strokes for cartoon styling. Animate text with effects like scaling letters or using the Build modifier for write-on effects, fitting J-Pop’s aesthetic for key song phrases.
- Costume and Scene Changes: Simulate outfit or stage changes with palette swaps or layer toggles. Keyframe Grease Pencil material colors for costume shifts (e.g., new color scheme in second chorus) or add overlay effects like monochrome filters or patterned backgrounds using Scene strips or material animations.
- Incorporate 3D Elements in 2D Style: Blend 3D elements (e.g., rotating stage, 3D instruments) with 2D characters by applying the Line Art modifier to 3D props, rendering them in Grease Pencil outline style. This creates a cohesive anime look with smooth 3D motion for complex elements like mechanical objects or crowds, enhancing scene depth.
Remember, the key to J-Pop aesthetic is energy and style. Keep things moving, sync visual changes to the rhythm, and use bright visuals that enhance the music’s mood. Test your animation by playing it with the soundtrack frequently – does it feel as exciting as the song? If not, amp up the visuals! Maybe add a quick cut or a flash of color here and there.
Next, we’ll address how to make those 2D character movements especially smooth and appealing, focusing on the animation principles and Blender techniques to avoid choppy motion.

How to Create Smooth 2D Character Movements in Blender
Smooth motion in animation comes from careful timing, spacing, and sometimes a bit of interpolation magic. In Blender, achieving smooth 2D character movements can be done through a combination of traditional frame-by-frame finesse and digital tools to aid interpolation.
- High Frame Rate or Appropriate Timing: First, decide on your frame rate. Many anime-style animations are done at 24 fps with actions on 2s or 3s (holding each drawing for 2 or 3 frames). If you want buttery smooth motion, you might animate on 1s at 24 or 30 fps. Blender will let you animate at any frame rate; 24 fps is a cinematic standard, 30 fps matches video, and 60 fps could be used if you intend to slow down or have ultra-smooth segments (though drawing 60 unique frames per second is a lot of work!). Ensure your scene’s frame rate (Render Properties) is set before you animate, to avoid timing issues later.
- Bezier Interpolation for Rigged Motion: For animating Vocaloid characters in a GTA 6-inspired Blender project using bones or object transforms (e.g., moving Grease Pencil objects), use Blender’s F-Curve interpolation for smooth motion. Default Bezier curves ease in and out between keyframes, smoothing pose transitions. Adjust Bezier handles in the Graph Editor for precise control, like slow-to-fast arm bone rotations. Use Graph Editor modifiers like Cycles for seamless looping (e.g., bouncing) or Noise for subtle randomness to avoid mechanical motion. For character animation, hand-tweak major poses and use interpolation to assist with subtle in-betweening.
- Motion Paths and Arcs: Smooth motion often comes down to nice arcs in animation. In Blender, you can use Motion Paths (available for armatures bones or objects) to visualize the trajectory of movement. For example, if you animate a hand bone, you can enable a motion path to see the arc it travels. If it looks erratic, adjust your poses. Make sure your character’s limbs move in arcs, not straight lines, unless a straight line is intended (like a robotic move).
- Grease Pencil Interpolate Tool: As mentioned earlier, the Grease Pencil Interpolate tool can generate an in-between drawing between two keyframe drawings. Use this when you have two drawings that are similar in structure but just slightly moved (like an arm raised and arm lowered). The tool will create a new breakdown pose that you can further tweak. This is essentially “tweening” for drawn frames. Keep in mind it works best for small differences; large changes might result in odd morphing. Still, it’s a unique feature that can save time and yield smoother transitions if used judiciously.
- Motion Blur: For a GTA 6-inspired Blender animation, enhance fast movements with motion blur in Eevee’s renderer to smooth transitions, like a hand swipe, by interpolating in-between frames. In 2D anime style, manually draw smear frames (e.g., elongated limbs) as stretched shapes on a single frame to mimic motion blur for fast moves. Alternatively, rely on Eevee’s motion blur for automatic smoothing, depending on the final video render output.
- Consistent Volumes: Sometimes animation looks jerky not because of timing, but because the character’s proportions fluctuate unintentionally. Ensure consistency by flipping between frames (Blender has shortcuts to jump to prev/next keyframe; you can assign a shortcut to flip like a traditional light table). Use the Sculpt tools to nudge any off-size parts into place. Maintaining consistent volume gives the illusion of smoothness because the viewer isn’t distracted by a head that suddenly grows or shrinks.
- Easing and Overlap: For a GTA 6-inspired Blender animation, use ease-in and ease-out for natural motion, starting and ending poses slowly unless a snappy effect is desired. Leverage Blender’s interpolation for easing, but manually adjust holds and acceleration. For example, when raising an arm, place frames closer at the start (slow), farther apart in the middle (fast), and closer at the end (slow). Focus on quality timing and spacing rather than frame count for smoother results.
- Secondary Motions and Follow-through: Enhance realism by adding follow-through for hair or clothing, continuing their motion briefly after the character stops. On a separate Grease Pencil layer, delay hair keyframes by a few frames relative to head movement or animate a slight overshoot with settling. Use the Time Offset modifier’s Delay for layer offsets, though manually tweaking keyframes in the Dope Sheet is often easier for precise, natural motion.
- High-Quality Tweens vs. More Frames: Sometimes, animators fall into the trap of thinking “more frames = smoother.” Instead, focus on the quality of your key poses and breakdowns. A well-placed breakdown can make a huge difference. If an action still looks jerky, consider if an additional passing pose or breakdown drawing would clarify the arc or spacing, rather than blindly adding frames. Each added drawing should have a purpose (change in direction, follow arc, settle something).
- Test at Full Speed Often: Play back your animation at the intended frame rate frequently. What feels smooth when scrubbing slowly might reveal hiccups at real-time. Blender’s viewport preview is your friend. If your machine struggles, do OpenGL render (Viewport Render) of the animation and watch it. Identify any pops or stutters and address them in the timeline by adjusting keys or adding frames.
By combining these traditional techniques with Blender’s tools, you can achieve impressively smooth 2D animations. Many animators have created works in Blender that viewers assumed were hand-drawn frame-by-frame, not realizing some computer assistance was involved. It’s all about integrating the software’s interpolation smartly with your own artistry.
Now that our character is moving smoothly, let’s ensure their expressions are just as dynamic – we’ll move on to animating facial expressions for our anime characters.

Animating Facial Expressions for Anime Characters in Blender
Facial expressions and lip-sync bring life to Vocaloid and anime characters, making them feel truly connected to the music or scene. In Blender, you have multiple ways to animate faces on a 2D character:
- Frame-by-Frame Drawn Expressions: For 2D animation, the most effective method is drawing facial expressions on separate Grease Pencil layers for mouth, eyes, brows, etc., redrawing them for each expression change. For instance, transitioning from happy singing to surprised involves drawing big round eyes and a wide-open mouth on the respective layers. Anime-style “symbol” expressions (e.g., ^^ for happy, T_T for crying) can be directly drawn. Onion skinning ensures face alignment between frames.
- Reusable Library of Mouth/Eye Shapes: For a GTA 6-inspired Vocaloid animation in Blender, create a Grease Pencil layer with a library of simplified anime mouth shapes (e.g., closed, half-open, open, smiling) and eye expressions (e.g., neutral, closed/blink, excited, sad). Use the Time Offset modifier in Fixed Frame mode to select shapes by frame, streamlining lip-sync and expression animation without redrawing.
- Shape Keys (for Mesh-based Faces): Shape keys can morph facial features for image-plane or mesh-based faces (e.g., distorting a mouth image), useful for cut-out styles or lattice deformers for squash/stretch. Less relevant for pure Grease Pencil 2D characters, where drawing is standard.
- Synchronizing with Audio: Sync lip movements by scrubbing audio and adding Grease Pencil keyframes on the mouth layer for syllable changes, using pre-drawn shapes or new drawings. Simple open/closed flaps suffice, with optional vowel shapes (e.g., “O”) for detail. Align mouth rhythmically with lyrics and animate eyes/eyebrows to reflect song emotions (e.g., raised eyebrows for high notes), guided by narrative.
- Blinking and Eye Movement: Add blinks every few seconds (a few frames of closed eyes) for lifelike characters, inserting at expression changes or intervals. Include subtle eye shifts or winks for front-facing singers, drawing new pupil positions or shapes on the Grease Pencil layer as needed.
- Exaggeration and Anime Tropes: Use anime-style expressions like sweat drops, vein pops, or sparkly eyes on temporary Grease Pencil layers for brief effects (e.g., a sweat drop for stress). Add or remove these “emote” layers mid-animation for flexibility.
- Maintain Character Consistency: Adjust facial features for rotations or perspective changes (e.g., profile mouth for side views) using a model sheet or a simple 3D head model as a reference. Place reference drawings in the scene for angle accuracy.
- Testing and Refining Expressions: Playblast sections with audio to check if facial expressions convey intended emotions. Fine-tune by adjusting keyframe timing, redrawing frames, or adding extreme single-frame expressions (e.g., a huge mouth for comedic effect) to enhance impact, ensuring alignment with the animation style.
In Blender, animating facial expressions is a mix of drawing prowess and timing. The tools like Time Offset can make the mechanical part of lip-sync easier, leaving you to concentrate on the art of the expression. By giving as much attention to the face as to the body motion, your anime character will truly convey personality and match the performance of the music.
Next, let’s move from characters to dynamic effects that can enhance the overall animation, such as environmental effects, special FX, etc., which are particularly useful in high-energy J-Pop scenes.

Adding Dynamic Effects to 2D Animations in Blender
Dynamic effects can elevate your animation by adding visual interest and emphasizing movements or beats. Blender provides multiple ways to create these effects even in a 2D Grease Pencil workflow:
- Grease Pencil Visual Effects: Grease Pencil objects have a set of non-destructive Visual Effects you can add, similar to layer effects in compositing. Some notable ones include:
- Blur: Blurs the strokes/fills of the GP object. This can be used to create depth-of-field on background elements or to soften something into the distance.
- Glow: As discussed, adds a glow around strokes/fills, great for neon lights, magic auras, or anything that should look bright.
- Shadow: Generates a drop shadow of the strokes at an offset – useful if your character is supposed to cast a shadow on a floor or just for a stylistic UI-like effect.
- Wave Distortion: Wiggles the drawing as if under a wave. Could simulate heat haze, water reflection, or just a jiggling cartoon effect on an impact.
- Swirl: Twists the drawing around a point – could be used when a character gets dizzy or to transition something off-screen.
- Pixelate: Makes the drawing blocky (like lowering resolution), rarely used in anime except for maybe a mosaic censorship gag or stylistic retro moment.
- Rim: Adds a rim light effect to strokes which can give a highlight edge.
For a GTA 6-inspired J-Pop concert scene in Blender, animate Grease Pencil effect parameters to enhance dynamics. Keyframe effects like Glow intensity to increase during key moments (e.g., an object powering up) or Wave strength for growing/fading ripples. Apply effects to separate GP objects for control (e.g., a flash shape with its own Glow). For example, draw a glowstick or penlight on a dedicated GP object, add a Glow effect, and keyframe its brightness to intensify during the chorus, making it gleam to emphasize the action.
- Particle Systems with GP Integration: For a GTA 6-inspired Blender animation, integrate Blender’s particle system with Grease Pencil (GP). Use a GP object (e.g., a sparkle star) as a particle emitter via a collection instancer to emit multiple 2D strokes. Alternatively, apply the Line Art modifier to 3D particles (e.g., mesh planes) to outline them as 2D line art each frame, creating dynamic effects like shards or confetti bursts without extensive hand-animation.
- Physics on Grease Pencil Strokes: GP strokes lack direct physics, but workarounds include using an Armature with bone chains and Soft Body/Spring physics for effects like hair, or a Cloth-simulated Mesh as a deform cage with GP strokes shrinkwrapped to it. These are complex and experimental. For simpler motion, use GP Smooth, Subdivision, or Lag settings. Additive Drawing tools are better for onion skinning.
- Manual Drawn FX (Frame-by-Frame): Create anime-style effects (e.g., smoke, lightning, speed streaks) by hand-drawing frame-by-frame on a new GP layer, using onion skin for accuracy. Draw looping effects like an 8-frame fire with Time Offset for repetition or single-use effects like explosions for reuse. Transform 2D effects in 3D space for depth (e.g., placing an explosion in the background).
- Camera and Compositing Effects: Apply post-process effects for dynamics, like camera shake via animated camera translation or Compositor oscillation for impacts. Create color flashes (e.g., white or inverted frames) by keyframing a color mix strip in the Video Sequencer or a Compositor color node. Add lens flares or bloom in the Compositor for intense light effects beyond Glow.
- Combine 2D and 3D for FX: For complex effects (e.g., rotating patterns, magic circles), animate 3D objects and use the Line Art modifier to convert them to GP-style outlines, blending seamlessly with 2D elements. This ensures smooth motion for perspective-heavy or mechanical parts that are hard to draw consistently by hand.
- Sound-synced Effects: Leverage the audio-driven animation for effects: e.g., a visual equalizer in the background or pulses that sync to bass. The Bake Sound to F-Curves can drive scale or opacity of an object to the music. For instance, a series of bars that bounce to the beat behind the character can be animated this way, giving a dynamic, music-responsive background.
Keep in mind not to overdo effects to the point they distract from the character. They should complement and highlight the performance. A few well-placed sparkles on a particularly high note or a burst of lines on a big jump can really make the scene exciting. Because Blender allows all these effects on separate layers and objects, you can tweak or toggle them easily to judge if they add or detract.
Now that we’ve covered adding these exciting elements, let’s talk about synchronizing the animation with the Vocaloid music, as that timing is crucial for a music-themed project.

Synchronizing Vocaloid Music with 2D Character Animations
Synchronization of animation to music (often called “animating to a beat” or lip-sync when vocals are involved) is a critical aspect of creating engaging music videos. Here’s how to ensure your Vocaloid and J-Pop animations hit all the right notes in Blender:
- Using the Audio in Blender: Import your music track into Blender for direct animation syncing. Add an Audio Strip in the Timeline, Dope Sheet, or Video Sequencer (VSE) to load the song. Enable Audio Sync (Playback → AV-sync) to keep animation and audio aligned. Use the VSE to view the waveform, as Blender’s timeline lacks default waveform display. Align keyframes with waveform spikes or beats, and add markers for beats or lyric start times for reference.
- Lip-Sync Workflow: For a GTA 6-inspired Vocaloid animation in Blender, animate lip-sync by scrubbing the song to mark syllable changes with Grease Pencil keyframes on the mouth layer. Assign mouth shapes (drawn or via Time Offset) at keyframes, adjusting timing for slight pre-sound mouth opening to mimic singing anticipation. For fast tracks, use simplified open-closed mouth flaps instead of precise phonemes for convincing results.
- Animating to Beats and Phrasing: Sync body movements to the song’s structure (verses, chorus, beats). Align major actions (e.g., dance moves, camera cuts) with strong beats or transitions, like jumps landing on impactful beats. Calculate frames per beat using BPM and frame rate or mark beats intuitively with Blender’s marker tool (press M during playback) for action alignment, noting manual marking may not be frame-perfect.
- Bake Sound for Automated Sync: Use Blender’s Bake Sound to F-Curves to automate audio-synced motion. In the Graph Editor, select an object/bone, choose Key → Bake Sound to F-Curves, and pick the audio file to generate keyframes from sound amplitude. Isolate frequencies (e.g., bass) to drive effects like character bounces, light pulses, or color changes. Smooth messy curves post-baking. Best for secondary effects (e.g., equalizer bars), while primary character motion should be manually animated for control.
- Mouth Flap Techniques: For image-plane characters, use drivers or constraints to auto-open the mouth based on audio amplitude (baking sound to a value to drive mouth image/bone). This provides quick open/close sync but lacks nuance, requiring threshold tweaks. Manual keyframing is preferred for precision.
- Coordinating with Song Structure: During instrumental breaks, shift to non-singing actions (e.g., dance, poses) to highlight body language. In lyric-heavy verses, simplify body movements to emphasize lip-sync. Use song dynamics to guide animation intensity.
- Fine-Tuning to Milliseconds: Adjust lip-sync keyframes for sub-frame precision, as one frame (~42ms at 24 fps) can feel off, given human sensitivity to ~20ms offsets. Nudge keyframes to the nearest frame, placing mouth changes slightly before consonants for natural sync. Higher frame rates (30/60 fps) allow finer tweaks but are rarely needed.
- Preview Often with Audio: Always playback with the sound on. It’s easy to focus on animation and later realize it’s off rhythm. Blender’s real-time preview with audio should be used frequently. If your viewport lags, do quick renders of short segments to check sync. Also, consider exporting a draft video and watching it externally, because sometimes playback inside software can drop frames and appear offsync. The final output should be checked to ensure sync is perfect.
Synchronizing animation with Vocaloid music is challenging but rewarding – when it’s done right, the character truly feels like part of the song. It’s that fusion of audio and visuals that makes music videos so captivating. With careful use of Blender’s tools and manual timing adjustments, you can achieve professional-looking sync.
Now, after all this work, you’ll want to share your animation. Let’s look at how to export 2D animations from Blender for various social media platforms, ensuring your work looks its best wherever it’s viewed.
Exporting 2D Animations from Blender for Social Media Platforms
Once your animation is complete, exporting it in the right format and settings is crucial for sharing on YouTube, Instagram, TikTok, or other social media. Here are guidelines for smooth export and quality retention:
- Rendering the Animation: In Blender’s Output Properties, set the Frame Range to your animation’s duration. Choose a resolution: 1920×1080 (16:9) for HD/YouTube, 1080×1920 (9:16) for TikTok/Instagram Reels, 1080×1080 (1:1) for Instagram posts, or 1080×1350 (4:5) for Instagram portrait. Match the frame rate to your animation (typically 24 or 30 fps). Select Eevee as the render engine for Grease Pencil 2D animations, as it’s real-time and handles GP effects well. Use Eevee or Workbench for heavy compositing or motion blur; avoid Cycles unless 3D elements require ray tracing.
- File Format: For final output in Blender, select FFmpeg Video in Output Properties, choose MPEG-4 as the container, H.264 as the video codec, and AAC for audio to embed music. Set the file extension to .mp4 for a widely compatible MP4 video. Alternatively, render as a PNG image sequence for safer long renders (resumable if crashed) and full quality, then combine in a video editor. For quick social media posts, direct MP4 output is sufficient.
- Bitrate and Quality: For Blender’s H.264 output, the default “Medium” quality may suffice, but to reduce compression artifacts, increase the bitrate in Encoding settings. Select High Quality or set 8000-10000 kbps for 1080p at 30fps to ensure good source quality for Instagram or YouTube. Instagram applies heavy compression, so export at recommended sizes (e.g., 1080×1080 or 1080×1350) to minimize additional scaling and optimize compression.
- Platform-specific Considerations:
- YouTube: Use 16:9 aspect (1920×1080 or higher like 4K if you want). YouTube will re-encode, but high resolution uploads get a higher bitrate on YouTube. So even for a 2D animation, uploading in 4K (3840×2160) can make YouTube allocate more bandwidth, resulting in less quality loss after their compression.
- Instagram Feed: As noted, stick to 1080×1080 for square or 1080×1350 for portrait posts (that’s the max Instagram will show vertically without cropping). Keep frame rate to 30 fps or lower; Instagram will force videos to 30fps and max 60 seconds for feed (longer goes to IGTV). Make sure file size isn’t huge (under 50MB for easy upload).
- Instagram Stories/Reels: 9:16 vertical, 1080×1920. Length limit (15 sec for stories segments, ~60 sec for Reels). 30fps is fine. Ensure important visuals are centered because Stories have UI elements top and bottom that might cover edges.
- TikTok: Also 9:16 vertical typically. Similar to Reels, keep action centered. TikTok supports 60 seconds (and longer now in some cases). File should be MP4 or MOV, and keep file size manageable (TikTok has relatively generous limits though).
- Twitter (X): Can handle 1080p videos, but under 2m20s for non-extended accounts. MP4 with H.264/AAC works. Keep file under 512MB. A 2D animation of a song likely exceeds length, so maybe you’d post a teaser clip on Twitter linking to full video on YouTube.
- Testing Quality: After rendering, watch the video on a similar size screen as the audience will. Check for any glitches (sometimes audio might desync if there were encoding issues – if that happens, you could render audio separately or use a video editor). Ensure the colors look right (no weird gamma shifts – if using color management, the default should be fine; just avoid any mismatches between sRGB and display). Make sure any subtitles or small details are readable on a phone if targeting mobile viewers.
- Captions and Metadata: If you have subtitles or lyrics, you might have burnt them into the video via Grease Pencil or Text objects. If not and you want soft subtitles (for YouTube), you can upload an SRT file to YouTube after posting. But for social media like Instagram, you’d burn in any text. Always proofread any text in the animation before exporting final.
- Looping Consideration: Platforms like TikTok or Instagram Reels often loop videos. If you want your animation to loop seamlessly, ensure the last frame connects to the first. You might even duplicate a few frames at the end or design the motion to cycle (we cover looping specifically in a later section). If it’s a perfect loop, users might watch multiple cycles which boosts engagement on those platforms.
- Aspect Ratio Adjustments: If you animated in one aspect (say 16:9 for YouTube) but also want a 9:16 cut for TikTok, you might have to rearrange the framing. You can either render as-is and crop using a video editor, or set up a second camera in Blender for vertical framing and re-render. Because it’s Grease Pencil (2D), re-rendering in a different aspect isn’t too heavy. You may need to reposition some elements so they fit in the vertical frame (e.g., bring the character to center). Planning for this ahead of time (keeping important action in a central safe zone) helps.
- Posting Best Practices: Once you have the video, for Instagram, transfer it to your mobile device (Dropbox, Google Drive, or direct upload via PC if using their Creator Studio). For YouTube, upload via web and fill in title, description (maybe mention “Made with Blender Grease Pencil”). Use relevant tags like #Vocaloid #Blender #2DAnimation when posting on social channels to reach the interested audience.
Exporting might seem like the “boring” part, but it’s essential to preserve all your hard work in the highest quality. With the above settings, you should get a crisp video that showcases your smooth animation and vibrant J-Pop aesthetic with minimal compression issues on each platform.
Next, let’s address some common challenges people face when doing 2D animation in Blender and how to overcome them, which will help troubleshoot any issues in your production.
Common Challenges in 2D Animation with Blender and How to Overcome Them
Even with the powerful tools at hand, you may encounter some challenges when animating 2D in Blender. Here are common issues and their solutions:
- Performance Slowdowns: As Grease Pencil projects grow with many strokes, long frame ranges, or multiple objects, viewport and undo performance may slow. To improve, disable Onion Skinning when unnecessary, turn off Post Processing in Grease Pencil draw mode to skip antialiasing, lower stroke viewport resolution with the Simplify modifier or work zoomed out, and use Workbench render mode for faster animating, switching to Rendered view for final checks. For slow undo, save and reopen the file to clear cache or split animations into multiple files for heavy scenes.
- Accidental Drawing on Wrong Layer/Frame: It’s easy to draw something only to realize you were on the wrong layer or frame. To avoid this, get in the habit of locking layers you’re not working on. Use the active frame only option (there’s a setting to lock frame changes so you don’t accidentally draw on an unintended frame). If it happens, you can cut and paste strokes in Edit Mode to the correct layer or frame. Blender does allow you to select strokes, then in the Active Frame panel, adjust their frame or layer.
- Rigging Woes: If a rigged Grease Pencil animation doesn’t render correctly (e.g., strokes not deforming), ensure Use Bone Envelopes or Vertex Group is enabled in the Armature modifier. Verify strokes are weight painted to bones, as forgetting this prevents movement. If the viewport looks fine but the render fails, check that modifiers like Armature are not disabled for rendering (camera icon). Apply transforms (scale/rotation) on the armature and Grease Pencil object, as unapplied scales can disrupt weight influences.
- Line Quality Issues: Jagged edges or unexpected stroke thickness in Grease Pencil renders may result from resolution scaling, where higher render resolutions make strokes appear thinner. Adjust by increasing stroke thickness or using the Thickness modifier to tweak line width globally. For zoom-ins in screen-space thickness mode, lines may appear thicker; animate stroke thickness inversely to maintain consistency. Test extreme camera distances to calibrate the look.
- Grease Pencil Fills Acting Up: Fill artifacts in Grease Pencil may occur when fills don’t update with moving strokes (e.g., via armature deformation). Fix by using Recalculate Geometry in Edit Mode or briefly re-triggering the fill tool. Ensure the fill layer is below the line art layer within the same object, as filling across objects isn’t automatic. For complex moving fills, convert to strokes or use multiple small fills to avoid overlap issues from a single large fill shape.
- Camera Clipping: If you place GP objects in 3D space (with depth), be mindful of camera clipping planes. A GP object too close or too far might get cut off by the camera’s start/end clip. Adjust the camera clip range or position GP objects within range. This often explains “disappearing” drawings if you move them in 3D.
- Export Colors Look Washed Out: If an exported Grease Pencil video looks washed out or too dark compared to the viewport, check Blender’s color management. The default Filmic setting may differ from standard sRGB. Use Filmic for rendering with realistic lighting, but for flat 2D colors, Standard may provide WYSIWYG results. Correct slight shifts in compositing with gamma adjustments or a Filmic Look (e.g., High Contrast). Test a short export and view outside Blender to confirm.
- Audio Sync Issues After Render: If audio in a Blender Grease Pencil project is off-sync in the final output, it may stem from a framerate mismatch or encoding issue. To resolve, render the video as an image sequence or silent video and combine with audio in video editing software (e.g., Blender’s VSE) for perfect sync. Ensure render fps matches audio fps, aligning project FPS with audio playback using the sync audio to playback option and checking for Time Stretch settings.
- Learning Curve and Interface: Grease Pencil’s interface may feel non-intuitive due to its modes and material/color attributes. Customize your workspace by keeping the materials panel open for quick color changes and assigning hotkeys for frequent actions like onion skin toggling. Explore Blender’s manual or community tutorials for hidden features, such as Convert tools for stroke-to-curve effects. Search for solutions online, as the active Blender community (e.g., Blender Artists, Stack Exchange) often provides answers and workarounds.
- Overwhelm (Too Many Keyframes): In a complex scene, you might have keyframes on dozens of layers and objects – managing them can be tough. Use the Dope Sheet filters to show only what you need at the moment (e.g., only the active GP object’s frames). Group your scene elements logically, and consider breaking shots. It’s challenging to animate an entire 3-minute music video in one Blender file/timeline. Often it’s done as separate shots that are edited together later. This also helps avoid one file becoming a monster to handle.
By anticipating these challenges and applying the solutions provided, you can troubleshoot effectively. Blender is continuously improving its Grease Pencil tool (performance and features have been getting better each release), so staying updated can also alleviate some issues (for instance, GP in Blender 3.x is more robust than in 2.8). The community forums are a great place to seek advice if you hit a very specific roadblock.
Having addressed challenges, you’re better prepared to handle production snags. Now, let’s explore how to further enhance your final output with Blender’s compositing tools, which can put a professional polish on your 2D animation.

Enhancing 2D Animations with Blender’s Compositing Tools
Blender’s Compositor is a powerful node-based system that allows you to apply post-processing effects to your renders. Even for 2D Grease Pencil animations, the compositor can be used to add polish and solve certain visual needs:
- Color Grading: You can adjust the overall color balance, contrast, and saturation of your animation using the compositor. For example, you might want a warmer tone during a sunset scene or a cool blue during a sad part of the song. Use the Color Balance node or RGB Curves to tweak the mood of your rendered frames. Subtle grading can make the animation feel more cohesive, especially if you composite 2D characters onto painted backgrounds or 3D elements.
- Bloom and Glare: While Grease Pencil’s Glow effect works per object, the compositor’s Glare node can handle bloom and glints for the whole frame. If you have bright highlights (like stage lights or reflections), the Glare node (set to Fog Glow) can create a soft bloom around them. This might give a more realistic camera feel to bright concert lights. You could also use it to create anime-style lens flares or streaks (the Glare node has “Streaks” and “Ghosts” options for different lens flare looks).
- Depth of Field and Focus Effects: To add depth to a multi-layered Grease Pencil scene, use the Defocus node in Blender’s compositor to blur background elements, simulating camera depth of field (e.g., blurring a crowd or stage to highlight a foreground character). This requires a Z-depth pass, which can be approximated for Grease Pencil by rendering separate layers and manually blurring one. Alternatively, if the character and background are separate, apply a Bokeh Blur node to the background render layer.
- Layered Compositing: Render a Grease Pencil scene in layers (e.g., character, effects, background) for enhanced control in Blender’s Compositor. This allows targeted adjustments, like adding motion blur to the character layer without affecting HUD graphics or color-correcting the background separately. Use Blender’s Render Layers system to manage layers and combine them with Alpha Over or Mix nodes in the Composite node tree for flexible layering and blending.
- Adding Effects Not in GP: Some effects might be easier in compositor. For instance:
- Vignette: Darken the corners subtly to focus viewer – use an Ellipse Mask and blur it, multiply over the image.
- Motion Graphics Overlays: If you want to overlay some 2D graphics or footage (like film grain, or a glow that encompasses the whole frame), you can do that by bringing in images or generated textures in compositor and mixing.
- Transition Effects: If your video has transitions (like a flash to white or a crossfade between scenes), those can be done in editing or in compositing by keyframing a Mix factor between two renders.
- Stabilization/Shaky Cam: Perhaps you intentionally want a handheld camera feel. You can do this by animating the camera, or in post by slightly offsetting the frame each few frames randomly. The compositor has a Translate node you could jitter with expressions, but it might be simpler in the Sequencer to do a slight wiggle. Compositor is more for systematic changes per frame though.
- Final Touches – Sharpen or Denoise: 2D animations usually are crisp, but if you rendered at high resolution and downscaled, you might apply a slight Sharpen to bring out line art. Or if you used Cycles (with noise) for some reason, a Denoise node can clean it up.
- Mixing Live Action or Video Clips: If your project involves mixing 2D animation with live footage (some Vocaloid videos do composite 2D characters onto real video), Blender’s compositor can handle that via Movie Clip input nodes. You can key colors, mask, etc., to integrate them. Ensure your 2D art has appropriate lighting or filtering to match the live video (for example, add a slight blur or grain to the 2D so it doesn’t look too clean on a grainy video).
- Use of Crypto/Masks: If using Cycles with Grease Pencil (GP objects can be rendered in Cycles too as emissive holdouts), you might use Cryptomatte to isolate elements. But for pure 2D, likely unnecessary. Instead, you can manually output masks by using Mask Layers in GP or object indices to separate things.
Compositing in Blender polishes Grease Pencil animations by procedurally combining layered elements (e.g., character, effects, background) for a cohesive look, similar to Photoshop but consistent across frames. Layering and adding effects in compositing, as shown in Blender Studio examples, enhances visuals. For advanced techniques, creating perfect looping animations for J-Pop music video GIFs or social media will be addressed next.
Creating Looping Animations for J-Pop Music Videos in Blender
Looping animations are particularly popular for short social media clips (like an animated GIF of a dancing Vocaloid that loops endlessly) or for music videos that have repetitive choruses where you might loop an animation sequence. Achieving a seamless loop means the end of the animation matches perfectly with the start. Here’s how to create loops in Blender:
- Design with Looping in Mind: For a GTA 6-inspired Blender animation, plan loop duration (e.g., 4-beat dance or 1-second idle). Ensure first and last frames are identical (e.g., hand position matches) or cut the duplicate frame to avoid repetition. Frame 1 and the last frame should align seamlessly.
- Using the Graph Editor Cycles Modifier: Apply the Cycles F-curve modifier in the Graph Editor to loop Grease Pencil motions like bone rotations or bounces (e.g., walk cycles). Use for background/secondary motions, but manually loop character actions for precision.
- Grease Pencil Frame Loops: Use the Grease Pencil Time Offset modifier to loop drawn sequences (e.g., 12-frame dance cycle) in Repeat or Ping-Pong mode with “Keep Loop” for seamless repetition, ideal for a song’s chorus. Separate looping body animations from unique motions (e.g., lip-sync) on different layers.
- Seamless Transitions: For looping entire Grease Pencil scenes (e.g., GIFs), ensure all elements (physics, particles) align at start and end. Reset particles or select aligned segments, avoid non-deterministic physics, or crossfade backgrounds using video editing/opacity fades. Use Cycles modifier for simpler loops.
- Musical Loop Points: For music video loops (e.g., chorus dance), ensure music loops at the same point (edit audio beat-matched). Loop dance animations and overlay varying lyrics per chorus. For GIFs (no audio), focus on visual frame alignment.
- Testing the Loop: Test loops by setting start/end frames for continuous playback, checking for hitches. Align motion paths between second-to-last and last frames. Animate to frame N-1, copy frame 1 to N, and render 1 to N-1 (e.g., render 1-23 if 1 and 24 are identical) for seamless looping.
- Looping Background Elements: Create looping backgrounds (e.g., scrolling cityscape, disco lights) with array modifiers and infinite scroll. Animate objects with Cycles modifier or duplicate scenery for seamless wrapping. Use Animation Nodes or Geometry Nodes for automated cyclic motion.
- Exporting Loops as GIFs/APNG: Render loops as PNG sequences and use external tools to create GIFs (Blender lacks direct GIF export). Keep GIF resolution modest to manage size. Use APNG for better quality (limited support) or MP4s for auto-looping on platforms like Instagram Stories.
For a GTA 6-inspired Blender animation, craft seamless loops to captivate viewers by using Blender’s modifiers (e.g., Cycles, Time Offset) and careful planning to avoid manually duplicating frames. This encourages repeat viewing as the loop’s start and end are imperceptible. To integrate external hand-drawn elements, import sketches (paper or digital) into Blender’s workflow, supporting stages where you prefer sketching outside Blender, such as with paper or other software.

Integrating Hand-Drawn Elements into Blender’s 2D Animation Workflow
Blender’s Grease Pencil is a digital tool, but you might have assets or frames drawn by hand (on paper or another digital app) that you want to use. There are several ways to integrate those:
- Scanning and Importing as Reference: For a GTA 6-inspired Blender animation, scan or photograph hand-drawn key poses or designs and import as reference images in the 2D Animation workspace (drag-and-drop or Add → Image → Reference). Trace with Grease Pencil or use as faint guides for drawing/animating, similar to traditional light table inbetweening.
- Frame-by-Frame from External Source: Import animations from other programs (e.g., TVPaint, PNG sequences) into Blender for compositing. Use the Images as Planes add-on to create a plane with an animated texture from the sequence, or use the Video Sequencer to overlay the sequence. For 3D integration (e.g., 2D smoke behind a character), assign an image sequence texture with alpha to a plane and position it at the correct depth.
- Vectorizing Hand-Drawn Art: Vectorize hand-inked backgrounds or characters using Inkscape’s Trace Bitmap for SVG outlines. Import the SVG into Blender and convert to Grease Pencil for stroke-by-stroke reproduction, preserving hand-drawn line quality. Clean drawings may need post-vectorization cleanup before animating or coloring.
- Using Krita/Photoshop in Tandem: Animate roughs in Blender’s Grease Pencil, export as PNG sequences, and enhance in Photoshop or Krita for a painterly look, then re-import into Blender for final assembly and effects. Ensure consistent resolution and alignment. Blender’s onion skin won’t display external frames, so complete rough animation in Blender before external coloring or styling.
- Mixing Drawn Backgrounds: For a GTA 6-inspired Blender animation, import hand-painted (traditional or digital) backgrounds as images, using them as world backgrounds or large planes/Grease Pencil objects. Pair with 2D characters for an anime-style workflow. Add subtle camera parallax for depth, avoiding excessive movement to maintain the flat illusion unless using layered backgrounds.
- COA Tools / External 2D Software Integration: Integrating specialized 2D software like Live2D Cubism or Spine with Blender is limited. Export sprite sheets or frame sequences from these tools for use in Blender, or recreate rigs using COA Tools. This is uncommon but viable for legacy assets.
- Onion Skin between External and Blender: To ensure smooth motion when combining Blender and external animation, create rough animations in Blender for all parts, including those to be hand-drawn externally, to establish timing. Export roughs as image sequences, draw over them frame-by-frame externally, and re-import into Blender. This rotoscoping approach preserves Blender’s timing and spacing for final lines or styles.
- Quality and File Management: High-res scanned drawings increase file size and may slow Blender. Scale down images if resolution exceeds final output needs. For drawings with white backgrounds needing transparency, remove the background in an image editor or convert white to an alpha mask before importing. Alternatively, use Multiply blending to overlay line art, but pre-processing for alpha is preferable.
For a GTA 6-inspired Blender animation, integrate hand-drawn elements to retain an organic, traditional art feel while leveraging Blender’s digital tools for consistency and effects. This hybrid approach excels in backgrounds or specific effects, creating striking animations. To ensure a smooth 2D animation workflow, optimize Blender project settings for 2D projects.
Optimizing Blender Settings for 2D Animation Projects
When working on a 2D animation, you can adjust some Blender settings to tailor the environment to this use-case, making things more efficient:
- Simplify for Viewport: Under Render Properties, find the Simplify section. This is usually for 3D, but it has a Grease Pencil subsection. You can reduce stroke detail here globally for the viewport if needed. Also, set a simpler shading (like no anti-aliasing, no fill) in viewport through the Grease Pencil object properties if you just want to focus on line animation first. The fewer pixels Blender has to draw each frame, the faster.
- Autosave and Undo Limits: 2D animators draw a lot, meaning you might hit undo often (and also potentially crash if something goes wrong). Ensure Auto Save is on (Preferences → Save & Load → Auto Save). Set it to a comfortable interval (maybe every 5 or 10 minutes). Also consider the Undo Steps in preferences; Blender default is 32. If you find yourself needing to undo further back, raise it, but note high undo steps in Grease Pencil can use more memory (GP stores a lot of data per undo). There’s a balance.
- UI Layout: Customize your UI for animation. For instance, you might split your 3D View so one side is always in camera view for the composition, and the other is free for close-up drawing or off-camera notes. Have the Dope Sheet (in Grease Pencil mode) open at the bottom so you can quickly move keys. Save this as a custom workspace for 2D animation so every time you open Blender for such projects, you can jump right in.
- Grease Pencil Preferences: In Preferences → Grease Pencil, there are some settings that can improve your workflow. For example, “Multithreaded strokes” should usually be on (makes drawing more responsive using CPU cores). There are also settings for onion skin defaults. You could set up onion skin opacity/colors to your liking by default to avoid tweaking per file.
- Render Settings: If you’re purely using GP with Eevee, you can disable some Eevee features that you don’t need (like Shadow maps, SSR, SSS, etc.) to speed up rendering. Turn off Motion Blur if you plan to do it in post instead. Use Render Simplify if needed to lower samples on Freestyle or such (Freestyle not typically used with GP, but if you mix).
- Memory Considerations: For a GTA 6-inspired Blender animation, Grease Pencil data in .blend files can significantly increase file size, potentially reaching hundreds of MBs for a music video with many frames (e.g., a 430MB file for a short sequence). To manage file size or memory issues, split scenes or use Library Overrides/Linked Data for repeated assets. For instance, animate a repeated dance sequence in one file and link it to multiple scenes to save space, though this may complicate editing.
- Use of Cache Files: If you do use any physics (like a cloth sim on a 2D element or a particle system), make sure to cache those simulations to disk (so Blender doesn’t re-calc each time) and also so they are consistent across renders. The Disk Cache option for particles/physics will output a cache that you can store and Blender will read from, speeding up playback of those parts.
- Frame Rate and Timing: Set your frame rate from the start (we mentioned this, but it’s optimizing to avoid retiming later). Also set your Time Remapping (usually leave at 1:1 unless you specifically want to retime the whole animation slower/faster).
- Camera and Output Setup: If you know you need multiple aspect ratios (vertical vs horizontal), you can actually create multiple cameras and set them up, then just change the camera and resolution when rendering each version. Or use Scenes: one scene could be your master 16:9, another could link the animation but use a different camera/resolution for 9:16. That way you don’t have to re-layout elements manually. Planning this early is an optimization to avoid double work.
- Add-ons: Consider using helpful add-ons. E.g., GPencil Tools (community add-on) provides some convenience functions for Grease Pencil (like quickly offsetting strokes, etc.). If you do a lot of pose-to-pose, “AnimAll” add-on might not help GP (it animates other data), skip that. But one great add-on is “Simplify Curves” (built-in function in Edit Mode) if you import vector art that’s too detailed. In general, keep your stroke point count reasonable – extremely detailed curves slow things down, so simplifying them can optimize without noticeable quality loss.
- Hardware Considerations: 2D animation in Blender can be done on modest hardware, but if you find performance lacking, aside from optimizing settings, note that Grease Pencil benefits from CPU speed (for stroke drawing) and GPU (for rendering with Eevee). Having a good amount of RAM is also helpful if your frames are many. If you plan big projects, invest accordingly. But for most, just closing other programs to give Blender more resources and possibly enabling GPU subdivision (if any meshes used) helps.
By optimizing both Blender’s settings and your workflow, you minimize technical bottlenecks and can focus on the art. Smooth interaction and playback can make the difference in maintaining your creative flow.
We have now covered everything from the initial animation process with Grease Pencil, through styling, special techniques, troubleshooting, and exporting. The combination of these allows 2D/3D artists and tech-savvy Vocaloid fans to create high-quality, anime-style animations in Blender that align perfectly with J-Pop music.
In the next section, we’ll provide some frequently asked questions and answers to address common concerns, and then conclude the guide.

10 faq questions and answers
- Q: Can Blender really be used for 2D animation like traditional anime?
A: Yes! Blender’s Grease Pencil tool was specifically created to enable 2D animation within Blender. You can draw frame-by-frame just like traditional animation. Many artists have used it to create anime-style shorts. It supports onion skinning, layers, and even mimicry of anime line art and shading, so you can achieve results very close to hand-drawn anime. - Q: Do I need a drawing tablet to animate 2D in Blender?
A: While not strictly required, a graphics tablet is highly recommended. Drawing with a mouse is possible for simple things, but for character animation (especially Vocaloid characters with fine details), a pressure-sensitive tablet will give you much better control and line quality. Blender fully supports tablets for Grease Pencil (pressure for line thickness, etc.). Some artists do roughs on paper, then scan, but eventually you’ll want a tablet for efficiency. - Q: How can I import my character drawn in another software (Photoshop/Krita) into Blender?
A: If it’s a single image, you have a couple options. One is to import it as a reference (Add > Image > Reference) and trace it with Grease Pencil. Another is to use Trace Image to Grease Pencil which converts a bw image to strokes. If your art is layered (e.g., PSD with parts), export each part as PNG and use Import Images as Planes or assemble them in Grease Pencil layers. For vector art (SVG), import and convert to GP. Essentially, any 2D art can be brought in either as a backdrop to trace or as pieces to rig. - Q: What is the best render engine for 2D animations in Blender?
A: Eevee is generally the best choice. It’s real-time, so what you see in the viewport is what you get in the render, including Grease Pencil effects like bloom, blur, etc. Grease Pencil also works in Cycles (useful if mixing with realistic 3D scenes), but for most anime-style 2D, Eevee is perfect and much faster. The Workbench engine can be used for quick previews or if you want a flat look without lighting. Many 2D animators use Workbench while animating (for speed) and Eevee for final render. - Q: My Grease Pencil drawings look pixelated or low-quality in the render, how can I fix that?
A: For a GTA 6-inspired Blender animation, Grease Pencil’s vector-based strokes scale to any resolution, but line thickness and camera zoom affect quality. To avoid pixelation, render at 1080p or higher and adjust Viewport vs. Render thickness settings (use World Space for renders if needed). Ensure crisp renders by checking Eevee’s anti-aliasing (Render Settings → Filter Size and Grease Pencil object edge softness). Pixelation may occur if a low-resolution render is enlarged. - Q: How can I make my 2D animations run in real-time (e.g., in a game engine or live performance)?
A: For GTA 6-inspired Blender 2D animations in real-time, export Grease Pencil animations as sprite sheets or image sequences for game engines like Unity or Unreal, as Grease Pencil rigs are Blender-specific and not directly exportable. Alternatively, recreate rigs in-engine using tools like Unity’s 2D bone animation. For live performances (e.g., Vocaloid dancing projections), play animations in Blender’s viewport with a strong PC or export as alpha-channel video for looping. Motion capture for Grease Pencil puppeteering is experimental. For games, rely on sprite exports, as most engines lack Grease Pencil-like features. - Q: The audio in Blender sounds out of sync or choppy when animating – how do I fix that?
A: For a GTA 6-inspired Blender animation, use AV-sync playback mode to ensure audio sync, as Blender drops frames if the viewport can’t maintain full framerate. For heavy scenes causing choppy playback, lower playback quality by soloing the character, hiding backgrounds, or using proxy mode. Use Refresh Sequencer or manual scrubbing to align elements. Verify sync with a playblast (viewport render) to check every frame with audio in a media player. If audio is offset, nudge it (rare if settings are correct). Match the project frame rate (typically 24 or 30 fps) to the audio’s intended rate. - Q: Is it possible to interpolate between two different drawings automatically (in-betweening)?
A: For a GTA 6-inspired Blender animation, use Blender’s Grease Pencil Interpolate tool to create in-between stroke arrangements on frames between two keyframes. It morphs one drawing into another, working best with similar drawings (e.g., same stroke count), but it’s not a Flash-style motion tween. For complex changes, manually draw in-betweens for nuanced motion, as interpolation doesn’t fully replace skilled hand-drawn inbetweening. - Q: My file size is getting huge with Grease Pencil frames – what can I do?
A: For a GTA 6-inspired Blender animation, large Grease Pencil animations inflate .blend file sizes due to stored strokes. To manage: split projects into scenes or shots, keeping each .blend file smaller and easier to handle, then render and combine segments. For repeated sequences, use the Time Offset modifier or link Grease Pencil objects between files to reuse data. Advanced users can batch import/export GP frames as SVG or JSON with addons. Enable the compress option when saving .blend files to reduce disk space, though it may slightly slow saving/loading. - Q: What resources can help me get better at 2D animation in Blender?
A: There are many! For a GTA 6-inspired Blender animation, refer to the Blender Manual’s Grease Pencil section for tool details. Blender Studio offers a Grease Pencil Fundamentals course and example files. YouTube tutorials by artists like Dedouze and Wayne Dixon, alongside animation books like “The Animator’s Survival Kit,” provide valuable techniques applicable to Blender. Study Vocaloid music videos (fan-made and official) for character animation and music-visual integration inspiration. Engage with communities like BlenderArtists, r/blender, and r/greasepencil for tips and questions.
With these FAQs clarified, you should be well-equipped to begin your journey in animating 2D Vocaloid and J-Pop characters in Blender.

Conclusion
Blender’s Grease Pencil enables 2D animation with 3D flexibility, ideal for creating Vocaloid and J-Pop themed animations. This guide explains setting up Grease Pencil for frame-by-frame animation, using cut-out rigging for puppetry, and applying anime aesthetics. Key points include organizing character layers, using modifiers like Glow and Armatures for enhancement, and syncing motion to music. It also addresses challenges like performance tuning and export quality for platforms like YouTube or Instagram.
The Vocaloid-anime visual combo thrives in Blender, a free tool with a steep learning curve but unified workflow for 2D, 3D, and effects. It supports experimental 2D-3D mixes, offering creative control. Iterating and enjoying the process is key, with community resources like .blend files aiding learning. Blender’s undo and non-destructive editing encourage experimentation. This guide aims to inspire vibrant 2D animations, urging creators to bring characters to life with Grease Pencil.
Sources and Citation
- Blender Official Documentation – Story Art (Grease Pencil)blender.orgblender.org
- Blender Manual – Trace Image to Grease Pencildocs.blender.orgdocs.blender.org
- Blender Manual – Grease Pencil Armature Modifierdocs.blender.orgdocs.blender.org
- Blender Artists Community – Hand-drawn image rigging discussion (suggesting SVG/COA Tools)blenderartists.org
- GitHub (ndee85) – COA Tools descriptiongithub.com
- Blender Artists – Grease Pencil glow effect tip (Use Lights off, add Glow)blenderartists.org
- Blender Manual – Grease Pencil Visual Effects Listdocs.blender.org
- Blender Manual – Bake Sound to F-Curvesdocs.blender.org
- Blender Artists – Audio waveform and markers for lip-syncblenderartists.org
- Blender StackExchange – Instagram export resolution adviceblender.stackexchange.com
- Blender Artists – Grease Pencil performance tips (disable post-process, use Workbench)blenderartists.orgblenderartists.org
- Blender Studio Blog – “Fighting with Grease Pencil” (layered compositing approach)studio.blender.org
- Blender Manual – Time Offset Modifier (looping drawings)docs.blender.orgdocs.blender.org
- Blender Manual – F-Curve Cycles Modifier (repeat animation curves)docs.blender.org
- Blender Studio – Grease Pencil Resources pagestudio.blender.org


