

Smooth camera transitions are the secret sauce behind cinematic animations, immersive architectural walkthroughs, and dynamic product showcases. In 3D production, the way your camera moves from one shot to another can significantly influence the viewer’s experience. Abrupt changes can break the narrative flow, while fluid transitions help guide the viewer’s eye and elevate the overall quality of your work. Achieving these seamless transitions manually in Blender can be challenging and time-consuming, but The View Keeper add-on simplifies this process by allowing you to create, save, and transition between multiple camera views with ease.
In this comprehensive guide, we’ll explore every facet of creating smooth camera transitions in Blender using The View Keeper. We’ll cover why smooth transitions matter, how to set up The View Keeper, step-by-step instructions for saving multiple camera views and animating transitions, techniques for refining transitions with interpolation modes, and best practices for ensuring consistent and high-quality outputs. Whether you’re working on an animated short, an architectural visualization, or a product showcase, this guide will empower you to produce smooth, professional camera movements that captivate your audience.
Introduction: The Importance of Smooth Camera Transitions
Camera transitions are more than just technical moves—they are storytelling tools. In any cinematic or 3D project, the camera is your eye, and the transitions between different views help shape how the story unfolds. Smooth transitions create a natural flow, allowing your audience to stay engaged without being distracted by jarring cuts or abrupt shifts in perspective.
When transitions are smooth, they enhance the visual narrative by:
- Maintaining Visual Flow: A well-executed transition helps the viewer follow the action effortlessly.
- Enhancing Storytelling: Fluid camera movements can underscore dramatic moments or gently guide the audience’s focus.
- Creating a Cinematic Experience: Professional camera work with smooth transitions gives your animation a polished, high-end look.
However, achieving this level of smoothness isn’t always easy. Manual keyframing of camera movements in Blender can be tedious, and small errors in setting keyframes or adjusting curves can lead to choppy or inconsistent transitions. This is where The View Keeper shines, automating many of the technical tasks and ensuring that each camera view is saved with the precise settings needed for seamless movement.

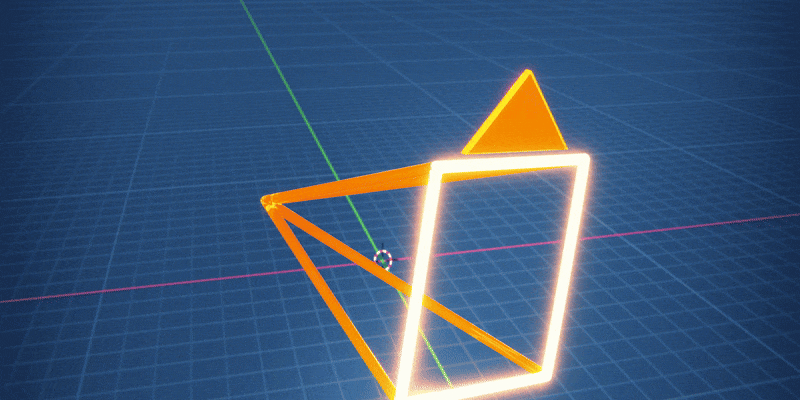
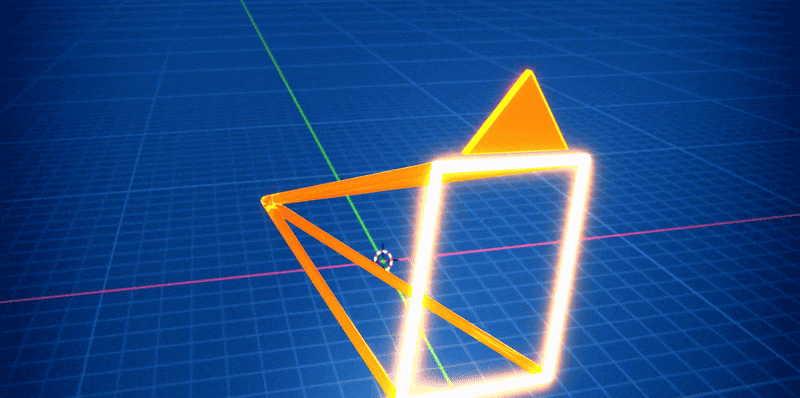
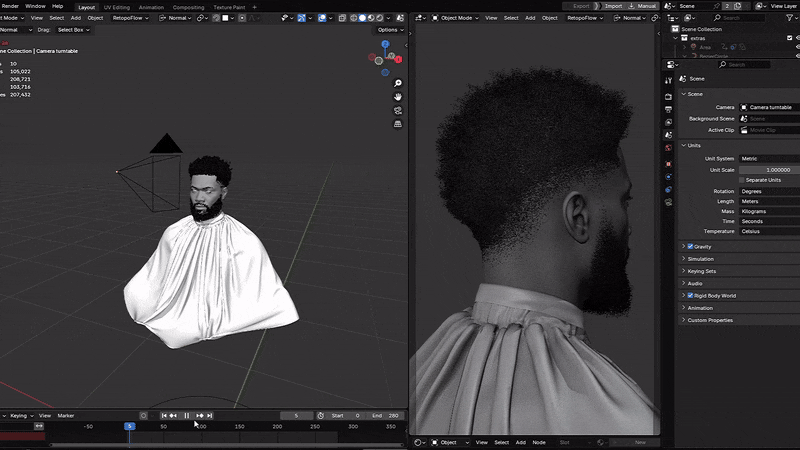
Understanding The View Keeper Add-On
The View Keeper is a powerful Blender add-on designed to streamline camera management. Its core function is to allow users to save multiple camera views and with them, individual camera settings within a single camera. This eliminates the need to duplicate cameras for every shot and helps maintain a clean, organized scene.
Key Features of The View Keeper
- Multiple Camera Views:
Save several camera positions, angles, and settings in one place, reducing scene clutter. - View-Specific camera Settings:
Each saved view retains its unique configuration, including focal length, depth of field, lens and more. - Instant Switching:
Easily switch between saved views with a single click, making it simple to test different camera angles. - Batch Rendering:
Render all saved views simultaneously, ensuring consistency and saving time. - Automation Tools:
Features such as “Refresh View” update settings automatically, reducing manual intervention.
By centralizing camera management, The View Keeper not only improves workflow efficiency but also ensures that your transitions are smooth and your renders are consistent.
Why Smooth Camera Transitions Matter
Smooth transitions play a pivotal role in the storytelling process. They determine how gracefully your animation flows from one scene to the next. Here are some key reasons why smooth camera transitions are vital:
Maintaining Narrative Flow
In animations, each camera angle is chosen for a reason. Smooth transitions help ensure that the narrative flows naturally, allowing the viewer to follow the story without interruption. Abrupt changes can distract or disorient the viewer, undermining the emotional impact of your work.
Enhancing Cinematic Quality
Cinematic productions rely heavily on fluid camera movements to create mood and drama. Whether it’s a slow pan to reveal a breathtaking landscape or a dynamic tracking shot during an action sequence, smooth transitions enhance the overall cinematic experience.
Consistency Across Frames
In projects with multiple camera angles, maintaining consistency is key. Each view must be rendered with the correct settings so that the final output appears cohesive. Automating transitions with The View Keeper ensures that every camera switch is precise, consistent, and free from manual errors.
Boosting Viewer Engagement
Smooth camera movements keep viewers engaged by guiding their eyes naturally through the scene. This is particularly important in immersive environments such as virtual reality or interactive media, where continuity is critical for maintaining immersion.

Setting Up The View Keeper for Camera Transitions
To create smooth camera transitions, the first step is to set up The View Keeper in your Blender project. This process involves installing the add-on, accessing its interface, and saving your cameras with their specific render settings.
Step 1: Installing The View Keeper
- Download the Add-On:
Visit the official website or Blender Market to download the latest version of The View Keeper. - Install in Blender:
Open Blender, go to Edit > Preferences > Add-ons, click Install, select the downloaded ZIP file, and install the add-on. - Enable the Add-On:
Once installed, check the box next to The View Keeper to enable it.
Step 2: Accessing The View Keeper Interface
- Open the N-Panel:
In the 3D Viewport, press the N key to open the side panel. - Locate The View Keeper Tab:
Scroll through the available tabs until you find The View Keeper. Click on it to open the interface.
Step 3: Saving Your Camera Views
With The View Keeper interface open, you can start saving different camera views that will be used for smooth transitions.
- Position Your Camera:
Move your camera to the desired position and angle for your shot. Adjust settings in the Properties panel as needed (focal length, depth of field, etc.). - Save the View:
Click Add View in The View Keeper to save the current camera configuration. This creates a view record that includes all the camera settings. - Name the View:
Give your camera view a descriptive name (e.g., “Intro_Wide,” “Action_CloseUp”) to make it easy to identify later.
Animating Camera Transitions with The View Keeper
Once you’ve saved multiple camera views, the next step is to animate transitions between them. This involves keyframing the switch between views in Blender’s timeline.
Step 1: Planning Your Animation Timeline
Before keyframing, plan where camera transitions should occur. Storyboard your animation and decide which camera view best fits each part of your narrative.
- Identify Key Frames:
Determine the exact frames where transitions will occur, such as the start of a new scene or a dramatic change in perspective. - Visualize the Sequence:
Sketch a rough timeline to visualize how the camera will move between views, ensuring smooth and natural progression.
Step 2: Inserting Keyframes for Camera Views
- Select the Starting View:
In The View Keeper interface, select the camera view you want to start with. - Insert a Keyframe:
With the desired view active, insert a keyframe for the camera’s position and settings. This can be done by right-clicking on the relevant property and selecting Insert Keyframe. - Transition to the Next View:
Move to the next frame range where you want the camera to switch. Select a different saved camera view in The View Keeper and insert another keyframe. - Repeat for All Transitions:
Continue this process throughout the timeline until all camera transitions are keyframed.
Step 3: Refining Transitions with Interpolation
The smoothness of camera transitions is largely influenced by the interpolation mode used for keyframes. Blender’s Graph Editor offers several interpolation options:
- Linear Interpolation:
Creates a constant-speed transition between keyframes. Use this mode for straightforward, predictable movements. - Bezier Interpolation:
Provides natural, curved transitions. This mode is ideal for achieving smooth and fluid camera movements that feel more organic. - Ease In/Out:
Gradually accelerates or decelerates the transition at the beginning or end. This creates a more cinematic effect, making the start and end of transitions feel softer.
Adjust these interpolation modes in the Graph Editor to fine-tune your transitions. Experiment with different curves until the movement feels natural and enhances the storytelling.
Benefits of Using The View Keeper for Camera Transitions
Using The View Keeper to manage and animate camera transitions offers numerous advantages:
Efficiency
- Streamlined Workflow:
Save time by managing all camera views and their render settings within one centralized interface. - Reduced Manual Keyframing:
Automate the process of switching between views, reducing the need for extensive manual adjustments.
Precision
- Consistent Settings:
Each camera record is saved with its own set of precise render settings, ensuring that transitions do not result in abrupt changes in quality. - Accurate Control:
Fine-tune transitions in the Graph Editor to achieve the exact movement and pacing desired for your scene.
Flexibility
- Adaptable to Different Projects:
Whether you’re working on animations, architectural walkthroughs, or product showcases, The View Keeper provides the tools to create smooth, dynamic transitions. - Easy Adjustments:
Modify transitions on the fly without having to redo keyframes, allowing for quick experimentation and refinement.
Best Practices for Creating Smooth Camera Transitions
To maximize the quality and effectiveness of your camera transitions, consider these best practices:
Use Slow Pans and Tilts
- Subtle Movements:
Avoid rapid, jarring movements. Slow pans and tilts create a more cinematic feel and guide the viewer’s eye naturally. - Control Speed:
Maintain a consistent speed throughout the transition to prevent abrupt changes.
Combine with Depth of Field
- Enhanced Focus:
Use depth of field settings to draw attention to the subject, making transitions more engaging. - Cinematic Quality:
Combining smooth transitions with subtle depth of field adjustments adds a professional touch to your animation.
Maintain Consistent Speed
- Uniform Transitions:
Ensure that the camera’s movement speed is consistent across all transitions. Inconsistent speeds can disrupt the visual flow and distract viewers. - Test and Iterate:
Render test sequences and adjust keyframes as necessary to achieve a uniform transition speed.
Plan Your Storyboard
- Visual Flow:
Pre-plan your camera movements by creating a storyboard that maps out each transition. This preparation helps maintain narrative coherence. - Timing is Everything:
Identify key moments in your animation where camera transitions can enhance the storytelling, and assign views accordingly.
Use the Graph Editor
- Fine-Tune Interpolation:
Utilize the Graph Editor to adjust the interpolation curves between keyframes. Experiment with linear, Bezier, and ease in/out modes to find the perfect balance. - Smooth Out Variations:
Ensure that the transitions are not only smooth but also naturally dynamic, reflecting the intended mood of the scene.
Get Feedback and Iterate
- Peer Review:
Show your work to colleagues or peers and gather feedback on the camera transitions. Fresh eyes can often spot inconsistencies that you might have missed. - Iterative Refinement:
Don’t hesitate to adjust keyframes and interpolation curves based on feedback. Iteration is key to mastering smooth transitions.

Practical Use Cases: Bringing Your Scenes to Life
Smooth camera transitions can significantly enhance a variety of projects. Here are some practical applications where The View Keeper’s capabilities shine:
Cinematic Animations
In narrative animations, smooth camera transitions help guide the viewer through the story. They provide subtle cues that indicate scene changes, highlight dramatic moments, and maintain overall visual coherence. With The View Keeper, animators can effortlessly switch between close-ups, wide shots, and tracking shots, ensuring that every movement contributes to the storytelling.
Example:
An animator working on a short film uses The View Keeper to save several camera views for different parts of a dramatic scene. By keyframing transitions and fine-tuning interpolation curves, the final animation features fluid, cinematic camera movements that enhance the emotional impact of the narrative.
Architectural Walkthroughs
In architectural visualizations, smooth transitions are essential for guiding viewers through a space. Whether showcasing a building’s exterior, interior, or detailed architectural elements, consistent camera movements make the walkthrough more immersive and professional.
Example:
A visualization studio creates a walkthrough of a modern office building. They use The View Keeper to manage multiple camera views one for the exterior façade, several for different interior spaces, and close-ups for design details. The automated transitions ensure that the viewer experiences a seamless journey through the building, enhancing the overall presentation.
Product Showcases
For product designers, showcasing a product from multiple angles can highlight its features and design intricacies. Smooth camera transitions allow for an elegant display of the product, emphasizing its aesthetics and functionality without distracting jumps.
Example:
A freelance 3D artist working on a smartphone advertisement uses The View Keeper to animate transitions between various shots close-ups of the device’s details and wide shots of the product in context. The consistent, smooth transitions result in a polished final render that elevates the product’s presentation.
Social Media Content Creation
Social media platforms demand high-quality visuals produced quickly and consistently. Whether creating content for Instagram, YouTube, or TikTok, smooth transitions can make your videos more engaging and professional.
Example:
A social media influencer uses The View Keeper to manage camera transitions in a series of short 3D animations. With automated switching and carefully tuned interpolation curves, the content is visually appealing, ensuring a strong and professional online presence.
Virtual Reality Experiences
In VR projects, smooth camera transitions are crucial to maintaining immersion. Abrupt changes can break the illusion of a seamless environment, so having fluid camera movements is essential for creating an engaging experience.
Example:
A VR development team employs The View Keeper to manage camera views in a 360-degree interactive environment. Automated transitions ensure that as users navigate the virtual space, the camera moves naturally, enhancing the realism and immersion of the experience.
Advanced Techniques for Perfecting Camera Transitions
For those looking to push the boundaries of what smooth camera transitions can achieve, here are some advanced techniques:
Utilizing the Graph Editor
The Graph Editor in Blender is an indispensable tool for refining keyframe interpolation. By adjusting the curves, you can control the speed and smoothness of transitions.
- Bezier Curves for Natural Movement:
Use Bezier curves to create fluid, organic transitions that mimic natural camera movements. - Ease In/Out for Subtle Start and End:
Apply ease in/out interpolation to create gradual acceleration and deceleration, making transitions feel less abrupt. - Fine-Tuning:
Adjust individual keyframes and curves to perfect the timing and flow of the camera movement.

Combining Transitions with Depth of Field
Integrating depth of field effects into your camera transitions can add an extra layer of cinematic quality. By adjusting focus settings during transitions, you can emphasize the subject and create a more immersive experience.
Scripting for Automated Adjustments
For advanced users, scripting in Blender can further automate the process. Python scripts can be used to adjust keyframe timings, modify interpolation curves, or even switch camera views based on specific triggers within your animation.
Using Multiple Camera Rigs
In more complex scenes, you might use multiple camera rigs for different parts of your animation. The View Keeper can help manage these rigs by preserving individual settings and allowing for seamless transitions between them.
sistency across complex projects.
FAQ
- What are smooth camera transitions and why do they matter?
They’re fluid movements between camera views that maintain narrative flow and enhance the cinematic feel of your animations. - How does The View Keeper add-on help achieve smooth transitions?
It lets you save multiple camera views with specific settings and automatically switch between them, reducing manual keyframing errors. - What key features of The View Keeper are used for camera transitions?
Features include storing multiple camera views, view-specific settings (like focal length and depth of field), instant switching, batch rendering, and automation tools. - How do I install The View Keeper in Blender?
Download the add-on from the official site or Blender Market, then install it via Edit > Preferences > Add-ons, and enable it. - How do I save a camera view with The View Keeper?
Position your camera, adjust the settings in the Properties panel, open The View Keeper panel (in the N-Panel), click “Add View,” and name it. - How do I animate transitions between saved views?
Insert keyframes for each saved view along your timeline, then fine-tune the transitions using Blender’s Graph Editor to adjust interpolation curves. - What role does the Graph Editor play in refining transitions?
It lets you adjust keyframe interpolation (using Bezier curves or ease in/out) so the camera movement is natural and smooth. - What best practices ensure smooth transitions?
Plan your storyboard, maintain consistent speed, use subtle pans/tilts, integrate depth of field, and test with render previews to refine timing. - What practical projects benefit from smooth camera transitions?
They’re essential in cinematic animations, architectural walkthroughs, product showcases, VR experiences, and dynamic social media content. - What advanced techniques can further perfect camera transitions?
Consider using scripting for automated keyframe adjustments, combining multiple camera rigs, and integrating additional effects like dynamic depth of field during transitions.

Conclusion: Elevate Your Animation with Smooth Camera Transitions
Creating smooth camera transitions in Blender is essential for producing professional, cinematic animations that captivate your audience. Manual keyframing and adjustments can be labor-intensive and error-prone, but with The View Keeper add-on, you can streamline this process significantly. By saving multiple camera views with their specific settings and automating the switching process, The View Keeper enables you to focus on storytelling and creative expression without getting bogged down in technical details.
This guide has covered everything from why smooth transitions matter, to a detailed step-by-step process for setting up The View Keeper, saving camera views, animating transitions, and refining them using Blender’s interpolation tools. We’ve also discussed best practices, practical use cases across various project types, and future trends that promise to further enhance your workflow.
Whether you’re working on a narrative animation, an architectural walkthrough, a product showcase, or immersive VR content, smooth camera transitions are key to creating a seamless, engaging experience. The View Keeper not only saves you time but also ensures that every shot is rendered with precision and consistency, elevating the overall quality of your work.
Embrace the power of The View Keeper and transform the way you manage camera transitions in Blender. With its user-friendly interface, robust automation features, and extensive customization options, you can create smooth, dynamic camera movements that bring your projects to life. As you continue to explore and master these techniques, your animations will become more polished, professional, and visually compelling.
Recommended
The Ultimate Guide to the Most Popular Black Hairstyle Options
Redefining Representation: Authentic Black Hairstyles in Video Games
The Ultimate Guide to Hair for Games: Techniques, Tools, and Trends