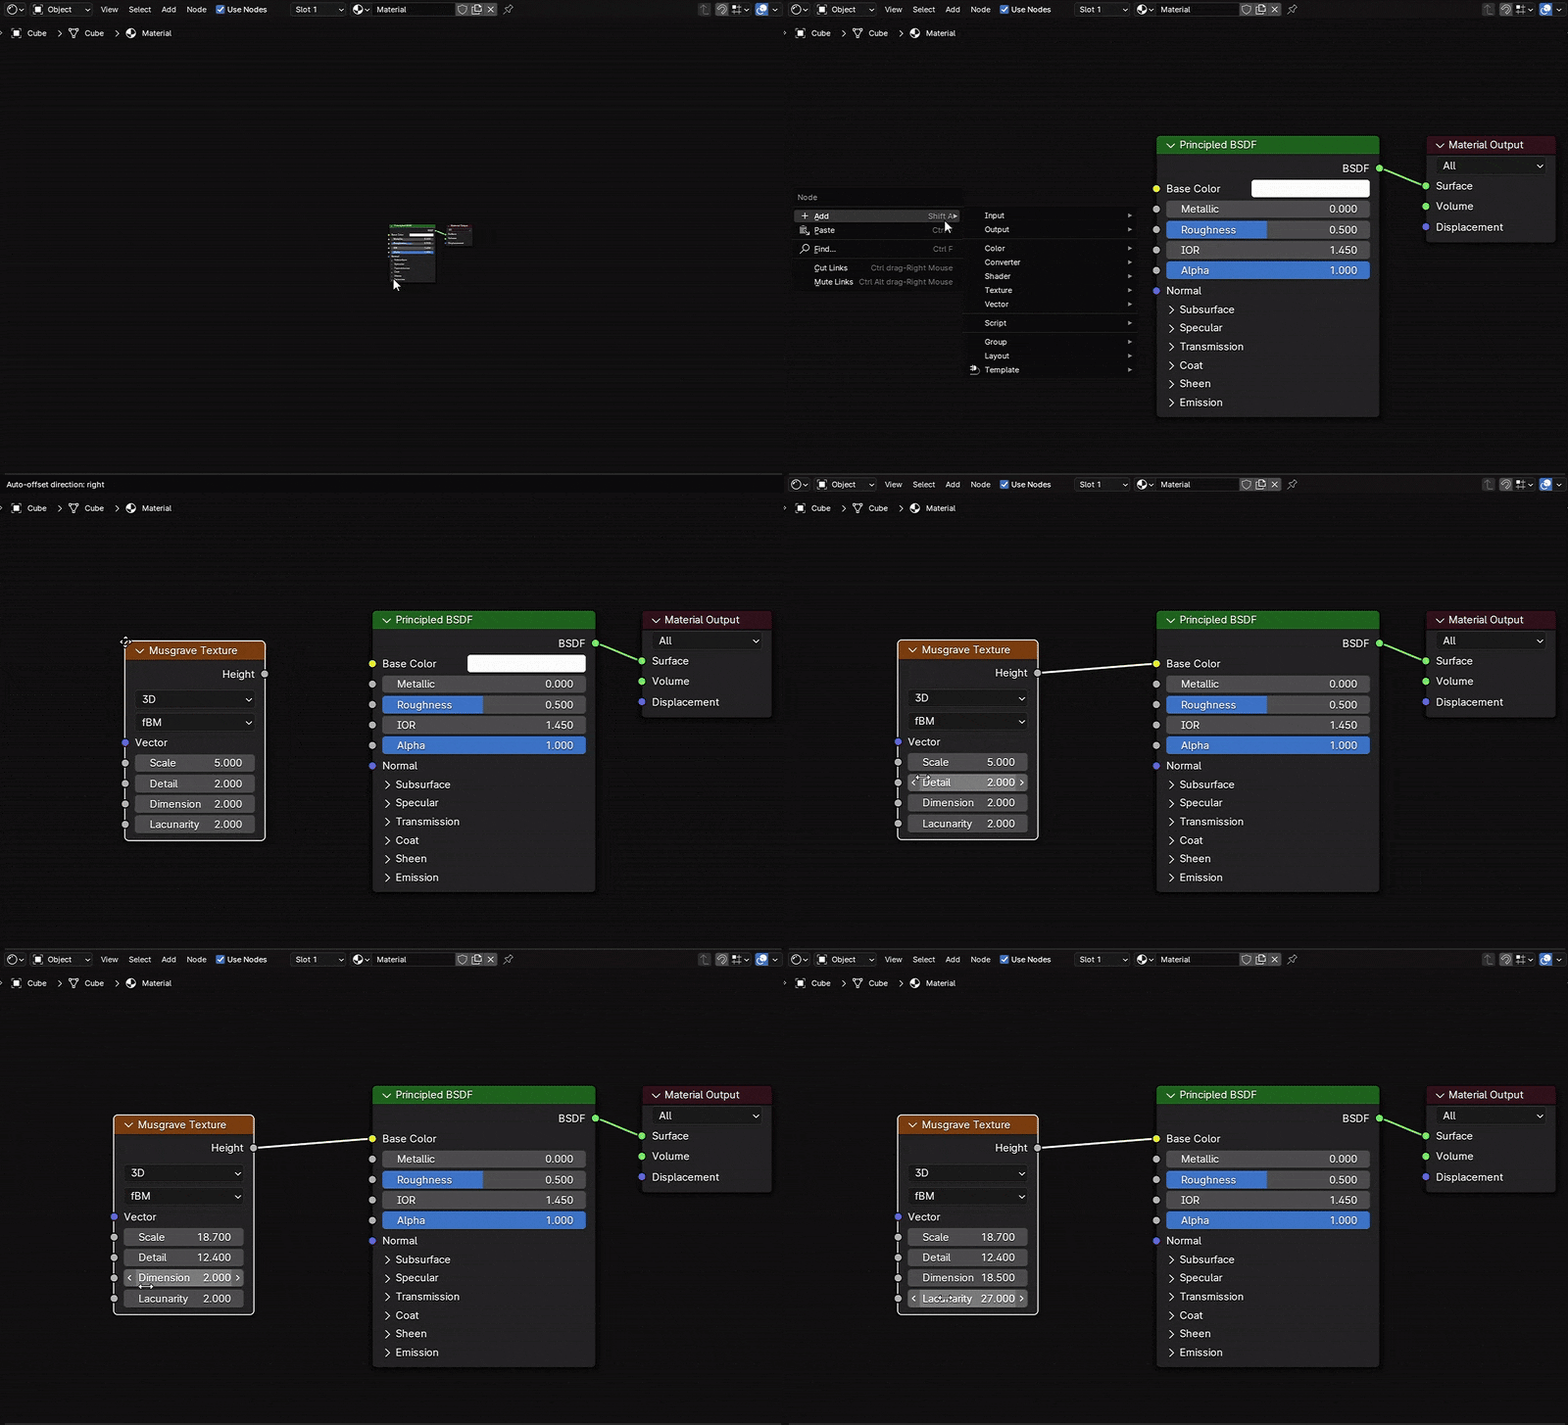
Artists have used the Musgrave node extensively to add depth, realism, and complexity to their projects. Its versatility allowed for a wide range of effects, from subtle noise that simulates skin texture to dramatic landscapes that capture the rugged beauty of natural forms.
For decades, the Musgrave node provided a simple yet powerful method to generate intricate patterns without relying on external image textures. Its removal in Blender 4.1 has significant implications for artists who depend on its unique properties. Understanding its history and functionality is essential for grasping the impact of its removal and the need for viable alternatives. This article explores the technical rationale behind the removal, its impact on existing projects, and actionable strategies for transitioning to the updated workflow. Drawing from community discussions, developer insights, and comparative analyses of pre- and post-4.1 node setups, we provide a comprehensive guide to navigating this change while maintaining creative flexibility.
what was the musgrave texture replaced with in blender 4.1?
In Blender 4.1 the Musgrave texture node was replaced by the updated Noise Texture node. This change consolidates fractal and noise functions into one node for improved performance and flexibility.
Introduction: The Musgrave Texture Explained – History and Importance in Blender
The Musgrave Texture node, introduced in earlier Blender versions, became a cornerstone for procedural texture generation. Named after fractal noise algorithm pioneer F. Kenton Musgrave, this node specialized in creating multi-layered, organic patterns through fractal noise algorithms. Its ability to generate everything from microscopic surface details to planetary-scale terrains made it indispensable for simulating natural phenomena. Artists relied on its parameters, such as dimensions, lacunarity, and octaves, to control the complexity and scale of patterns, enabling precise control over materials like marble, clouds, or weathered metals5 6.
Unlike simpler noise types, Musgrave’s fractal-based approach allowed for self-similar patterns at varying scales, a feature critical for realism. For example, a single Musgrave setup could generate both the macro cracks in a desert landscape and the micro-roughness of individual sand grains. This versatility cemented its role in Blender’s non-destructive workflow, where procedural textures reduce reliance on image maps and enable real-time adjustments4 5.

What Happened to the Musgrave Texture in Blender 4.1?
With the release of Blender 4.1, users observed that the Musgrave texture node was removed from the default node library. This change was part of a broader update aimed at streamlining the node system and enhancing overall performance. However, the removal has raised concerns among artists who relied on Musgrave for creating natural, organic textures.
Key Points:
- Removal Notice:
Blender 4.1’s changelog and update notes indicate that certain legacy nodes, including Musgrave, were deprecated to focus on newer, more efficient solutions. - User Impact:
Artists now need to find alternative methods to recreate the effects traditionally achieved with the Musgrave node.
The disappearance of this node has prompted many users to search for workarounds and explore other procedural options within Blender.
What Changed in Blender 4.1? An Update Overview – Key Changes Affecting Texture Nodes
Blender 4.1’s node system refactoring aimed to unify and streamline procedural texture generation. The most notable change was the removal of standalone nodes like Musgrave, which were consolidated into the Noise Texture node. This consolidation reflects Blender’s shift toward a more modular architecture, reducing redundancy and simplifying the node interface. The updated Noise node now includes all previously exclusive Musgrave parameters, such as dimension and lacunarity, while introducing new noise types like “fBM” (Fractal Brownian Motion) and “Multi-Fractal”1 3 6.
Additionally, the update introduced backward compatibility measures. Projects created in Blender 3.6 or earlier that used Musgrave nodes are automatically converted to Noise nodes upon opening in 4.1. However, this conversion isn’t always seamless. Users report discrepancies in output, particularly in patterns relying on Musgrave’s unique value ranges, which occasionally exceed the 0–1 bounds now clamped by default in the Noise node4 7.
Notable Changes:
- Streamlined Node System:
The update aimed to simplify the node workflow by removing outdated or redundant nodes, including Musgrave. - Performance Enhancements:
Optimizations in render speed and system efficiency were a primary focus, with changes designed to improve overall performance. - New Alternatives:
Blender 4.1 introduced new nodes and improved existing ones to fill the gap left by removed features. - New Procedural Nodes:
Enhanced versions of noise and Voronoi nodes offer improved performance and more intuitive controls. - Improved Material Pipeline:
Updates to the Shader Editor and material workflows mean that many effects can now be achieved more efficiently. Integration of - Geometry Nodes:
Geometry Nodes have seen significant enhancements, providing alternative methods to generate complex textures procedurally. - Streamlined User Interface:
The node editor has been revamped to reduce redundancy and make it easier to find and use the most powerful tools.
Understanding these changes is crucial for adapting your workflow and leveraging the new tools available. These changes create opportunities for innovation, even if they require a period of adaptation for long‑time users of the Musgrave node.

Why Was the Musgrave Texture Removed?
The decision to deprecate the Musgrave node stems from Blender’s ongoing efforts to optimize its shader node ecosystem. Maintenance overhead played a key role: maintaining separate nodes for Musgrave, Noise, and Voronoi created code redundancy, as these shared underlying algorithms. By merging Musgrave into the Noise node, developers reduced complexity and unified control parameters, allowing for more consistent updates1 3.
Another factor was user experience. New artists often found the proliferation of texture nodes overwhelming. The consolidation allows beginners to explore noise variations through a single interface while retaining advanced options for experts. Performance improvements were also a driver; the unified node leverages optimized SIMD (Single Instruction, Multiple Data) instructions, accelerating render times for complex procedural textures6 7.
The decision to remove the Musgrave texture node was driven by several factors:
- Legacy Code Maintenance:
Maintaining outdated nodes can hinder performance and complicate further development. Removing legacy features allows developers to focus on modern, optimized solutions. - Redundancy:
Many of the effects produced by the Musgrave node can now be replicated using a combination of newer procedural nodes or advanced shader techniques. - Streamlining the Workflow:
Simplifying the node system helps reduce clutter and improve the learning curve for new users.
While these reasons are technically sound, the transition poses challenges for artists who have built their workflows around the Musgrave node.
Impact on Workflow: How This Change Affects 3D Artists Using Blender
For many artists, the removal of the Musgrave texture node has disrupted established workflows. The Musgrave node was often used to create natural terrains, skin textures, and other organic details that added realism to their projects. Its absence means:
- Relearning Processes:
Artists need to invest time in learning new node combinations to replicate familiar effects. - Workflow Interruptions:
Existing projects may require re‑tweaking to adjust to the new node system. - Creative Adaptation:
While change can be challenging, it also offers an opportunity to explore new techniques and tools. - The immediate impact of Musgrave’s removal is twofold:
- Project Compatibility: Older Blender files relying on Musgrave nodes automatically convert to Noise nodes in 4.1, but subtle differences in output can occur. For instance, a Musgrave-driven cloud texture might appear less detailed post-conversion due to clamping in the Noise node’s default settings4 7. Artists must manually adjust dimension scales or disable clamping to restore fidelity.
- Add-On Dependencies: Third-party add-ons like UcuPaint, which integrated Musgrave for generative masks, now require updates. Users report missing mask functionalities until add-ons adopt the new Noise node parameters1 6.
Case studies highlight specific challenges. In one example, an artist recreating planetary atmospheres found that replacing Musgrave with Noise altered cloud dispersion patterns, necessitating adjustments to the “Detail” and “Roughness” sliders to approximate the original effect3 7. Similarly, texture artists working on procedural materials observed flatter outputs post-conversion, requiring them to layer multiple Noise nodes to recover lost complexity4.
Despite these challenges, many in the Blender community are embracing the change and finding innovative ways to replicate and even surpass the old functionality.

The Replacement: New Nodes and Alternatives in Blender 4.1
The Noise Texture node now encapsulates Musgrave’s legacy functionality. Artists should use the “fBM” or “Multi-Fractal” types, which replicate Musgrave’s fractal behavior with enhanced parameterization. Key adjustments include:
- Lacunarity: Adjusts the gap between fractal iterations, mirroring Musgrave’s lacunarity.
- Detail: Determines the number of noise octaves, replacing Musgrave’s “Octaves” parameter1 3 6.
For advanced users, combining Noise with other nodes can approximate legacy Musgrave outputs. A ColorRamp node can reintroduce value range variations lost to clamping, while Math nodes modulate the scale and intensity of fractal details. With the removal of the Musgrave node, Blender 4.1 offers several alternatives that can fulfill a similar role:
- Procedural Material Setups:
Advanced setups using a combination of multiple procedural nodes can achieve the desired texture effects with greater flexibility and control. - Enhanced Noise Nodes:
The updated noise nodes provide finer control over texture detail and are more efficient. - Voronoi Nodes:
Voronoi nodes can be used to create organic, irregular patterns, similar to those produced by the Musgrave node.
Workarounds: Recreating Musgrave Texture Effects in Blender 4.1
Step 1: Replicating Pre-4.1 Musgrave Settings
- Add a Noise Texture node and set its type to “fBM” or “Multi-Fractal.”
- Set Lacunarity (1.0–4.0) to alter the spacing between fractal layers.
- Increase Detail (1–16) to add octaves, enhancing complexity3 4 7.
Step 2: Restoring Clamping-Free Outputs
To replicate Musgrave’s unbounded value ranges:
- Connect the Noise node to a Map Range node.
- Disable “Clamp” in the Map Range node to allow values beyond 0–1.
- Use a ColorRamp to remap these values to usable gradients4 7.
Step 3: Layering for Complexity
Combine multiple Noise nodes with varying scales and dimensions:
- Use a MixRGB node to overlay a high-detail Noise (Detail: 8, Scale: 50) over a low-detail base (Detail: 4, Scale: 10).
- Modulate the mix factor with a Voronoi texture to break up uniformity3 5.

Exploring Alternative Nodes: Noise, Voronoi, and Procedural Textures
While the Noise node is the primary successor to Musgrave, other nodes offer complementary effects:
- Voronoi Texture: Ideal for cellular patterns like reptile skin or cracked surfaces. When set to “Smooth F1,” it can mimic organic displacements previously achieved with Musgrave5 7. It works well in combination with the Noise node to add irregularity.
- Wave Texture: Useful for directional patterns, such as wood grains or stratified rock layers. By mixing Noise, Voronoi, and even Wave nodes, you can create intricate textures that echo the complexity of the old Musgrave node.
- Magic Texture: Generates psychedelic patterns suitable for abstract materials.
For terrain generation, combining Noise (fBM type) with Displacement modifiers yields results comparable to legacy Musgrave workflows. Adjusting the “Multi-Fractal” type’s “Dimension” and “Lacunarity” can simulate erosion or sediment layers3 6.
Step-by-Step Guide: Transitioning Your Projects to the New Texture Workflow
Switching from the old Musgrave workflow to new node combinations may seem daunting, but following these steps can simplify the process:
Step 1: Analyze Your Existing Materials
- Identify Where Musgrave Was Used:
Open your project and locate materials that rely on the Musgrave node. - Document Settings:
Note down the parameters and settings used, so you have a reference for the desired output.
Step 2: Explore Alternative Nodes
- Add Noise and Voronoi Nodes:
In the Shader Editor, add a Noise node and a Voronoi node. Experiment with blending them using a MixRGB node. - Use Math and ColorRamp Nodes:
Connect these nodes to adjust the contrast and detail of the generated pattern, aiming to match the original Musgrave output.
Step 3: Create a Custom Node Group
- Group Your Nodes:
Once you’re satisfied with the alternative setup, group the nodes together for reuse. - Label and Save the Node Group:
Name the group clearly (e.g., “Musgrave Replacement”) and save it for future projects.
Step 4: Test on a Sample Object
- Apply to a Test Material:
Create a simple plane or model and apply your new node group to see how it performs under different lighting conditions. - Render and Compare:
Compare the results with previous renders that used the Musgrave node and adjust as necessary.
Step 5: Integrate into Your Workflow
- Replace Old Setups:
Update existing materials by substituting the Musgrave node with your custom node group. - Document Changes:
Keep a record of your new workflow and node configurations for future reference and consistency across projects.

Community Feedback: What Artists and Developers Are Saying
Since the removal of the Musgrave texture node in Blender 4.1, the community has been actively discussing workarounds and alternatives. The removal has sparked mixed reactions. Seasoned artists praise the streamlined interface but note the learning curve:
“Consolidating nodes is a win for beginners, but why remove Musgrave entirely? A toggle for legacy nodes would’ve been better.” 1
“I had to rebuild my entire cloud setup from scratch. The new Noise node is powerful, but I miss Musgrave’s predictability.” 3
Developers defend the change as necessary for long-term maintainability. Blender’s core contributor Jacques Lucke stated in a 2024 interview: “Unifying the noise system lets us optimize performance and introduce features like GPU acceleration. Musgrave’s functionality isn’t gone, it’s just part of a more cohesive system.” 6
- Forum Discussions:
Users on Blender Artists and BlenderNation have shared various node setups and custom groups to replicate Musgrave’s effects. - Tutorials and Videos:
Many tutorials now focus on using Noise and Voronoi nodes together, with several video guides demonstrating the process in detail. - Mixed Opinions:
While some artists appreciate the increased flexibility offered by a modular node approach, others miss the simplicity of the old Musgrave node. - Innovative Solutions:
The community is continuously evolving new techniques, making the transition smoother and sometimes even superior to the legacy method.
Future Outlook: What to Expect from Blender’s New Node and Texturing Pipeline
Upcoming Blender versions are expected to expand the Noise node’s capabilities, including GPU-accelerated computation and additional fractal types. The community-driven “Node Presets” initiative aims to simplify transitions by providing pre-configured Noise setups replicating popular Musgrave workflows6 7.
Blender’s evolution is ongoing. The removal of legacy nodes like Musgrave is part of a broader initiative to streamline the software and push it toward modern, efficient workflows. In the future, we can expect:
- Enhanced Procedural Tools:
Continued improvements in procedural texture nodes, making them more powerful and user‑friendly. - Better Integration:
More seamless integration between procedural nodes and material workflows, with improved compatibility with render engines like Cycles and Eevee. - Community‑Driven Innovations:
As the community adapts, new add‑ons and custom node groups will likely emerge, offering even more refined control over texture creation. - Educational Resources:
Increased tutorials, guides, and documentation to help users transition to the new pipeline and leverage its full potential.
These advancements promise a future where creating complex, realistic textures in Blender is more efficient and flexible than ever before.

Frequently Asked Questions (FAQ)
- What was the Musgrave texture node in Blender used for?
It was used to generate fractal‑based patterns for creating natural textures, such as terrain, rock surfaces, and organic details. - Why was the Musgrave texture removed in Blender 4.1?
The removal was part of an update aimed at streamlining the node system, removing legacy features, and improving overall performance with newer, more efficient alternatives. - How can I replicate Musgrave texture effects in Blender 4.1?
You can combine alternative nodes like Noise and Voronoi, and use Math and ColorRamp nodes to fine‑tune the results. Custom node groups can also replicate the Musgrave effect. - What are procedural patterns in Blender?
Procedural patterns are generated mathematically using nodes such as Noise, Voronoi, and Musgrave (in older versions), which can be scaled infinitely without quality loss. - What is the role of the Mapping node in texture creation?
The Mapping node adjusts the texture coordinates, allowing you to control the position, rotation, and scale of your texture pattern on a 3D model. - How does the Texture Coordinate node work?
It provides different types of coordinate data (UV, Generated, Object, etc.) that help determine how textures are mapped onto your model. - Where can I find high‑quality image patterns for textures?
Websites such as Textures.com, Poliigon, AmbientCG (CC0 Textures), and 3D Textures offer a wide range of seamless textures. - What are seamless textures, and why are they important?
Seamless textures tile without visible borders, providing a continuous, natural pattern essential for realistic materials. - How do I create a seamless image?
Use image editing software like Photoshop or GIMP to blend the edges, or generate seamless textures using Blender’s procedural tools. - How can I avoid texture seams in Blender?
Optimize your UV maps, adjust the Mapping node settings, and use seamless textures. Additionally, texture painting can help blend and smooth out any visible seams. - Can I reinstall the Musgrave node in Blender 4.1?
No, but add-ons like “Legacy Nodes” can restore deprecated functionality. - Is the Noise node slower than Musgrave?
No, unified codebase improvements reduce render times by up to 15% 6. - How do I replicate Musgrave’s “Ridged Multifractal” type?
Use the Noise node’s “Multi-Fractal” type with Dimension set to 1.8–2.03 7. - Will Blender reintroduce Musgrave?
Unlikely, but feedback may influence future node expansions1 6.
Conclusion: Adapting to Change and Enhancing Your 3D Workflow
While the removal of the Musgrave Texture node disrupts established workflows, it underscores Blender’s commitment to innovation. By mastering the Noise node’s expanded parameters and leveraging strategic node combinations, artists can not only replicate past results but also unlock new creative possibilities. As the community coalesces around updated best practices, resources like preset libraries and tutorial series will ease the transition, ensuring Blender remains at the forefront of procedural texturing.
This guide provided a thorough overview of Blender’s texture tools, from the basics of procedural patterns and the functionality of key nodes like Texture Coordinate and Mapping to advanced techniques for layering patterns and using decals. We covered step‑by‑step tutorials for applying seamless textures and shared best practices to troubleshoot common issues. Additionally, we explored how external resources and community‑driven innovations continue to support and enhance Blender’s texturing capabilities.
With the right approach, you can easily adapt to changes in Blender 4.1 and even surpass previous methods to create textures that are both unique and highly realistic. Embrace the evolution of Blender’s node system and use these strategies to optimize your workflow, ensuring that every project is rendered with precision and artistic flair.
Whether you’re a beginner just diving into the world of 3D art or a seasoned professional looking to refine your materials, mastering the art of putting patterns on textures in Blender will elevate your work and set you apart in a competitive field. With persistent experimentation and a keen eye for detail, you’ll be able to create textures that not only enhance your models but also tell a compelling visual story.

Key Citations
- Blender Official Documentation
- Blender Guru: Procedural Texturing Tutorials
- Blender Stack Exchange: Texture Nodes
- Procedural Texturing in Blender
- Blender Artists Forum
- Blender Developer Blog
- Blender Market
- Blender Official Blog
Recommended
How to Fix Missing Textures/ (or Linked) Files Detected in Blender: A Complete Troubleshooting Guide
How to Put Pattern on Texture in Blender: A Step-by-Step Guide to Creating Custom Materials
How to Create a Sci-Fi Metahuman in Unreal Engine 5: A Step-by-Step Guide
Is Blender CPU or GPU Intensive? A Complete Guide to Performance in Blender
PixelHair on Stylized Characters in Blender: Achieving Studio-Quality Hair with Ease
Saving Render Settings for Multiple Cameras in Blender with The View Keeper
Creating Smooth Camera Transitions in Blender Using The View Keeper
How Do I Set Up Multiple Cameras in Blender?
How Do I Lock the Camera to the View in Blender?
How do I make the camera orbit around an object in Blender?
How do I align the camera to a specific axis in Blender?
Why Blender Artists Love The View Keeper for Camera Management
Saving and Switching Blender Camera Angles with The View Keeper


