

Rendering in Blender is a critical step in any 3D project, transforming your meticulously crafted scenes into final images or animations. However to do this, at least a camera is needed, and in many cases mutilpe cameras. Managing multiple cameras, adjusting render settings for different platforms, and rendering various angles can quickly become a tedious process with lot of repititions and restritions. For artists juggling client demands, tight deadlines, or complex projects, an inefficient rendering workflow can mean the difference between success and frustration.
This is where The View Keeper comes in, a powerful yet lightweight plugin for Blender designed to streamline camera management and optimize rendering workflows. Developed by Yelzkizi, The View Keeper introduces tools that simplify the process of saving, organizing, and rendering multiple camera setups making it an indispensable asset for freelancers, animators, and 3D artists alike. In this comprehensive article, we’ll explore how The View Keeper enhances Blender rendering workflows, breaking down its key features, providing a practical guide to its use, and addressing common questions. By the end, you’ll see why this plugin is a game-changer for anyone looking to save time, reduce errors, and boost creativity in rendering.
This article ensures a thorough exploration of the topic, offering detailed explanations, practical examples, and actionable insights. Let’s dive in.
Introduction: The Challenges of Rendering in Blender
Blender is a robust and versatile tool, but its default rendering workflows can be restrictive, especially for projects requiring multiple outputs. Consider a scenario where you’re tasked with rendering a product advertisement for different platforms: a square image for Instagram, a landscape video for YouTube, and a vertical still for TikTok. Without a dedicated management tool, you probably need to:
- Create separate camera to capture multiple angles.
- Manually adjust resolution, aspect ratio, output settings and other camera settings for each camera
- Render each camera shot individually, waiting for it to finish.
- Go back to Blender and all over again manually adjust resolution, aspect ratio, output settings and other camera settings for each camera
- Then repeat till all platform renders are complete.
This approach is not only time-consuming but also increases the risk of mistakes. This can be abything from forgetting to update a setting to completely overwriting a previous render and having to re-render. For animators, the complexity compounds when you add client revisions into the mix. It really becomes a logistical nightmare.
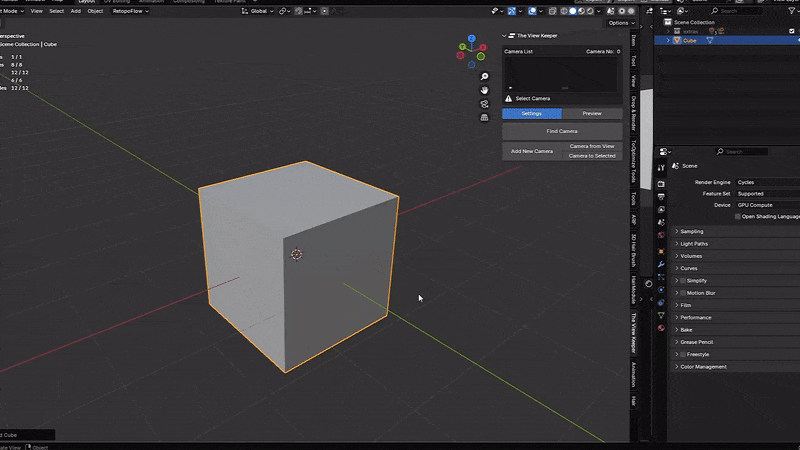
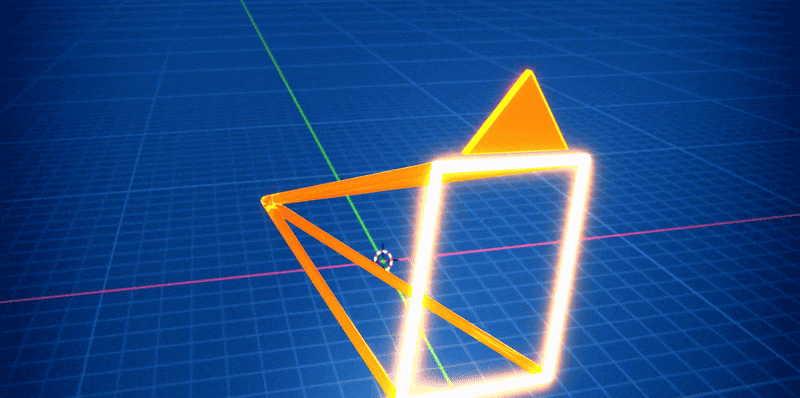
The View Keeper addresses these challenges head-on by centralizing camera management and rendering tasks within an intuitive interface. Accessible via the N-panel in Blender’s 3D viewport, this plugin allows users to save camera settings, manage multiple views, and batch-render outputs with different render settings. All without cluttering the scene and in a single render. Whether you’re a solo artist or part of a team, The View Keeper transforms rendering from a bottleneck into a streamlined, efficient process.

What is The View Keeper?
The View Keeper is a Blender plugin that enhances rendering workflows by providing advanced camera management tools. At its core, it simplifies three key aspects of rendering:
- Camera Configuration: Save and manage render settings for multiple cameras with each camera having it’s own unique camera settings.
- View Organization: Store multiple angles and settings within a single camera.
- Efficient Output: Render all saved setups in one go, even with different render parameters.
How It Works
The plugin operates through two primary tables in its interface:
- Camera List Table: Manages all cameras in your scene, storing unique render settings such as resolution, aspect ratio, file format and more.
- View List Table: Saves multiple views ( camera angles, positions, and camera-specific settings ) within a single camera, reducing the need for duplicate cameras.
These tables are complemented by features like Alternative Rendering, which processes multiple renders sequentially, and a Preview Section, which displays saved settings for transparency and accuracy. Together, they create a workflow that’s both powerful and user-friendly.
Why It’s a Game-Changer
Rendering workflows matter because they directly impact productivity and quality. The View Keeper offers:
- Time Savings: Automate repetitive tasks and render multiple shots simultaneously.
- Consistency: Ensure settings are applied correctly across outputs.
- Flexibility: Experiment with compositions without losing previous setups.
For freelancers delivering multi-platform content, animators crafting dynamic sequences, or hobbyists refining their craft, The View Keeper is a tool that adapts to your needs, enhancing efficiency without sacrificing control.
Key Features of The View Keeper for Rendering Workflows
The View Keeper’s strength lies in its feature set, each designed to tackle specific rendering pain points. Let’s explore how these features improve your Blender experience.
1. Camera List Table: Centralized Camera Management
The Camera List Table is the backbone of The View Keeper’s camera management system. It allows you to:
- Add Cameras: Incorporate existing cameras or create new ones directly in the plugin.
- Save Render Settings: Store format settings (resolution, aspect ratio) and output settings (file format, save path) for each camera.
- Refresh Records: Update saved settings when changes are made, keeping the saved camera settings updated.
- Switch Cameras: Switch and restore camera settings with a single click.
- Monitor Usage: Track the number of cameras in your scene for better project oversight.
How It Helps Rendering
Imagine you’re rendering a scene for three platforms: a 1080×1080 PNG for Instagram, a 1920×1080 TIFF for YouTube, and a 1080×1920 JPEG for TikTok. With the Camera List Table, you assign each camera its own settings, save them as records. Now, you can switch between them effortlessly. No more manual tweaks in Blender’s Output Properties panel, just select a camera, and its settings are ready to go. This is especially useful for projects requiring multiple resolutions, file types or even need to save renders to multiple folders. It eliminates repetitive adjustments and ensures consistency.

2. View List Table: Multiple Views, One Camera
The View List Table takes camera management and render efficiency a step further by allowing you to save multiple views within a single camera. Its capabilities include:
- Add Views: Save camera transforms (position, rotation), lens settings (focal length, depth of field), and more as view records.
- Refresh Views: Update a view record to capture new camera settings, ideal for iterative adjustments.
- Switch Views: Switch between saved different saved camera angles/views instantly, with each view’s settings automatically applied.
- Clear Views: Reset a camera’s view list with one click, streamlining cleanup.
How It Helps Rendering
Instead of cluttering your scene with multiple camera objects for different angles, you can use one camera and save each camera angle as a view. For example, in a product render, you might save a “Close-Up” view with a shallow depth of field and a “Wide Shot” with a broader focus. When it’s time to render, you can cycle through these views without repositioning the camera manually. This reduces scene complexity, speeds up experimentation, and keeps your renders optimized. Crucial for rendering workflows with multiple camera compositions.
3. Alternative Rendering: Batch Processing Made Simple
The standout feature of The View Keeper is Alternative Rendering, which lets you render multiple cameras and views in a single session, even if they have different settings. Key aspects include:
- Batch Rendering: Process all saved records sequentially with one command.
- Varied Settings: Apply unique resolutions, formats, and save locations to each output.
- Background Operation: Renders run in the background.
How It Helps Rendering
Alternative Rendering is a time-saver for multi-output projects. Consider the earlier example: three platforms, each needing a close-up and wide shot. With The View Keeper, you set up your cameras and views, then hit “Alternative Render.” The plugin renders all six shots, Instagram close-up and wide (PNG format), YouTube close-up and wide (TIFF format), and TikTok close-up and wide (JPEG format). While automatically saving each to its designated folder. What might have taken hours of manual rendering is reduced to a single, one click hands-off process. This efficiency is invaluable for tight deadlines or iterative workflows.
4. Preview Section: Transparency and Assurance
The Preview Section provides a clear view of your saved settings, ensuring accuracy and debuging before rendering:
- Camera Previews: Displays format (e.g., 1920×1080) and output (e.g., PNG, save path) settings for each camera record.
- View Previews: Shows saved camera settings (e.g., position, focal length) for each view record.
How It Helps Rendering
Mistakes in rendering like using the wrong resolution or forgetting to set the output format can waste time and resources. The Preview Section mitigates this by letting you double-check settings at a glance. Before hitting render, you can confirm that your Instagram camera view is set to 1080×1080 PNG or that your close-up view has the correct depth of field. This transparency enhances confidence and reduces errors, making your workflow more reliable.
Practical Guide: Rendering with The View Keeper
To demonstrate The View Keeper’s real-world impact, let’s walk through a practical scenario: rendering a product advertisement for multiple platforms. This step-by-step guide shows how to leverage its features effectively.
Scenario
You’re tasked with delivering renders of a 3D product model for:
- Instagram: Square image (1080×1080, PNG), close-up and wide shots.
- YouTube: Landscape video frame (1920×1080, TIFF), close-up and wide shots.
- TikTok: Vertical image (1080×1920, JPEG), close-up and wide shots.
Here’s how The View Keeper simplifies this process.
Step 1: Set Up Cameras and Views
- Add Cameras:
- Open The View Keeper in the N-panel.
- Add three cameras: “Instagram Camera,” “YouTube Camera,” and “TikTok Camera.”
- Select each in the Camera List Table to make it active as needed.
- Save Render Settings:
- For “Instagram Camera”:
- Set resolution to 1080×1080 in Format settings.
- Set output to PNG and choose a save folder (e.g., “C:/Renders/Instagram”).
- Click Refresh Record to save.
- For “YouTube Camera”:
- Set resolution to 1920×1080.
- Set output to TIFF, save to “C:/Renders/YouTube.”
- Refresh Record.
- For “TikTok Camera”:
- Set resolution to 1080×1920.
- Set output to JPEG, save to “C:/Renders/TikTok.”
- Refresh Record.
- For “Instagram Camera”:
- Save Views:
- Select “Instagram Camera.”
- Position it for a close-up shot (e.g., zoom in, shallow depth of field), then click Add View in the View List Table. Name it “Close-Up.”
- Reposition for a wide shot (e.g., pull back, wider focus), add another view named “Wide Shot.”
- Repeat for “YouTube Camera” and “TikTok Camera,” saving “Close-Up” and “Wide Shot” views for each.

Step 2: Verify Settings
- In the Camera List Table, select each camera record and check the Preview Section to confirm resolution and output settings.
- In the View List Table, select each view record and verify saved camera settings (e.g., position, focal length).
Step 3: Render All Shots
- Click Alternative Rendering in The View Keeper.
- The plugin processes all six renders sequentially:
- Instagram Close-Up (PNG, 1080×1080).
- Instagram Wide Shot (PNG, 1080×1080).
- YouTube Close-Up (TIFF, 1920×1080).
- YouTube Wide Shot (TIFF, 1920×1080).
- TikTok Close-Up (JPEG, 1080×1920).
- TikTok Wide Shot (JPEG, 1080×1920).
- Renders run in the background, saving to their respective folders.
Step 4: Adjust and Re-Render (If Needed)
- If the client requests a tweak (e.g., a tighter close-up for Instagram), adjust the “Close-Up” view for “Instagram Camera,” refresh the record, and re-run Alternative Rendering. Only the updated shots need reprocessing.
Rendering Animations
The View Keeper also shines for animation workflows:
- Set up a camera with multiple views (e.g., “Angle 1,” “Angle 2,” “Angle 3”).
- In the timeline, select “Angle 1” at frame 1 and insert a keyframe via The View Keeper’s keyframing option.
- At frame 50, switch to “Angle 2” and keyframe again.
- At frame 100, switch to “Angle 3” and keyframe.
- Use Alternative Rendering to output the full animation, with the plugin applying each view’s settings at the correct frames.
This method ensures smooth transitions between angles, with consistent render settings throughout, perfect for dynamic sequences and cinematic shots.
Common Questions About The View Keeper
Here are answers to 10 frequently asked questions to help you get the most out of The View Keeper.
1. How do I install The View Keeper?
- Download the plugin ZIP file from the official source.
- In Blender, go to Edit > Preferences > Get Extensions.
- Click the down arrow, select Install from Disk, choose the ZIP, and click Install from Disk.
- Verify it’s installed by checking the N-panel in the 3D viewport for “The View Keeper.”
2. What versions of Blender does The View Keeper support?
- It requires Blender 4.2 or higher. Future updates will maintain compatibility at no additional cost.
3. Can I use The View Keeper with multiple cameras?
- Yes, the Camera List Table is built to handle multiple cameras, each with unique settings and views.
4. How does The View Keeper handle different render engines like Cycles or Eevee?
- It’s agnostic to render engines, managing camera and output settings regardless of whether you use Cycles, Eevee, or another engine.
5. Is there a limit to how many views I can save?
- No strict limit exists; it’s constrained only by your system’s memory. For optimal performance, avoid excessive view records.
6. Can I use The View Keeper for animation rendering?
- Absolutely. Keyframe view switches to create multi-angle animations, and Alternative Rendering applies the correct settings per segment.
7. How does Alternative Rendering work?
- It renders all saved camera and view records in sequence, using their specific settings, and processes in the background for uninterrupted work.
8. Does The View Keeper support rendering to different file formats?
- Yes, each camera record can specify its own format (e.g., PNG, JPEG, TIFF) and save location, applied during rendering.
9. Can I rename records for better organization?
- Yes, rename camera and view records in their respective tables. Renaming a camera record also updates the camera’s name in the scene but doesn’t for view records.
10. Is there a way to clear all views at once?
- Yes, the View List Table’s Clear View List option removes all views from a camera after confirmation.

Conclusion: Elevate Your Blender Workflow
The View Keeper redefines rendering in Blender, turning a potentially chaotic process into a streamlined, efficient workflow. Its Camera List Table eliminates manual setting adjustments, the View List Table declutters your scene, Alternative Rendering saves hours of processing time, and the Preview Section ensures accuracy. Together, these features empower you to tackle complex projects with confidence and speed, whether delivering multi-platform renders, animating intricate sequences, or iterating on client feedback.
For freelancers, it’s a lifeline for meeting deadlines and managing revisions. For animators, it’s a tool for crafting dynamic shots without workflow headaches. For any Blender user, it’s a way to focus on creativity rather than logistics. This article has unpacked The View Keeper’s capabilities in detail, offering practical insights and answers to common questions for more details check out the addon documentation.