


Introduction:
Creating a 3D render that’s indistinguishable from a real photograph is the ultimate goal for many Blender artists. Achieving photorealism means paying attention to countless details—from accurate lighting and materials to camera effects and post-processing. In this comprehensive guide, we’ll reveal the secrets to Blender photorealism and explain how to make your renders look real. Whether you use Cycles or Eevee, and whether you create characters, products, or environments, these tips will help elevate your work. Let’s dive in step by step.
What Is Photorealism in Blender Rendering?
Photorealism in Blender involves accurately simulating light, materials, and scale using PBR-based engines (Cycles and Eevee). It’s essential for industries like film and gaming but requires mastering lighting, materials, and camera setups for realistic results.
How to Set Up Lighting for Photorealistic Renders in Blender
Lighting is crucial for photorealism, with many artists claiming it’s 80% of the work. To achieve realistic lighting, mimic natural light with key, fill, and rim lights. For outdoor scenes, use Blender’s Sun lamp and sky textures or HDRIs. For indoor or portrait scenes, use a three-point lighting setup.
Always use physically accurate light intensities and colors, and in Cycles, enable Multiple Importance Sampling for world lighting to reduce noise. In Eevee, use Soft Shadows and Contact Shadows for realistic effects. Indirect light is important too, with Cycles handling it automatically and Eevee requiring probes and cubemaps for baked lighting. Adjust light size for soft or sharp shadows, and always study reference photos for accuracy. Proper lighting can make even a simple model look more realistic than a poorly lit detailed one.

What Are the Best HDRIs for Photorealism in Blender?
HDRIs (High Dynamic Range Images) provide realistic, 360° environment lighting that can instantly enhance photorealism in Blender. They capture real-world lighting and reflections, making scenes feel natural with accurate ambient and directional lighting. High-resolution HDRIs with a wide dynamic range (e.g., those with the sun or bright windows) create strong shadows and fill light. Free libraries like Poly Haven offer a variety of high-quality HDRIs for different moods.
When using HDRIs, ensure they’re set as Environment Textures, not tone-mapped images, to preserve dynamic range. Rotate the HDRI to find the best lighting angle and combine it with additional lights like a Sun lamp for specific shadow directions. For studio shots, use HDRIs without greenish light or tree reflections, and for outdoor scenes, match the HDRI to the environment. While HDRIs provide great base lighting, don’t hesitate to add extra lights for final adjustments.
How to Use Real-World Scale and Measurements in Blender
For photorealism, always model your scene at real-world scale. For example, a 1-meter tall chair in reality should be 1 meter in Blender. Real-world scale impacts lighting, physics, and depth of field, as Blender’s camera mimics a real DSLR. Using incorrect scale leads to unrealistic lighting and lens settings, such as unreal F-stop values.
Blender makes it easy to model to scale: Set your scene to real-world scale using Metric or Imperial units, and use accurate reference measurements. This ensures realistic physics, camera perspective, and scene accuracy. Always check and apply scale when importing assets.
Proportions matter for realism; slight inaccuracies in object size can make a render feel “off.” Use references and measure real objects to avoid mistakes. Keep the camera at eye-level for human-scale scenes. Correct scale ensures accurate materials, textures, lighting, and physics, eliminating common photorealism issues like blurry depth of field or odd shadows.
How to Create Photorealistic Materials and Textures in Blender
Materials are crucial to photorealism, as they define how surfaces interact with light. Blender’s Principled BSDF shader, which follows real-world properties, is key for creating realistic materials. To make a material realistic, use high-quality textures and appropriate maps like roughness, normal, and ambient occlusion. High texture resolution is important, especially for close-up views. PBR materials follow real-world ranges and values, and reference materials like Index of Refraction for accurate realism. Adding variation and imperfections, like scuffs or slight color changes, helps avoid the “CG look.” Investing time in materials can significantly improve the realism of your render.

What Are the Best Texture Maps for Photorealism?
Photorealistic materials in a PBR workflow use multiple texture maps, each representing a surface property:
- Albedo (Diffuse) Map: Base color without lighting/shadows, showing flat details like wood grain or paint.
- Roughness Map: Defines shininess (dark = glossy, light = rough), key for realism and showing wear.
- Normal Map (or Bump/Height Map): Simulates surface details (scratches, texture) for light interaction without altering geometry.
- Metalness Map: Distinguishes metals (white) from non-metals (black) for realistic reflections in PBR.
- Specular Map: Defines reflectivity color for non-metals in specular/gloss workflows (less used in Blender’s Principled BSDF, which defaults Specular to ~0.5 or uses IOR).
- Displacement (Height) Map: Adds real depth (e.g., tile gaps), best with Cycles’ Adaptive Subdivision.
- Ambient Occlusion (AO) Map: Darkens crevices for realism, optional in Cycles, useful in Eevee for fake shadows, used sparingly.
- Opacity (Alpha) Map: Controls cut-outs/transparency (black = transparent, white = opaque), e.g., torn stickers, plant leaves.
- Emissive Map: Adds self-lit areas (e.g., screens, LEDs, fireflies), contributing light from the material.
- Subsurface and Other Special Maps: Epidermal/subdermal maps for Subsurface Scattering (e.g., skin), or glossiness maps (inverse roughness) for specific workflows.
Key maps for realism are Albedo, Roughness, Normal, and Metalness (for metals). Combining these in the Principled BSDF shader with proper connections ensures realistic materials.
How to Use the Principled BSDF Shader for Realism in Blender
Blender’s Principled BSDF shader is essential for photorealistic shading, integrating multiple properties into one energy-conserving, PBR-compatible node.
To use it effectively:
- Base Color: Add an albedo map or color. For metals, it’s the reflectance tint; for dielectrics, it’s the diffuse color.
- Metallic: Set to 0 for insulators (plastic, wood), 1 for metals (gold, iron). Use a black/white metallic map if available.
- Roughness: Use a roughness map or set a value (0 = mirror, 1 = matte) to define reflection character.
- Specular: Controls non-metal reflections, typically 0.5. Adjust for wet surfaces or use IOR (e.g., 1.33 for water) for auto-specular.
- Normal: Connect a Normal Map node (set to Non-Color Data) or a Bump node for texture-based normals.
- Clearcoat: Set to 1.0 for a shiny layer (e.g., car paint, varnished wood), adding secondary reflections without altering base roughness.
- Subsurface Scattering: Use the Subsurface slider (e.g., 0.1) and adjust Subsurface Radius for soft scattering in materials like skin or leaves.
- Transmission: Set to 1.0 for transparency, tweak roughness for clarity, and use correct IOR. Enable Screen Space Refraction in Eevee or ensure transmission bounces in Cycles.
Principled BSDF is the default for realistic materials, simplifying workflows, ensuring energy conservation, and working with PBR maps. One node suffices for most materials, offering a physically plausible, efficient solution, with layering possible for complexity.

How to Add Surface Imperfections for More Realistic Results
Real-world objects aren’t perfectly clean or smooth; imperfections like scratches, fingerprints, dust, dirt, smudges, dents, corrosion, and edge wear make renders realistic. Without them, pristine objects look fake subconsciously.
Techniques to add imperfections:
- Bump/Normal Mapping: Use subtle normal maps or procedural noise to break up perfect reflections and enhance surfaces like metal, with small strength values for impact.
- Roughness Map Variation: Apply grunge maps to vary roughness, simulating wear like polished spots or dirt buildup, boosting material realism when mixed with base roughness.
- Color Variation and Dirt: Use vertex paint or texture masks for discoloration (dirt, moss, tonal shifts), guided by AO/cavity maps to darken crevices and lighten edges for realistic weathering.
- Geometry Imperfections: Bevel sharp edges and add slight asymmetries to objects, as perfect symmetry and edges look unnatural.
For realistic materials, add subtle imperfections (e.g., fingerprints, dust, fuzz on fabric, oiliness on skin) via texture maps, applied sparingly to avoid overemphasis. Small details enhance life and realism, with subtlety being key.
How to Set Up a Realistic Camera in Blender (Include using The View Keeper and its benefits)
The camera setup in Blender, a virtual DSLR, impacts realism through framing and configuration. Here’s how to achieve it:
- Focal Length and Sensor Size: Use 50mm for natural perspective, 18-35mm for architecture, and 80-120mm for portraits. Adjust per subject and use Passepartout for accurate framing.
- Depth of Field: Set small f-stops for close-ups (blurry background) and large f-stops for wide shots (more in focus). Ensure proper scene scale for realistic DOF.
- Motion Blur: Enable for moving elements (e.g., wheels, characters) to enhance realism. Use sparingly in stills to imply motion, avoiding it if nothing moves.
- Camera Position and Height: Place at eye level for human perspective, unless using high/low angles. For architecture, keep level to avoid distortion, adding a slight 0.1° tilt for a natural, human-held feel.
- Lens Settings: Mimic bokeh shape, barrel distortion, and vignetting via camera settings and post-processing nodes.
- The View Keeper Add-on: The View Keeper simplifies camera management by storing, switching, and tweaking multiple angles/settings in one camera. It’s useful for testing compositions, adjusting focal length/DOF, and preserving setups without extra cameras, ideal for product visualization, environments, and animations, ensuring consistency and focus on artistic direction without accidental camera moves.
Treat Blender’s camera like a real one: pick lenses wisely, focus intentionally, and use tools like View Keeper. A good angle enhances realism, mimicking real photos/films, while a poor one can make even high-fidelity scenes feel artificial.

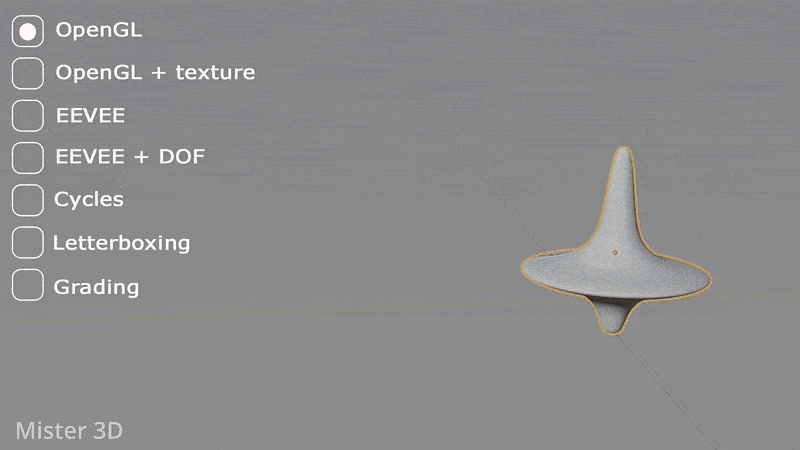
What Are the Best Render Settings for Photorealism in Cycles?
Cycles, a physically-based path tracer in Blender, achieves photorealism with proper settings, balancing quality and render time. Here are the key settings:
- Samples: Use 200-500 samples for photorealism, with Adaptive Sampling to target noisy areas and save time. Complex lighting may need 1000+ samples to reduce noise.
- Denoising: Use OptiX, OpenImageDenoise, or Intel OIDN denoisers subtly to reduce noise with fewer samples, avoiding detail blur. Apply to specific passes, use a low noise threshold, or pair with Albedo + Normal pass denoising for better detail.
- Light Bounces: Set diffuse bounces to 4–8 and glossy/transmission to 2–4 for realistic global illumination. Higher bounces (up to 12) improve accuracy in complex scenes but increase render time.
- Clamp and Caustics: Enable Clamp Indirect (5 or 10) to cut fireflies, but avoid low values that dim caustics/reflections. Enable reflective/refractive caustics for realism (needs more samples) or use Shadow Caustics with “caustic caster” lights and “caustic receiver” objects for approximated caustics.
- Resolution: Render at 1080p minimum, 4K for best detail and sharpness, enhancing realism, especially when zoomed.
- Color Management (Filmic): Use Filmic for 25 stops of dynamic range, preserving highlights and preventing white clamping, ensuring realistic lighting with bright highlights and well-exposed shadows.
- Volume Lighting: For volumes (fog, smoke), enable Volumetric Shadows and slightly increase volume bounces for accuracy. Volume rendering needs high samples or separate Denoise for the volume pass due to noise.
- Performance Settings: Use GPU (or GPU+CPU) and adjust tile size—smaller for CPU, larger for GPU. Auto tile size in newer Blender versions improves efficiency.
For photorealistic Cycles renders, prioritize Filmic, ample samples, sufficient bounces, and minimal clamping. Aim for clean, noise-free results, tweaking based on tests and refining in post.
How to Use Depth of Field and Motion Blur for Realism
Depth of Field (DOF) and Motion Blur, inspired by photography and cinematography, enhance realism when applied correctly. Here’s how in Blender:
- Depth of Field: Use DOF to mimic camera behavior by adjusting F-stop and focus distance. Lower F-stops (e.g., F2.8–F5.6 for portraits) create shallow DOF with more blur; higher F-stops (e.g., F8 or F11 for exteriors) keep more in focus. In Cycles, DOF uses ray tracing for realistic bokeh; in Eevee, it’s a post-process effect. Set focus distance based on real-world scale for accuracy, using DOF to direct viewer focus realistically.
- Motion Blur: Motion Blur simulates blur from moving objects or cameras. In Cycles, enable Motion Blur to blur based on frame-to-frame motion, controlled by Shutter (0.5 = cinematic 1/48th second at 24 FPS). Slower shutters increase blur, faster reduce it. In Eevee, it’s a post-process effect, effective for action but subtle in stills to avoid excess blur.
- Tip: For crisp static scenes with a hint of life, add slight motion blur via minor camera shake, mimicking handheld low-shutter photography. This is advanced and optional, not typically needed unless matching a specific style.
DOF and motion blur are finishing touches that match your image’s story (fast subjects -> motion blur, close-ups -> DOF). They eliminate “CG feel” by replicating real-world optic/camera limits, aligning with subconscious expectations.

How to Post-Process Your Render for a Photorealistic Look
PPost-processing polishes raw Blender renders, enhancing believability through compositing and color grading, like developing a photo. Here are the tips:
- Filmic Tone Mapping: Filmic preserves highlight/shadow details; tweak Look in Color Management for mood. Medium contrast curve balances dynamic range for realistic display.
- Glare and Bloom: Use the Glare node in the Compositor for subtle bloom/streak effects, mimicking lens imperfections. Keep minimal—overuse looks unnatural. Streaks simulate flares but use sparingly.
- Color Grading: Adjust white balance, contrast, and hues to match mood or reference photos (e.g., warm evening, neutral midday).
- Sharpening/Blurring: Slight sharpen enhances details; avoid oversharpening. Add subtle film grain/noise to break perfection, boost realism, and reduce banding in dark areas, unifying the image.
- Lens Distortions: Use Lens Distortion node for slight barrel distortion and chromatic aberration (0.01–0.05) to mimic real camera shots, keeping it subtle.
- Composite Elements: For separate passes (volumetrics, DOF), composite correctly. Use Mist pass for atmospheric perspective in large scenes, color-match backgrounds/skies, and blur if out of focus.
- High Dynamic Range Edits: With OpenEXR (HDR) renders, adjust tonemapping/exposure to balance shadows/highlights like real cameras. Allow some clipped highlights/deep shadows for contrast and realism; Filmic aids highlight retention.
- Final Comparison: Compare your render to a real photo of a similar subject. Adjust saturation, color bleeding (via subtle overlays), or blacks (with a contrast curve) to refine based on differences. This trains your eye and improves output.
Post-processing enhances, not fixes, with subtle bloom, vignette, contrast, and color harmony making renders photorealistic. Avoid overdoing effects to prevent unrealistic artifacts; subtlety is key.
What Are the Most Common Mistakes That Ruin Photorealism?
Common mistakes can undermine photorealism. Here are key pitfalls:
- Incorrect Scale and Proportions: Consistent scale and gravity-aligned objects are vital. Off-size or intersecting objects break realism. Use Blender’s gravity or rigid body simulation for correct placement.
- Too-Perfect Geometry (Sharp Edges): Real objects have beveled/filleted edges, not sharp ones. Add slight bevels and irregularities (e.g., dings) for realistic highlights and renders.
- Low-Quality or Insufficient Textures: Low-res images or flat colors kill realism. Use high-quality textures with proper UV mapping, breaking tiling with decals/variations, aligning seams, and avoiding stretching.
- Overly Clean and Uniform Materials: Add subtle imperfections (e.g., fingerprints, dirt) for realism, keeping weathering contextual with references, not overdone.
- Poor Lighting and Shadow Handling: Realistic shadow color and global illumination are key. Avoid pure black shadows or flat lighting; fix shadow terminator with auto-smooth or extra geometry.
- Camera Angles and Composition Mistakes: Odd angles or extreme lenses distort reality. Use realistic camera settings and thoughtful framing for natural perspective.
- Missing Contact Shadows / Floating Objects: Ensure contact shadows or indentations where objects meet surfaces, using Ambient Occlusion or subtle darkening to ground them.
- Excessive Perfection in Animation (if applicable): Perfect motion paths look robotic. Real motion has easing, noise, or shake; perfect rotation without blur looks synthetic (less relevant for stills).
- Ignoring Reference: Use real-life references for lighting and materials, not just imagination or defaults, to avoid unrealistic choices.
- Overdone Post-Processing: Excessive bloom, chromatic aberration, vignetting, saturation, or contrast makes images artificial. Keep effects subtle for realism.
- Not Enough Samples (Noisy Image): Noise ruins realism unless intentional (e.g., film grain). Avoid early render stops leaving speckles in shadows/glossy areas; use enough samples or denoising for a clean image.
For photorealism, ensure realistic lighting, quality textures, and detailed objects. Regularly check for errors, seek feedback, and compare with real photos to improve, aiming to eliminate CG signs.

How to Use References to Improve Realism in Blender
References from real-world images and observations are vital for photorealism. Pros use photos, materials, lighting, and movie stills to ensure accuracy in textures, lighting, and details, making renders convincing.
Here’s how to use references in Blender:
- Modeling References: Use blueprints and multi-angle photos for real-world objects to ensure accurate proportions, especially for complex subjects like the human body.
- Material and Texture References: Collect close-up photos of materials (e.g., rust, skin) to replicate light interaction in 3D models and shaders.
- Lighting References: Study lighting images (e.g., overcast, sunset) to mimic real-world shadows and colors for believable scenes.
- Camera and Composition References: Learn from photography for angles, lens choices, and depth of field suited to subjects.
- Use Pureref or Similar Tools: Display references in Pureref or Blender’s Image Editor, comparing texture, lighting, and color to align with reality.
- Physics and Behavior References: Study slow-motion videos/photos of simulations (liquid, fire, cloth) to match Blender’s physics settings to real-life behavior.
- Feedback Loop: For fantasy, use real references (e.g., lizard skin for dragon scales) to ground imaginative elements.
- Avoid Stylized References if Aiming for Photorealism: Use real photos/scans, not CG renders/artwork, cross-checking with reality even when studying CG artists.
References are key for realism, used by pros for accuracy in materials, lighting, and composition. A reference library and consistent checks sharpen realism instincts, reducing guesswork and boosting render quality.
Frequently Asked Questions (FAQ)
- Can I achieve photorealism with Eevee, or is Cycles required?
Eevee can achieve photorealism with effort but struggles with complex scenes. Cycles excels at realistic lighting naturally; Eevee needs manual tweaks for reflections and indirect light. Use Eevee for previews, Cycles for high-quality renders. - What resolution and format should I use for textures to make my renders look real?
Use high-res, lossless textures (2K-8K) based on detail needs, with proper UV scaling. Save final renders in 16-bit formats (PNG, EXR) for post-processing. Avoid low-res textures for realism. - Do I need a powerful GPU/CPU to create photorealistic renders?
Photorealism is possible on any computer, but strong hardware speeds rendering. Optimize with Adaptive Sampling, proxies, and render farms for high-res outputs. A good GPU helps but isn’t required. - My renders still look fake. What are the typical things I should check to improve realism?
Check:- Lighting – Too flat/harsh? Matches real-world (time of day, indoor/outdoor)? Use HDRI or bounce lights.
- Materials – Principled BSDF with realistic values? High-res, mapped textures? Add roughness, avoid pure colors.
- Models – Beveled edges? Proper scale, no odd intersections? Add details if too perfect.
- Shadows – Contact shadows at surfaces? Adjust softness, ambient occlusion. Ensure right color/intensity (not pitch black in daylight).
- Depth of Field – Add for realistic focus, match lighting/color in compositing. Ensure detailed 3D environment for reflections/depth.
- Post-processing – Refine lighting, materials, grading. Compare to photos, get feedback, fix step-by-step.
- How do I make realistic glass and water in Blender? They always look either too clear or too noisy.
Use Principled BSDF with Transmission 1.0, correct IOR, and Caustics for glass; ensure reflections. For water, add a dark object behind, use Volume Absorption for large bodies, and increase light samples to reduce noise. In Eevee, use Screen Space Refraction; Cycles is better for realism. Model glass with thickness. - How can I get rid of the “CGI shine” on my objects? Everything looks too glossy.
Fix “CGI shine” from high specularity/low roughness or unrealistic lighting/reflections:- Increase roughness, add noise for realistic materials.
- Set specular at 0.5 for dielectrics, use metallic for metals, avoid extreme tints for non-metals.
- Check lighting: Contrasty HDRI gives matte materials minimal highlights. Ensure environment/objects for realistic reflections, not solid colors.
- Normals: Verify normals, use autosmooth, adjust light angles, match real-world reflectivity.
- How do I use IES light profiles in Blender for more realistic lighting?
IES profiles use real-world data for authentic light patterns. Load into Spot, Area, or Point Lights for beam shapes and falloff, ideal for interior archviz. Adjust strength due to unit differences - My character’s skin looks fake – what are the key things to make realistic skin in Blender?
For realistic skin:- Use Subsurface Scattering (SSS) for light penetration/glow, set Subsurface Color by tone, adjust radius by area.
- Skin Texture Maps: High-res diffuse/albedo for freckles/redness, roughness for oily/dry patches, normal/disp for pores/wrinkles. Use scans or hand-paint.
- Specular and Microdetail: Specular 0.5 or IOR ~1.45, roughness 0.4-0.6 by area. Add velvet sheen or SSS for fuzz; dual-specular optional, Principled suffices.
- Lighting for Skin: Soft lighting, rim light for glow, Filmic tonemapping to avoid burn-out.
- Eyes: Glassy cornea, iris texture, SSS on sclera, add eyelashes/eyebrows.
- Other factors: Capillaries, translucency, hair. Use SSS, good textures, gentle lighting, test with references. Takes time.
- Where can I find good free resources (textures, HDRIs, models) to help with photorealism?
Free/paid resources: Poly Haven, HDRI Hub, AmbientCG for textures/HDRIs; BlenderKit, Sketchfab, Quixel Megascans for models. Tutorials from Yelzkizi, Blender Guru, CG Cookie. Saves time for integration/lighting. - Is photorealism the only worthwhile goal? What if I want a mix of realistic and artistic?
Photorealism builds a foundation for all styles, letting you break rules artistically. It enhances any 3D art, offering flexibility. Mastering it strengthens your skills for realism or stylization.

Conclusion: How to Master Blender Photorealism Step by Step
Mastering Blender photorealism is a journey of continuous learning, involving skills like modeling, texturing, lighting, camera work, and post-processing. Focus on one aspect at a time, using references and practice exercises to improve. Leverage tools and add-ons to save time without sacrificing quality, and avoid shortcuts that reduce realism. Refine your work with a critical eye, applying techniques step by step to achieve more realistic results. Photorealism blends technical skill with artistic sensibility—study real-world images and incorporate these insights to create renders that feel real. With practice and patience, you’ll master Blender photorealism.
Recommended
What’s New in Blender 4.4: A Comprehensive Overview of Features and Improvements
Best Blender Render Settings: Ultimate Guide to High-Quality Renders Without Wasting Time
PixelHair vs. Manual Hair Grooming in Blender: Which is Better?
The View Keeper vs. Manual Camera Switching: Which is Better?
How do I make the camera follow a character in Blender?
What Is Depth of Field in Blender, and How Do I Set It?
How to Make Stylized Anime Hair Naturally in Blender
Camera Transitions Made Easy in Blender Using The View Keeper
How do I set up a panoramic camera in Blender?
Blender Trim Hair Curves Geometry Nodes Preset: Comprehensive Guide for 3D Hair Grooming


