
Making a shot where the camera orbits around an object is a fundamental technique in 3D animation and visualization. It allows you to showcase an object from every angle, providing a dynamic and engaging way to present models, architectural designs, or product visuals. In Blender, you can achieve the effect where a camera orbits around an object through various methods.
From parenting the camera to an empty to using a circular curve with a Follow Path constraint. This comprehensive guide will walk you through every step of the process, discuss advanced techniques and workflow enhancements with tools like The View Keeper, and provide practical troubleshooting tips. Whether you’re a beginner or an experienced 3D artist, this guide will equip you with over 2500 words of detailed insight into creating a cinematic orbit around an object.
Introduction
A camera orbiting around an object is a versatile technique used to highlight the form, structure, and details of a subject. This method is commonly used in product visualizations, architectural visualization, and cinematic animations. Whether you’re aiming to create a dramatic reveal or a technical demonstration, a camera orbiting shot can add a dynamic dimension to your scene.
In Blender, there are several ways to make the camera orbit around an object. You can parent the camera to an empty, use a circular curve with a Follow Path constraint, parent the camera to a curve sing follow path or animate the camera’s rotation with keyframes. This article will guide you through these techniques step-by-step. It’ll provide advanced tips for fine-tuning the motion, and show you how to manage multiple camera orbiting or switch between a camera orbiting and a regular camera setup using add-ons like The View Keeper.
Understanding Camera orbiting Shots
What Is a Camera orbiting Shot?
A camera orbiting shot is a technique where the camera moves around a subject, maintaining a fixed distance while capturing the subject from all angles. This type of shot can reveal details that might be hidden from a single viewpoint and provide a comprehensive overview of the object or scene.
Key Elements of a camera orbiting Shot
- Consistent Distance:
The camera maintains a constant distance from the object, ensuring that the subject remains the focal point. - Smooth Motion:
Smooth, fluid movement is essential to avoid distracting the viewer and to enhance the cinematic quality of the shot. - 360-Degree Perspective:
An effective camera orbiting shot often covers a full 360-degree view, offering a complete understanding of the subject’s shape and structure. - Dynamic Framing:
Changing the camera angle subtly during the orbit can add visual interest and emphasize certain features.
Why Use an Orbiting Camera?
A camera orbiting around an object offer several advantages in both creative and technical contexts:
Comprehensive Presentation
An orbiting shot provides a full view of an object, making it ideal for product presentations or architectural models. It shows the subject from every angle, ensuring no detail is overlooked.
Cinematic Impact
Dynamic camera movements contribute to the overall cinematic quality of a scene. In film and TV shows, directors use orbiting shots to build tension or reveal a character or their surroundings. Mimicking this effect in Blender can give your animations a similar professional, film-like quality.
Versatility in Applications
Whether you’re designing for virtual reality, creating video game cutscenes, or preparing technical illustrations, a camera orbiting can adapt to a wide range of applications. It is particularly effective in environments where spatial relationships are key.
Enhanced User Engagement
In interactive media and VR experiences, an orbiting shot can serve as a navigational tool or a dramatic introduction to a scene. This immersive perspective can engage users and provide a sense of depth and scale.
Preparing Your Scene in Blender
Before setting up your orbiting camera, it is important to ensure your scene is well-organized and properly prepared:
Open Your Blender Project
- Load Your Scene:
Open Blender and load your project, making sure all necessary objects, lighting, and materials are in place.
Organize Your Scene
- Clean Outliner:
Group objects into collections and name them clearly. This will help you manage the scene and easily locate the subject. - Check Scene Scale:
Ensure your scene is modeled to a realistic scale. Accurate scale is crucial for maintaining the correct perspective during an orbit.
Set Up Lighting
- Lighting Setup:
Configure your lighting to emphasize the object’s details. Proper lighting not only enhances the scene but also ensures that the orbiting shot looks dramatic and well-defined.
Techniques for Creating a Camera Orbit
There are several methods to create an orbiting camera effect in Blender. Below are the primary techniques:
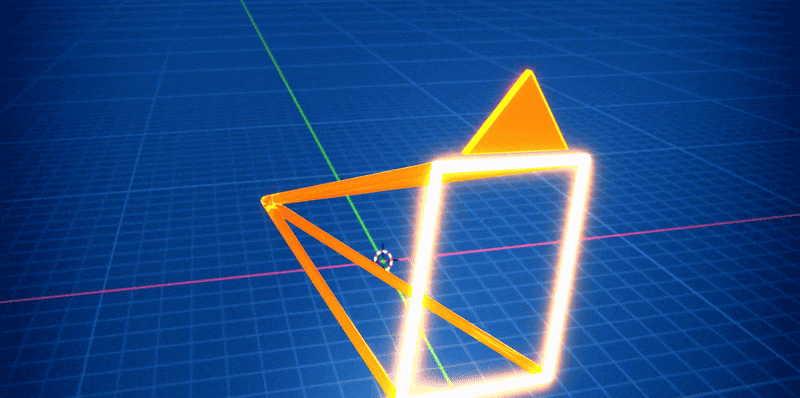
Parenting the Camera to an Empty
Parenting the camera to an empty object is one of the simplest and most effective methods to create a smooth orbit.
Step-by-Step Process:
- Add an Empty:
Press Shift + A and select Empty > Plain Axes. Position the empty at the center of the object you want to orbit around. - Position the Camera:
Move your camera to the desired starting position relative to the empty. Ensure the camera is facing the object. - Parent the Camera to the Empty:
Select the camera, then shift-select the empty, and press Ctrl + P. Choose Object (Keep Transform). Now, when you rotate the empty, the camera will orbit around it. - Animate the Empty:
In the Timeline, add keyframes for the empty’s rotation. For a full 360-degree orbit, set the rotation on the Z-axis to 0 degrees at the first keyframe and 360 degrees at the last keyframe. - Preview the Orbit:
Play your animation (press Spacebar) to see the camera orbiting smoothly around the object.
Using a Circular Curve with a Follow Path Constraint
Another method is to create a circular curve that the camera can follow.
Steps:
- Add a Circular Curve:
Press Shift + A, navigate to Curve > Circle. Scale and position the circle so that it encloses the object you want to orbit. - Select the Camera:
Select the camera you want orbiting around the object. - Apply the Follow Path Constraint:
In the Constraints tab, click Add Object Constraint and choose Follow Path. Set the target to the circular curve. - Animate the Evaluation Time:
In the curve’s Object Data Properties, adjust the Evaluation Time with keyframes to make the camera move along the path.
Using a Circular Curve with Parenting and the Follow Path Option
Another method is to create a circular curve that the camera can follow by parenting the camera to the curve and selecting the follow path option.
Steps:
- Add a Circular Curve:
Press Shift + A, navigate to Curve > Circle. Scale and position the circle so that it encloses the object you want to orbit. - Parent the Camera:
Select the camera, then Shift + Click on the curve circle to select it as well. Press Ctrl + P and choose Follow Path. - Animate the Evaluation Time:
In the curve’s Object Data Properties, adjust the Evaluation Time with keyframes to make the camera move along the path.
Keyframe Animation and Manual Rotation
For more control, you can animate the camera’s position and rotation manually.
Steps:
- Position the Camera:
Place the camera at the starting point of the orbit, ensuring it is facing the object. - Insert Keyframes:
Add keyframes for the camera’s location and rotation at the beginning of the orbit. - Animate the Orbit:
Manually rotate the camera around the object by adjusting its location and rotation over time, and insert keyframes at various points. - Smooth Transitions:
Use the Graph Editor to refine keyframe interpolation, ensuring the camera movement is smooth and natural.

Enhancing Your Workflow with The View Keeper
For projects with multiple camera setups, The View Keeper is a vital add-on. It allows you to save multiple camera setups as records within the same blend file. This is especially useful for orbiting shots where you might want to experiment with different camera angles, distances, or animation curves. It also lets you switch between an orbiting shot and a regular camera shot. you can easily switch from an orbiting camera to a dolly camera without changing any settings.
Benefits of Using The View Keeper:
- Store Multiple Camera Records:
Save different orbiting or regular camera setups with unique settings (e.g., one for a tight close-up orbit and another for a trailing shot or a wide panoramic orbit). - Quick Switching:
Instantly switch between saved setups without reconfiguring your scene. This makes it easy to test different looks and compare results. - Render Efficiency:
Each saved record can include its own render settings (resolution, file format, output folder), allowing you to render all different camera setups at once. - Organized Workflow:
Keep your scene uncluttered by storing multiple views/angles per camera in The View Keeper. Instead of duplicating cameras. This makes managing advanced projects more efficient.
Integrating The View Keeper into your orbiting camera workflow can dramatically improve your efficiency, allowing you to focus more on creative exploration and less on repetitive setup tasks.

Real-World Inspirations and Applications
Architectural Visualization
A top-down orbit can provide a comprehensive overview of a building or complex layout. This is particularly effective in architectural visualization, where understanding spatial relationships is crucial.
Film and Television
Directors often use orbiting shots to create dramatic, sweeping views that reveal the scale and context of a scene. Cinematic techniques like these are used in films such as The Avengers or Inception, where camera movement plays a pivotal role in storytelling.


Video Games
Many video games incorporate orbiting camera shots in cutscenes or level previews to give players a better understanding of the environment. An orbiting shot can add a dynamic element to gameplay presentations, making the experience more engaging.
Virtual Reality
In VR, a smooth orbiting camera can be used to create interactive tours or to guide users through a virtual environment. It allows viewers to see the full context of a space, enhancing immersion.
Product Animations
For product demos, an orbiting shot can highlight every angle of a product. This technique is widely used in commercials and online promotions to showcase design details and functionality.
Troubleshooting Common Issues
Even with a well-planned setup, you may encounter some challenges when creating an orbiting camera shot.
Camera Misalignment
Issue: The camera does not remain focused on the object.
Solution: Ensure that the camera’s parent (empty) or the follow path is correctly centered on the object. Double-check the pivot point and adjust the empty’s position if necessary.
Abrupt Transitions
Issue: The orbiting motion appears jerky.
Solution: Use the Graph Editor to smooth out keyframe curves and adjust interpolation modes (e.g., use Bezier curves for smooth transitions).

Inconsistent Distance
Issue: The camera’s distance from the object changes unexpectedly during the orbit.
Solution: If using the parenting method, ensure that the empty’s scale remains constant. For Follow Path constraints, verify that the curve is correctly shaped and centered.
Render Quality Issues
Issue: The final render does not match the viewport preview.
Solution: Confirm that your render settings (resolution, sampling, clipping) are consistent. Use test renders frequently to catch discrepancies early.
Workflow Clutter
Issue: Multiple camera setups clutter your scene, making it difficult to manage.
Solution: Organize cameras in the Outliner with clear names, and use The View Keeper to store and recall different configurations without duplicating objects.
People Also Ask
- How do I create a bird’s-eye orbit in Blender?
You can create an orbit by positioning your camera around the object and either parenting it to an empty or using a circular curve with a Follow Path constraint or parenting the camer to the curve with follow path. - What is the easiest way to make the camera orbit around an object?
Parenting the camera to an empty located at the object’s center is one of the simplest and most effective methods. You can also parent the camera to a curve circle using follow path. - How do I animate a smooth orbiting camera shot?
Use keyframes to animate the rotation of the empty or the Evaluation Time of a circular curve, and fine-tune the movement in the Graph Editor for smooth transitions. - Can I use a Follow Path constraint to orbit a camera?
Yes, by creating a circular curve around the object and applying a Follow Path constraint to the camera, you can achieve a smooth orbit. - How do I ensure the camera stays focused on the object during an orbit?
Use constraints such as Track To or Locked Track to keep the camera pointed at the object, even as it moves. - What are the benefits of using an empty for camera orbiting?
Parenting the camera to an empty allows for precise control over the orbiting movement, making it easy to adjust the speed and angle of rotation. - How do I manage multiple orbiting camera setups?
Use tools like The View Keeper to save different camera configurations, enabling you to switch between setups quickly without adjusting settings each time. - Can I combine multiple methods for an orbiting shot?
Yes, you can combine parenting with keyframe animation or Follow Path constraints to create a more advanced, dynamic orbit. - What render settings should I use for orbiting shots?
Ensure that your clipping distances, resolution, and sampling settings are properly adjusted to capture the entire orbit without distortion. - Is it possible to automate camera orbit movements in Blender?
Advanced users can utilize Python scripting or drivers to automate camera orbit movements, ensuring consistency and reducing manual keyframing.
Bringing It All Together
Creating an orbiting camera shot in Blender is a multi-step process that combines precise camera placement, thoughtful animation, and advanced workflow management. Whether you choose to parent your camera to an empty, parent the camera to a curve using follow path, use a circular curve with a Follow Path constraint, or animate the camera manually with keyframes. The goal is to maintain a smooth, consistent orbit around your subject.
Start by preparing your scene: organize your objects, set up lighting, and ensure accurate scale. Then, position your camera around the object and align it using viewport snapping techniques. Choose the method that best suits your project. Parenting to an empty or curve is great for simplicity and control, while a Follow Path constraint offers a more automated approach. Fine-tune the orbit using the Graph Editor to smooth out keyframe transitions, and add constraints if needed to keep the camera focused on your subject.
For those using multiple camera setups, The View Keeper is a game-changer. This add-on lets you store multiple camera setups as records, so you can quickly switch between different orbit configurations or even totally different camera setups without changing settings. It ensures consistency across various shots and allows for simultaneous rendering of multiple views, saving time and enhancing creative flexibility.
Real-world applications for orbiting camera shots are diverse. In film, directors use orbiting shots to create dynamic, cinematic sequences. Video games often employ these techniques in cutscenes and level previews, while architectural visualizations benefit from a comprehensive overhead view that showcases spatial relationships. Whether you’re crafting immersive VR experiences or detailed product animations, an orbiting camera shot can add a professional polish to your project.
Final Thoughts
Creating a cinematic orbit around an object in Blender is a vital technique that enriches your visual storytelling and provides a comprehensive view of your scene. By carefully positioning and animating your camera, you can capture every angle and detail, transforming a static object into a dynamic subject. Whether you use parenting, Follow Path constraints, or manual keyframe animation, the key is to maintain smooth, controlled movement that keeps the focus on your subject.
Leveraging advanced tools like The View Keeper further enhances your workflow by allowing you to store, reuse, and compare multiple camera shots without cluttering your scene. This organized approach not only saves time but also expands your creative possibilities, enabling you to experiment with different setups and render multiple views in one go.
We hope this comprehensive guide has provided you with the detailed insights, practical techniques, and advanced tips needed to create an impressive orbiting camera shot in Blender. Embrace the process, experiment with various methods, and let your creative vision come to life with every smooth, cinematic orbit.